
Related Manuals for Platinum 6960467 CM4605T


Summary of Contents for Platinum 6960467 CM4605T
-
Page 1: Instruction Manual
INSTRUCTION MANUAL 3 IN I COFFEE MAKER MODEL: 6960467(CM4605T) EAN:6001001782777 INDOOR HOUSEHOLD USE ONLY Please save and read this instruction manual carefully before use. -
Page 2: Important Safeguards
ENGLISH INTRODUCTION Thank you for purchasing our “Platinum” Coffee Maker. Each unit has been manufactured to ensure safety, reliability, and ease of use. Before use, please read these instructions carefully and keep them for future reference. IMPORTANT SAFEGUARDS When using your “Platinum” Coffee Maker, basic precautions should always be followed, including... - Page 3 ENGLISH Do not touch hot surfaces directly. Use handles or knobs. l Do not leave this appliance unattended during use. Always unplug the unit when not in use. l Allow it to cool before putting on or taking off parts, and before cleaning the appliance. Always operate the appliance on a smooth, even and stable surface.
-
Page 4: Product View
ENGLISH KNOW YOUR COFFEE MAKER SPECIFICATIONS Capacity : 1.5L Voltage : AC 220-240V / 50Hz Wattage : 1850W Cord : 3-pin grounded plug. (to reduce risk of electric shock) USING YOUR COFFEE MAKER You must read all instructions before using. l... -
Page 5: Using Coffee Maker
ENGLISH 1. Pour 1500ml water into water tank, and then replace its cover. 2. Set nylon funnel in the funnel support (add no coffee ground). Place a paper filter in the funnel. 3. Set steel mesh into metal funnel (no coffee in steel mesh). Pull the press bar backward, make sure the tube on the funnel aligns with groove in the appliance, then insert the funnel into the appliance from the “Insert”... - Page 6 ENGLISH 6. When the process is finished, if you do not want to serve immediately, keep the switch on, the coffee can be kept warm in the keeping warm plate until the power is cut off manually. For an optimum coffee taste, serve it just after brewing. PRE-HEATING To make a cup of good hot espresso coffee, we recommend you pre-heat the appliance before making coffee, including the funnel, filter and cup, so that the coffee flavour can not be influenced by...
- Page 7 ENGLISH 3. Pour out the hot water in the cup. Then place the hot cup (your cup) on removable shelf. 4. At the time, the green light is illuminated, if the green lamp is extinguished, wait for a moment, once the green lamp is illuminated, you should press the pump control switch to the “P” position, wait for a moment, there will be coffee flowing out.
-
Page 8: Care And Cleaning
ENGLISH Note1: after making frothed milk, remember to clean the steam tube to prevent it from being jammed at the next use., The cleaning method is as follows: First, press the espresso coffee/frothing to select button to position and dip the steam tube into a cup; Second, turn on the steam controller and press the pump control button to the P position, and there will be water flowing out from the steam tube and funnel. - Page 9 ENGLISH CLEANING MINERAL DEPOSITS (for the section of making espresso coffee) 1. To make sure your coffee maker operates efficiently, internal piping is clean and you get the maximum flavor in your coffee, you should clean away the mineral deposits every 2-3 months. 2.
-
Page 10: Troubleshooting
ENGLISH TROUBLE SHOOTING Symptom Cause Corrections Carafe leaks water or Ensure center line of carafe aligns with leakage The carafe is not adjusted properly opening of brew basket well. water leaks out from lid of carafe The level of water in the tank The water level in the tank should be within the exceeds the scale of MAX. -
Page 11: Warranty
ENGLISH WARRANTY PLEASE AFFIX YOUR RECEIPT/PROOF OF PURCHASE HERE. IN THE EVENT OF A CLAIM UNDER THIS WARRANTY THE AFORESAID RECEIPT/PROOF OF PURCHASE MUST BE PRODUCED TOGETHER WITH THIS WARRANTY. Model number (Lot number: Product name Date of purchase Place of purchase 1. -
Page 12: Proteções Importantes
PROTEÇÕES IMPORTANTES Quando usar a sua “Platinum” Máquina de café, as precauções básicas devem sempre ser seguidas, incluindo o seguinte: Este dispositivo não destina-se a ser utilizada por pessoas (incluindo crianças) com l... - Page 13 PORTUGUÊS Não deixe este aparelho sem supervisão durante o uso. Sempre desligue o aparelho quando não l estiver em uso. Deixe esfriar antes de colocar ou retirar peças e antes de limpar o aparelho. Sempre opere o aparelho sobre uma superfície lisa, plana e estável. Não coloque o aparelho l...
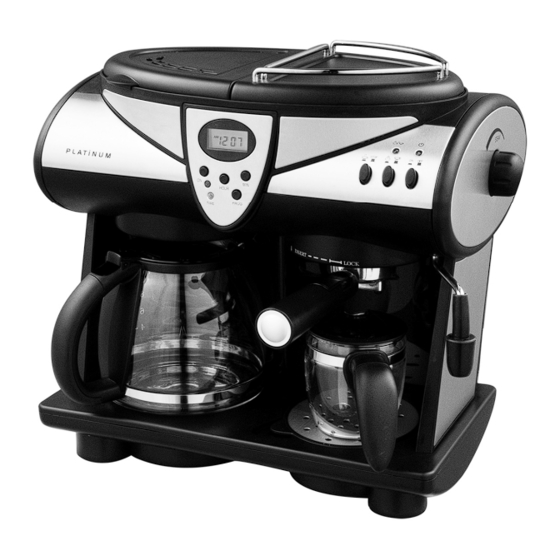
- Page 14 PORTUGUÊS CONHECER A SUA MÁQUINA DE CAFÉ [A] Tampa superior [B] Funil (para o café por gotejamento) [C] Filtro de nylon ( para o café por gotejamento) [D] Funil de apoio [E] Mantendo placa quente [F] Tampa [G] Garrafa grande [H] Alça [I ] Gotejamento bandeja [J] Funil de metal lidar...
- Page 15 na posição "LOCK". PORTUGUÊS 4. Ponha garrafa no prato térmico e coloque jarro (sua xícara) na prateleira amovível. 5. Conecte o cabo de alimentação na tomada, aperte o botão ON / OFF Ⅰ,o indicador será iluminado.O aparelho começará a trabalhar.Você pode parar a fermentação por apertar o botão à posição 0 no qualquer momento, o indicador será...
- Page 16 de transformá-lo anti-horário até que esteja na posição "LOCK". (Veja a Figura 1.). PORTUGUÊS 3. Coloque uma chávena de café expresso (sua xícara) na prateleira amovível. 4. Depois conecte o aparelho à fonte de alimentação. Certifique-se o botão de controle de vapor estiver na posição desligado.
- Page 17 desligado. PORTUGUÊS 2. Aperte e segure o botão na posição , esperando até que o indicador verde está aceso. 3. Encha uma jarra com cerca de 100 gramas de leite para cada cappuccino que estar preparado, você é recomendado o uso de leite integral em temperatura de geladeira (não quente!). Nota: Ao escolher o tamanho do jarro, é...
-
Page 18: Cuidados E Limpeza
PORTUGUÊS Certifique-se que o botão de controle de vapor estiver na posição desligado. Aperte o botão ON / OFF Ⅱ, e o indicador amarelo será iluminado, você deve apertar o controlador da bomba, quando a água flui para fora e feche a bomba, o elemento de calor interno começa a funcionar, a máquina de café... - Page 19 PORTUGUÊS Aperte o botão para a posição , esperando até que a luz indicadora verde acende. Faz vapor por 2min, em seguida, ligue o controlador de vapor para a posição desligado para parar de fazer vapor. Aperte o botão ON / OFF II à posição "0" para parar o equipamento imediatamente, deixe o depósito destartáricos na unidade, pelo menos, 15 minutos.
- Page 20 PORTUGUÊS RESOLUÇÃO DE PROBLEMAS Sintoma Causa Correções Garrafa vaza água ou A garrafa não é ajustado Garantir a linha central do carafe alinha água vaza da tampa da corretamente. com a abertura de vazamento o cesto de garrafa fermentação também. O nível de água no tanque excede a O nível da água no tanque deve estar escala do MAX.
-
Page 21: Termo De Garantia
PORTUGUÊS TERMO DE GARANTIA FAVOR ANEXAR AQUI SEU RECIBO/FISCAL DE COMPRA. EM CASO DE RECLAMAÇÃO DURANTE O PRAZO DA GARANTIA ESTE RECIBO/ FISCAL DE COMPRA DEVE SER APRESENTADO JUNTAMENTE COM ESTA GARANTIA. Número do modelo (Número do lote: Nome do produto Data da compra Local da compra 1. -
Page 22: Mesures De Sécurité Importantes
FRANÇAIS INTRODUCTION Merci d'avoir choisi notre Cafetière « Platinum ». Chaque unité a été fabriquée pour assurer la sécurité, la fiabilité et la facilité d'utilisation. Avant l'utilisation, veuillez lire attentivement ces instructions et les conserver pour référence future. MESURES DE SÉCURITÉ IMPORTANTES Lorsque vous utilisez votre Cafetière«... - Page 23 FRANÇAIS Ne pas laisser cet appareil rester sans surveillance pendant l'utilisation. Toujours débranchez l l'appareil lorsqu'il n'est pas utilisé. Laissez refroidir avant de mettre ou enlever des pièces, et avant de le nettoyer. Toujours faites fonctionner l'appareil sur une surface lisse, plane et stable. Ne pas placer l'appareil l...
- Page 24 FRANÇAIS CONNAITRE VOTRE CAFETIERE [A] couvercle supérieur, [B] entonnoir, [C] filtre en nylong(pour filtre du café), [D]support d’entonnoir, [E] plaque maintenant la chaleur , [F] couvercle, [G] carafe large, [H] poignée, [ I ] plateau du filtrage, [J] poignée métallique d’entonnoir, [K] barre d’appui(mailles d'acier d’appui avec lui quand versez les résidus de café...
- Page 25 FRANÇAIS 5. Brancher le câble d'alimentation dans la prise, appuyer sur le bouton ON / OFF , l'indicateur sera allumé. L'appareil commencera à travailler. Vous pouvez arrêter de brassage en appuyant sur le bouton sur la position 0, à tout moment, l'indicateur s'éteint. L'appareil continuera de brassage une fois en appuyant sur le bouton ON / OFF à...
- Page 26 FRANÇAIS 3. Placer une tasse à espresso (votre tasse) sur l'étagère amovible. Ensuite, connecter l'appareil à l'alimentation. Assurez-vous que le bouton de commande vapeur est en position fermée. 5. Appuyer sur le bouton ON / OFF pour café expresso, le voyant jaune s'allume, tourner le bouton à...
- Page 27 FRANÇAIS Méthode: 1. Préparer l'espresso d’abord avec un récipient qui est assez grand, comme indiqué dans "faire du café espresso", assurez-vous que le contrôleur de la vapeur est en position fermée. 2. Appuyer et maintenir le bouton enfoncé sur la position , en attendant que le voyant vert est allumé.
-
Page 28: Entretien Et Nettoyage
FRANÇAIS Méthode: 1. Ouvrir le couvercle du réservoir, ajouter l'eau potable dans le réservoir d'eau en fonction de la jauge. 2. Fermer le couvercle du réservoir d'eau, puis connecter l'appareil à une prise d'alimentation. 3. Assurez-vous que le bouton de commande vapeur est en position fermée. 4. -
Page 29: Depannage
FRANÇAIS 9. Puis le café infuser (sans poudre de café) avec l'eau du robinet, au niveau MAX, et répéter les étapes 4 au 6 mars fois (il n'est pas nécessaire d'attendre 15 minutes dans l'étape 6), puis brasser jusqu'à ce qu'il n'y soit laissé dans l'eau le réservoir. 10. -
Page 30: Garantie
FRANÇAIS GARANTIE APPOSEZ VOTRE REÇU/PREUVE D´ACHAT À CET EMPLACEMENT. EN CAS DE RÉCLAMATION COUVERTE PAR LA GARANTIE, LE REÇU /LA PREUVE D´ACHAT MENTIONNÉS AUPARAVANT DOIVENT ÊTRE JOINTS À CETTE GARANTIE. Numéro de modèle (Numéro de lot: Nom du produit Date d´achat Lieu d´achat 1.
Need help?
Do you have a question about the 6960467 CM4605T and is the answer not in the manual?
Questions and answers