Bell ExpressVu Installation Manual
Bell expressvu satellite tv system installation guide
Hide thumbs
Also See for ExpressVu:
- Installation manual (83 pages) ,
- Quick user manual (19 pages) ,
- User manual (13 pages)
Table of Contents
Advertisement
Advertisement
Table of Contents

Related Manuals for Bell ExpressVu


Summary of Contents for Bell ExpressVu
- Page 1 INST ALLA TION GUIDE INST ALLA TION GUIDE...
-
Page 2: Table Of Contents
..........Vertical Elevation Protractor I-53 ......Connect Receiver to Telephone Connection I-54 ............How to Test the System I-54 ......Order Your Bell ExpressVu Programming I-55 ..........Pre-Authorized Payment Plan I-56 ............Program the Remote I-58 ............... Security Features I-59... -
Page 3: Safety Instructions
Important Safety Instructions 1. Read these instructions. 2. Keep these instructions. 3. Heed all warnings. 4. Follow all instructions. 5. Do not use this apparatus near water. 6. Clean only with a dry cloth. 7. Do not block any ventilation openings. Install in accordance with the manufacturer’s instructions. -
Page 4: Safety Tips
Installation Guide Note to Satellite TV System Installer: This reminder is provided to call the satellite TV system installer’s attention to Article 820-40 of the National Electrical Code (NEC) that provides guidelines for proper grounding and, in particular, specifies that the cable ground shall be connected to the grounding system of the building as close to the point of cable entry as practical. -
Page 5: Installation And Setup
(DVD) players, digital video cassette recorders (VCRs), and data communication networks. The Bell ExpressVu Customer Service Call Center provides a single source for you to get answers to all your questions. For all your questions or comments, call us at 1-888-SKY- DISH (1-888-759-3474), or visit our Web Site at www.expressvu.com. -
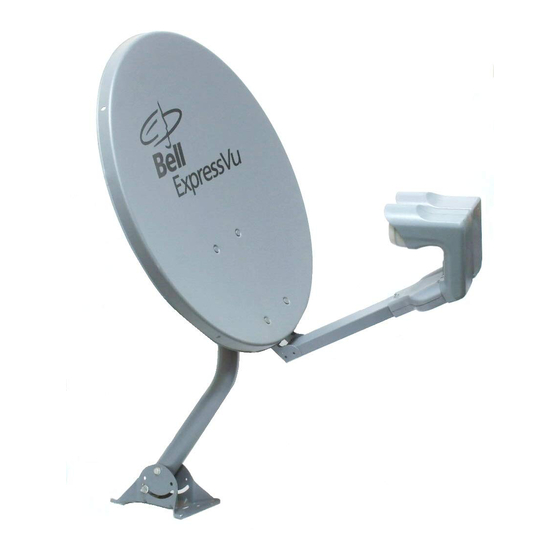
Page 6: Components Of The Satellite Antenna
COMPONENTS OF THE SATELLITE ANTENNA Note: The following pictures are not to scale. The fully assembled Bell ExpressVu satellite antenna looks like this. See "Install the Satellite Antenna" on page I-13 for the procedure to assemble and install the satellite antenna. Following are descriptions of each component of the satellite antenna. -
Page 7: Optional Installation Kit
• Silicone sealant • 10 Cable clips for the coaxial cable If you did not purchase the Installation Kit, but still plan to install your Bell ExpressVu system yourself, we recommend that you gather the appropriate materials before beginning installation. Note: Amount of RG-6 (coaxial) cable required will depend on distance between LNBF and receiver. -
Page 8: Summary Of Installation
Installation Guide SUMMARY OF INSTALLATION Following is a summary of the procedures to install and set up your Bell ExpressVu system. We recommend that you perform the procedures in the order presented. 1. Unpack the satellite antenna, receiver, and parts (see page I-6) and the optional installation kit, if you purchased one (see page I-3). -
Page 9: Before You Start Installation
The size of your dish will vary depending on the part of Canada in which you live. The standard diameter of a Bell ExpressVu dish is 51 cm, however, 60 cm, 90 cm or 1.2m dishes are also available. If you require the large dish, we recommend that you hire a professional to install it because installation of the 90 cm and 1.2 m dishes is a more... -
Page 10: Package Contents
In addition, we provide an optional Installation Kit, which includes the necessary hardware and cables that you would typically use during installation. Contact the location where your Bell ExpressVu system was purchased for more information, or call the Bell ExpressVu Customer Service Call Centre at 1-888-SKY-DISH for the location of a licensed dealer near you. - Page 11 (for example, a neighbour's UHF remote or a UHF remote being used in another room of your building). • There is another Bell ExpressVu receiver and remote being used in the vicinity. Note: In either of the above situations, you may need to assign an address to your remote and receiver, so that the receiver responds only to that remote.
- Page 12 Installation Guide • If your receiver and remote address do not match, you must match them to be able to use the remote. See "Confirming Remote Control Operation" on page 10-3. TEMPORARILY CONNECT THE RECEIVER TO TV You must connect the receiver to your TV to get the information to aim your satellite antenna.
-
Page 13: Discussion Of Potential Mounting Sites
Installation and Setup Discussion of Potential Mounting Sites DISCUSSION OF POTENTIAL MOUNTING SITES When you are surveying your property for appropriate sites for the satellite antenna, keep in mind that you can mount the satellite antenna on a variety of surfaces: brick, cinder block, wood, some sidings, rooftop, or a pole. - Page 14 Installation Guide • If possible choose a site that is accessible in most weather conditions. You may need to clean snow, ice or debris off the satellite antenna. • Place the satellite antenna as close to the receiver as possible. We recommend using no more than 30 meters of RG-6 (coaxial) cable between the receiver and the satellite antenna, unless you install a line amplifier to boost the signal.
- Page 15 Installation and Setup Discussion of Potential Mounting Sites MOUNTING THE ANTENNA ON BRICK We define "brick" as a solid brick wall or other structure. This does not include brick facing that is used on some buildings over the main structure. If you are mounting the satellite antenna on brick facing, see "Mounting the Antenna on Siding,"...
- Page 16 Installation Guide MOUNTING THE ANTENNA ON CINDER BLOCK You can mount the satellite antenna on cinder blocks, whether they are part of a wall or the side of a building. • The surface must be flat and even. • Be sure that the cinder block and mortar are in good condition. •...
- Page 17 Installation and Setup Discussion of Potential Mounting Sites MOUNTING THE ANTENNA ON WOOD You can mount the satellite antenna on a wooden deck, wooden beam, or other wooden surface. • The surface must be flat and even. • Be sure that the wood has a solid foundation, and is secured. It should be a strong piece that cannot be moved or jiggled.
- Page 18 Installation Guide Vertical Mounting Horizontal Mounting Pole Mounting Surfaces with Mast Surfaces with Mast Surfaces The figure above The figure above The figure above shows how you shows how you shows how you should attach the should attach the should attach the mast to the foot for mast to the foot for dish support and...
- Page 19 Installation and Setup Discussion of Potential Mounting Sites You may have either one or two LNBF cables to attach, depending on which type of LNBF you purchased and how many receivers are being installed. Note: If you have to attach two cables to the LNBF, the following instructions apply to both cables.
- Page 20 Installation Guide Tighten the mast clamp bolts so that the clamp is snug, but can still be moved back and forth. 11. Thread the LNBF cable into the cable hole near the mast foot, up the mast and out the top of the mast. Do not kink or pinch the cable.
- Page 21 Installation and Setup Discussion of Potential Mounting Sites • You can mount the satellite antenna on a metal pole that is attached to an existing building. Using this method, you can raise the satellite antenna to gain a line-of-sight view of the satellite if you cannot find a better location. Be sure to follow all safety requirements, and properly ground the satellite antenna and pole.
- Page 22 “view” of the satellite and which is also free from occasional blockages due to vehicles or passers-by. Locating the appropriate site for your Bell ExpressVu dish is a two step process: First, use your compass and the satellite direction data provided in this guide, to estimate the general direction of the satellite.
- Page 23 Find The Right Location For The Dish WHERE IS IT? The Bell ExpressVu satellite orbits the Earth over the equator. For everyone in Canada, this means that the satellite will be south of your location. The Bell ExpressVu satellite is approximately 35,680 kilometers above the surface of the Earth.
- Page 24 Installation Guide 1. Take a compass and the direction and elevation numbers to your planned location for the satellite antenna. (VERY IMPORTANT) Make sure the compass is well away from metal objects, and that there are no magnetic or electronic devices nearby. Holding the compass so the needle can swing freely, turn the compass until the dark end of the compass needle is aligned on the N.
-
Page 25: Multi-Satellite Antenna Installation
Installation and Setup Multi-Satellite Antenna Installation MULTI-SATELLITE ANTENNA INSTALLATION The procedures in this guide are specifically for the Bell ExpressVu's Multi-Satellite Antenna installation. For more detailed information, you may need to refer to your satellite system’s Installation Instructions/User Manual 1. Before you start, read all safety precautions in your satellite system’s Installation Instructions/User Manual. - Page 26 Installation Guide 6. Assemble the satellite dish, following the diagram. Your satellite system’s Installation Instructions/User Manual contains detailed assembly instructions. 7. Loosen both skew bolts and set the skew by rotating the dish mounting bracket to align the red mark with the required angle on the skew scale. Tighten the skew bolts securely to keep the dish from rotating.
- Page 27 Installation and Setup Multi-Satellite Antenna Installation 9. Note the Y-bracket is labeled ‘82˚’ on one side and ‘91˚’ on the other. Only use the RG-6 coaxial cable for all connections between the LNBFs and receiver. Label one coaxial cable '91' on both ends and the other coaxial cable '82' on both ends. If you are installing two receivers,repeat this step for the additional two cables.
- Page 28 Installation Guide 15.Turn the dish assembly back and forth very slowly, until the signal strength bar turns green to indicate the signal. Ensure that your body is not blocking the path between the dish and the satellite! Note: If you cannot find the signal, turn the dish assembly back to the original azimuth setting.
- Page 29 SW21 multi-dish switches Finally, take cable from the other side of the multi-dish switch and connect directly to each Bell Express Vu satellite receiver. If you possess only one satellite receiver, use either multi-dish switch output to connect the cable in order to relay the satellite signal.
-
Page 30: System Set-Up
3474) to activate your satellite receiver(s) and begin enjoying Bell ExpressVu’s 100% digital quality television. www.bell.ca/satellite 1-888-SKY-DISH Bell is a trade-mark of Bell Canada used under license; ExpressVu is a trade-mark of Bell ExpressVu L.P. All Rights Reserved. Page I-26... -
Page 31: A Pre-Assemble The Parts
Installation and Setup Assembling The Dish STEP 3: ASSEMBLING THE DISH The following section outlines the assembly procedure for all four dish sizes: 51 cm, 60 cm, 90 cm, and 120 cm. The overall assembly procedure is similar for all sizes, but there are some specific differences which are addressed in four separate sections. -
Page 32: B Attaching The Mount To Your Dwelling
Installation Guide 2. Determine your specific vertical elevation from the Table (page I-50) and adjust the angular tilt of Ve rtica l Ele vat io n the antenna so that the edge of the red mark on the Ga u ge gauge is set to your vertical elevation. -
Page 33: C Installing The Dish On The Mount
Installation and Setup Assembling the 51cm Dish 4. Mark the location of one of the holes and remove the mount. 5. Drill the hole and attach the mount foot with the one fastener only. 6. Now, once again, position the top of the mast to be approximately plumb; then place a level on the side of the pipe and pivot the mount foot slightly around the one attachment and adjust the mount foot to make the pipe vertical. -
Page 34: A Pre-Assemble The Parts
Installation Guide 3. Attach the LNBF to the LNBF cable(s). Slide the weather boot up securely to cover the cable/LNBF connection at the base of the LNBF. 4. Slip the LNBF onto the end of the arm, until contact is made with the LNBF bracket stops and put in screw through arm and LNBF. -
Page 35: B Attaching The Mount To Your Dwelling
Installation and Setup Assembling the 60cm Dish 2. Determine your specific vertical elevation from the Table (page I-50) and adjust the angular tilt of Ver tica l Ele vat io n the antenna so that the edge of the red mark on the Ga ug e gauge is set to your vertical elevation. -
Page 36: D Connecting Things Together
Installation Guide 4. Mark the location of one of the holes and remove the mount. 5. Drill the hole and attach the mount foot with the one fastener only. 6. Now, once again, position the top of the mast to be approximately plumb; then place a level on the side of the pipe and pivot the mount foot slightly around the one attachment and adjust the mount foot to make the pipe vertical. -
Page 37: A Pre-Assemble The Parts
Installation and Setup Assembling the 90cm Dish 3. Attach the LNBF to the LNBF cable(s). Slide the weather boot up securely to cover the cable/LNBF connection at the base of the LNBF. 4. Slip the LNBF onto the end of the arm, until contact is made with the LNBF bracket stops and put in screw through arm and LNBF. -
Page 38: B Attaching The Mount To Your Dwelling
Installation Guide 2. Determine your specific vertical elevation from the VERTICAL Table (page I-50) and adjust the angular tilt of the ELEVATION GAUGE antenna so that the centre of the top bolt on the Mast Head Clamp lines up with your vertical elevation position on the Mast Head elevation gauge. - Page 39 Installation and Setup Assembling the 90cm Dish Here is how it can be done: FRONT VIEW PRESS LEVEL AGAINST MOUNT 1. Place the mount foot on the surface location where you intend to attach it to the structure. 2. Mark the location of one of the 2 holes and remove the mount.
-
Page 40: C Installing The Dish On The Mount
Installation Guide STEP 3.3C: INSTALLING THE DISH ON THE MOUNT (90 CM DISH) You have installed the mount on your dwelling and you have pre-assembled the antenna unit, ready to be installed on the mount. There are just a few steps here: 1. -
Page 41: A Pre-Assemble The Parts
Installation and Setup Assembling the 120cm Dish STEP 3.4: ASSEMBLING THE 120 CM DISH STEP 3.4A: PRE-ASSEMBLE THE PARTS (120 CM DISH) It’s best to pre-assembly the dish indoors, so that it is all ready to place on the mast outdoors, quickly and easily ... -
Page 42: B Attaching The Mount To Your Dwelling
Installation Guide STEP 3.4B: ATTACHING THE MOUNT TO YOUR DWELLING (120 CM DISH) The mount should be attached to your dwelling before putting the dish assembly on it. When fastening it to your wall or roof, etc., make sure that the top portion is “plumb”; you can get it right by using a spirit level on both the front and side of the top piece. -
Page 43: C Installing The Dish On The Mount
Installation and Setup Assembling the 120cm Dish 8. Attach the two struts to the mast with the supplied hardware. Tighten the bolt for a snug fit that still allows some slight movement of the struts. 9. Position the foot of each strut squarely on the mounting surface and mark the holes for drilling. - Page 44 Installation Guide 3. Slip the weather boot(s) onto the LNBF cable(s). To do this, insert the end of the cable with the screw connector into the smaller end of the boot and work it through. When you are finished the boot should slide freely over the cable but hold snugly when slipped up over the the screw connector.
-
Page 45: Installing The Receiver
Installing The Receiver STEP 4: INSTALLING THE RECEIVER Connect the output of the satellite receiver to your TV as described in the Bell ExpressVu User Manual, and turn on the Bell ExpressVu receiver. Note that the Bell ExpressVu receivers are configured at the factory for English language operation. French language operation is available after the dish is aligned and the initial software download is complete. -
Page 46: Ground And Wire The Satellite Antenna
Installation Guide GROUND AND WIRE THE SATELLITE ANTENNA As with any such electronic devices, the satellite antenna and the coaxial cable(s) should be grounded in accordance with local electrical codes to protect against damage caused by lightning strikes and other electrical discharges. This section provides some suggestions on grounding both satellite antennae and the cable. - Page 47 Installation and Setup Ground and Wire The Satellite Antenna 3.Insert one end of the ground wire into the grounding terminal on the grounding block. Tighten the screw to hold the wire firmly. 4.Attach the other end of the ground wire to the clamp on the grounding rod.
-
Page 48: Aligning The Dish
Installation Guide STEP 5: ALIGNING THE DISH This is the final step to be completed before ordering your program package. If your antenna mast is plumb, it can be accomplished very quickly; however, be patient with the adjustments, as this step can be tricky. The process of aligning the dish involves two steps. - Page 49 Installation and Setup Aligning The Dish Remote Buttons Menu Options 4. Press the Menu button to open the Main Menu. 5. Select the System Setup option. 6. Select the Installation option. 7. Select the Point Dish and Signal Strength option. You will now see the Point Dish and Signal Strength menu.
- Page 50 Bell ExpressVu’s. The signal tone will be beeping. • If it is green and displays the words “Locked ExpressVu,” you are aiming the dish at the correct satellite and should have a strong enough signal for a picture. The signal tone will be steady.
- Page 51 Installation and Setup Aligning The Dish “ Ok, I moved it” “ No Change” “ OK, I moved it some more” “ Hold it ... I see something on the meter ... , move it some more” “ Ok I moved it some more, any change ?” “...
-
Page 52: Change Languages
17. Once the download is complete you are ready to order your program package by calling the Bell ExpressVu Customer Service Call Centre at1-888-SKY-DISH. See page I-55. 18. If you want the Bell ExpressVu system menus to appear in French, follow the instructions in the section “Change Languages” below. CHANGE LANGUAGES... -
Page 53: Help
Installation and Setup Help HELP If you can’t find the satellite or suspect that your mast assembly is not exactly plumb, try the following: With your compass, aim the dish toward the satellite to the best of your ability. Now, put your spirit level vertically across the dish, as shown in the diagram, and adjust the antenna on the elevation pivot so that the antenna is vertical. -
Page 54: Satellite Location Table
Installation Guide SATELLITE LOCATION TABLE (“LOOK” ANGLES) Community Community DBS Nimiq (@ 91W)) DBS Nimiq (@ 91W) Compass Vertical Skew Compass Vertical Skew Direction Elevation Direction Elevation ALBERTA Quesnel 117.7 21.2 66.6 Revelstoke 123.1 24.6 67.3 Athabasca 130.7 23.8 72.2 Valemount 121.7 22.5... - Page 55 Codes Community Community DBS Nimiq (@ 91W) DBS Nimiq (@ 91W) Compass Vertical Skew Compass Vertical Skew Direction Elevation Direction Elevation Springdale 240.2 25.8 112.9 Lake Harbour 238.5 16.9 101.0 St Anthony 240.4 25.0 112.2 Pond Inlet 249.5 99.5 St Johns 243.1 26.1 116.2...
- Page 56 Installation Guide Community Community DBS Nimiq (@ 91W) DBS Nimiq (@ 91W) Compass Vertical Skew Compass Vertical Skew Direction Elevation Direction Elevation Perth 208.4 37.1 100.3 La Ronge 145.5 25.1 77.6 Sarnia 194.8 40.2 94.8 Moose Jaw 143.0 29.8 74.5 Peterbrough 203.9 38.6...
-
Page 57: Vertical Elevation Protractor
Installation and Setup Vertical Elevation Protractor - Nimiq VERTICAL ELEVATION PROTRACTOR - NIMIQ Use the Satellite location chart and this protractor to determine your dish elevation measurement. Page I-53... -
Page 58: Connect Receiver To Telephone Connection
Installation Guide CONNECT RECEIVER TO TELEPHONE CONNECTION Your Bell ExpressVu receiver(s) must be connected to a telephone line at all times. To connect your receiver to a phone line, plug one end of the telephone cord provided to the connection at the back of the receiver, and plug the other end into an active telephone jack. -
Page 59: Order Your Bell Expressvu Programming
All you need to do is call the Bell ExpressVu Customer Service Call Centre at 1-888- SKY-DISH and notify them that your system has been installed and you would like to begin receiving programming. - Page 60 Payments • Decrease Cheque Writing HOW DOES IT WORK? • Each month you will receive your Bell ExpressVu bill in the mail. The amount of your bill will be automatically deducted from you chequing account twenty (20) calendar days from your statement date. If you disagree with your bill, call us immediately to resolve any discrepancies.
-
Page 61: Pre-Authorized Payment Plan
• We require a minimum of 14 days to process your cancellation request. “ExpressVu” is a registered trademark held by Bell ExpressVu Inc. “Bell” is a registered trademark of Bell Canada and is used under license. Bell ExpressVu Pre-Authorized Payment Plan... -
Page 62: Program The Remote
Installation Guide PROGRAM THE REMOTE For certain models of Bell ExpressVu receivers you can program the remote to control not only the receiver, but your VCR, TV, and amplifiers. This remote supports most brands and models; however, there may be some brands or models that it does not support. You can program the remote to control a maximum of four different electronic components. -
Page 63: Security Features
Security Features SECURITY FEATURES There are two levels of security: receiver security and Bell ExpressVu Customer Service Call Centre security. Each method works independently of the other. You can use either method or both methods, or you can decide not to use the security features at all. - Page 64 You can select the PIN when you first turn on your service, or at any time thereafter. If you forget your PIN, you will need to speak with a Bell ExpressVu Customer Service Representative at 1-888-SKY-DISH. The Bell ExpressVu Customer Service Representative may ask for additional information to confirm that you are authorized to make transactions on your account.
Need help?
Do you have a question about the ExpressVu and is the answer not in the manual?
Questions and answers
Wellandport satelite setup