Table of Contents
Advertisement
Quick Links
LPX-600
User's Manual
Thank you very much for purchasing this product.
To ensure correct and safe usage with a full understanding of this product's performance, please be sure to read through this
manual completely and store it in a safe location.
Unauthorized copying or transferral, in whole or in part, of this manual is prohibited.
The contents of this operation manual and the specifications of this product are subject to change without notice.
The operation manual and the product have been prepared and tested as much as possible. If you find any misprint or error, please
inform us.
Roland DG Corp. assumes no responsibility for any direct or indirect loss or damage which may occur through use of this product,
regardless of any failure to perform on the part of this product.
Roland DG Corp. assumes no responsibility for any direct or indirect loss or damage which may occur with respect to any article
made using this product.
Advertisement
Table of Contents

Related Manuals for Roland Picza LPX-600

Summary of Contents for Roland Picza LPX-600
- Page 1 The operation manual and the product have been prepared and tested as much as possible. If you find any misprint or error, please inform us. Roland DG Corp. assumes no responsibility for any direct or indirect loss or damage which may occur through use of this product, regardless of any failure to perform on the part of this product. ...
-
Page 2: Federal Communications Commission
This is a Class A product. In a domestic environment this product may cause radio interference in which case the user may be required to take adequate measures. Roland DG Corp. has licensed the MMP technology from the TPL Group. -
Page 3: Table Of Contents
Table of Contents Table of Contents ..........................1 To Ensure Safe Use ........................3 Important Notes on Handling and Use..................... 7 About the Documentation ......................... 8 1. Getting Started ..........................9 1-1 What Is the LPX-600? ......................10 Features ......................................10 Scanning System ..................................10 1-2 Names and Functions ...................... - Page 4 Corporation in the United States and/or other countries. ® ® Pentium is a registered trademark of Intel Corporation in the United States. ® Other company names and product names are trademarks or registered trademarks of their respective holders. http://www.rolanddg.com/ Copyright© 2005-2010 Roland DG Corporation...
-
Page 5: To Ensure Safe Use
To Ensure Safe Use Improper handling or operation of this machine may result in injury or damage to property. Points which must be observed to prevent such injury or damage are described as follows. About WARNING and CAUTION Notices Used for instructions intended to alert the user to the risk of death or severe injury should WARNING the unit be used improperly. - Page 6 To Ensure Safe Use Incorrect operation may damage the scan object WARNING WARNING Securely fasten the object to be scanned to Never try to scan an object whose height is the table so that it does not slip or topple 406.4 mm (16 in.) or more, or that protrudes over.
- Page 7 Roland DG Corp. dealer. Never place any object on the power cord, Never insert metal objects, flammable bend the power cord using excessive...
- Page 8 To Ensure Safe Use About the Labels Affixed to the Unit This machine bears caution labels. These are intended to ensure the safety of the operator. Never remove the labels or allow them to become obscured. Also, be sure to observe the stated cautions during use. Left Front Right...
-
Page 9: Important Notes On Handling And Use
Important Notes on Handling and Use This machine is a precision device. To ensure the full performance of this machine, be sure to observe the following important points. Failure to observe these may not only result in loss of performance, but may also cause malfunction or breakdown. Main Unit This Machine Is a Precision Device Handle carefully, and never subject the machine to impact or excessive force. -
Page 10: About The Documentation
You can use either of two methods to view the documentation. From the [Start] Menu in Windows From the [Start] menu, choose [All programs (or Programs)], then [Roland Dr.PICZA3 (Roland 3D Editor)], then [Dr.PICZA3 (3D Editor) Help]. Clicking the Help Menu in the Program... -
Page 11: Getting Started
1. Getting Started... -
Page 12: What Is The Lpx-600
1-1 What Is the LPX-600? Features The LPX-600 is a three-dimensional (3D) scanner that uses a noncontacting laser method to scan the shape of solid ob- jects. Noncontacting Laser System for Fast, Dependable Scanning You can perform scanning without contact with the scan object, using a laser beam. This enables high-speed scanning without the worry of damage to the object. -
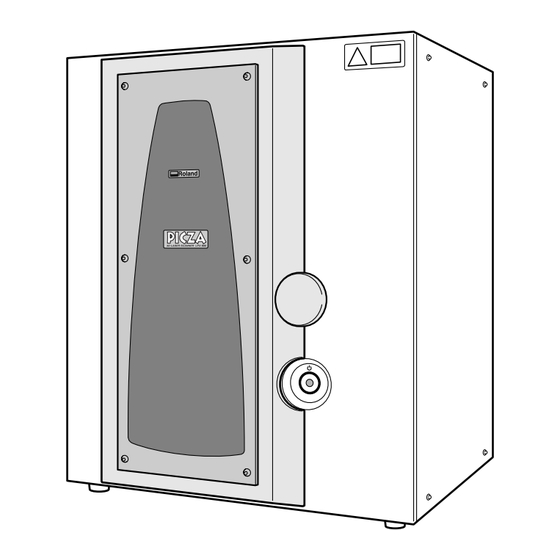
Page 13: Names And Functions
1-2 Names and Functions Front Door When performing scanning, be sure to close this. The power cannot be switched on while Table the door is open. Opening the door while the This is the base where you place power is on switches off the machine. objects to be scanned. -
Page 14: About The Indicator Lights
1-2 Names and Functions About the Indicator Lights The lighted state of the power button and the movement lights tells you the status of the LPX-60. Indicator lights The status of the LPX-600 Power button Flashing one at a time Dark Dark The power is off. -
Page 15: Preparing The Machine
2. Preparing the Machine This section describes what to do when you first open the packing, including how to connect the machine to a computer and install the programs and the like. -
Page 16: Checking Accessories
The following items are packed with the machine. Make sure they are all present and accounted for. AC adaptor: 1 Power cord: 1 Clay: 1 CD-ROM: 1 User's manual: 1 Roland LPX EZ Studio : 1 AC adaptor holder: 1 USB cable: 1 Cable clamps: 3... -
Page 18: Installing
2-2 Installing Deciding On an Installation Site Install in a stable location offering good operating conditions. An unsuitable location can cause accident, faulty operation, or breakdown. CAUTION Install on a stable surface. Failure to do so may result in the unit tipping over, leading to injury. CAUTION Lifting and carrying are operations that must be carried out by two or more per- sons. -
Page 19: Removing The Protective Material
2-2 Installing Removing the Protective Material Open the door and remove the screws, packing materials, and other protective material. Never touch or manually try to move any of the internal components. Doing so may result in breakdown. The protective material is required when moving the machine. Do not discard it. ... -
Page 20: Connecting The Cables
2-3 Connecting the Cables When you connect the cables to the machine, use the included cable clamps and AC adapter holder. Attaching the Cable Clamps and the AC Adapter Holder Attach the cable clamps and the AC adapter holder to the back of the machine. AC adaptor holder Secure in place using the retaining screws for the head (the two Y... - Page 21 Place the AC adapter on the AC adapter holder. AC adaptor USB cable Cable clamp Orient the AC adapter as shown in the figure. The "Roland" logo is visible. Power cord AC adaptor holder Electrical outlet DO NOT connect the USB cable at this point.
-
Page 22: Installing And Setting Up The Software
Go to "5-1 What to Do If ...," see "What to Do If Installation Is Impossible." Procedure Windows XP Start Windows and log on as "Administrator." Insert the Roland Software Package CD-ROM into the CD-ROM drive. The window shown in the figure appears automatically. Switch on the machine. Press the power button. - Page 23 2-4 Installing and Setting Up the Software When the window shown in the figure appears, select [No, not this time], then click [Next]. If the screen does not appear, refer to step Select [Install the software automatically (Recom- mended)], then click [Next].
- Page 24 2-4 Installing and Setting Up the Software Windows 2000 Start Windows and log on as "Administrator." Insert the Roland Software Package CD-ROM into the CD-ROM drive. The window shown in the figure appears automatically. Switch on the machine.
- Page 25 2-4 Installing and Setting Up the Software Select [Search for a suitable driver for my device (recommended) ], then click [Next]. Select the [CD-ROM drives] check box, then click [Next]. Click [Next]. Installation starts automatically. Click [Finish]. The [Welcome to the Found New Hardware Wizard] dialog box appears.
- Page 26 2-4 Installing and Setting Up the Software Windows Me/98 SE Start Windows. Insert the Roland Software Package CD-ROM into the CD-ROM drive. The window shown in the figure appears automatically. Switch on the machine. Press the power button.
- Page 27 Windows 98 SE Select [Search for the best driver for your device. (Recom- mended)], and click [Next]. Go to step 8. Choose the folder on the Roland Software Package CD-ROM to search the driver. Double-click on your CD-ROM drive. Select [\Drivers\Lpx-600].
-
Page 28: Installing The Programs
2-4 Installing and Setting Up the Software Installing the Programs Install the following programs. Dr.PICZA3 This program enables you to perform scanning using the machine. 3D Editor This program enables you to edit scanned 3D data. Procedure Make sure the window shown in the figure is displayed. ... -
Page 29: Making The Settings For Using Dr.picza3
You use the included Dr. PICZA3 program to make the settings that let you perform scanning with the machine. Procedure Start Dr.PICZA3. From the [Start] menu, choose [All programs (or Pro- grams)], then [Roland Dr.PICZA3], then [Dr.PICZA3]. Go to the [File] menu and click [Preferences]. Make the setting for the communication port and the unit of measurement to use with Dr. -
Page 31: Creating 3D Data
3. Creating 3D Data This chapter describes how to create 3D data using the machine and the included Dr. PICZA3 program. -
Page 32: Task Flow
3-1 Task Flow This machine can scan three-dimensional shapes using the included Dr. PICZA3 program. To make 3D data obtained by scanning available for use by other programs, you need to convert and save the data using Dr. PICZA3. This section describes the sequence of operations from getting ready to scan through to saving the 3D data. Prepare the object to be scanned and mount it on the machine. -
Page 33: Mounting The Scan Object
3-2 Mounting the Scan Object First, you prepare the object to be scanned. After making sure the object is one that can be scanned, you mount the object on the machine. Preparing the Scan Object This machine is not able to scan every possible kind of object. Some objects may be impossible to scan because of their composition or shape. -
Page 34: Items That May Not Be Copied
Unauthorized reproduction of a copyrighted item for any purpose other than personal use may be a violation of copyright. Roland DG Corp. will not be responsible for any violation of third-party copyright by any article made through use of this product. -
Page 35: Mounting The Scan Object
3-2 Mounting the Scan Object Mounting the Scan Object Choose the object to be scanned, then mount the scan object. CAUTION Securely fasten the object to be scanned to the table so that it does not slip or topple over. The table rotates during scanning. -
Page 36: Performing Scanning
Procedure Start Dr.PICZA3. From the [Start] menu, choose [All programs (or Programs)], then [Roland Dr.PICZA3], then [Dr.PICZA3]. Click the [ ] button. The [Scan] dialog box appears. Click one of these buttons. - Page 37 3-3 Performing Scanning While viewing the preview, make the following settings, then start scanning. Scanning pitch Using a fine setting can reproduce details more accurately, but the amount of memory required increases, and scanning takes longer time. Scanning area Specify the minimum area that allows the entire object to be scanned, thereby speeding up scanning time.
- Page 38 3-3 Performing Scanning Scanning Pitch and Scanning Area The methods for making the settings are different for plane scanning and rotary scanning. Plane scan Rotary scan Width-direction pitch Circumferential pitch 0 degrees circum- ferentially Last point Height- Height- Last point direction direction Scanning...
-
Page 39: Checking The Scanning Results
3-3 Performing Scanning Checking the Scanning Results You can examine the results of scanning while changing the view method and perspective. The Scan List displays a list of scanning data. For detailed information about this window, see the online help for Dr. PICZA3. These move and rotate the perspective, and change the amount of zoom. -
Page 40: Finishing The Data
3-4 Finishing the Data You take the data from basic scanning and modify it to produce finished data that has the form you want. Selecting and Scanning a Specific Area After the basic scanning, you can select specific areas and performing additional scanning (rescanning). The available types of rescanning are as follows. - Page 41 3-4 Finishing the Data Scanning Modes for Rescanning You can choose the same scanning modes for rescanning and line scanning as you can for basic scanning. Scanning using plane scanning -- Plane rescan and plane line scan Scanning using rotary scanning -- Rotary rescan and rotary line scan What follows is a general guide for using these selectively.
- Page 42 3-4 Finishing the Data Procedure You perform rescanning using the following procedure. The windows shown are those for plane rescanning. First, scan the entire object. Choose a scanning mode according to the shape of the scan object. From this point on, never open the door until rescanning ends. Doing so switches off the power.
- Page 43 3-4 Finishing the Data Click the [ ] button. The mode for specifying the rescanning area is can- celed. Drag to verify the area to rescan. The specified rescanning area is displayed as a three-dimen- sional form. When You Want to Respecify the Rescanning Area Go back to step 2 on the previous page, then click anywhere on the object to clear the specified area.
-
Page 44: Creating New Polygons
3-4 Finishing the Data Creating New Polygons You can create new polygons using all the scanning points, including the data produced by rescanning. These polygons are called a "polygon mesh." Creating a polygon mesh can make it possible for you to reproduce cavities and voids in the object and fill in holes according to the surrounding shape. -
Page 45: Saving And Exporting Data
3-5 Saving and Exporting Data You can take data obtained by scanning and creating polygon meshes and save it in a file format compatible with Dr. PICZA3. You can also convert (export) data and save it in a file format allowing import into other programs. Saving Data Go to the [File] menu and click [Save As]. - Page 46 3-5 Saving and Exporting Data Procedure At the Scan List, select just the data you want to export and display the window. Select the box of the object you want to export. Click the [ ] button. Click the file format you want to use for exporting.
-
Page 47: Editing Scanning Results - Using 3D Editor
4. Editing Scanning Results - Using 3D Editor This chapter describes basic operation methods for "3D Editor," the 3D-data editing program included with the machine. -
Page 48: What You Can Do Using 3D Editor
4-1 What You Can Do Using 3D Editor 3D Editor lets you do things like the following. Enlarge and reduce Deforming operations such as stretching in one direction are also possible. Specifying numerical values for the movement distance and angle of rotation is also Move and rotate possible. -
Page 49: Importing And Exporting Data
4-2 Importing and Exporting Data This section describes how to import and export data using 3D Editor. Importing Scanning Results Immediately In Dr. PICZA3, clicking the [Run 3D Editor] button starts 3D Editor and simultaneously imports the displayed scanning re- sults. -
Page 50: Basic Operations For Objects
4-3 Basic Operations for Objects This section describes the windows in 3D Editor and how to perform simple editing using the program. How to View the 3D Editor Window The 3D Editor window is composed of panels that display the object from four different perspectives at the same time. You can carry out editing tasks using any one of these views. -
Page 51: Let's Try Editing Data With 3D Editor
4-3 Basic Operations for Objects Let's Try Editing Data with 3D Editor Let's try some simple editing. We'll scan an apple with the machine, then try cutting and moving it. The explanations in this section begin at the point where you have scanned an apple using Dr. PICZA3. Procedure ... - Page 52 4-3 Basic Operations for Objects Using the [Front] window, let's try shifting the cut surface to the left, then carry out cut- ting. Drag the cut surface to move it to the left. The apple is divided into two parts. However, its still looks like a single object.
- Page 53 4-3 Basic Operations for Objects Now try orienting the cut surface of the apple on the right to face the front. You can only do this when you're in the [Top] window. When you're done with the operation, right-click to quit the [Move Object] mode. Click the [Rotate Object] button.
-
Page 55: What To Do If
5. What to Do If... This section describes how to resolve problems that can occur dur- ing operation, and what is required when moving the machine to a different location. -
Page 56: Scanning Is Impossible
Uninstalling the driver • About the illumination pattern of the power button Remove [Roland LPX-60 USB Device] from the list of [Add or Go to "1-2 Names and Functions," see "About the Indicator Remove Programs] (or [Add/Remove Programs]). - Page 57 Click [LPX-600]. Go to "2-4 Installing and Setting Up the Software," see "Installing the Driver." Click [OK]. If [Roland LPX-600 USB Device] does not appear in the list, follow the steps below. 1. Display [System Properties]. Windows XP Click the [Start] menu, then right-click [My Computer].
-
Page 58: When Moving The Machine
5-2 When Moving the Machine When you move the machine to another location, you secure the table and the head in place. Procedure Make sure the power to the machine is turned off, then detach the AC adapter, the USB cable, and the power cord. -
Page 59: Appendix
6. Appendix... -
Page 60: Table Dimensional Drawing
6-1 Table Dimensional Drawing 20 screw holes (M6, depth 7 mm) 1/2 scale (Unit: mm) 6. Appendix... -
Page 61: Locations Of The Power Rating And Serial Number Labels
6-2 Locations of the Power Rating and Serial Number Labels Serial Number This is required when you seek maintenance, servicing, or support. Never peel off the label or let it get dirty. Power Rating Use an electrical outlet that meets the requirements for voltage, frequency, and amperage given here. -
Page 62: Specifications
Plane scanning: width direction 0.2 to 254 mm, height direction 0.2 to 406.4 mm Rotary scanning: circumference 0.18 to 3.6 degrees, height direction 0.2 to 406.4 mm ±0.05mm (This figure reflects standard scanning conditions established by Roland Repeat accuracy DG.) -
Page 64: Software License Agreement
Please read this Agreement before unpacking the media. Software license agreement Roland DG Corporation (hereinafter referred to as the “Company”) shall grant you a non-transferable, non-exclusive right to use the Software supplied with this Agreement, on the condition that you agree to the following provisions.
Need help?
Do you have a question about the Picza LPX-600 and is the answer not in the manual?
Questions and answers