
Related Manuals for Akitio Taurus Super-S LCM


Summary of Contents for Akitio Taurus Super-S LCM
- Page 1 Taurus Super-S LCM Dual-Bay RAID Storage Enclosure for two 3.5-inch Serial ATA Hard Drives User Manual August 2, 2011 - v1.3...
-
Page 2: Table Of Contents
Taurus Super-S LCM Table of Contents Table of Contents Introduction ........................... 1 System Requirements ..................... 1 1.1.1 PC Requirements ......................1 1.1.2 Mac Requirements ....................... 1 1.1.3 Supported Hard Drives ....................1 Package Contents ......................1 About this Manual ......................1 Trademarks ........................ -
Page 3: Introduction
(e.g.: Windows 7 or Mac OS 10.4 and above). 1.2 Package Contents Package content may vary depending on vendor & version. • Taurus Super-S LCM storage enclosure (hard drives not included) • Power supply • Interface cables •... -
Page 4: Detailed View
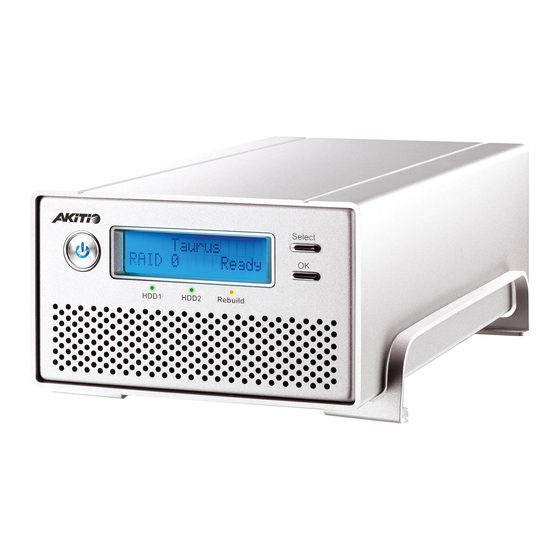
Taurus Super-S LCM Introduction 1.5 Detailed View 1.5.1 Front View To turn on the device, press and hold the power button for 1 second and then let go. To turn it off, press and hold the power button for 3 seconds and then let it go again. -
Page 5: Raid Modes
Taurus Super-S LCM Introduction 1.6 RAID Modes Hard drives of identical capacities are recommended. If the capacities are different, the total amount of the space that can be used will depend on the drive with the smallest capacity. The difference in performance is only visible for fast interfaces like eSATA. -
Page 6: System Setup
Taurus Super-S LCM System Setup 2 System Setup 2.1 Hard Drive Assembly Your unit may come with pre-installed hard drives. Before opening such an enclosure, please read the warranty from your vendor carefully, as this could void your warranty. 1. Remove the four screws at the bottom of the case, push the inner chassis out and remove the outer enclosure. - Page 7 Taurus Super-S LCM System Setup 4. Install the second hard drive and mount it with two screws on each side. 5. Connect the SATA and power cables to your hard drives. Be careful not to damage any components and confirm that the cables are connected firmly.
-
Page 8: Replacing Hard Drives
Taurus Super-S LCM System Setup 2.2 Replacing Hard Drives When a drive fails, the corresponding HDD LED will light up red. If only one drive is defective and the RAID mode is set to RAID 1, the data can still be accessed, however, we strongly recommend replacing the faulty drive immediately to assure continued proper backup and data safety. -
Page 9: Lcd Display
2. The serial number is a combination of the 1394 vendor ID, the chip ID Hi and the chip ID Lo. 3. Displays the current firmware version of the Taurus Super-S LCM. 4. The I/O status shows the interface that is currently used for the connection to the computer. -
Page 10: Hdd Information
Taurus Super-S LCM LCD Display 3.3 HDD Information Press the [Select] button until the HDD information menu is selected and then press the [OK] button to start displaying further details about the installed hard drives. It will automatically cycle through the different information displaying each screen for about 8 seconds and then return to the main screen. -
Page 11: Settings
Taurus Super-S LCM LCD Display 3.4 Settings Press the [Select] button until the settings menu is selected and then press the [OK] button to enter the configuration menu. You can now use the [Select] button to cycle through the different settings and the [OK] button to further configure the device settings. -
Page 12: Raid Mode Setup
Taurus Super-S LCM LCD Display 3.4.2 RAID Mode Setup In order to set the RAID mode via LCD display, make sure the DIP switch position is set as follows: 1 up, 2 down. To lock the setting once it has been changed via LCD display or to set it by using the DIP switch, please refer to the “Rear View”... -
Page 13: Alarm Setup
Taurus Super-S LCM LCD Display 3.4.3 Alarm Setup The general alarm sound is the short beep you hear when starting up the system and it will sound when something is wrong. To enable or disable the alarm, do one of the following. -
Page 14: Fan Speed Setup
Taurus Super-S LCM LCD Display 3.4.5 Fan Speed Setup For the smart-fan to automatically regulate the fan speed according to the internal temperature, the thermal probe has to be installed. • [Automatic] Regulates the fan speed according to the internal temperature (below 40˚C = low speed, 40-50˚C = medium speed, above 50˚C = high speed). -
Page 15: Backlight Setup
Taurus Super-S LCM LCD Display 3.4.6 Backlight Setup The backlight for the LCD display can be enabled, disabled or set so that it turns off automatically, when the screen has been idle for a certain amount of time. • [ON] Always ON. -
Page 16: Event Information
Taurus Super-S LCM LCD Display 3.5 Event Information In addition to the details about the hardware and device configuration, the LCD display will also show certain event information. Following is a list of possible messages and their meanings. • [HDD Error / Remaining 1xHDD] When using RAID 0 and one of the drives fails, the alarm will go off and the display indicates that only one good drive remains. -
Page 17: Appendix
© Copyright 2011 by Akitio. All Rights Reserved The information contained in this manual is believed to be accurate and reliable. Akitio assumes no responsibility for any errors contained in this manual. Akitio reserves the right to make changes in the specifications and/or design of this product without prior notice.
Need help?
Do you have a question about the Taurus Super-S LCM and is the answer not in the manual?
Questions and answers