
Related Manuals for Sonim XP STRIKE IS


Summary of Contents for Sonim XP STRIKE IS
-
Page 1: User Guide
Sonim XP STRIKE IS User Guide ©2013 Sprint. Sprint and the logo are trademarks of Sprint. Other marks are trademarks of their respective owners. Copyright © 2013 Sonim Technologies, Inc. -
Page 2: Battery Precautions
DO NOT charge your Sonim XP Strike IS inside hazardous areas and/or with anything other than the provided Safety Box ―SBH 07‖ (USB Cable). ● DO NOT remove or install your battery in your Sonim XP Strike IS in a hazardous environment. ●... - Page 3 Charging your Sonim XP Strike IS with a different cable/charger and/or in a hazardous environment will compromise the Intrinsically Safe nature of the device.
-
Page 5: Table Of Contents
Charging the Battery ....................7 Activating Your Phone ..................... 8 Activating an Existing Number using a New Phone ............ 9 Setting Up Voicemail Box ....................9 Phone Basics........................10 Sonim XP STRIKE IS Layout ..................10 Sonim XP STRIKE IS Front Layout ................. 10... - Page 6 Sonim XP STRIKE IS Back Layout ................. 11 Switching ON Your Phone ..................... 12 Sonim XP STRIKE IS Home Screen ................12 Home Screen Indicators ....................12 Shortcut Keys in the Home Screen ................14 Keypad Functions ......................15 Main Menu Icons......................17 Phone Calls .........................
- Page 7 Permissions – Permissions Method................. 27 Permissions – Blocked DC Numbers ............... 27 Permissions – Allowed DC Numbers ............... 27 Group Call Options ....................28 Headset Mode ....................... 28 One Touch Direct Connect Setting ................29 Your Direct Connect Number ..................29 Dial Direct Connect Numbers..................
- Page 8 Sending Messages to Contacts ..................38 Sending Text Messages ..................38 Sending Multimedia Messages ................39 Dialing a Number from Contacts ..................39 Edit Contact Details ....................... 40 Delete Contacts ......................40 Sending Contact Details ....................40 Sending Contact Details by MMS ................41 Sending Contact Details by Bluetooth ..............
- Page 9 Accessing the Calendar ..................51 Edit Events ......................52 Notes..........................53 To-do List ........................53 Calculator ........................54 Stopwatch........................54 World Clock ........................55 Unit Converter....................... 55 Update Phone ....................... 56 Update Profile ....................... 56 Mobile Sync ........................56 My Files ........................56 My Stuff ..........................
- Page 10 Receiving Data via Bluetooth .................. 66 Connecting Your Sonim XP STRIKE IS to a Computer ........... 67 microSD Card ....................... 67 Insert a microSD Card into the Phone ..............67 Access the microSD Card ..................67 PC-Tools Application ..................... 68 Installing PC-Tools ....................
- Page 11 GPS Service ......................80 Bluetooth Settings ......................80 Security Settings ......................80 Change Lock Code ....................80 Call Restrictions ..................... 80 Phone Lock ......................81 Voice Privacy ......................81 Network Settings ......................81 Network Service Settings....................82 Restore Factory Settings ....................82 1-Touch Dialing ......................
-
Page 12: General Information
General Information Congratulations on the purchase of a Soinm XP STRIKE IS mobile phone. This phone is a CDMA and EVDO REV-A enabled handset with quad-band capabilities and has an intuitive, feature-rich user interface, which allows you to make the best use of the offered functions. -
Page 13: Precautions To Use The Battery
Avoid using the phone in close proximity to personal medical devices, such as pacemakers and hearing aids. Use only Sonim XP STRIKE IS approved charging equipment to charge your phone and avoid damage to your phone. This product, and any enhancements marked with this symbol, cannot be disposed as unsorted waste but must be taken to separate collection at their end-of-life. -
Page 14: Battery Replacement
When the talk and standby times are noticeably shorter than normal, replace the battery with an original Sonim battery. If a replacement battery is being used for the first time or if the battery has not been used for a prolonged period, it may be necessary to connect the charger and then disconnect and reconnect it to begin charging the battery. -
Page 15: Personal Medical Devices
Check with your local service provider. SAR Information The Sonim XP STRIKE IS has been certified in compliance with the Government‘s requirements for exposure to Radio Waves. When communicating over the wireless network, the mobile phone emits via the radio frequency waves low levels of radio energy. -
Page 16: Sar Data Information For Residents In The United States And Canada
(that is, by the ear and worn on the body) as required by the FCC for each model. The highest SAR value for the SONIS3410 (FCC model number: XP3410 IS) phone when tested by Sonim for use: ●... -
Page 17: Get Started
Keep the battery out of the reach of children. Inserting the Battery Complete the following steps to insert a Sonim certified battery into your Sonim XP STRIKE IS phone. 1. Insert the battery and push it into the battery compartment such that the three metallic... -
Page 18: Removing The Battery
Ensure not to over tighten the screws. Removing the Battery Complete the following steps to remove the Sonim certified battery from your Sonim XP STRIKE IS phone. 1. Using the screwdriver provided, rotate both battery cover screws in counter clockwise direction. -
Page 19: Activating Your Phone
At this point, you can disconnect the phone from the charger. Activating Your Phone Complete the following steps to activate your Sonim XP STRIKE IS. ● If you purchased your phone at a Sprint Store, it is probably activated and ready to use. -
Page 20: Activating An Existing Number Using A New Phone
Activating an Existing Number using a New Phone Complete the following steps to activate an existing phone number on your new Sonim XP STRIKE IS. Note: Switch OFF the old phone before you switch ON the new phone. -
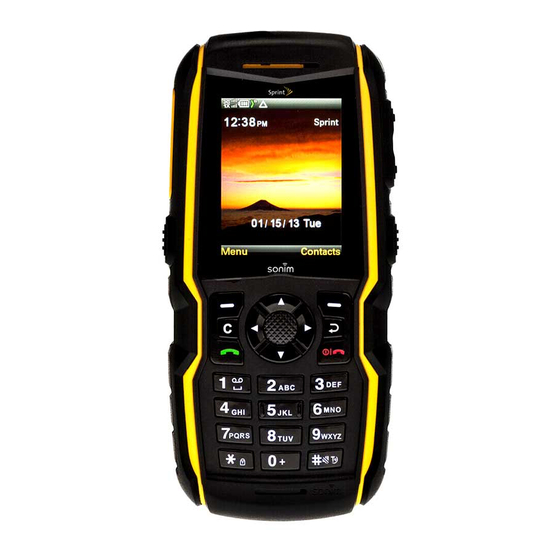
Page 21: Phone Basics
(W) and 320 (H) pixels. The TFT technology used displays 262K colors. The Sonim XP STRIKE IS keypad has 11 function keys and 12 alphanumeric keys. The left side of the phone has one key and the right side of the phone has three keys. The torch, battery and the speaker are located in the back side of the phone. -
Page 22: Sonim Xp Strike Is Back Layout
Sonim XP STRIKE IS Back Layout The following image provides the details of the back layout of your Sonim XP STRIKE IS. Phone Basics... -
Page 23: Switching On Your Phone
Sonim XP STRIKE IS Home Screen The following screen represents the home screen of the Sonim XP STRIKE IS. Home Screen Indicators The home screen indicators are visible in the status bar at the top of the home screen when the phone is in standby mode. - Page 24 Unread Message Indicates that there are unread messages in the inbox. Urgent text Indicates that there are unread urgent messages in the message inbox. Unread MMS Indicates that there are unread MMS messages in the inbox. Alarm Clock Indicates that the alarm clock has been set. Keypad Lock Indicates that the keypad is locked.
-
Page 25: Shortcut Keys In The Home Screen
Active Call Indicates an active call. Mute Indicates that you can mute the call, if required. Call on Mute Indicates a call on mute. Loud speaker Indicates that you can activate the loudspeaker during a call. The following table describes the display indicators in the call log: Display Name Description... -
Page 26: Keypad Functions
Keypad Functions The following table displays the various keys and the corresponding functions they perform: Key Name Function ● Press to end a call. ● Power Press and hold to switch on or switch off the mobile phone. On/Off/End ● Press when in Menu or Edit modes to return to Standby mode. - Page 27 The Menu key is in the center of the navigation keys. ● Press to perform tasks similar to the left and right selection keys. Its Menu Key corresponding option will be indicated in the bottom-center of the (Center key) screen. ●...
-
Page 28: Main Menu Icons
● When entering text, press to enter a space. ● Press and hold to display ‗+‘ used for dialing an international number while in standby mode. ● Press and hold to activate Silent mode. ● When entering text, press to switch between lower case, upper case or initial caps characters. - Page 29 Entertainment – access voice recorder and music player. Maps – access Telenav GPS Navigator. Shopping – access shopping applications. Browser – access the internal browser that allows you to browse contents of various Websites on the Internet. My Account – access and manage your Sprint account details related to your phone.
-
Page 30: Phone Calls
Phone Calls The following topics provide information on calls, managing calls and call settings. Make and Receive Calls You can call a local/international number from contacts or call history, or dial a number directly. Dial a Local Number To dial a local number, use the numeric keys on the phone to enter the number and press the Green button (Call button). -
Page 31: Receive Or Reject A Call
2. Select a list, scroll to the number and press Green button (Call button) to dial the number. 3. Press the Red button (End call button) or select Options (left selection key) > End call to disconnect. Receive or Reject a Call When you receive an incoming call, you can choose to accept it or reject it. -
Page 32: Call History Options
highlight the desired group connect call > View info > highlight the desired group connect number > Save > Enter a new contact name and select Save. Clear log – delete all the call log entries Alert History – view the Direct Connect alert history Call History Options Call history options provides the following details related to a specific call. -
Page 33: Auto Redial
Note: Press and hold the Power On/Off key during a call to switch off the phone. Auto Redial When auto redial is enabled, your phone will automatically redial within a set interval if a call does not connect. Follow the instructions below to enable auto redial feature. ►... -
Page 34: In-Call Timer
In-Call Timer In-call timer provides the total call time at the end of each call. Follow the instructions below to enable in-call timer. ► Select Menu (left selection key) > Settings > Call settings > In-call timer > On to activate the call time display. -
Page 35: Missed Direct Connect Alerts
1. Select Menu (left selection key) > Missed Alerts. 2. Select Missed DC Calls. 3. Highlight the desired phone number and select Options (left selection key) to access the following options: Options Function Dismiss Dismiss the missed call. Call Call the caller. Send message Send a text message to the caller. - Page 36 Save Save the phone number. Phone Calls...
-
Page 37: Sprint Direct Connect
Sprint Direct Connect Sprint Direct Connect offers instant, two-way walkie-talkie-style communication between you and your family, friends, and co-workers, all at the click of a button. Perfect for get-in get-out conversations such as checking status, getting information, getting directions, or coordinating with others—fast. -
Page 38: Permissions - Permissions Method
Permissions – Permissions Method This option is used to select the option to block or allow selected DC numbers for DC calls, then it will display only Blocked DC numbers or Allowed DC numbers in Permissions. ► Select Menu (left selection key) > Settings > DC Settings > Permissions method > select one of the following options: ... -
Page 39: Group Call Options
6. Select Allowed DC numbers. User can add and remove DC numbers in Allowed DC numbers list from Call log, Contacts, Alert history. To add a number to the allowed numbers, select Options (left selection key) > Add number and select either Contacts to select a number from your contacts or Input Manually to enter a unsaved DC number select the required number to be... -
Page 40: One Touch Direct Connect Setting
► Select Menu (left selection key) > Settings > DC Settings > Headset mode The following options are displayed: Headset button starts voice calls. [Talk Key] – initiates voice calls. Headset button starts DC calls. [DC key] – initiates Direct Connect calls. One Touch Direct Connect Setting One touch Direct Connect settings enable you to view and modify the home screen that is displayed when you press the DC button on the left hand side of the phone. -
Page 41: Save Direct Connect Numbers
Note: One way to easily ensure that your contacts have your correct number is to call them so that they can save your number from their Call Log. Ask them for their contact information. Remember you will need all digits of the number to make a successful call. Save Direct Connect Numbers You can add new Direct Connect contacts to your contacts list. -
Page 42: Make A Direct Connect Call From Contacts
1. From standby mode, enter a Direct Connect number using the keypad. The Direct Connect number may be the ten-digit wireless phone number of the person you are calling (Mobile+DC). 2. Press and release the Direct Connect button (DC button) on the left side of your phone. ... - Page 43 Select Menu (left selection key) > History > select the call type and highlight the Direct Connect number. – or – From standby mode, press the DC button to display your Direct Connect (including Call Alert and Invite) call history. Highlight the number and press and release the DC button.
-
Page 44: Answer Or Reject Direct Connect Calls
Answer or Reject Direct Connect Calls When you receive a Direct Connect call, you hear an incoming tone or the phone vibrates. The Direct Connect number or the caller‘s name (if available) is displayed. You may also hear the caller‘s voice through the speakerphone. By default for Direct Connect calls, the speakerphone is activated. -
Page 45: Send Call Alerts
Send Call Alerts Follow the instructions below to send Direct Connect alerts to individual Direct Connect contacts. 1. Select Menu (left selection key) > Contacts > All Contacts. 2. Highlight a contact and select Options (left selection key) > select one of the following options: ... -
Page 46: Make Group Connect Calls
that is not Direct Connect–capable, the name will be added to the list, but Group Connect calls will not go through to that group member. Make Group Connect Calls Follow the instructions below to make Group Connect calls by selecting saved groups from your Contacts, selecting from group calls saved in History, or by creating groups for one-time use. -
Page 47: Join Or Rejoin A Group Connect Call
5. Continue the Group Connect call as described in Make a Direct Connect Call by Entering a Number. Join or Rejoin a Group Connect Call If you are not available at the beginning of a Group Connect call, or if you drop off the call temporarily, you can rejoin the in-progress Group Connect call. -
Page 48: Teamdc
Delete group Delete the group. TeamDC TeamDC lets Direct Connect users make group calls to up to 200 other users nationwide. With TeamDC, any Direct Connect or Sprint user can create a TeamDC group online, which the system then automatically sends to all the group members‘ phones. Once a user creates and distributes a TeamDC group, any member of the group can make a TeamDC call to the entire group. -
Page 49: Contacts
Contacts You can use the contact list to maintain phone numbers of your contacts. You can also add, delete, and dial phone numbers, and send text messages and MMS messages to contacts in the contact list. To access your contacts, select Contacts (right selection key) from the home screen or select Menu (left selection key) >... -
Page 50: Sending Multimedia Messages
3. Press Details (menu key) to view the contact details. 4. Highlight the number and select Options (left selection key) > Send message > Text message. 5. Enter the message and select Send (menu key) or navigate to the To field and select Add (menu key) to select additional recipients. -
Page 51: Edit Contact Details
Edit Contact Details Follow the instructions below to edit a contact entry's details. 1. Select Menu (left selection key) > Contacts > All Contacts. 2. Highlight the contact and press Options (left selection key) > Edit contact. 3. Edit the desired information and press Save (menu key). Delete Contacts Follow the instructions below to delete a contact entry altogether or simply delete one of your contact‘s numbers from their details. -
Page 52: Sending Contact Details By Mms
7. Enter the number of the desired recipient or press Find (menu key) and select it from your Contacts list. 8. Select OK (menu key) to send the contact information. Sending Contact Details by MMS Follow the instructions below to send the details of any contact as an MMS message to another contact in your Contacts list. -
Page 53: Selecting Multiple Contacts
Selecting Multiple Contacts Follow the instructions below to select multiple contacts when there is an action you want to perform on all of them. 1. Select Menu (left selection key) > Contacts > All Contacts. 2. Highlight a contact entry and do one of the following: ... -
Page 54: Messaging
Messaging Text messages and multimedia messages (MMS) are convenient and inexpensive means of communication. You can send a text message to other people using text message service. MMS allows you to send messages with multimedia content such as pictures, audio files, video files, and so on. -
Page 55: Writing Messages
Slide timing Set slide display timings. Allow multimedia Enable or disable reception of multimedia messages in message receptn. roaming/home network. Received Select the option to manually accept, download or reject the multimedia multimedia message. messages Allow ads Enable or disable download of multimedia advertisements. Multim. -
Page 56: Multimedia Messages
Mark text Select the desired text from the message. Mark all Select all the text in the message. Save as draft Save the message as draft. Prediction Turn text prediction on or off. options Cancel message Delete the message before it is sent. 5. -
Page 57: Message Folders
Insert symbol Select the required symbol to include in the message. Writing language Select the input languages. Prediction Turn text prediction on or off. options Cancel message Delete the message before it is sent. 5. Select Options (left selection key) > Send to send the message. Message Folders Your messages are stored in the inbox, draft, outbox and sent folders. -
Page 58: Outbox
Message details: View the message details. Number of messages: View the number of messages stored in the phone. 3. To open a message, scroll to a message and press Select (menu key). 4. After opening a message, select Options (left selection key) to list the following options: Delete, Call sender, Save detail, Forward, Mark text, and Copy all. -
Page 59: Drafts
Delete: Delete the message. Message status: View the sending status of the message. Resend: Resend the message. Forward: Send the message to another recipient. – or – Scroll to a message and press Select (menu key) to view the message and select Options (left selection key) to list the following options: Message status, Edit message, Resend, Forward, Save detail, Mark text, and Copy all. -
Page 60: Accessing Voicemail
Accessing Voicemail Your incoming calls can be forwarded to your voice mail. Callers will be prompted to leave a message for you. This feature requires you to enter a voice mail number which is provided by your service provider. To set your voice mail number, select Menu (left selection key) > Messaging >... - Page 61 1. To enter a character, press the numeric key repeatedly until the desired character appears on the screen. For example, to enter GOOD, in the text mode, press 4 once to display G, press 6 thrice to display O, and again press 6 thrice to display O and press 3 once to display D.
-
Page 62: Tools
Tools The following topics provide details about the tools supported by the Sonim XP STRIKE IS. Device Self Service Follow the instructions below to update your phone firmware. ► Select Menu (left selection key) > Tools > Device Self Service. -
Page 63: Edit Events
2. Select Options (left selection key) to view the list of options available. Make a note: Add a new note for a specific date. Go to date: Go to a particular date and view the events for that date. ... -
Page 64: Notes
Go to date: Go to a particular date and view the events for that date. Go to today: Access the current date. Delete event: Delete events based on the following options: All until today, All in time period, and Delete all. ... -
Page 65: Calculator
Send Send the selected note to another contact as a text or using Bluetooth. Delete notes Delete all notes or delete all notes up to the current date. Go to Calendar Access the calendar to view saved schedules. Save to Calendar Mark the selected task in the calendar. -
Page 66: World Clock
2. To record the time for a single lap, select Start (menu key) to start the timer and Stop (right selection key) to stop the timer. – or – To record the time for multiple laps, select Start (menu key) to start the timer and Split (menu key) to start the timer for the consecutive laps. -
Page 67: Update Phone
Select Options (left selection key) > Set conversion to set the conversion units. Select Options (left selection key) > Reverse conversion to swap the conversion units. Select Options (left selection key) > Configure to add new conversion units or edit the conversion values for existing units. - Page 68 2. Scroll to a folder and select Open (menu key) to open the folder. The listed folders are: SD Card (Optional) - stores files in the microSD card. This option will be displayed only if an SD card is inserted in the phone. ...
- Page 69 Options Function Use image Use the image as a wallpaper, screen saver, or contact picture. Delete Delete the image. Send Send the image to another phone as a multimedia message or via Bluetooth. Move Move the file to different folder. Copy Copy the file to different folder.
- Page 70 Bluetooth. Move Move the file to different folder. Copy Copy the file to different folder. Rename Rename the audio file. Details View the name, size, created date, format, length and copyright of the file. Format view Set the format to view the images as a list, a list with details, or a grid.
-
Page 71: My Stuff
My Stuff Use My Stuff to download new ringtones, ringback tones, games and other applications. The Sonim XP STRIKE IS includes an application manager and a content manager to download and use Java applications. Application Manager Follow the instructions below to use the application manager to manage the applications downloaded on your phone or SD card. -
Page 72: Browser
Browser The Sonim XP STRIKE IS mobile phone has an internal browser that allows you to browse contents of various websites on the Internet. This feature is made available only if you subscribe to a data service from your network operator for Internet access. Please consult your local operator for more details. -
Page 73: Browser Settings
View browsing View the browsing history. Select Sort (right selection key) history to sort the history by name or last used. Select a specific page and select Delete (left selection key) to delete it from history. Send this page Send the current Web page link as a text or MMS message to a friend to a selected contact. - Page 74 Show/Do not Show or hide icons when browsing the Web pages. show icon row Virtual mouse Set the speed of the browser pointer to slow/normal/fast. pointer Select Off to disable the browser pointer. Popups You can enable or disable pop-ups. Select one of the following options: ●...
-
Page 75: Connectivity
Bluetooth is a wireless connection that enables devices to exchange information. Devices within a range of 10 meters can be connected using Bluetooth technology. The Sonim XP STRIKE IS is compliant with Bluetooth specification 2.0 and supports the following profiles: HFP, HSP, GAVDP, AVRCP, OPP, and A2DP. This device can send images and audio files using Bluetooth connection. -
Page 76: Connecting A Bluetooth Headset
2. Select New (menu key). – or – Select Options (left selection key) > Pair new device. 3. Highlight the device of your choice and select Pair (menu key). 4. If prompted, enter the pass code (for example, 0000) in the Enter pass code screen. The same pass code must be entered for the other device also. -
Page 77: Change Your Phone's Bluetooth Name
2. Highlight the paired device. 3. Select Options (left selection key) > Delete > Yes (menu key). Note: If you cancel the pairing with a device that is connected, the pairing is removed and the connection is switched off immediately. Change Your Phone's Bluetooth Name Follow the instructions below to change the name of your phone as it is displayed to other users trying to connect via Bluetooth. -
Page 78: Connecting Your Sonim Xp Strike Is To A Computer
Card You can insert a removable microSD card into your Sonim XP STRIKE IS to increase the storage capacity. This card is inserted into the slot inside the phone‘s battery compartment. Note: The maximum capacity of the microSD card cannot exceed 8 GB. -
Page 79: Pc-Tools Application
1. Click the Sonim PC-Tools icon ( ) on your computer desktop. 2. Connect the SONIM XP STRIKE IS phone to the USB port of the computer using a USB cable. 3. Once the USB cable is connected, the USB configuration screen is displayed on the phone. - Page 80 4. Use the PC Sync application to synchronize data such as contacts between your computer and mobile phone to ensure both media have complete up-to-date data. Note: For complete information on PC-Tools installation procedures and using the PC-Tools, refer to the Sonim XP STRIKE IS PC-Tools Installation and User Guide (English). Connectivity...
-
Page 81: Maps
Maps Your phone has a navigational application that uses internal GPS and provides turn by turn navigation. Follow the instructions below to access this application. 1. Select Menu (left selection key) > Maps > Telenav GPS Navigator. 2. Accept the license agreement. 3. -
Page 82: Entertainment
Entertainment The Sonim XP STRIKE IS phone provides a lot of entertainment features. Refer to the following topics for more information. Voice Recorder Follow the instructions below to record audio using the voice recorder. 1. To record an audio file, select Menu (left selection key) > Entertainment > Voice recorder. -
Page 83: Playlists
Follow the instructions below to connect to a Bluetooth headset. ► Select Menu (left selection key) > Entertainment > Music player > Options (left selection key) > Play via bluetooth. Playlists Follow the instructions below to view and manage the playlists. ►... -
Page 84: My Account
My Account You can manage your Sprint account and track your call time and call balance. Follow the instructions below to manage your Sprint account. ► Select Menu (left selection key) > My Account. You will see the following options: ... -
Page 85: Shopping
Shopping You can shop online using the Sprint shopping application. Follow the instructions below to access the shopping application. ► Select Menu (left selection key) > Shopping. The browser will open and you will be taken to the Sprint downloads page where you can browse through content to purchase and download. -
Page 86: Settings
The section provides information on personalizing your phone through its various settings. Profiles Profiles allow you to use a set of predefined settings on your Sonim XP STRIKE IS phone, as well as customize these settings to use features such as incoming call alert, ring tone, ring volume, vibrating alert, message alert tone, keypad tones, and Java App. -
Page 87: Tone Settings
Screen saver: Activate the screen saver to appear on the idle screen. The user can select the screensaver image. Screen save mode: Set the phone idle time to activate the Screen Saver if the phone is idle for specific time. ... -
Page 88: Shortcuts
Follow the instructions below to set the date and time format. ► Select Menu (left selection key) > Settings > Date and time > Date and time format. The date formats supported are DD-MM-YYYY, DD-MM-YY, MM-DD-YYYY, MM-DD-YY, YYYY-MM-DD, and YY-MM-DD. You can use periods, slashes, dashes, or spaces as separators. -
Page 89: Automatic Keyguard Setting
The memory usage of the phone and SD card is displayed. Automatic Keyguard Setting Follow the instructions below to enable or disable the Automatic Keypad lock. 1. Select Menu (left selection key) > Settings > Phone settings > Automatic keyguard. 2. -
Page 90: Hearing Aid Compatibility (Hac) Settings
ANSI C63.19 contains two rating standards: an ―M‖ rating from 1 to 4 for hearing aids operating in microphone mode, and a ―T‖ rating from 1 to 4 for hearing aids operating in telecoil mode. M-Rating stands for Microphone rating and indicates the amount of reduction of RF interference between the telephone and the hearing aid in acoustic coupling mode (also called microphone mode). -
Page 91: Net Guard
Note: While using the mobile phone for voice calls with a hearing aid, slightly adjust the position of the phone against the ear to reduce the interference and to give better voice quality. Net Guard Net guard alert notifies the user when any application or feature requires Internet data access. This option will be available only when Direct Connect status is set to Offline. -
Page 92: Phone Lock
Note: The default lock code is the last four digits of your phone number. ► Select Menu (left selection key) > Settings > Security > Call restrictions. Select Restrict sent calls to set the numbers that you want blocked or allowed from receiving calls from your phone. -
Page 93: Network Service Settings
Options Description Sprint Only Can receive calls and messages only in your home network (Sprint network). Automatic Can receive calls and messages in both home and roaming networks. The network is set automatically. Follow the instructions below to set a different ring tone for roaming calls. ►... -
Page 94: 1-Touch Dialing
2. To restore factory settings, select Restore settings only. – or – To restore factory settings and delete all personal data present in your phone, select Restore all. 3. Enter the lock code and select OK. 1-Touch Dialing This feature enables you to dial a number quickly via a shortcut. Follow the instructions below to activate 1-touch dialing. -
Page 95: End User License Agreement
Software. Sonim, and, to the extent that the Software contains material or code of a third party, such third party, shall be entitled third party beneficiaries of these terms. The validity, construction and performance of this license shall be governed by the laws of Delaware, United States. -
Page 96: Phone Care
2m deep water for up to 30 minutes. Immersion in deeper water can damage it and must be avoided. The Sonim XP STRIKE IS is solid and built for heavy duty use. Its design protects against disassembly or mechanical damage when subjected to forces equal to free fall from the height of 2 meters. - Page 97 Sonim. Minor variations in display brightness and color may occur between phones. There may be tiny bright or dark dots on the display. These are called defective pixels and occur when individual dots have malfunctioned and cannot be adjusted.
-
Page 98: Fcc Statement
Warning: Changes or modifications made to this equipment not expressly approved by Sonim Technologies, Inc. for compliance could void the user‘s authority to operate the equipment. The SONIS3410 (FCC model number: Sonim XP3410 IS) device complies with Part 15 of the FCC rules. Operation is subject to the following two conditions: This device may not cause harmful interference. - Page 99 Index 3 Year Warranty, 89 Contacts Activating your phone, 8 Add new contact, 41 Phone activation, 9 Delete, 43 Alerts, 25 Dial a number, 42 Missed calls, 25 Edit details, 43 Missed Direct Connect alerts, 26 Search contacts, 41 Missed Direct Connect calls, 26 Send contact details, 43 Anykey answer, 24 Send contact details by Bluetooth, 44...
- Page 100 Responsibility, 89 Phone Care, 90 Main menu icons, 19 Phone Models, 1 Maps, 74 Phone settings Message folders Auto keyguard, 82 Drafts, 51 DTMF, 82 Inbox, 49 GPS service, 84 Outbox, 50 HAC, 84 Sent messages, 50 Memory status, 81 Message response, 25 Net guard alert, 84 Message settings...
- Page 101 Opt-In TeamDC, 40 Home Screen, 14 Permissions method, 29 Home screen indicators, 14 Prerequisites, 28 Sonim XP STRIKE layout, 11 Reply to call alerts, 37 Back layout, 12 Save Direct Connect numbers, 32 Front layout, 11 Send call alerts, 36...
Need help?
Do you have a question about the XP STRIKE IS and is the answer not in the manual?
Questions and answers