Table of Contents

Related Manuals for Holme HDSM4001


Summary of Contents for Holme HDSM4001
- Page 1 Steam Mop User guide Model No: HDSM4001 For Customer Services & Spare Parts please call 0845 209 7461 Opening times: Monday - Friday 8am – 6pm & Saturday 9am – 1pm Or visit us at www.productcareuk.com IMPORTANT: RETAIN FOR FUTURE REFERENCE...
-
Page 2: Table Of Contents
……………………………………… Connection to the mains supply ……………………………………… Thank you for purchasing your Holme Steam Mop. With a three corner mop head for flexible cleaning and an ergonomic handle for comfort, cleaning your floors has never been so easy. What’s more, the detergent cleaning power breaks down dirt and stains better than steam alone, killing 99.9% of household germs. -
Page 3: Safety Instructions
IMPORTANT SAFETY INSTRUCTIONS Safety instructions READ CAREFULLY AND KEEP FOR FUTURE REFERENCE WARNING: It is hazardous for anyone other than a competent person to carry out any service or repair operation that involves the removal of a cover which gives protection against exposure to electrical parts. -
Page 4: Safety Instructions
Safety instructions • Do not direct steam at people, animals, electrical outlets, or equipment containing electrical components. • Unplug from power outlet when not in use. Do not leave steam mop unattended while plugged in. • Do not use with damaged cord or plug. •... - Page 5 Safety instructions • The filling aperture must not be opened during use. • Do not use appliance in an enclosed space filled with vapor given off by oil-based paint, paint thinner, some moth proofing substances, flammable dust, or other explosive or toxic vapors.
-
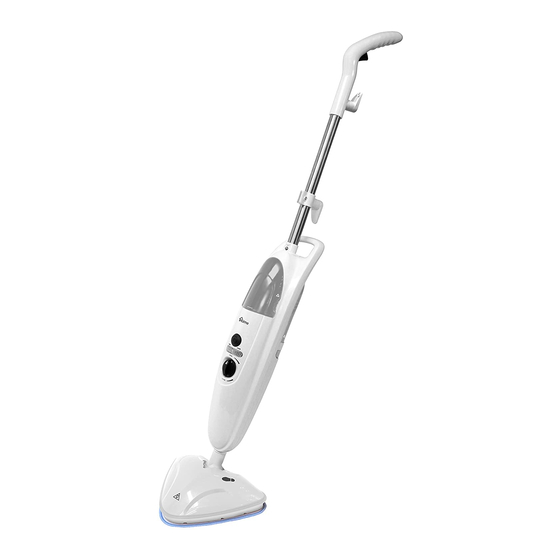
Page 6: Steam Mop Feature Diagram
Steam mop feature diagram Handle Detergent tank dial Steam/Detergent release trigger Mop head Upper power cord grip Microfibre cleaning pad Lower power cord grip Carpet glider Detergent tank Filler cup Water tank Power cord On/Off button Detergent Hard water filter Cooling tray Indicator lights... -
Page 7: Steam Mop Assembly
Steam mop assembly Before using your steam mop: Remove all packaging and lay out the separate components. Check the steam mop after unpacking for any visual damage such as: • Misaligned or damaged parts • Damage to the main body and separate components •... -
Page 8: Using Your Steam Mop
Using: Filling the water tank Grip the sides of the water tank and pull upwards to remove. Remove the cap on the top of water tank by turning it anti-clockwise and lifting. Fill the tank with 500ml of water using the filler cup. -
Page 9: Filling The Detergent Tank
Using: Filling the detergent tank Grip the sides of the detergent tank on the front of the steam mop and pull upwards to remove. Remove the cap on the top of the detergent tank by turning it anti-clockwise and lifting. Fill the tank, using the filler cup with 30ml of detergent &... - Page 10 Using your steam mop Fasten the microfibre cleaning pad on the base. IMPORTANT: Never use the steam mop without the microfibre cleaning pad fitted correctly. Plug the steam mop into a mains socket and turn the power on. Press the ON/OFF button on the front of the steam mop body in to switch the mop ON.
- Page 11 To recline the handle, place your foot over the shoe symbol on the side of the mop head and gently pull the handle downwards. Cleaning hard floors Pull trigger on the handle (1) to release the steam. Move the steam mop backwards and forwards across the floor (2).
-
Page 12: Storing Your Steam Mop
Storing your steam mop Place the mop head on the cooling tray that has been provided after every use. When you have finished cleaning your floor, switch the steam mop off by pressing the ON/OFF button. Switch the power off at the plug socket and remove the plug. - Page 13 Pull the microfibre cleaning pad from the base of the mop head. IMPORTANT: Never store the steam mop with the pad fitted. Wind the power cord around the top and bottom cord grips on the handle. Slot the end of the power cord into the grip on the top power cord grip.
-
Page 14: Cleaning And Care
Cleaning and Care If you live in a hard water area, over time the filter will become blocked and affect the performance of the steam mop. Check and change the filter regularly to ensure your steam mop works to its optimum level. As the filter becomes more blocked the colour will darken and discolour. -
Page 15: Problem Solving
Problem Solving PROBLEM POSSIBLE PROBLEM POSSIBLE SOLUTION 1. Difficult to attach mop 1. The main body of the product can be pushed down into head. the nozzle of the mop head. Ensure the groove is aligned correctly with the body. Refer to page 7 of the instruction manual provided. - Page 16 Problem Solving PROBLEM POSSIBLE PROBLEM POSSIBLE SOLUTION 1. The power button has 1. Press the power button on the centre of the steam not been pressed. mop. This should illuminate the power indicator light. Ensure you have waited 40 seconds for the water to heat up –...
- Page 17 Problem Solving PROBLEM POSSIBLE PROBLEM POSSIBLE SOLUTION 1. Contact Customer Services using the details on the The filter needs bottom of this page. replacing 1. The unit may not be 1. Verify the unit is plugged securely into an approved The indicator lights plugged in properly/the electrical outlet and that the fuse or breaker is functioning...
-
Page 18: Guarantee
Guarantee This product is guaranteed for 12 months from the date of the original purchase. If any defect arises due to faulty materials or workmanship the faulty product must be returned to the place of purchase. Refund or replacement is at the discretion of the retailer. The following conditions apply: •... -
Page 19: Customer Services
Customer services Attach your receipt to this page for proof of purchase. We’re here should you need us For Customer Services & Spare Parts please call 0845 209 7461 Opening times: Monday - Friday 8am – 6pm & Saturday 9am – 1pm Or visit us at www.productcareuk.com Produced for: G2S Limited... -
Page 20: Spare Parts
Spare parts Part: 1. Body 2. Handle 3. Hard water filter 4. Microfibre cleaning pad 5. Mop head 6. Filler cup 7. Detergent tank 8. Water tank 9. Carpet glider 10. Detergent 11. Cooling Tray We’re here should you need us For Customer Services &... -
Page 21: Connection To The Mains Supply
Connection to the mains supply WARNING- THIS APPLIANCE MUST BE EARTHED This appliance is designed to operate from a mains supply of AC230V - 240V ~ 50/60HZ. Check that the voltage marked on the product corresponds with your supply voltage. This product is fitted with a 13A plug complying with BS1363. - Page 22 Connection to the mains supply For UK use only – Plug fitting details (where applicable): As the colours of the wires in the mains lead of this appliance may not correspond with the coloured markings identifying the terminals in your plug, proceed as follows: The GREEN/YELLOW wire is the EARTH and must be connected to the terminal which is marked with the letter E or by the earth symbol or...
- Page 23 Model number: HDSM4001...
Need help?
Do you have a question about the HDSM4001 and is the answer not in the manual?
Questions and answers