Table of Contents
Advertisement
Advertisement
Table of Contents

Related Manuals for Acer Aspire Switch 10


Summary of Contents for Acer Aspire Switch 10
- Page 1 Aspire Switch 10 User’s Manual...
-
Page 2: Sign Up For Acer Id/Enable Remote Files
Regulatory model number: P0JAC Sign up for an Acer ID and enable Acer Remote Files Open the Acer Portal from the Start screen to sign up for an Acer ID or sign in if you already have an Acer ID. -
Page 3: Table Of Contents
Taking care of your computer ..... 6 Saving power ......... 41 Taking care of your AC adapter ....6 Cleaning and servicing........ 7 Battery pack Your Acer computer tour Battery characteristics ......43 Computer..........8 Charging the battery ......... 43 Front view ........... 8 Optimizing battery life ....... -
Page 4: Getting Started
• Where to find the power button, ports and connectors • Tips and tricks for using the touchpad and keyboard • How to create recovery backups • Guidelines for connecting to a network and using Bluetooth • Information on using Acer’s bundled software... -
Page 5: First Things First
First things first - 5 I R S T T H I N G S F I R S T We would like to thank you for making this Acer computer your choice for meeting your mobile computing needs. Your guides... -
Page 6: Taking Care Of Your Computer
6 - First things first You can also put the computer in sleep mode by pressing the sleep hotkey <Fn> + <F4>. Note If you cannot power off the computer normally, press and hold the power button for more than four seconds to shut down the computer. If you turn off the computer and want to turn it on again, wait at least two seconds before powering up. -
Page 7: Cleaning And Servicing
First things first - 7 single wall outlet should not exceed the fuse rating. Cleaning and servicing When cleaning the computer, follow these steps: 1. Turn off the computer. 2. Disconnect the AC adapter. 3. Use a soft, moist cloth. Do not use liquid or aerosol cleaners. If either of the following occurs: •... -
Page 8: Your Acer Computer Tour
C E R C O M P U T E R T O U R After setting up your device as illustrated in the Setup Guide, let us show you around your new Acer computer. You can enter information into your new computer via the touchscreen. -
Page 9: Bottom View
Your Acer computer tour - 9 Bottom view Icon Item Description Keyboard Connects to the keyboard. connector Keyboard hook Fastens to the keyboard. slots Left/right views Icon Item Description Connects to audio devices (e.g., Headset/ speakers, headphones) or a headset speaker jack with microphone. -
Page 10: Led Indicators
10 - Your Acer computer tour Icon Item Description Press to turn the computer on; press again to place the computer in Sleep Power button mode. Press and hold to turn the computer off. Volume control Adjusts the system volume. -
Page 11: Keyboard
Your Acer computer tour - 11 Keyboard Keyboard front view Icon Item Description Keyboard For entering data into your computer. Touch-sensitive pointing device. The touchpad and selection buttons form a single surface. Press down firmly on the touchpad surface to perform a left click. -
Page 12: Keyboard Right View
12 - Your Acer computer tour Keyboard right view Icon Item Description USB port Connects to USB devices. -
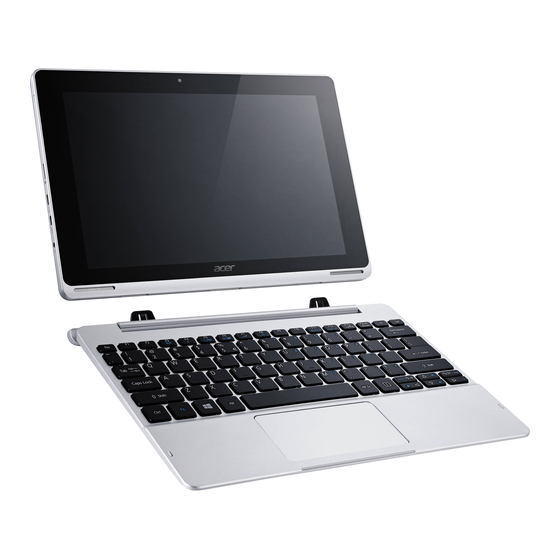
Page 13: Attaching And Detaching The Keyboard
Your Acer computer tour - 13 Attaching and detaching the keyboard The Acer Smart Hinge makes attaching and detaching the keyboard fast and easy. Attach the computer with the keyboard by aligning the keyboard hooks and the keyboard hook slots to function as a laptop. Ensure the... - Page 14 14 - Your Acer computer tour Detach the computer from the keyboard by lifting one corner to release it from the keyboard to function as a tablet. You can also attach the computer to the keyboard facing outwards as a display. Ensure the computer clicks into place.
-
Page 15: Using The Keyboard
Using the keyboard - 15 S I N G T H E K E Y B O A R D The keyboard has full-sized keys and an embedded numeric keypad, separate cursor, lock, Windows, function and special keys. Lock keys and embedded numeric keypad The keyboard has three lock keys which you can toggle on and off. -
Page 16: Hotkeys
16 - Using the keyboard Hotkeys The computer employs hotkeys or key combinations to access most of the computer's controls like screen brightness and volume output. To activate hotkeys, press and hold the <Fn> key before pressing the other key in the hotkey combination. Hotkey Icon Function Description... -
Page 17: Windows Keys
Activate Microsoft 2013 Your Acer computer includes a Microsoft Product Identification (MPI) card in the box, which contains a product key to activate the full version of Microsoft Office 2013 Home and Student Edition. -
Page 18: Touchpad
18 - Touchpad O U C H P A D Touchpad basics The touchpad controls the arrow (or 'cursor') on the screen. As you slide your finger across the touchpad, the cursor will follow this movement. Note The touchpad is sensitive to finger movement; the lighter the touch, the better the response. - Page 19 Touchpad - 19 This allows you to control applications with a few simple gestures, such as: • Swipe in from edge: Access Windows tools by swiping into the center of the touchpad from the right or left. • Swipe in from right edge: Toggle the charms.
-
Page 20: Recovery
Windows tools, or the recovery backup. Note Acer Recovery Management is only available with a pre-installed Windows operating system. Important We recommend that you create a Recovery Backup and Drivers and Applications Backup and as soon as possible. - Page 21 Recovery - 21 1. From Start, type 'Recovery' and then click Acer Recovery Management in the list of apps. 2. Click Create Factory Default Backup. The Recovery Drive window opens. Make sure Copy contents from the recovery partition to the recovery drive is selected.
-
Page 22: Creating A Drivers And Applications Backup
22 - Recovery • Since the recovery backup requires at least 16 GB of storage after formatting, it is recommended to use a USB drive with a capacity of 32 GB or larger. 4. You will be shown the backup progress on the screen. 5. - Page 23 USB storage drive or, if your computer features a DVD recorder, one or more blank recordable DVDs. 1. From Start, type 'Recovery' and then click Acer Recovery Management in the list of apps. 2. Click Create Drivers and Applications Backup.
-
Page 24: Recovering Your System
24 - Recovery with a permanent marker. If multiple discs are required, insert a new disc when prompted, then click OK. Continue until the process is complete. • If you are using a USB drive, unplug the drive and label it clearly. Important Write a unique, descriptive label on each backup, such as 'Drivers and Applications Backup'. -
Page 25: Reinstalling Drivers And Applications
If you are reinstalling using Windows and the recovery information stored on your computer: 1. From Start, type 'Recovery' and then click Acer Recovery Management in the list of apps. 2. Click Reinstall Drivers or Applications. - Page 26 1. Insert the Drivers and Applications Backup into the disc drive or connect it to a free USB port. • If you inserted a DVD wait for Acer Resource Center to start. • If Acer Resource Center does not start automatically, press the Windows key + <E>, then double-click on the optical drive...
-
Page 27: Returning To An Earlier System Snapshot
Recovery - 27 2. You should see the Contents section of the Acer Resource Center. Images for reference only. 3. Click the install icon for the item you want to install, then follow the onscreen prompts to complete the installation. Repeat this step for each item you want to reinstall. -
Page 28: Returning Your System To Its Factory Condition
Recovering from a recovery backup on page Recovering from Windows Start Acer Recovery Management: • From Start, type ’Recovery’ and then click Acer Recovery Management in the list of apps. Two options are available, Restore Factory Settings (Reset my PC) or Customized Restore (Refresh my PC). - Page 29 Recovery - 29 the Windows Store). See Customized Restore with Acer Recovery Management on page Restore Factory Settings with Acer Recovery Management 1. Click Restore Factory Settings. Important ’Restore Factory Settings’ will erase all files on your hard drive. 2. The Reset your PC window opens.
-
Page 30: Customized Restore With Acer Recovery Management
"Reset your PC" completely removes all your files and resets your computer to factory settings. 4. Click Next. The process will take several minutes. Customized Restore with Acer Recovery Management 1. Click Customized Restore (Retain User Data). -
Page 31: Recovering From A Recovery Backup
Recovery - 31 2. The Refresh your PC window opens. Images for reference only. 3. Click Next, then Refresh. 4. The recovery process begins by restarting your computer, then continues by copying files to your hard drive. This process takes about 30 minutes. - Page 32 32 - Recovery b. Windows starts from the recovery backup instead of the normal startup process. 6. Select your keyboard type. 7. Select Troubleshoot and then choose the type of recovery to use: a. Click Advanced then System Restore to start Microsoft System Restore: Microsoft System Restore periodically takes a ’snapshot’...
- Page 33 Recovery - 33 2. Click Next. 3. Select the operating system to recover (normally only one option is available). 4. Choose to keep any changes to the hard drive: a. If you have deleted the recovery partition or otherwise changed the partitions on the hard drive and want to keep these changes, select No.
-
Page 34: Connecting To The Internet
Windows will detect and display a list of available networks during setup. Select your network and enter the password if required. Acer notebook computers feature an Airplane mode hotkey that turns the network connection on or off. You can use the network management options to turn your wireless network on/off or control what is shared over the network. -
Page 35: Using A Bluetooth Connection
Using a Bluetooth connection - 35 S I N G A L U E T O O T H C O N N E C T I O N Bluetooth is a technology enabling you to transfer data wirelessly over short distances between many different types of devices. - Page 36 36 - Using a Bluetooth connection 4. Tap the device you wish to add from the list of discovered devices, and tap Pair. A code displays on your computer, which should match the code displayed on your device. Select Yes. Then, accept the pairing from your device.
- Page 37 - 37 Keeping your computer and data safe... In this section you will find: • How to secure your computer • Setting passwords • What you need to prepare when you’re traveling • How to get the most out of your battery...
-
Page 38: Bios Utility
38 - BIOS utility B I O S U T I L I T Y The BIOS utility is a hardware configuration program built into your computer's BIOS. Your computer is already properly configured and optimized, and you do not normally need to run this utility. However, if you encounter configuration problems, you may need to run it. -
Page 39: Securing Your Computer
Securing your computer - 39 E C U R I N G Y O U R C O MP U TE R Your computer is a valuable investment that you need to take care of. Learn how to protect and take care of your computer. Using passwords Passwords protect your computer from unauthorized access. - Page 40 40 - Securing your computer • Type the User Password and press <Enter> to use the computer. If you enter the password incorrectly, a warning message appears. Try again and press <Enter>. Important You have three chances to enter a password. If you fail to enter the password correctly after three tries, the system halts.
-
Page 41: Power Management
Power management - 41 O W E R M A N A G E M E N T This computer has a built-in power management unit that monitors system activity. System activity refers to any activity involving one or more of the following devices: keyboard, mouse, hard disk, peripherals connected to the computer, and video memory. - Page 42 42 - Power management 5. Select Change settings that are currently unavailable. 6. Scroll down and disable Turn on fast startup. 7. Select Save changes.
-
Page 43: Battery Pack
Battery pack - 43 A T T E R Y P A C K The computer uses an embedded Lithium battery that gives you long use between charges. Battery characteristics The battery is recharged whenever you connect the computer to the AC adapter. -
Page 44: Optimizing Battery Life
44 - Battery pack Follow these steps again until the battery has been charged and discharged three times. Use this conditioning process for all new batteries, or if a battery hasn't been used for a long time. Warning Do not expose battery packs to temperatures below 0° C (32° F) or above 45°... -
Page 45: Checking The Battery Level
Battery pack - 45 Checking the battery level The power meter indicates the current battery level. Rest the cursor over the battery/power icon on the taskbar to see the battery's present charge level. Battery-low warning When using battery power pay attention to the power meter. Important Connect the AC adapter as soon as possible after the battery-low warning appears. -
Page 46: Ports And Connectors
46 - Ports and connectors... In this section you will find: • Information on the ports and connectors fitted to your computer... -
Page 47: Memory Card Reader
Memory card reader - 47 E M O R Y C A R D R E A D E R Connectivity options Your computer has a card reader and other ports/jacks that allow you to connect peripheral devices to your computer. For instructions on how to connect different external devices to the computer, read the following section. - Page 48 48 - Memory card reader (2 TB). Your computer provides an SDHC or SDXC compatible card reader. Note SDXC memory cards can only be used in an SDXC-compatible reader; SD and SDHC cards can be used in either type. Removing a card from a memory card reader 1.
-
Page 49: Video And Audio Connectors
Video and audio connectors - 49 I D E O A N D A U D I O C O N N E C T O R S Connect to a monitor with a VGA or DVI port (the type of connection supported depends your... -
Page 50: Hdmi Micro
50 - HDMI Micro H D M I M I C R O HDMI (High-Definition Multimedia Interface) is a high-quality, digital audio/video interface. HDMI allows you to connect any compatible digital audio/video source, such as your computer, a set-top box, DVD player, and audio/video receiver to any compatible digital audio and/or video monitor, such as a digital television (DTV) with a single cable. -
Page 51: Universal Serial Bus (Usb)
Note Two USB standards are currently available on Acer computers: USB 2.0 (High-speed USB) and USB 3.0 (SuperSpeed USB). USB 2.0 ports on Acer computers have a black tongue in the port, while USB 3.0 ports have a blue tongue. For best performance, USB 3.0 devices should always be plugged into USB 3.0 ports. -
Page 52: Micro Usb
52 - Micro USB U SB I C R O The USB (Universal Serial Bus) port is a high-speed serial bus which allows you to connect USB peripherals without taking up system resources. The Micro USB port provides a compact port that is compatible with USB 2.0 devices. - Page 53 - 53 Got a question? In this section you will find: • Frequently asked questions • Tips for using Windows 8.1 • Troubleshooting information • How to protect yourself while online • Where to find Acer service center contact information...
-
Page 54: Frequently Asked Questions
54 - Frequently asked questions R E Q U E N TL Y A S K E D Q U E S T I O N S The following is a list of possible situations that may arise during the use of your computer. - Page 55 Your C: drive will be reformatted and all data will be erased. It is important to back up all data files before using this option. Before performing a restore operation, please check the BIOS settings. 1. Check to see if Acer disk-to-disk recovery is enabled or not.
-
Page 56: Requesting Service
2. Make sure the D2D Recovery setting in Main is Enabled. 3. Exit the BIOS utility and save changes. The system will reboot. Note To activate the BIOS utility, press <F2> when you see the Acer logo during boot up. For more information,... -
Page 57: Tips And Hints For Using Windows 8.1
F r e qu e nt ly a sk Frequently asked questions - 57 Tips and hints for using Windows 8.1 We know this is a new operating system that will take some getting used to, so we've created a few pointers to help you get started. How do I get to Start? Press the Windows key;... -
Page 58: Can I Boot Directly To The Desktop
58 - Frequently asked questions Can I boot directly to the desktop? Yes, you can, just follow these steps: 1. Go to the desktop. 2. Tap and hold the taskbar until you see the square outline. Select Properties from the menu that opens when you remove your finger. 3. - Page 59 Frequently asked questions - 59 Can I personalize the Lock screen? You can personalize the lock screen with a different image, to run a slideshow of images, or to show you quick status and notifications to suit your personal needs. To change the background, swipe the right-hand edge of the screen inwards and tap Settings >...
-
Page 60: How Do I Set The Alarm
60 - Frequently asked questions Can I make tiles bigger or smaller? Swipe upwards from bottom of the screen and tap Customize, tap the tile(s) you wish to resize and tap Resize. Select a size from the menu that appears. How do I close an app? Swipe the window downwards from the top to the bottom of the screen. -
Page 61: Where Are My Apps
Frequently asked questions - 61 5. Save the alarm by tapping the Save icon in the upper right-hand corner. Delete Save Hour Minutes Note The alarm will only sound if your computer is awake at the set time. Where are my apps? Swipe the right-hand edge of the screen inwards and tap Search, type the name of the app you would like to open using the pop-up keyboard. - Page 62 62 - Frequently asked questions menu that appears at the bottom of the screen. How do I make an app appear on my taskbar? If you're in All apps and you want to make an app appear on the taskbar, tap and hold a tile until you see the screen dim. When you release the tile, the Customize menu appear at the bottom of the screen.
-
Page 63: What Is A Microsoft Id (Account)
Swipe the right-hand edge of the screen inwards and tap Settings > Change PC settings > Update & recovery > Windows Update. Tap Check now. Where can I get more information? For more information please visit the following pages: • Windows 8 and 8.1 tutorials: www.acer.com/windows8-tutorial • Support FAQs: support.acer.com... -
Page 64: Troubleshooting
R E Q U E N T LY 64 - Frequently asked questions Troubleshooting This chapter shows you how to deal with common system problems. Read it before calling a technician if a problem occurs. Solutions to more serious problems require opening up the computer. Do not attempt to open the computer yourself;... - Page 65 Frequently asked questions - 65 Error messages Corrective action Keyboard error or no Contact your dealer or an authorized service keyboard connected center. Keyboard interface Contact your dealer or an authorized service error center. Press <F2> (during POST) to enter the BIOS Memory size utility, then press Exit in the BIOS utility to mismatch...
-
Page 66: Internet And Online Security
66 - Internet and online security N T E R N E T A N D O N L I N E S E C U R I T Y First steps on the net Protecting your computer It is vital to protect your computer from viruses and attacks over the Internet (see Security on page 70). - Page 67 Internet and online security - 67 Internet as the connection speed is low and connection time is typically charged per hour. DSL (e.g. ADSL) DSL (Digital Subscriber Line) is an ‘always-on’ connection that runs over the phone line. As DSL and phone do not use the same frequencies, you can use your telephone at the same time you are connected to the Internet (this requires a ‘micro-filter’...
-
Page 68: Network Connections
68 - Internet and online security Network connections A LAN (Local Area Network) is a group of computers (for example, within an office building or home) that share a common communications line and resources. When you set up a network, you can share files, peripheral devices (such as a printer) and an Internet connection. - Page 69 Internet and online security - 69 point/router for detailed setup instructions. Network cable (RJ45) A network cable (also called RJ45 cable) is used to connect the host computer to the access point (see illustration below); this type of cable may also be used to connect peripheral devices to the access point. Wireless adapter An internal wireless adapter is normally already installed in your computer.
-
Page 70: Surf The Net
Security You are probably eager to explore everything the Internet has to offer. In order for you to be safe online, Acer has pre-installed McAfee Internet Security Suite on your computer. McAfee Internet Security Suite runs quietly in the background to block today’s complex threats and protect your identity when you shop,... - Page 71 Note Acer guarantees that your computer was 100% virus free at the time of purchase and does not cover damages due to viruses. What is spyware? Spyware refers to generally unwanted programs that are downloaded onto your computer while connected to the Internet, often without you knowing it.
- Page 72 72 - Internet and online security would allow it (i.e. a game connecting to a multi-player server or an encyclopaedia making a content update). How to protect your computer Cybercrime prevention can be straight-forward - when armed with a little technical advice and common sense, many attacks can be avoided.
- Page 73 A complete version of McAfee Internet Security Suite is pre-installed on your Acer system. It includes a free trial subscription to protection updates. Make sure you Activate it! Choose strong passwords and keep them safe Passwords are a fact of life on the Internet today;...
- Page 74 74 - Internet and online security of your online accounts, one of the first steps you can take is to change your password. Protect your personal information Exercise caution when sharing personal information such as your name, home address, phone number, and email address online. To take advantage of many online services, you will inevitably have to provide personal information in order to handle billing and shipping of purchased goods.
- Page 75 Internet and online security - 75 • Pay attention to privacy policies on Web sites and in software. It is important to understand how an organization might collect and use your personal information before you share it with them. • Guard your email address. Spammers and "phishers" sometimes send millions of messages to email addresses that may or may not exist in hopes of finding a potential victim.
- Page 76 76 - Internet and online security that something bad may have happened and you should take necessary action. Protect your computer with Windows security tools Windows provides a variety of protection applications. Windows Updates If you have an active Internet connection, Windows can check for important updates for your computer and install them automatically.
Need help?
Do you have a question about the Aspire Switch 10 and is the answer not in the manual?
Questions and answers