Advertisement
Table of Contents
- 1 Safety Summary
- 2 Removing Existing Ratchet Assembly (Figure 1)
- 3 Articulating Legrest
- 4 Installing New Ratchet Kit - Elevating Legrests (Figure 2)
- 5 Installing New Ratchet Kit - Articulating Legrests (Figure 3)
- 6 Correct Assembled Position for Complete Travel of Articulating Legrest (Figure 4)
- 7 Notes
- Download this manual
SAVE THESE INSTRUCTIONS
NOTE: Check ALL parts for shipping damage. In case of
shipping damage, DO NOT use. Contact Carrier/Dealer
for further instruction.
SAFETY SUMMARY
The following recommendations are made for safe
installation and adjustment of the Ratchet Replace-
ment Articulating / Elevating Legrest:
GENERAL WARNING
DO NOT install or use this kit without first read-
ing and understanding this instruction sheet.
If you are unable to understand the Warn-
ings, Cautions or Instructions, contact a
healthcare professional, dealer or technical
personnel before attempting to install this kit
- otherwise, injury or damage may occur.
DO NOT step or stand on footrests; it could
cause the chair to tip over resulting in injury.
INSTALLATION WARNING
After making adjustments and BEFORE use,
make sure all attaching hardware is securely
tightened.
The Ratchet Replacement Kit consists of the following:
DESCRIPTION
Ratchet Body
Ratchet Bar
Ratchet Handle
Nylon Washer
Acorn Nut
Cam
Spring
Snap Ring
Spacer
Domed Push Cap
Have the following tools available:
Hammer
Punch
Snap Ring Tool
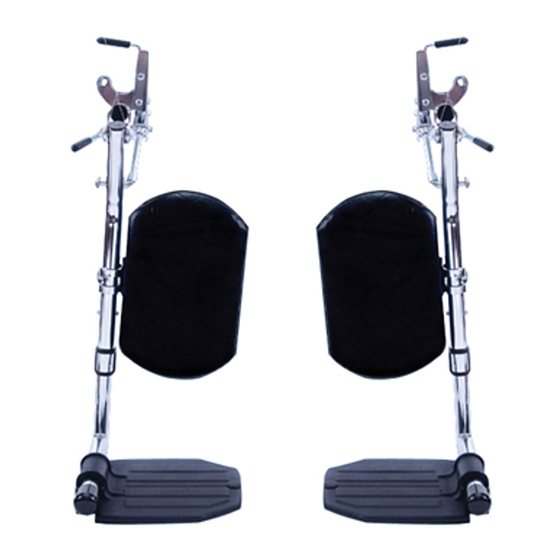
REMOVING EXISTING RATCHET
ASSEMBLY (FIGURE 1)
NOTE: Note location and orientation of ratchet assembly
BEFORE removing for installation of NEW ratchet kit.
1. Determine how the ratchet handle is secured to the
legrest.
2. Perform one (1) of the following:
If the ratchet handle is secured with a Roll Pin:
A. Use a hammer and a punch to remove the roll pin
B. Adjust the legrest assembly until the ratchet as-
NOTE: When removing the ratchet assembly and handle
on the articulating legrest, open the legrest assembly until
you clear the drive link and link bar.
NOTE: This procedure will eliminate disassembling the
upper support tube from the legrest support tube and in
the case of the articulating legrest the gears will not have
to be remeshed to obtain correct travel.
C. Remove ratchet body and ratchet handle from
D. Discard the existing ratchet parts.
QUANTITY
If the ratchet handle is secured with a snap ring:
2
2
A. Remove the snap ring from the end of the ratchet
2
2
B. If equipped, remove the domed push cap that se-
2
2
C. Adjust the legrest assembly until the ratchet as-
2
2
2
D. Remove ratchet body and ratchet handle from upper
2
E. Discard the existing ratchet parts.
1
that secures the ratchet handle to the ratchet as-
sembly as shown in FIGURE 1, DETAIL "A".
sembly including handle can be removed from
the upper support tube of legrest assembly.
upper support tube as shown in FIGURE 1,
DETAIL "A".
handle using snap ring tool.
cures the ratchet bar to the legrest support tube.
sembly including handle can be removed from
the upper support tube of the legrest assembly.
support tube.
Advertisement
Table of Contents

Related Manuals for Invacare Articulating/Elevating Legrest


Summary of Contents for Invacare Articulating/Elevating Legrest
-
Page 1: Safety Summary
SAVE THESE INSTRUCTIONS NOTE: Check ALL parts for shipping damage. In case of shipping damage, DO NOT use. Contact Carrier/Dealer for further instruction. SAFETY SUMMARY The following recommendations are made for safe installation and adjustment of the Ratchet Replace- ment Articulating / Elevating Legrest: GENERAL WARNING DO NOT install or use this kit without first read- ing and understanding this instruction sheet. - Page 2 RATCHET KIT WITH ROLL PIN: ELEVATING LEGREST Upper Support Tube Ratchet Handle ARTICULATING LEGREST Upper Support Tube Link Bar DETAIL “A” - DISASSEMBLING EXISTING RATCHET KIT WITH ROLL PIN Discard Roll Pin Ratchet Handle FIGURE 1 - REMOVING EXISTING RATCHET ASSEMBLY RATCHET KIT WITH SNAP RING: Domed Push Cap...
- Page 3 INSTALLING NEW RATCHET KIT Elevating Legrests (Figure 2) 1. Install ratchet handle through support tube. 2. Install nylon washer onto end of ratchet handle. 3. Install spring into ratchet body. Snap the spring clips into the spring clip mounting holes of the ratchet body. 4.
- Page 4 Articulating Legrests (Figure 3) 1. Install ratchet handle from outside of legrest through upper legrest support tube. 2. Install nylon washer onto end of ratchet handle. 3. Install spring into ratchet body. Snap the spring clips into the spring clip mounting holes of the ratchet body as shown in DETAIL “A”, FIGURE 3.
- Page 5 CORRECT ASSEMBLED POSITION FOR COMPLETE TRAVEL OF ARTICULATING LEGREST (FIGURE 4) 1. The ADULT, after it is mounted to the chair frame, will be at about a 30° angle. 2. The HEMI, after it is mounted to the chair frame, will be at about a 45°...
- Page 6 NOTES...
- Page 7 NOTES...
Need help?
Do you have a question about the Articulating/Elevating Legrest and is the answer not in the manual?
Questions and answers