Table of Contents
Advertisement
Quick Links
OL
OL
OL
2
2
2
4
4
4
7
7
7
10
10
10
15
15
15
20
20
20
25
25
25
30
30
30
35
35
35
40
40
40
50
50
50
1
2
3
1
2 3 4 5 6 7 8
DIRECT OUTPUTS
U
THE FOLLOWING ARE TRADEMARKS OR REGISTERED
TRADEMARKS OF MACKIE DESIGNS INC "MACKIE",
"MACKIE INDUSTRIAL", AND THE "RUNNING MAN" FIGURE
CONCEIVED, DESIGNED, AND MANUFACTURED
BY MACKIE DESIGNS INC WOODINVILLE • WA • USA
-20
+20
MADE IN USA • FABRIQUE AU USA • COPYRIGHT ©1999
TRIM
BUS A
MIC
POWER
–
+ G
INPUT
LINE
22-28V DC,
–
G
+
3A MAX
–
–
100
240V
, 50/60Hz, 1A MAX
+
LISTED COMMERCIAL
AUDIO EQUIPMENT
LINE
R
9Z39
Digital Audio Mixer/
Signal Processor
OL
OL
OL
OL
2
2
2
2
4
4
4
4
7
7
7
7
10
10
10
10
15
15
15
15
20
20
20
20
25
25
25
25
30
30
30
30
35
35
35
35
40
40
40
40
50
50
50
50
4
5
6
7
DX8 DIGITAL MIXER
U
U
U
U
U
0
60
0
60
0
60
0
-20
+20
- 30dB +30dB
- 30dB +30dB
- 30dB +30dB
- 30dB +30dB
TRIM
TRIM
TRIM
TRIM
TRIM
BUS B
1
2
3
4
MIC
MIC
MIC
MIC
LINE
LINE
LINE
LINE
LINE
DX810 v3.0
Instruction Manual
15
12
9
6
3
0
3
6
9
12
15
8
LO
EQ
HI
A
MASTER
SERIAL NUMBER
MANUFACTURING DATE
U
U
U
U
60
0
60
0
60
0
60
0
60
- 30dB +30dB
- 30dB +30dB
- 30dB +30dB
- 30dB +30dB
TRIM
TRIM
TRIM
TRIM
5
6
7
8
MIC
MIC
MIC
MIC
LINE
LINE
LINE
LINE
OL
2
4
7
10
DX8 DIGITAL MIXER
15
20
25
30
35
40
50
A
B
LOCK
MODE
B
COMM PORT
–
J
I
H
G
+
G
•
10
e
–
+
G
C
D
E
F
–
12
INPUTS
1 +5V
G
+
G
11
OUTPUTS
1
REMOTE BUS
COMM PORT
LOGIC I/O
OUTPUTS
PHANTOM POWER
–
G
+
48V DC
A
B
A
B
ON
1 2 3 4 5 6 7 8
RECORD
POWER
–
G
+
Advertisement
Table of Contents

Related Manuals for Mackie DX810 v3.0


Summary of Contents for Mackie DX810 v3.0
- Page 1 TRADEMARKS OF MACKIE DESIGNS INC "MACKIE", – INPUTS 1 +5V "MACKIE INDUSTRIAL", AND THE "RUNNING MAN" FIGURE CONCEIVED, DESIGNED, AND MANUFACTURED BY MACKIE DESIGNS INC WOODINVILLE • WA • USA - 30dB +30dB - 30dB +30dB - 30dB +30dB - 30dB +30dB - 30dB +30dB...
-
Page 2: Table Of Contents
All other servicing should be referred to the 1. Read Instructions — Read all the safety and operation instructions before Mackie Service Department. operating the DX810. 13. To prevent electric shock, do not use this polarized plug with an extension cord, 2. -
Page 3: Introduction
Mix A and B. This allows adjustment of levels to • 8 unbalanced Direct Channel Outputs both mix outputs from the same set of input Part No. 0001335 Rev. B 11/02 © 2002 Mackie Designs Inc. All rights reserved. Printed in the U.S.A. DX810 – 3... -
Page 4: New Features In Version 3.0
THE FOLLOWING ARE TRADEMARKS OR REGISTERED TRADEMARKS OF MACKIE DESIGNS INC "MACKIE", "MACKIE INDUSTRIAL", AND THE "RUNNING MAN" FIGURE CONCEIVED, DESIGNED, AND MANUFACTURED BY MACKIE DESIGNS INC WOODINVILLE • WA • USA - 30dB +30dB - 30dB +30dB - 30dB +30dB... -
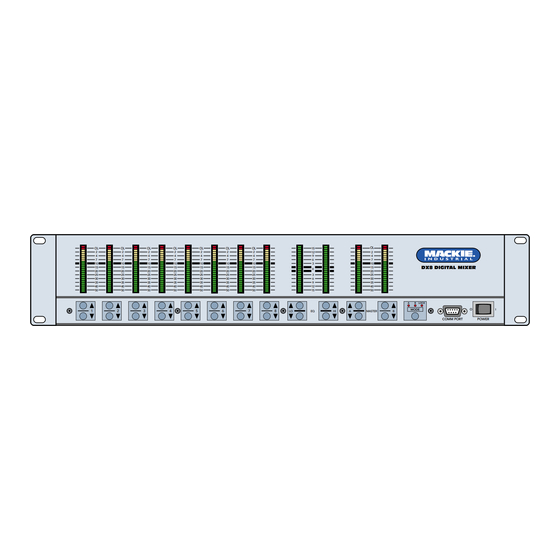
Page 5: Front Panel Features
TURING DATE – Each of the eight analog inputs has • separate balanced mic and line input – connectors that use Mackie’s acclaimed INPUTS 1 +5V – XDR mic preamps. These are 3-pin - 30dB +30dB Phoenix-type connectors. Use either the... - Page 6 TRADEMARKS OF MACKIE DESIGNS INC "MACKIE", INPUTS 1 +5V – "MACKIE INDUSTRIAL", AND THE "RUNNING MAN" FIGURE CONCEIVED, DESIGNED, AND MANUFACTURED BY MACKIE DESIGNS INC WOODINVILLE • WA • USA - 30dB +30dB - 30dB +30dB - 30dB +30dB - 30dB +30dB - 30dB +30dB...
-
Page 7: Installation
The DIRECT OUTPUT connector is wired as follows: 3. INSTALLATION DIRECT OUTPUTS Connections INPUT 1 HOT (+) SIGNAL RETURN INPUT 2 HOT (+) SIGNAL RETURN INPUT 3 HOT (+) SIGNAL RETURN INPUT 4 HOT (+) SIGNAL RETURN Connecting Balanced Sources INPUT 5 HOT (+) SIGNAL RETURN INPUT 6 HOT (+) -
Page 8: Ac Power Considerations
Note: Pins 12 and 13 are not used at this time. Connecting the LOGIC I/O They are reserved for future updates. Do not This is a 25-pin D-Sub connector. There are 10 connect anything to these pins. programmable logic inputs and 10 programmable logic outputs. -
Page 9: Operation
4. OPERATION Quick Start Set the Levels MIC and LINE Input Trim The analog trim controls on the rear panel are Reading the instruction manual is the only way not adjustable via the control software. This is to fully understand the features and functions of the because these are in the analog domain, prior to the DX810. -
Page 10: Using Inputs 1-8
PC. Plug-ins can be used along with selectable corner and center frequencies (LO: 20 the EQs and compressor described above. Check Hz-500 Hz; MID: 20 Hz-20 kHz HI: 500 Hz-20 kHz). the Mackie website at www.mackie.com availability. Using the BUS A and B Inputs These inputs provide a direct analog connection to the BUS A and B buses. -
Page 11: Using The Direct Outputs
function and its associated LED displays the current Using the DIRECT OUTPUTS state of the function. Refer to Appendix C for a list of the predefined The DIRECT OUTPUTS provide an unbalanced functions available for the Selection Remote Control. line-level signal from each of the 8 Input channels. This signal comes from the output of the preamplifier DX-RVC Level Remote (2-Button/12-LED) stage on each input channel, prior to the A/D... - Page 12 • Latch Off: The mute/enable function is deactivated when the The logic functions assigned to each individual logic input goes from inactive to active. logic input and output are configured using the DX- 810-PC application. In addition, each logic input and •...
-
Page 13: Password Protection
Note: The default User Lock Code is “1234.” The buttons must be pressed in rather rapid From time to time, Mackie Designs will release sequence in order to unlock the front panel (no upgrades for the internal operating software in the more than about 1 second between key presses). -
Page 14: Connecting A Pc
1. Top Section 1. Connect the PC to the DX810 as described above. 2. Button Section 2. Open the DX810 v3.0 software. DO NOT click the 3. Crosspoint Matrix Section On Line button yet. 4. Input Section 3. Click Advanced in the top menu bar and select 5. -
Page 15: Top Section
Top Section Edit The Top Section includes the Menu bar, the Active Logic Input and Output indicators, and Preset, On Line, and Panel Lock controls. Menu Bar The following menus are available in the Menu Copy Crosspoint (Ctrl+C) bar at the top of the screen: Copies the gain setting of the selected File crosspoint to the clipboard. - Page 16 Firmware Upgrade Note: The DX–810–PC application defaults to COM1 whenever it is restarted. This is regardless This allows you to select an OS upgrade file to of whether another COM port was selected in a upload to the DX810 as they become available. previous session.
- Page 17 Note: When changing presets, the faders Windows change position quickly on-screen, but the audio actually ramps according to the Ramp Time setting. Set Powerup Preset Select this to open the Powerup Preset Selection window. When None (last state) is selected, the DX810 returns to its state when it was last turned off.
-
Page 18: Indicators/Presets/Control
Output EQ Options This toggles the Output EQ window open and The Options window is reserved for future closed. It duplicates the function of the Output EQ upgrades. button in the Button Section. Force Control Compressor This toggles the Force Control window open and This toggles the Compressor window open and closed. -
Page 19: Button Section
Grp Name: Enter a name for each group with Button Section the keyboard. It will accept up to 32 characters. The Button Section includes the assignment Priority: Assign a priority level from 1 (highest) buttons (Force Ctrl, Logic In, Logic Out, Groups, to 8 (lowest) for each group. - Page 20 Logic Out Tip: If you have an input and output turned up, but you are not hearing the signal in the output, Click this button to open the Logic Output check to see if that input or output (or crosspoint) is window.
- Page 21 Combine Rules Note that if two or more outputs are linked via the Crossover window, only one button appears. 1. Combining only affects groups. No other controls This is true of the Output EQ (Graphic or Parametric), are affected. X-Over, and Delay output processors, as shown in 2.
- Page 22 Now let’s look at an example to see how the Next we will add the inputs that we want to rules apply in a practical application. appear at each output when each combination is active. A Three Room Combination In this example, Outputs A, B, and C provide 8.
- Page 23 Next we’ll create the combination to allow the Each input strip has a 3-band EQ comprised of: inputs for rooms B and C to be heard in both B and C 1. A high-frequency shelving EQ with adjustable gain outputs when C2 is active. (±15 dB) and frequency (500 Hz–20 kHz).
- Page 24 Click the right mouse button over the processor copy, or paste the processor settings to another display. This brings up a menu allowing you to cut, channel. copy, or paste the processor settings to another About Compression: output. A compressor is used to reduce or limit transient peaks in a signal.
- Page 25 Fine: This control adjusts the delay in small Click the On button to activate the Gate for the increments (22.7 µs), with a range from 0 µs to 997 µs. selected input. The Reset button returns all the The equivalent distance the sound travels in the knobs to their default settings.
-
Page 26: Crosspoint Matrix Section
With the first band active (red active button lit), Crosspoint Matrix Section click the On button to turn the crossover on and off. When the crossover is turned off, all the outputs This section provides a view of all the input-to- assigned to the crossover pass a full-range signal. -
Page 27: Output Section
The input level meter indicates the level of the input signal as it comes out of the analog to digital converters and shows the level in dBFS. If the red 0 dB portion is lit, then the signal level is above –2 dBFS and close to clipping. -
Page 28: Group Section
Group Section Exclusive Enable Program Selection Control Groups can be enabled exclusively; that is, when one group is enabled, other groups are This section includes the 32 control groups. automatically disabled so that only one group is active Eight groups are displayed at one time. However, at a time. -
Page 29: Specifications
6. SPECIFICATIONS DX810 Block Diagram DX810 – 29... -
Page 30: Dx810 Specifications
DX810 Specifications INPUTS / OUTPUTS SIGNAL PROCESSING Inputs 1-8: Balanced, Phoenix-type terminals General: Five 32-bit floating-point DSPs 24-bit A/D and D/A converters Bus A and B: Balanced, Phoenix-type terminals, Direct to 512Kx16 Flash ROM Mix Buses 128Kx32 SRAM (with battery backup) Outputs A-J: Balanced, Phoenix-type terminals Inputs:... - Page 31 Audio Impedances Mic inputs: 1.3K ohms Noise Line inputs: 40K ohms (20 Hz-20 kHz bandwidth, Master Out, channel Trims @ unity gain, All other inputs: 10K ohms or greater channel EQs flat, all odd channels panned left, even channels All outputs: 120 ohms panned right): Master level @ unity, channel levels @ unity:...
-
Page 32: Service Information
Design refinements are 1. Call Mackie Tech Support at 1-888-337-7404, 8 am introduced into existing products without notice as to 5 pm PST (Monday-Friday). Verify the problem a routine expression of that philosophy. -
Page 33: Appendix A: Logic Input Functions
Appendix A: Logic Input Functions Logic Input Function Action Affected I/O Inactive None None Force-On Momentary Input 1-8; Group 1-32 Latch On Input 1-8; Group 1-32 Latch Off Input 1-8; Group 1-32 Toggling Input 1-8; Group 1-32 Force-Off Momentary Input 1-8; Group 1-32 Latch On Input 1-8;... -
Page 34: Appendix C: Selection Remote Predefined Functions
Appendix C: Selection Remote Predefined Functions DX-SW4 Remote Switch Control (4-button/4-LED) for DX-810 v3.01 (Firmware v7.00) Switch Positions 1 through 8 Function Control 1 Control 2 Control 3 Control 4 00000000 Mute Input 1-4 Mute Input 1 Mute Input 2 Mute Input 3 Mute Input 4 10000000... -
Page 35: Appendix D: Level Remote Predefined Functions
Appendix D: Level Remote Predefined Functions DX-RVC Remote Volume Control (2-button/12-LED) Switch Positions Switch Positions 1 through 8 Function In/Out 1 through 8 Function In/Out 00000000 Input Level 10111100 Input Level 10000000 Input Level 01111100 Input Level 01000000 Input Level 11111100 Input Level 11000000... - Page 36 DX810 Digital Audio Mixer and Signal Processor version 3.0 Mackie Designs Inc. 16220 Wood-Red Rd. NE • Woodinville, WA 98072 • USA 888/337-7404 • Outside the U.S.: 425/487-4333 Fax: 425/487-4337 • www.mackie.com...
Need help?
Do you have a question about the DX810 v3.0 and is the answer not in the manual?
Questions and answers