Table of Contents
Advertisement
Thank you for purchasing this product.
Please read these instructions carefully before using this product,
and save this manual for future use.
Included Installation Instructions
The installation work should be done by a qualified installation specialist. (
Before commencing work, carefully read these installation instructions and the operating instructions
to ensure that installation is performed correctly.
(Please keep these instructions. You may need them when maintaining or moving this system.)
Model number suffix "EB" denotes UK model.
EB GN
Operating Instructions
Home Theater Audio System
Model No. SC-HTB680
13 to 18)
RQT9916-B
Advertisement
Table of Contents

Related Manuals for Panasonic SC-HTB680


Summary of Contents for Panasonic SC-HTB680
-
Page 1: Operating Instructions
Operating Instructions Home Theater Audio System Model No. SC-HTB680 Thank you for purchasing this product. Please read these instructions carefully before using this product, and save this manual for future use. Included Installation Instructions The installation work should be done by a qualified installation specialist. (... -
Page 2: Safety Precautions
Safety precautions WARNING CAUTION Unit Unit ≥ To reduce the risk of fire, electric shock or ≥ Do not place sources of naked flames, such as product damage, lighted candles, on this unit. jDo not expose this unit to rain, moisture, ≥... -
Page 3: Caution For Ac Mains Lead
Caution for AC Mains Lead (For the AC mains plug of three pins) For your safety, please read the following text How to replace the fuse carefully. The location of the fuse differ according to the type This appliance is supplied with a moulded three of AC mains plug (figures A and B). -
Page 4: Table Of Contents
Table of contents Safety precautions.................... 2 Caution for AC Mains Lead ................3 Before use Supplied items ....................5 This system (SC-HTB680) ....................5 Accessories .........................5 Control reference guide ................... 6 This system (Front) ......................6 This system (Rear) ......................7 Remote control ........................8 Getting started Step 1 Connections .................. -
Page 5: Supplied Items
Before us e ≥ The illustrations shown may differ from your unit. ≥ These operation instructions are applicable to model SC-HTB680 for variety of regions. Unless otherwise indicated, illustrations in these operating instructions are of the model for the United Kingdom and Ireland. -
Page 6: Control Reference Guide
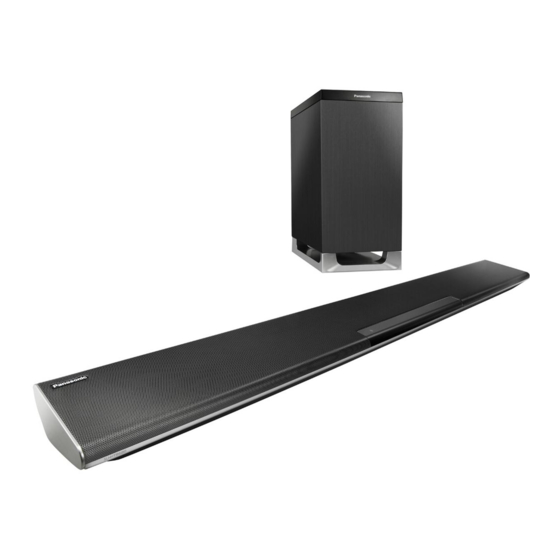
Control reference guide This system (Front) Main unit Active subwoofer Standby/on switch (Í/I) Select the Bluetooth device as the source ® Touch to switch the unit from on to standby mode or vice versa. In standby mode, the unit NFC touch area ( is still consuming a small amount of power. -
Page 7: This System (Rear)
This system (Rear) Main unit Active subwoofer HDMI AV IN (BD/DVD) terminal ( Ir SYSTEM terminal ( 11, 12) HDMI AV OUT (TV (ARC)) terminal (ARC USB port (for service use only) compatible) ( 9, 10) AC IN terminal ( OPTICAL DIGITAL AUDIO IN (TV) terminal Active subwoofer on/off button ( §... -
Page 8: Remote Control
Remote control ∫ Before using for the first time Remove the insulation sheet A. INPUT SETUP SOUND ∫ To replace a button-type battery Battery type: CR2025 (Lithium battery) Turn the main unit on or off ( Select the input source ( “TV”... -
Page 9: Step 1 Connections
25) when used with a compatible Panasonic TV. ≥ Use the ARC compatible High Speed HDMI Cables. Non-HDMI-compliant cables cannot be utilised. ≥ It is recommended that you use Panasonic’s HDMI cable. ∫ IR (Infrared) Blaster ≥ Do not use the IR Blaster if the TV’s remote control sensor is not blocked by the main unit. ( Connection with the TV Verify if the TV’s HDMI terminal is labelled “HDMI (ARC)”. -
Page 10: Connection From An Hdmi Compatible Device
Not labelled “HDMI (ARC)” HDMI IN AV OUT TV(ARC) OPTICAL DIGITAL AUDIO IN OPTICAL OUT A HDMI cable B Optical digital audio cable ≥ When you use the optical digital audio cable, insert the tip correctly into the terminal. Connection from an HDMI compatible device You can direct the audio signal from the connected Blu-ray Disc player, DVD player, Set Top Box, etc. -
Page 11: Connection To A 4K Ultra Hd Tv
Connection to a 4K Ultra HD TV This system cannot pass-through the 4K content of a 4K compatible equipment to a 4K Ultra HD TV. However, you can connect the system to a 4K Ultra HD TV to enjoy the 4K content. Connect both ends HDMI IN (ARC) HDMI IN (4K) -
Page 12: Ac Mains Lead Connection
≥ If you peel off the adhesive tape, the surface may become damaged and exposed adhesive may remain. Once you have confirmed the TV is operating correctly, secure it by attaching the adhesive tape. ≥ The supplied IR Blaster is only compatible with Panasonic TVs. ∫ Placement example... -
Page 13: Step 2 Placement
Professional installation is required. The installation should never be done by any other than a qualified installation specialist. PANASONIC DISCLAIMS ANY PROPERTY DAMAGE AND/OR SERIOUS INJURY, INCLUDING DEATH RESULTING FROM IMPROPER INSTALLATION OR INCORRECT HANDLING. ≥ Be sure to install the main unit as indicated within this operating Instructions. -
Page 14: Selecting The Placement Method
Selecting the placement method Choose a placement method that suits you best. When placing the main unit in a rack or on a table ≥ Place the main unit on a flat and horizontal surface. Page 15 When attaching the main unit to a wall ≥... -
Page 15: When Placing The Main Unit In A Rack Or On A Table
When placing the main unit in a rack or on a table Additionally required accessories (commercially available) ≥Fall prevention cord ........................k 2 ≥Screw eyes (to attach the fall prevention cord) ................k 2 ≥ Use commercially available screws that are capable of supporting over 26 kg. ≥... -
Page 16: When Attaching The Main Unit To A Wall
When attaching the main unit to a wall The main unit can be wall mounted using the supplied wall mount brackets, etc. Make sure that the screw used and the wall are strong enough to support the weight of at least 26 kg. The screws and other items are not supplied as the type and size will vary with each installation. - Page 17 Attach the wall mount brackets to the main unit. A Wall mount bracket (supplied) B Screw (supplied) Drive a screw into the wall. ≥ Use the measurements indicated below to identify the screwing positions on the wall. ≥...
- Page 18 Fit the main unit securely onto the screw(s). DO NOT ≥ Move the speaker so ≥ In this position, the that the screw is in speaker will likely fall this position. if moved to the left or right. Secure the cord to the wall. ≥...
-
Page 19: Step 3 Wireless Connections
≥ If “PAIRING” is indicated on the display, go to step 3. Press and hold [ ] until “PAIRING” is indicated on the display. Active subwoofer on/off button [B Í C I] Use this button to turn the active subwoofer on Select “SC-HTB680” from the and off. Bluetooth device’s Bluetooth ®... -
Page 20: Remote Control Code
Bluetooth device. ® “REMOTE 2” is indicated on the display. – Enter “Panasonic Music Streaming” in the search box of Google Play to search, and then select ∫ To set the code to “REMOTE 1” “Panasonic Music Streaming”. -
Page 21: Using This System
Using this system Operations ∫ To adjust the volume of this system Preparation Press [i VOL j]. ≥ Volume range: 0 to 100 ≥ Turn on the active subwoofer. ≥ Turn on the TV and/or connected device. ∫ To mute the sound Press [MUTE]. -
Page 22: 3D Sound
5.1ch. STEREO: Play any source Adding to the Dolby Virtual of sound in stereo. Speaker effect, Panasonic has applied its own sound You can adjust the amount field controlling technology to of bass. This system 3D surround... -
Page 23: Audio Format
Enhance the harmonic Audio format bass effect. H.BASS You can view the current audio format. The 3D Clear Mode Dialog Press and hold [SOUND] for more than 4 sec. feature creates a sound DOLBY Dolby Digital is the audio field similar to the sound DIGITAL source. -
Page 24: Setup Menu
Setup menu Change the Bluetooth ® connection link mode to suit the connection type. Press [SETUP] repeatedly to select Make sure to disconnect the setup item. the current connected LINK device (“BLUETOOTH Press [3, 4] repeatedly to select MODE READY” is indicated on the the desired setting and then press display). -
Page 25: Linked Operations With The Tv (Viera Link "Hdavi Control Tm ")
HDMI CEC cannot be guaranteed. ∫ Automatic lip-sync function ≥ This unit supports “HDAVI Control 5” function. “HDAVI Control 5” is the standard for Panasonic’s HDAVI (for HDAVI Control 3 or later) Control compatible equipment. This standard is compatible Delay between audio and video is automatically with Panasonic’s conventional HDAVI equipment. -
Page 26: Troubleshooting
Troubleshooting Reference The main unit is automatically switched to Before requesting service, make the following standby mode. checks. If you are in doubt about some of the “AUTO POWER DOWN” function is on. check points, or if the solutions indicated in the The main unit will automatically switch to standby following guide do not solve the problem, consult mode when no signal is input and no operation is... - Page 27 In 9, 10) this case, turn VIERA Link off. ( ≥ If the main unit is connected to a Panasonic TV and turned on using the remote control or the Bluetooth ®...
-
Page 28: Active Subwoofer
Active Subwoofer There is no audio. The power of the main unit turns off No power. automatically. Ensure the AC mains lead of the active subwoofer (When the main unit detects a problem, a safety is connected properly. measure is activated and the main unit automatically switches to standby mode.) After turning the subwoofer on, it immediately ≥... -
Page 29: About Bluetooth
® arise due to radio wave interference if the main Bluetooth SIG, Inc. and any use of such marks by Panasonic unit is located too close to other Bluetooth Corporation is under license. Other trademarks and trade ®... -
Page 30: Specifications
Specifications AMPLIFIER SECTION GENERAL RMS output power: Dolby Digital Mode Power consumption Front ch (L, R ch) Main unit 70 W per channel (6 ≠), 1 kHz, 10 % THD 36 W Centre ch (C ch) 70 W per channel (6 ≠), 1 kHz, 10 % THD Active subwoofer Subwoofer ch 23 W... - Page 31 SPEAKER SECTION Front speakers (Built-in) Full range 6.5 cm cone type k1/ch Centre speaker (Built-in) Full range 6.5 cm cone type k1 Active subwoofer Woofer 16 cm cone type k1 WIRELESS SECTION Wireless module Frequency Range 2.40335 GHz to 2.47735 GHz No.
- Page 32 [For]the]United]Kingdom]and]Ireland] Declaration of Conformity (DoC) Hereby, “Panasonic Corporation” declares that this product is in compliance with the essential requirements and other relevant provisions of Directive 1999/5/EC. Customers can download a copy of the original DoC to our R&TTE products from our DoC server: http://www.doc.panasonic.de...
-
Page 33: Limited Warranty (Only For Australia)
Panasonic Warranty 1. The product is warranted for 12 months from the date of purchase. Subject to the conditions of this warranty Panasonic or its Authorised Service Centre will perform necessary service on the product without charge for parts or labour, if in the opinion of Panasonic, the product is found to be faulty within the warranty period. - Page 34 RQT9916...
- Page 35 RQT9916...
- Page 36 ≥ Or go on line through our Internet Accessory ordering application at www.pas-europe.com. ≥ Most major credit and debit cards accepted. ≥ All enquiries transactions and distribution facilities are provided directly by Panasonic UK. ≥ It couldn’t be simpler! ≥ Also available through our Internet is direct shopping for a wide range of finished products. Take a browse on our website for further details.
Need help?
Do you have a question about the SC-HTB680 and is the answer not in the manual?
Questions and answers
Can I have the correct code to set up my new remote control please? Thank you