Advertisement
Advertisement
Table of Contents

Related Manuals for StreetStrider ETX 8r

Summary of Contents for StreetStrider ETX 8r
- Page 1 ETX 8r / ETX 3r OWNER’S MANUAL...
- Page 2 RECORDS Please record your StreetStrider model name (ETX 8r or ETX 3r), serial number found on the bottom bracket and other information below. Please retain your sales receipt as proof of purchase and keep with this information. MODEL NAME_______________________________ SERIAL NUMBER______________________________...
-
Page 3: Table Of Contents
About This Manual Parts Identification Unpacking & Assembly Simple Steps to Learn to Stride Safety Equipment Mechanical Safety Check Limited Warranty Return Policy Sales Affiliate Program 7042 North West Street, Suite 110 Fresno CA 93711 1-800-348-0998 www.StreetStrider.com © June 2010... -
Page 4: About This Manual
IMPORTANT: Failure to read and comply with all assembly, maintenance, safety, and performance requirements and warnings, and unsafe or improper use of the StreetStrider could result in serious injury or death. It is impossible to predict every situation and condition that will occur while riding. -
Page 5: Parts Identification
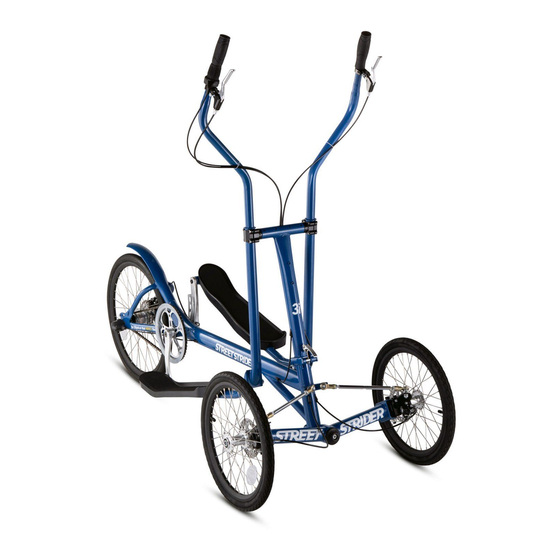
2. Parts Identification The parts of the StreetStrider ETX 8r and ETX 3r are listed and labeled in the following table and figures. Table 2-1. StreetStrider Parts List. Parts are numbered in subsequent figures. SYSTEM PART # PART DESCRIPTIONS FRAME... - Page 6 2. Parts Identification Table 2-1 (con’t). StreetStrider Parts List. Parts are numbered in subsequent figures. SYSTEM PART # PART DESCRIPTIONS DRIVE Internal gear hub Twist shifter clamp, 3 mm hex screw Shifter cable adjuster Gear indicator Brake cable adjuster Brake lever clamp, 5 mm hex screw...
- Page 7 2. Parts Identification Figure 2-1. StreetStrider Side View. Refer to Table 2-1 for part numbers and descriptions.
- Page 8 2. Parts Identification Figure 2-2. StreetStrider Hand Control System. Refer to Table 2-1 for part numbers and descriptions.
- Page 9 2. Parts Identification Figure 2-3. StreetStrider Front End. Refer to Table 2-1 for part numbers and descriptions.
- Page 10 2. Parts Identification Figure 2-4. StreetStrider Rear End. Refer to Table 2-1 for part numbers and descriptions.
-
Page 11: Unpacking & Assembly
Opening the Box The StreetStrider comes in a large box (Fig. 3-1a) with a set of holes for handles near the top, one on either side, to show which side is up. Open the box with a sharp edge to cut the top flap. Notice how the two end flaps secure each end of the folded StreetStrider inside (Figs. - Page 12 (con’t) Lift the folded StreetStrider out of the box, close the box flaps, and set the unit on top of the box as shown (Fig. 3-2a). IMPORTANT: Save the box and the packing material - it must be used to repack the StreetStrider for any returns. Remove the packing material and ties to free the wheels from the frame (Fig.
- Page 13 3. Unpacking & Assembly To attach the left inboard rod end on the aluminum steering linkage to the head tube bracket, remove the nut from the rod end stud (Fig. 3-4a), insert the nut into the slot on the back side of the bracket (Fig. 3-4b), push the rod end stud into the hole to contact the nut, and screw the stud in tight using the 12 mm open end wrench (Fig.
- Page 14 (Fig. 3-8c). Once the brake levers are positioned, rotate the twist shifter so that the gear number is facing the rider, then tighten. If you own an ETX 3r, use the next section to install the rear wheel. If you own an ETX 8r, use the section following this one to install the rear wheel.
- Page 15 3. Unpacking & Assembly Remove ties and packing material from the rear triangle (Fig. 3-9a) and from the chain (Fig. 3-9b). Figure 3-10. Installing the Rear Wheel – ETX 3r (con’t) Thread the shifter cable along the frame (Fig. 3-10a) and through the hanging loop of chain (Fig. 3-10b), and secure the cable to the cable boss (Fig.
- Page 16 5 mm hex wrench (Fig. 3-13c). Finally, close the quick release rear brake and check that the brake shoes contact the rear rim on the side face. Adjust if necessary. Installing the Rear Wheel – ETX 8r Figure 3-14.
- Page 17 Figure 3-15. Installing the Rear Wheel – ETX 8r (con’t) With the wheel partly inside the frame, thread the chain around the hub sprocket (Fig. 3-15a). Slide the rear axle into the dropouts so that the non-turn washers (black on right side and gray on left) are on the outer side of the frame just under the chrome hub nuts.
- Page 18 Figure 3-18. Rotating the Crank Arms In order to fold the StreetStrider for packing and transporting, one crank arm needs to be rotated 180 degrees so both crank arms are in the same position. Therefore in order to restore the crank arms to the correct position for riding, the left crank arm has to be rotated 180 degrees relative to the right crank arm.
- Page 19 3. Unpacking & Assembly IMPORTANT: For the needed leverage, use a 8 mm hex wrench or socket wrench with 8 mm hex bit with at least a 6 inch long handle. Also, make sure that some grease is present on the square spindle to facilitate crank arm installation and removal when folding the ETX. The Park Tool company provides torque specifications for screws, bolts, and nuts on bicycle parts http://www.parktool.com/repair/ readhowto.asp?id=88.
- Page 20 To check the front brakes, stand in front of the StreetStrider, facing it, and pull it towards you. Then squeeze the left grip brake lever, first lightly then harder (Fig. 3-20b). If the vehicle stops moving without pulling to one side, then the front brakes are adjusted correctly.
- Page 21 Insert the second screw and finger tighten. When all screws are started, tighten them with the hex wrenches. To install the bottle cage that comes with the ETX 8r and the ETX 3r, use the 2 hex screws in the box containing the cage on...
- Page 22 3. Unpacking & Assembly Folding the ETX for Transportation or Storage Figure 3-23. Folding the ETX for Transportation or Storage To fold down the ETX head tube and secure for transportation or storage, reverse the unfolding procedure. Place the main frame rectangular packing foam piece over the forward section of the main frame (Fig.
- Page 23 3. Unpacking & Assembly Figure 3-25. Folding the ETX for Transportation or Storage (con’t) Using the 6 mm hex wrench on the black cap screw and the 5 mm hex wrench on the silver barrel nut, loosen the lower screw 1 turn. Then unscrew and remove the upper and middle screws in the folding joint of the head tube (Fig. 3-24c). When the second screw is ready for removal, hold the head tube above the joint, remove the screw (Fig.
-
Page 24: Simple Steps To Learn To Stride
Step 5: Become Familiar with the Brakes and Grip Shifter In the USA, your StreetStrider comes with a grip shifter and a rear brake lever at the top of the right strider pole, and a front brake lever at the top of the left strider pole. These brake levers may be swapped around in other countries according to the specific legal requirements of each country. - Page 25 Step 8: Cruise a Bit Before you go out on the road or bike path, it is a good idea to practice using your StreetStrider in a safe area. We recommend practicing right and left turns, braking and gear shifting using these instructions.
-
Page 26: Safety Equipment
ANSI approved helmet whether the law requires it or not. Most serious vehicular injuries involve head injuries that might have been avoided if the rider had worn a helmet. The online StreetStrider store or your local dealer both have a variety of attractive helmets, and can recommend one to suit your needs. - Page 27 Front and rear lights are not standard equipment on this StreetStrider. If you intend to ride at any time under poor visibility conditions, you must have front and rear lights and reflectors that are adequate for those riding conditions.
- Page 28 Even if you yourself have excellent night vision, many of the people with whom you’re sharing the road don’t. A StreetStrider, like any object, is more difficult for motorists and pedestrians to see at dusk, at night, or at other times of poor visibility.
- Page 29 • Any reflective device or light source that moves will help you get the attention of approaching motorists, pedestrians and other traffic. • Make sure your clothing or anything you may be carrying on the StreetStrider does not obstruct a reflector or light. • While striding at dusk or at night, stride slowly and avoid areas of heavy traffic, dark areas, and roads with speed limit over 35 mph. Avoid road hazards. If possible, ride on routes already familiar to you.
-
Page 30: Mechanical Safety Check
Lift the rear wheel off the ground by two or three inches, then let it bounce on the ground. If anything sounds, feels or looks loose, do a quick visual and tactile inspection of the whole StreetStrider for any loose parts or accessories. If found, secure them. - Page 31 WARNING: Do not engage in any activity that exceeds your riding ability and skill. Practice new riding skills in a safe controlled environment. WARNING: Keep hands, fingers and feet away from all moving parts while the StreetStrider is in motion, including the chain, chain ring, tire, wheels, brakes and brakes cables.
-
Page 32: Limited Warranty
7. Limited Warranty The specific warranty covering your StreetStrider is governed by the law of the state or country in which it was purchased, and applies only to mobile elliptical devices purchased from a StreetStrider Authorized Dealer. Frames (Frame, Strider Skis, Strider Poles) StreetStrider frames are warranted by StreetStrider International LLC, 204 West Spear Street, Carson City, Nevada 89703, against manufacturing defects in materials and/or workmanship for a period of three years from the date of original purchase. - Page 33 For any warranty claim to be considered, the StreetStrider must be returned to a StreetStrider Authorized Dealer on the same continent on which it was purchased. The StreetStrider must be in assembled condition or appropriatley packed (See 8. Return Policy) and accompanied by the original dated sales receipt for the StreetStrider. Be sure to keep your receipt in a safe place.
-
Page 34: Return Policy
* If the StreetStrider product is delivered in a damaged condition as a result of faulty shipping, the customer should contact StreetStrider at shipping@StreetStrider.com or 1-800-348-0998 EXT 105 for return instructions. The customer should also notify the shipper. -
Page 35: Sales Affiliate Program
9. Sales Affiliate Program • Would you like to make money while getting exercise? • Become a StreetStrider Sales Affiliate today and start to earn while you burn! • You don’t need to own a retail store. • The only product you have to buy is a StreetStrider for yourself. • Just visit our website www.streetstrider.com, click on Sales Affiliates, fill out and submit the form provided, and we’ll contact you about becoming a StreetStrider Sales Affiliate. - Page 36 7042 North West Street, Suite 110 Fresno CA 93711 1-800-348-0998...
Need help?
Do you have a question about the ETX 8r and is the answer not in the manual?
Questions and answers