Hotpoint GC640IX Operating Instructions Manual
Hide thumbs
Also See for GC640IX:
- Operating instructions manual (16 pages) ,
- Operating instructions manual (12 pages)
Table of Contents
Advertisement
Quick Links
Advertisement
Table of Contents

Related Manuals for Hotpoint GC640IX


Summary of Contents for Hotpoint GC640IX
-
Page 1: Table Of Contents
GC640IX GC640WH GC640BK GC751TX GC760FX GC750X GC730RTX GC640TIX GC750TIX GC641IX GCD641IX GCA641IX GCB641X GCB640X GCB641IK GCL640TK GCL641TX GC640TK GCB751X English Operating Instructions Contents Operating Instructions,1 Warnings,2 Assistance,3 Description of the appliance,4 Installation,5 Start-up and use,10 Precautions and tips,11 Maintenance and care,12... -
Page 2: Warnings
CAUTION: In case of hotplate glass breakage: - shut immediately off all burners and any Warnings electrical heating element and isolate the appliance from the power supply WARNING: The appliance and its - do not touch the appliance surface. accessible parts become hot during use. Care should be taken to avoid touching heating elements. -
Page 3: Assistance
Assistance Communicating: • The type of problem encountered. • appliance model (Mod.) • serial number (S/N) This information is found on the data plate located on the appliance and/or on the packaging. PLEASE PHONE US TO REGISTER YOUR APPLIANCE AND ACTIVATE YOUR PARTS GUARANTEE ON 08448 24 24 24... -
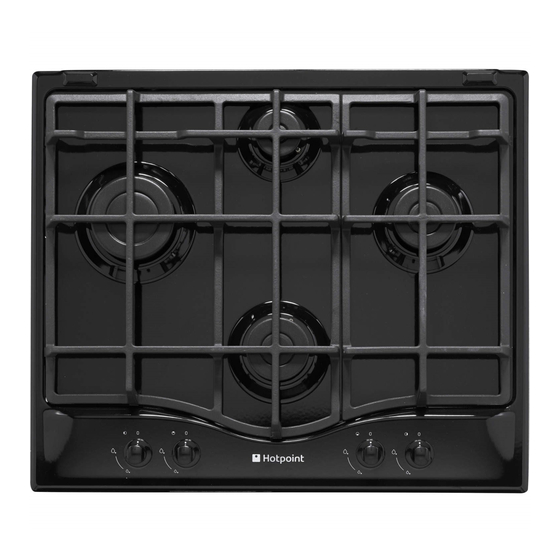
Page 4: Description Of The Appliance
Description of the appliance Overall view 1 Support Grid for COOKWARE 2 GAS BURNERS 3 Control Knobs for GAS BURNERS 4 Ignition for GAS BURNERS* 5 SAFETY DEVICES* • GAS BURNERS differ in size and power. Use the diameter of the cookware to choose the most appropriate burner to cook with. -
Page 5: Installation
Installation partially or completely full, must not be installed or stored in rooms or storage areas that are below ground level (cellars, etc.). It is advisable to keep only the cylinder ! Before operating your new appliance please read this being used in the room, positioned so that it is not subject instruction booklet carefully. -
Page 6: Electrical Connection
Electrical connection Hook fastening diagram ! THIS APPLIANCE MUST BE EARTHED. The hob is designed to work with alternating current, the supply voltage and frequency indicated on the rating plate (situated under the hob). Make sure that the local supply voltage corresponds to the voltage indicated on the rating plate. -
Page 7: Gas Connection
Gas connection internal burner has a nozzle, the external burner has two (of the same size). Replace the nozzle with models The appliance should be connected to the main gas supply suited to the new type of gas (see table 1). or to a gas cylinder in compliance with current national 3. - Page 8 5. Once the adjustment has been made, replace the seals on the by-passes using sealing wax or a similar substance. ! If the appliance is connected to liquid gas, the regulation screw must be fastened as tightly as possible. ! Once this procedure is finished, replace the old rating sticker with one indicating the new type of gas used.
-
Page 9: Burner And Nozzle Specifications
Propane P.C.S. = 50.37 MJ/Kg Butane P.C.S. = 49.47 MJ/Kg Natural P.C.S. = 37.78 MJ/m³ GC730RTX GC750X GC751TX GC760FX GC750TIX GC640IX GC640TIX GC640WH GC640BK GC641IX PLEASE PHONE US TO REGISTER YOUR APPLIANCE AND ACTIVATE YOUR PARTS GUARANTEE ON 08448 24 24 24... -
Page 10: Start-Up And Use
Start-up and use starts when the knob is pressed in. Since the burner is equipped with a safety device, after lighting the burner keep the knob pressed in for about ! The position of the corresponding gas burner or electric 2-3 seconds to allow the device which keeps the flame lit hotplate* is shown on every knob. -
Page 11: Precautions And Tips
Practical Advice on Using the Half Fish- “Positioning” the appliance. Kettle Burner * • These instructions are only valid for the countries whose symbols appear in the manual and on the serial number plate. The two “Half Fish-Kettle” burners, are eliptic in form and can •... -
Page 12: Maintenance And Care
and Electronic Equipment (WEEE), requires that old household electrical appliances must not be disposed Troubleshooting of in the normal unsorted municipal waste stream. Old appliances must be collected separately in order to It may happen that the appliance does not function properly optimise the recovery and recycling of the materials they or at all. - Page 13 PLEASE PHONE US TO REGISTER YOUR APPLIANCE AND ACTIVATE YOUR PARTS GUARANTEE ON 08448 24 24 24...
- Page 14 PLEASE PHONE US TO REGISTER YOUR APPLIANCE AND ACTIVATE YOUR PARTS GUARANTEE ON 08448 24 24 24...
-
Page 15: After Sales Service
After Sales Service No one is better placed to care for your Hotpoint appliance during the course of its working life than us – the manufacturer. Essential Contact Information Hotpoint Service We are the largest service team in the country offering you access to 400 skilled telephone advisors and 1000 fully qualified engineers on call to ensure you receive fast, reliable, local service. -
Page 16: Guarantee
5 Year Parts Guarantee Hotpoint also offers you a free 5 year parts guarantee. This additional guarantee is conditional on you registering your appliance with us and the parts being fitted by one of our authorised engineers. There will be a charge for our engineer’s time.
Need help?
Do you have a question about the GC640IX and is the answer not in the manual?
Questions and answers