Table of Contents
Advertisement
Advertisement
Table of Contents

Related Manuals for Barnes & Noble NOOK GlowLight


Summary of Contents for Barnes & Noble NOOK GlowLight
- Page 2 , LendMe , Lifetime Library ® ® ® More In Store , NOOK , NOOK Book , NOOK Friends™, NOOK GlowLight™, NOOK Kids , NOOK News- ® ® ® ® stand™, NOOK Press™, NOOK Store , NOOK Study , Read In Store , and the NOOK logos are trademarks of ®...
-
Page 3: Table Of Contents
Table of Contents Introduction ..............................7 Contact Us ......................................7 Getting to Know Your NOOK ................................ 7 Registering Your NOOK ................................11 Power and Charging ..................................13 Safety and Care ....................................16 Caring for Your NOOK .................................. 17 Locking and Unlocking Your NOOK ............................. 18 Using Gestures to Control Your NOOK .................... - Page 4 Searching Your Library ..................................56 Viewing and Sorting the Contents of Your Library ........................57 Organizing Your Library on Shelves ............................... 58 Archiving Books and Periodicals ..............................59 Unarchiving Books and Periodicals ..............................59 Transferring Files from Your Personal Computer to Your NOOK ....................60 Using the LendMe Program ........................
- Page 5 Configuring Search ..................................90 Using Your NOOK at Wi-Fi Hotspots ......................91 Wi-Fi Networks in Barnes & Noble Stores ........................... 91 AT&T Wi-Fi Hotspots ..................................91 Unsecured Wi-Fi Networks ................................91 Secured Wi-Fi Networks ................................91 Updating the Software on Your NOOK ..................... 92 Tips and Troubleshooting ..........................
-
Page 7: Introduction
Introduction This User Guide is designed to help you get the most enjoyment out of your NOOK GlowLight™. Contact Us If you have questions about your NOOK that this guide doesn’t answer, be sure to visit the NOOK online support ®... -
Page 8: Power Button
The picture below shows the features on the front of your NOOK. Power Button GlowLight ® Touchscreen E Ink ® Display NOOK Button The front of your NOOK. Power Button The power button for your NOOK is located on the left edge, near the upper left corner. Press and hold the button for 2 seconds to turn on your NOOK. - Page 9 If your NOOK is on, you can also press and hold the NOOK button for 2 seconds to turn on or off GlowLight, the light built into the frame of your NOOK. When GlowLight is on, you can read your NOOK’s touchscreen E Ink display even in areas with low lighting.
-
Page 10: Getting Started With Your Nook
Getting Started with Your NOOK The first time you use your NOOK, you’ll need to go through a short set-up process that will take about 5 to 10 min- utes. Make sure that you’re in an area that has a Wi-Fi connection (a wireless connection to the Internet), because ®... -
Page 11: Registering Your Nook
Registering Your NOOK NOTE: You will need to connect to a Wi-Fi network to complete your registration. Read the Welcome screen. Tap the Next button. Your NOOK displays its Terms of Service. Please read the Terms of Service for your device and the NOOK Store , and the Barnes &... - Page 12 Read the message that your NOOK displays about GlowLight. Press the NOOK button and hold it for 2 seconds to turn on GlowLight. GlowLight turns on, and a Next button appears in the lower right corner of the screen. Tap the Next button. A new screen tells you that you’re ready to get started exploring the features of your NOOK.
-
Page 13: Power And Charging
Power and Charging Turning Your NOOK On and Off Turning On Your NOOK To turn on your NOOK, press the power button on the left side of your NOOK. Hold the button down for 2 sec- onds and release it. Your NOOK starts up. - Page 14 Do not use a power adapter and cable intended for other models of NOOK Tablets. Use only a power adapter and cable intended for use with NOOK GlowLight. When connecting your NOOK to a personal computer, the computer must be a UL listed, approved product.
- Page 15 NOTE: Once your NOOK has enough power to turn on, you can see how much power remains in the battery by checking the battery charge indicator in the right corner of the Status Bar. NOTE: Some personal computers must be turned on in order to charge other devices through USB ports. When these computers are asleep or turned off, their USB ports are inactive, and no charging takes place.
-
Page 16: Safety And Care
• Avoid high temperatures for charging, use, and storage. For more information, see “Temperature Ranges.” • Charge the battery half way before storing your NOOK for a week or more. Safety and Care This section explains important information about safety and about caring for your NOOK. Water CAUTION: Your NOOK, cables, and adapters are not waterproof. -
Page 17: Caring For Your Nook
Electronic Equipment If you are around sensitive electronic equipment–for example, if you are in a hospital–ask if you may use your NOOK. Settings such as intensive care units might forbid the use of any electronic device, with or without network- ing. -
Page 18: Locking And Unlocking Your Nook
You can extend your NOOK’s coverage by purchasing a two-year B&N Protection Plan to help safeguard NOOK against spills, drops, and other accidents. The B&N Protection Plan can only be purchased together with a NOOK. Information about the B&N Protection Plan can be found on the Web page listed above. NOTE: To ensure the highest quality of reading, your NOOK has an anti-glare film already installed. -
Page 19: Using Gestures To Control Your Nook
Using Gestures to Control Your NOOK Your NOOK puts great reading material right at your fingertips. To read that material, to share it, to rate it, and so on, you’ll use your fingers in different ways. Your NOOK recognizes these different gestures: •... -
Page 20: Press And Hold
Press and Hold Pressing and holding means touching your finger to the screen and holding it there for 2 seconds. In many situations, pressing and holding causes your NOOK to open menu at the bottom of the screen. The menu offers you choices about the image your finger is resting on. -
Page 21: Scroll
Scroll Slide your finger up or down the screen to scroll through any list displaying up and down arrows at the bottom of the screen. A scroll gesture is like a vertical swipe. You can scroll up and down through shelves of books and periodicals. Barnes &... -
Page 22: The Quick Nav Bar
The Quick Nav Bar The Quick Nav Bar is a row of three buttons at the bottom of the Home Screen. If your NOOK is turned on and active, you can make the Quick Nav Bar and the Home Screen appear by pressing the NOOK button below the touchscreen. -
Page 23: The Status Bar
The Status Bar A Status Bar runs along the top of the NOOK touchscreen. The Status Bar looks like this when GlowLight is turned The Status Bar with GlowLight turned on. The Status Bar shows a different lightbulb icon when GlowLight is turned off: The Status Bar with GlowLight turned off. -
Page 24: Swiping Left On The Status Bar
Swiping Left on the Status Bar If you swipe left across the Status Bar, your NOOK goes back to the feature or function you were previously using. Barnes & Noble NOOK User Guide... -
Page 25: Glowlight
GlowLight Your NOOK includes GlowLight, a built-in light that enables you to read even in dim lighting conditions. Turning GlowLight On or Off There are several ways you can turn GlowLight on or off. Turning GlowLight On or Off with the NOOK Button To turn GlowLight on or off, press and hold the NOOK button for 2 seconds. - Page 26 Once you have adjusted the brightness of GlowLight to your satisfaction, continue with your reading or shop- ping. • To close the Quick Settings window, tap anywhere outside it on the screen. • To return to the main Settings screen from the GlowLight settings screen, tap the left arrow in the upper left corner of the screen.
-
Page 27: The Home Screen
The Home Screen The Home screen gives you easy access to the books and periodicals you have recently read or purchased. In the top portion of the screen, you’ll see the cover of the most recent books or periodicals you’ve been reading. The Reading Now panel has room for three titles. - Page 28 The picture below shows an example of a details page about a recommended book. The Details page for a book. Returning to the Home Screen You can return to the Home screen at any time by pressing the NOOK button (the raised button in the shape of the NOOK logo) on the lower front of your NOOK.
-
Page 29: Reading Books On Your Nook
Reading Books on Your NOOK You can read books, magazines, and newspapers on your NOOK. You can make notes about what you’re reading, highlight and annotate favorite passages, and share your thoughts and recommendations with friends on social sites such as Facebook. Your NOOK makes reading books fun. -
Page 30: The Reading Tools Menu
The Reading Tools Menu The Reading Tools menu makes it easy to move through a book, to search for content, share content, and adjust the display of text. To call up the Reading Tools menu, tap anywhere in the center of the page or tap on the small dark arrow at the bot- tom of the page. - Page 31 Reading Tools: content Tap on the content icon in the Reading Tools to open a window with three tabs: • Chapters - a Table of Contents listing chapters or sections • Notes & Highlights - list of all the passages you have highlighted or written notes about •...
- Page 32 Tapping on the Notes & Highlights tab displays the Notes & Highlights screen. The Notes & Highlights screen. The Notes & Highlights screen lists all the passages you have highlighted or written notes about. Each passage is iden- tified by its page number and opening line. If the list of notes and highlights runs longer than one screen, you can tap the arrows at the bottom of the screen to scroll down and up through the list.
- Page 33 Tapping on the Bookmarks tab displays the Bookmarks screen. Here’s an example of a Bookmarks screen. The Bookmarks screen. For each bookmarked page, the screen lists the page number and either the chapter number (if you bookmarked the first page of a chapter) or the first line of text that appears on the page (if you bookmarked any page other than the first page of a chapter).
- Page 34 Reading Tools: goto Tap on the goto icon in the Reading Tools to jump to another page in the book. When you tap on goto, a navigation dialog box appears at the bottom of the screen, as shown below. The goto dialog box. The dialog box includes a slider bar that shows your current position in the book.
- Page 35 If instead of moving to the new page, you want to jump back to the previous page you had navigated from, tap the Go Back button in the goto dialog box. You can tap the Go Back button repeatedly to through several previous loca- tions.
- Page 36 Reading Tools: find Tap on the find icon in the Reading Tools to search for a word or phrase in the book you’re reading. When you tap on find, a keyboard appears on the screen. Type a word or phrase you want to search for in the book, then tap the search button in the lower right corner of the screen.
- Page 37 The image below shows an example of search results. Search results within a book. Barnes & Noble NOOK User Guide...
- Page 38 If the word or phrase you searched for appears more than once in the book, your NOOK displays a search naviga- tion tool at the bottom of the screen when you jump to the location of a search result. This toolbar includes a forward arrow and a backward arrow for moving from one appearance of the word or phrase to another.
- Page 39 Reading Tools: text Tap on the text icon in the Reading Tools to open a window for adjusting the font, the font size, line spacing, and margin size. The Text dialog box. The Text dialog box lets you pick: • a text size •...
- Page 40 When you have finished making changes, close the dialog box either by tapping on the X in the upper right corner of the dialog box or by tapping anywhere on the page of the NOOK book you are reading. Reading Tools: more Tap on the more icon in the Reading Tools to open a page with details about the book, along with buttons for opening Social features.
- Page 41 Tapping the Share button opens a dialog box like that shown below. (The contents of this dialog box may vary, depending on whether you are reading a book you own or a sample and whether the book is eligible for lending.) The Share dialog box.
- Page 42 Archiving Books and Periodicals To save storage space on your NOOK, you can archive books and periodicals you’re not currently reading. Archiving keeps a copy of a book in your account on the Barnes & Noble Web site, while removing all but the most basic infor- mation about the book (such as its cover, title, author, and description) from your NOOK.
- Page 43 Using Bookmarks Adding a Bookmark A bookmark marks a location in a book. In a printed book, a bookmark helps you find the page where you left off reading. You can set bookmarks in books to make it easy to jump to specific locations You can set as many bookmarks as you like.
- Page 44 In the Contents pane, tap the Bookmarks tab. Your NOOK displays a list of all the bookmarks in the book. To visit any bookmarked passage, tap on its bookmark in the list. To close the bookmark list without visiting a bookmark, tap the Close button in the upper right corner of the Con- tents window.
- Page 45 Selecting Text to Look up Words, Add Highlighting or Notes, and Share Quotes with Friends You can select a word or a passage of text. Once you have selected a word, you can look it up in a dictionary. You can also select words or passages for highlighting, making notes, or sharing through email or social media networks such as Facebook.
- Page 46 Changing the Selection from a Word to a Passage To select an entire passage, rather than just a word, select the word that you want to have at the beginning or end of the selected passage and drag the vertical bar that’s closest to the direction in which you want to extend the selec- tion.
- Page 47 Looking Up Words in the Dictionary It’s easy to look up information about a word or topic when you’re reading. Looking Up a Word in the Dictionary Your NOOK includes the Merriam-Webster’s Collegiate Dictionary, Eleventh Edition. ® To look up a word in the dictionary, do this: Press and hold on a word to select it.
- Page 48 Sharing Quotes through Social Media and Email You can share a highlighted passage with friends through email, Facebook, or Twitter. NOTE: Before you can share quotes through Facebook or Twitter, you need to link your NOOK to your Facebook or Twitter account. Use the Social settings page to link your NOOK to social sites. On the Quick Nav Bar, tap Settings, and then tap the Social menu choice to open the Social settings page.
- Page 49 Viewing a Note To open a note and read it, tap the note icon in the margin. When you’re done viewing the note, you can close the note window by tapping the X in the upper right corner of the window.
- Page 50 Tap the On/Off switch labeled “Notes & Highlights.” Tap the switch On to display notes and highlights, or tap it off to hide notes and highlights. Sharing a Quote If you have entered contacts in your NOOK or linked your NOOK to Facebook or Twitter, you can share quotations from the book you’re reading with your friends.
- Page 51 Tap Next. Fill in the form to finish sharing the quote. • If you opted to share the quote with contacts, you will see an email form with a Select Contacts but- ton. Tap the button to see a list of your contacts. Select the contacts with whom you want to share the quote.
- Page 52 NOTE: Some publishers define recommended settings for their eBooks; other publishers do not. If the Pub- lisher Settings toggle switch is grayed out, the publisher of the eBook you are reading has not defined recommended settings. All other page controls in the dialog box appear grayed out. To change the appearance of the book, do this: Tap the center of the page to make the Reading Tools appear.
-
Page 53: Reading Magazines And Newspapers On Your Nook
Reading Magazines and Newspapers on Your NOOK Reading magazines and newspapers on your NOOK is similar to reading books. You use the same gestures--tapping and swiping–to turn pages. You have access to the same Reading Tools, such as Contents and GoTo. Some periodicals may include their own table of contents with live links to specific articles and features, but otherwise the features are similar to the features used in reading books. -
Page 54: The Library On Your Nook
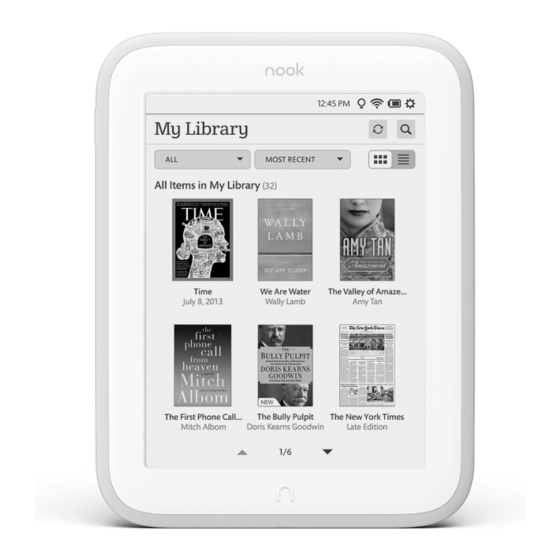
The Library on Your NOOK Your library is where you keep everything you want to read on NOOK. In your library, you will find: • Books you have purchased from the NOOK Store • Newsstand magazines and newspaper you have purchased from the NOOK Store •... - Page 55 The Category Menu The category menu (sometimes called the filter menu) is a pull-down menu in the upper left corner of the Library lets you select the Library contents you want to display. Choices include: • All - shows everything in your Library •...
-
Page 56: The Sync Button
The Sort Menu The sort menu is a pull-down menu that lets you sort the content shown on the screen according to rules such as Most Recent, Title (an alphabetical listing of titles), or Author (an alphabetical listing of authors’ last names). The Sort Menu. -
Page 57: Viewing And Sorting The Contents Of Your Library
Viewing and Sorting the Contents of Your Library Your Library allows you to view and sort your books and periodicals in different ways. You can arrange items in a grid, in horizontal shelves running across the screen, or in various types of lists. You can also sort items by title and by date of publication. -
Page 58: Organizing Your Library On Shelves
• Pre-order: This item is available for pre-order. You can order it now, even though it hasn’t been released, yet. You will be able to read it the moment it is released. • Recommended: A friend has recommended this book or periodical to you. •... -
Page 59: Archiving Books And Periodicals
Tap the checkboxes to the left of book and periodical titles to add or remove items, as you like: • Any item with a checked checkbox is included in the shelf. • Any item with a blank checkbox is excluded. When you have finished adding or removing items, tap Save. -
Page 60: Transferring Files From Your Personal Computer To Your Nook
To unarchive a book or periodical, do this: In the Library, tap the category menu, then tap the Archived menu choice. Your NOOK displays the items you have archived. Double-tap on the cover or title of the book or periodical you want to unarchive. The details page for that item appears. -
Page 61: Using The Lendme Program
Using the LendMe Program Lending and Borrowing Books With Barnes & Noble’s LendMe technology, you can share lendable NOOK Books with any NOOK Friend or any friend who has a NOOK or BN.com account with a valid credit card number. Your NOOK Friend or friend can read the book on any NOOK device or on any NOOK application such as NOOK for Android, NOOK for iPhone ®... -
Page 62: Determining Whether A Book Can Be Lent
Determining whether a Book Can Be Lent Not all books can be lent. Here’s how you can determine whether or not a book is lendable. • Any book eligible for lending has a LendMe badge on its cover. • If your Library includes any books eligible to be lent out, they will appear on the shelf of lendable books in the LendMe section of your Library. - Page 63 To find out which of your friends have lendable books, use the Manage my NOOK Friends™ feature on the Social set- tings screen. NOTE: If you’re enjoying a book sample or a book you’ve borrowed, you can purchase the book at any time. Simply tap the Buy button at the top of any page in the book to purchase the book using your NOOK (or BN.com) account.
-
Page 64: Shopping On Your Nook
Shopping on Your NOOK Introduction NOTE: To access the NOOK Store on your NOOK, you must be connected to a Wi-Fi network. If you are in an area with Wi-Fi access but you are not connected to a network, your NOOK will guide you through the process of connecting. -
Page 65: Purchasing Books, Newspapers, And Magazines
• A display area in the center of the screen presents offers and recommendations from our booksellers. You can swipe left and right to scroll through these offers and recommendations. • POPULAR Lists, such as the NOOK Top 100, appear below the display area. Tap on a list to see its list of books. To learn more about any book or periodical, tap on its cover. -
Page 66: Browsing Lists And Categories
Browsing Lists and Categories To browse lists and categories of books and periodicals, tap the Browse button at the top of the Shop screen. The Shop displays a menu showing lists, such as BN Top 100, and categories such as books, magazines, and newspa- pers. -
Page 67: Buying A Book
Buying a Book Once you’re in the Shop, you can buy any book you see that has a button displaying the book’s price. (If you do not see a button with a price next to a particular book, it’s because you have already purchased the book. A label reading Purchased or Read appears in place of the price button.) Tap on the price button to purchase a book. -
Page 68: Buying A Single Issue Of A Magazine Or Newspaper
Buying a Single Issue of a Magazine or Newspaper To buy a single issue of a newspaper or magazine, do this: Open the details page for the magazine or newspaper you want to buy. Tap the Buy Current Issue button. The button changes to a gray Confirm button. - Page 69 Adding to Your Wishlist To add a book, magazine, or newspaper to your Wishlist, do this: Tap on the book or periodical’s cover to display the details page for the item. On the details page, tap on the checkbox next to the word Wishlist. Your NOOK adds the item to your Wishlist.
-
Page 70: Using Your Nook In A Barnes & Noble Store
Using Your NOOK in a Barnes & Noble Store When you turn on your NOOK in a Barnes & Noble store, your NOOK automatically detects the Wi-Fi network running in the store. Your NOOK displays a special window, asking if you would like to connect to the InStore net- work. -
Page 71: Searching Your Nook
Searching Your NOOK Your NOOK includes a search tool to help you quickly find what you’re looking for. To provide you with the most relevant results possible, your NOOK customizes its searching according to what you were doing when you started the search. -
Page 72: Configuring Your Nook
Configuring Your NOOK Your NOOK gives you full control over many areas of its operations, from Wi-Fi connections to font sizes. Your NOOK’s built-in Settings screen make it easy to adjust the configuration of your NOOK. To access the Settings screens, do this: On the Home screen or the Search screen or in your Library or the NOOK Store, tap the gear icon in the Status Bar to open on the Quick Settings window. -
Page 73: Configuring Glowlight
Configuring GlowLight You can use the GlowLight settings screen to turn GlowLight on and off and to adjust its brightness. (You can also make these adjustments using the Quick Settings window, which is described earlier in this guide.) To configure GlowLight, do this: On the Settings screen, tap GlowLight. -
Page 74: Viewing And Configuring Device Info
Viewing and Configuring Device Info To display device information, do this: On the Settings screen, tap Device Info. Your NOOK displays the Device Info page, which shows: • a Battery charge status bar, showing how much power is left on your battery •... - Page 75 Displaying System Information Tap the About Your NOOK menu choice to display the following information: • Owner, the name of the owner of this NOOK • Account, the email address of the NOOK (or BN.com) account linked to this NOOK •...
-
Page 76: Configuring Wireless Settings
Configuring Wireless Settings The Wireless settings screen provides: • a switch for turning on and off Wi-Fi networking • a list of all the Wi-Fi networks your NOOK has detected Turning Wi-Fi Networking On or Off On the Wireless settings page, tap the Wi-Fi button to change its status from On to Off or from Off to On. NOTE: If Wi-Fi networking is turned off, you will not be able to access the Shop, share information with friends, download new books, magazines, or newspapers, or perform any other action that requires a live net- work connection. -
Page 77: Configuring Screen Settings
Configuring Screen Settings On the Screen settings page, you can: • Change the amount of time your NOOK should wait when no activity is taking place before turning off the screen. • Select the screensaver your NOOK displays when it turns off the screen and goes into sleep mode. To display the Screen settings page, tap the word Screen on the main Settings screen. - Page 78 Adjusting the Screen Timeout When your NOOK has been setting for some amount of time and no activity has taken place (e.g., you haven’t tapped the screen or pressed any buttons), your NOOK turns off its screen to conserve power. When that happens, you can turn on your NOOK again simply by pressing the NOOK button.
-
Page 79: Configuring Time Settings
Configuring Time Settings On the Time settings page, you can control whether your NOOK uses a 12-hour clock or a 24-hour clock. You can also select a Time Zone for your NOOK. The Time Settings screen. To return to the main Settings page, tap the back arrow under the title Settings. Switching to a 24-hour Format To switch to a 24-hour format in which hours after 12 noon are added to the number 12, so that 1:15 p.m. - Page 80 Selecting a Time Zone To select a time zone for your NOOK, do this: Tap the Select Time Zone field on the Time Settings screen. Your NOOK display a screen for selecting time zones. NOTE: By default, the list of time zones includes only time zones in the United States. To see a list of all time zones around the world, tap the checkbox labeled Show all world time zones.
-
Page 81: Configuring The Shop
Configuring the Shop Requiring Your Account Password for Purchases By default, your NOOK asks you to confirm all purchases by tapping a Confirm button. If you like, you can require that your NOOK (or BN.com) account password be entered before your NOOK authorizes a purchase. - Page 82 Clearing Your Wishlist If you have added any items to the Wishlist on your NOOK and now want to clear your Wishlist, tap the Clear Wishlist menu button. If you have not added any items to your Wishlist, this menu choice appears grayed out. Clearing the List of Recently Viewed Items Your NOOK keeps track of the items you have viewed recently in the Shop.
-
Page 83: Configuring Social Features
Configuring Social Features You can use the Social settings screen to manage: • your links to your Facebook, Twitter, and Google accounts • your email contacts • your NOOK Friends • the visibility of your lendable books to your NOOK Friends A NOOK Friend is a friend who has a NOOK (or BN.com) account and an email address in your contacts list, and who has accepted your invitation to connect as a NOOK Friend. - Page 84 Linking Your NOOK to Your Facebook Account You can import your friends on Facebook as contacts for lending books, sharing quotations, and other social activities. You can post a LendMe offer, a quotation, and a recommendation on the wall of a friend. You can also post a quote, a recommendation, and reading status on your own wall.
- Page 85 To link your NOOK to your Google account, do this: On the Social screen in Settings, tap the button labeled Link your Facebook, Twitter, and Google Accounts. Tap the Link Your Account button under the Google logo. Your NOOK displays a Google login screen. Tap in the Email address field.
- Page 86 Inviting Individual Friends to Become NOOK Friends To send an NOOK Friends™ invitation to a user in your Contacts list, do this: On the Manage my Contacts page, tap on the user’s name. Your NOOK displays the Contact Information page for that user. Tap in the checkbox labeled Invite as NOOK Friend.
- Page 87 Managing Your NOOK Friends™ Tap the Manage my NOOK Friends™ menu choice on the Social settings screen to sent and accept NOOK Friends invitations and to see a list of all your current NOOK Friends The Manage my NOOK Friends™ feature includes three tabs under the Manage my NOOK Friends title. The three tabs are: •...
- Page 88 If the Suggested button is not grayed out, you can tap it to see a list of your contacts who already have NOOK (or BN.com) accounts and who can easily become your NOOK Friends. Tap the Invite button next to a contact’s name to send that contact a NOOK Friends invitation.
- Page 89 To control the visibility of individual books, use the Show/Hide toggle switches next to book titles. • Set the toggle to Show to show the book to your NOOK Friends. • Set the toggle to Hide to hide the book from your NOOK Friends. NOTE: Only NOOK Friends can see the books you make visible, and they can see the books only through NOOK Friends software on a NOOK or NOOK Color eReader.
-
Page 90: Configuring Search
Configuring Search You can clear your NOOK’s history of items that you have searched for and selected. To clear the list of search-result shortcuts, do this: On the Settings screen, tap Search. Tap the menu choice Clear recent NOOK searches. A dialog box appears, explaining that this will clear shortcuts to recently searched items. -
Page 91: Using Your Nook At Wi-Fi Hotspots
AT&T Wi-Fi Hotspots Your NOOK will also automatically detect any AT&T Wi-Fi hotspot and ask if you want to connect to it. Access to AT&T Wi-Fi hotspots in the U.S. is free for NOOK GlowLight devices. Unsecured Wi-Fi Networks Your NOOK will detect unsecured Wi-Fi networks close by. An unsecured Wi-Fi network does not require users to enter a password in order to establish a connection. -
Page 92: Updating The Software On Your Nook
When a new software update becomes available, you have the option of downloading it from BN.com to your com- puter at any time and copying it to your NOOK GlowLight using the microUSB cable for your NOOK. To sideload a software update from your personal computer to your NOOK, do this: On your personal computer, download the software update file from the BN.com Web site, and save the file to... - Page 93 Connect your NOOK to your computer using the USB cable that came with your NOOK. A new, removable drive should show up in My Computer (Mac users will see the NOOK drive appear on the desktop or in de- vices). You should also see a “USB Mode” message on your NOOK screen. From your computer, drag and drop the downloaded *.ZIP file onto the main directory of the NOOK drive.
-
Page 94: Tips And Troubleshooting
Tips and Troubleshooting Solving Problems My NOOK is sluggish or unresponsive. Like any computer or electronic equipment, your NOOK periodical needs to be completely powered-off (not just put in sleep mode) to allow it to reset. To power off your NOOK, press and hold the power button for 20 seconds. At that point, the device should be turned-off. - Page 95 The screen is acting as though I’m tapping on it, even though I am not. If your screen is dirty, it might detect touches when none are occurring. This problem can occur on any touchscreen device. Turn off your NOOK, and wipe the screen clean with a soft, dry cloth. Pay particular attention to clear out or gently blow out any dust or dirt from the small lip around the edges of the display.
-
Page 96: Appendix A: Page Numbering And File Formats
Appendix A: Page Numbering and File Formats When you read a book or periodical on your NOOK, you’re reading the same words that appear in the paper edi- tion of the book or periodical. In most books, the page number that appears at the bottom of the screen is the page number you would see if you were reading the printed version of the same book. -
Page 97: Appendix B: International Use And Languages
Appendix B: International Use and Languages This chapter summarizes information about using your NOOK outside of the United States and explains your NOOK’s support of languages. Using Your NOOK Abroad Your is designed for use in the United States and United States territories. You can use it to read anything NOOK already on your NOOK when travelling anywhere in the world. - Page 98 Languages Your has fonts that support languages based on a Latin character set for reading eBooks and other digital NOOK content, when fonts are not embedded as part of the eBook or digital content file. Examples of supported languages include: Afrikaans, Basque, Catalan, Danish, Dutch, English, Finnish, French, German, Hungarian, Icelandic, Indo- nesian, Italian, Norwegian, Portuguese, Romanian, Spanish, Swedish, and Turkish Your NOOK can display eBooks in other languages if the fonts are embedded in the eBook files.
-
Page 99: Appendix C: One Year Limited Warranty
Appendix C: One Year Limited Warranty THE FOLLOWING WARRANTY TERMS WERE IN EFFECT AS OF THE DATE YOUR DEVICE WAS MANUFAC- TURED, AND ARE PROVIDED FOR YOUR REFERENCE ONLY. THE ACTUAL TERMS OF YOUR WARRANTY ARE THE TERMS THAT WERE IN EFFECT AS OF THE DATE OF YOUR PURCHASE, WHICH MAY BE DIFFER- ENT THAN THE TERMS SET FORTH HEREIN. - Page 100 B&N. You must return your NOOK within the timeframe provided by B&N. You may also be required to provide a credit card to obtain an advance replacement before B&N receives your NOOK at its returns center. All returned NOOKs become the property of B&N. Before you send your NOOK to B&N, it is your responsibility to back up any data, software or files stored on your NOOK because B&N will only return your NOOK to you if it is not covered by this Limited Warranty and B&N has not provided an advance replacement.
- Page 101 removed, tampered with or defaced or if your NOOK has been opened or serviced without authorization, tampered with, altered or modified. Please note that opening the back cover of your NOOK to change the battery, external SD card or back cover will void this Limited Warranty, except to the extent that such opening is done through a custom- er-accessible opening and in accordance with the instructions provided with the NOOK.
-
Page 102: Appendix D: Trademarks And Copyrights
Appendix D: Trademarks and Copyrights Adobe Reader Mobile Software Your NOOK contains Adobe Reader Mobile software under license from Adobe Systems Incorporated, Copyright ® ® © 1995-2011 Adobe Systems Incorporated. All rights reserved. Adobe , Reader , and Reader Mobile are either ®... -
Page 103: Google
Tipperary™ Tipperary is a trademark of Monotype Imaging, Inc. and may be registered in certain jurisdictions. Google Android, Google, Google Play, and other Google marks are trademarks of Google Inc. Wi-Fi Wi-Fi and Wi-Fi Alliance are registered trademarks of the Wi-Fi Alliance. Additional Information Additional copyright, trademark, and other notices may be found in the NOOK Terms of Service and Privacy Policy: http://www.NOOK.com/support... -
Page 104: Appendix E: Fcc Notices
Appendix E: FCC Notices FCC IDs NOOK WI-FI: XHHBNRV500-A MODEL: BNRV500 This device complies with Part 15 of the FCC Rules. Operation is subject to the following two conditions: (1) this de- vice may not cause harmful interference, and (2) this device must accept any interference received, including interfer- ence that may cause undesired operation. -
Page 105: Other Information Related To The Radio
Other Information Related to the Radio Also note the following: • For information on connecting to Wireless networks, see “Using Your NOOK at Wi-Fi Hotspots”. • Your NOOK has a Wi-Fi setting that turns off the radio. Wi-Fi networking should be turned off on airplanes. For more information, see “Airplanes”. -
Page 106: Appendix F: Industry Canada Notice
Appendix F: Industry Canada Notice The term “IC” before the equipment certification number only signifies that the Industry Canada technicalspecifica- tions were met. IC: 8961A-BNRV500A This device complies with Industry Canada license-exempt RSS standard(s). Operation is subject to the following two conditions: (1) This device may not cause harmful interference, and (2) this device must accept any interference received, including interference that may cause undesired operation. -
Page 107: Appendix G: European Union
Appendix G: European Union EU Regulatory Conformance We, Barnes & Noble, hereby declare that this device is in conformance to all essential requirements of the R&TTE Directive 1999/5/EC. This equipment is marked with the symbol and can be used throughout the European Community. This indicates compliance with the R&TTE Directive 1999/5/EC and meets the relevant parts of the following technical specifications: •... -
Page 108: Appendix H: Nook Terms Of Service
Appendix H: NOOK Terms of Service The NOOK Terms of Service are located here: http://www.nook.com/legal Barnes & Noble NOOK User Guide... -
Page 109: Appendix I: At&T Terms Of Service & Acceptable Use Policy
Appendix I: AT&T Terms of Service & Acceptable Use Policy These Terms of Service & Acceptable Use Policy (the “Terms”) govern your use of AT&T Internet Services’ AT&T Wi-Fi service (“Service”) and the AT&T Internet Services network (“Network”). If you connect to the AT&T Wi-Fi service via one of AT&T’s roaming partners, your use of the Service will also be governed by that provider’s Terms of Service and Acceptable Use Policy, which will be available on the first screen that you see when you access the Wi-Fi service. - Page 110 your license to use any Software. AT&T may also terminate or suspend your Service if you provide false or inaccurate information that is required for the provision of Service or is necessary to allow AT&T to bill you for Service. Mem- bership customers: customer cancellation of Services is governed by the terms and conditions of your Membership Agreement.
- Page 111 Privacy Policy Registration data and certain other information about you is subject to the AT&T Wi-Fi Privacy Policy. For more information see: http://secure.sbc.com/privacy_statement.adp. General Use Restrictions Subject to your acceptance of and compliance with these Terms, payment to AT&T for the Service and compli- ance with all AT&T Online Policies identified below, you are hereby granted the right to use the Service through a non-exclusive, non-transferable and non-assignable limited license.
- Page 112 Disclaimer of Warranties UNLESS OTHERWISE EXPLICITY STATED, THE MATERIALS AND THE SERVICE ARE PROVIDED “AS IS”, AND ARE FOR PERSONAL USE ONLY. ALL EXPRESS OR IMPLIED CONDITIONS, REPRESENTATIONS AND WAR- RANTIES, INCLUDING ANY IMPLIED WARRANTY OF MERCHANTABILITY, FITNESS FOR A PARTICULAR PURPOSE, OR NON-INFRINGEMENT, ARE DISCLAIMED, EXCEPT TO THE EXTENT THAT SUCH DISCLAIM- ERS ARE HELD TO BE LEGALLY INVALID.
- Page 113 Kingdom and Australia. You acknowledge and agree that Materials are subject to the U.S. Export Administration Laws and Regulations. Diversion of such Materials contrary to U.S. law is prohibited. You agree that none of the Materi- als, nor any direct product there from, is being or will be acquired for, shipped, transferred, or re-exported, directly or indirectly, to proscribed or embargoed countries or their nationals, nor be used for nuclear activities, chemical biological weapons, or missile projects unless authorized by the U.S.
- Page 114 Customers are responsible for avoiding the prohibited activities and strictly following the AUP terms set forth herein. AUP Coverage The AT&T Acceptable Use Policy (“AUP”) applies to the services that provide (or include) access to the Internet, services provided over the Internet, and Hosting services (collectively “IP Services”). Customer is responsible for the actions of others who may be using the IP Service(s) under Customer’s account.
- Page 115 it may terminate your Service without further notice. In such case, you are responsible for any applicable early termi- nation charges. AT&T will not issue any refunds, credits or other forms of compensation for the period when IP Service(s) have been suspended as a result of violation(s) or alleged violation(s) of this AUP.
- Page 116 damage or security breaches to AT&T’s network or to the network of any other IP Service provider. Customer shall not create or attempt to utilize a domain name that is fraudulent, indecent, offensive, deceptive, threatening, abusive or harassing. Interaction with Minors AT&T has a zero tolerance policy regarding use of its Service to engage in inappropriate conduct with a minor (any- one under 18 years of age).
- Page 117 posting messages to or canceling or superseding messages on an online forum or newsgroup in a manner that violates the rules of the forum or newsgroup or that contain forged header information. sending bulk electronic messages in quantities that exceed standard industry norms or that create the poten- tial for disruption of the AT&T network or of the networks with which AT&T interconnects intercepting, redirecting or otherwise interfering or attempting to interfere with e-mail intended for other parties...
- Page 118 unauthorized monitoring of data or traffic on any network or system without express authorization of the owner of the system or network; this would include use of sniffers or SNMP tools; falsifying packet header, sender, or User information whether in whole or in part to mask the identity of the sender, originator or point of origin;...
- Page 119 Customer agrees to indemnify and hold AT&T harmless from any claim, action, demand, loss, or damage (including attorneys’ fees) made by any third party against AT&T as a provider of the IP Service(s) arising out of or relating to any violation(s) of this AUP by Customer (or its Users). Incident Reporting Any complaints (other than claims of copyright or trademark infringement) regarding violation of this AUP by an AT&T Customer (or its User) should be directed to abuse@att.net.
- Page 120 Barnes & Noble NOOK User Guide...
-
Page 121: Index
Index downloading Library items with the Sync button 56 drag 21 archiving books or periodicals 42, 59 DRM-protected files 52 AT&T Terms of Service & Acceptable Use Policy 109 Facebook back linking your NOOK to your Facebook account 84 swiping left to move to a previous activity 20 sharing a highlighted passage 48 Barnes &... - Page 122 line spacing 39 Quick Nav Bar 22 MAC address 75 rating and reviewing on BN.com 41 magazine reading status buying a single issue 68 posting 41 buying a subscription 68 Reading Tools menu 30 free 14-day trial 68 recommending a book 41 margin size 39 registering your NOOK 11 Memory Card display in the Library 57...
- Page 123 tap 19 Terms of Service AT&T 109 NOOK 108 time settings 79 time zones 80 trademarks 102 transferring files 60 troubleshooting tips 94 turning pages 29 turning your NOOK on and off 13 Twitter sharing quotes via Twitter 48 unarchiving books or periodicals 42, 59 unlocking your NOOK 18 version of software 92 viewing Library items 57...
- Page 124 Barnes & Noble NOOK User Guide...
Need help?
Do you have a question about the NOOK GlowLight and is the answer not in the manual?
Questions and answers
red light when nook is charging
There is no mention of a red light when charging the Barnes & Noble GlowLight. The charging indicator light glows orange while charging and turns green when fully charged.
This answer is automatically generated