Fisher-Price Kid tough User Manual
Digital camera
Hide thumbs
Also See for Kid tough:
- Instructions manual (52 pages) ,
- Manual (48 pages) ,
- Instruction manual (28 pages)
Table of Contents
Advertisement
Advertisement
Table of Contents

Related Manuals for Fisher-Price Kid tough


Summary of Contents for Fisher-Price Kid tough
- Page 1 www.fi sher-price.com...
-
Page 2: Table Of Contents
Table of Contents Getting Started Introduction ................................... 3 Tips for Better Images ..............................4 Features ..................................5 Specifi cations ................................8 Setting Up Your Camera Battery Safety Information ............................9 Battery Installation ...............................10 Using Your Camera Turning the Camera On and Off ..........................12 Taking a Picture ................................13 Using the Flash ................................14 Reviewing or Deleting Pictures ............................15... -
Page 3: Introduction
Introduction Introduction • Please keep this instruction booklet for future reference, as it contains important information. • Requires four “AAA” (LR03) alkaline batteries (not included). • Adult assembly is required for battery installation. Tool required for battery installation: Phillips or slotted screwdriver (not included). •... -
Page 4: Tips For Better Images
Tips for Better Images! Before your child uses the camera independently, we recommend that you fi rst thoroughly read these instructions. Explain to your child how to use the camera and then practice taking pictures with your child. 1. Use Bright Light Indoors Make sure there is a bright light source when taking indoor pictures. -
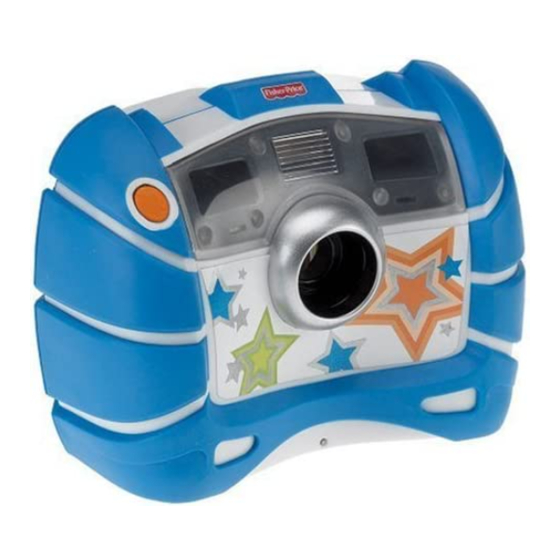
Page 5: Features
Features Flash Shutter Button Lens Front View... - Page 6 Features Viewfi nder Image Forward Image Back Button Button Image Delete Button Power Button LCD Screen Back View...
- Page 7 Features USB Port Battery Compartment Door Battery Compartment Battery Holder USB Cable Bottom View (This is not a toy.)
-
Page 8: Specifi Cations
Specifi cations Picture Resolution ....640 x 480 (standard resolution setting) or interpolated 1.3 megapixels (high resolution setting). Internal Memory ...... 64 MB SDRAM approximately 540 pictures (standard resolution setting) or approximately 165 pictures (high resolution setting). Lens ..........4.8 mm, f = 2.6 Focus Range ......4 ft. -
Page 9: Battery Safety Information
Battery Safety Information In exceptional circumstances, batteries may leak fl uids that can cause a chemical burn injury or ruin your toy. To avoid battery leakage: • Do not mix old and new batteries or batteries of different types: alkaline, standard (carbon-zinc) or rechargeable (nickel-cadmium). -
Page 10: Battery Installation
Battery Installation Lock Battery Compartment Door Battery Holder... - Page 11 Battery Installation 1.5V x 4 “AAA” (LR03) • Make sure camera power is off. • Locate the battery compartment door on the bottom of the camera. • Turn the lock on the battery compartment door a 1/4 turn. Open the battery compartment door.
-
Page 12: Turning The Camera On And Off
Turning the Camera On and Off Power Button • Press the power button on the back of the camera to turn power on. You will hear a tone. • To turn power off, press and hold the power button until you hear a tone. Hint: If you have not used the camera for a while, it shuts off automatically. -
Page 13: Taking A Picture
Taking a Picture • Have your child look through the viewfi nder or look at the LCD screen to see the picture subject. • While holding the camera steady, press the shutter button on the front of the camera. Listen for a “shutter sound” and look for the camera icon on the LCD screen. -
Page 14: Using The Flash
Using the Flash Flash Indicator • If you are taking pictures in low light (dim light) and the fl ash is required, the fl ash will operate automatically. A lightning bolt appears on the LCD screen and blinks until the fl ash is ready. •... -
Page 15: Reviewing Or Deleting Pictures
Reviewing Pictures Image Forward Image Back Button Button • Press the image forward or image back buttons to review the pictures you have taken. • When you are fi nished reviewing, the camera switches back to normal picture taking mode in a few seconds. -
Page 16: Deleting Pictures
Deleting Pictures Image Delete Button • If you decide you do not want a picture, fi rst locate it by using the image forward or back buttons. • Then press the image delete button . A trash can with a question mark appears on the LCD screen. -
Page 17: Changing Picture Resolution
Changing Picture Resolution Your camera comes set up to take normal quality pictures (standard resolution). If you’d like to take higher quality pictures (high resolution), follow these steps. • First press both the image back and image forward buttons at the same time and hold Next, press the shutter button . -
Page 18: System Requirements
System Requirements Operating System ......Compatible with Windows 2000 or higher and Operating System ......Compatible with Windows 2000 or higher and ......................Macintosh OS 10 or higher Macintosh OS 10 or higher Hardware ........Pentium Class 500 MHz processor or better Hardware ........ -
Page 19: Connecting Your Camera To Your Computer
Connecting Your Camera to Your Computer • Open the battery compartment door and insert the USB cord (smaller end) into the USB port. • Insert the larger end of the USB cord into a USB port on your computer, generally marked with this symbol •... -
Page 20: Disconnecting Your Camera
Disconnecting Your Camera • To disconnect your camera, click “eject disk” on your computer's task bar. • Select the “USB Mass Storage Device” (your camera) and click “stop”. • Click “OK” to confi rm. • A message will appear on your computer screen advising you to remove your device (camera). •... -
Page 21: Troubleshooting
Troubleshooting Problem Cause Solution Camera will not take pictures Batteries are weak Replace the batteries in the or exhausted camera with four, new “AAA” (LR03) alkaline batteries. Camera is turned off Press the power button on the back of the camera to turn it on. Camera memory is full of Download pictures to your computer images (... - Page 22 Troubleshooting Problem Cause Solution Photos are blurry Lens may be dirty or smudged Clean the lens with a soft cloth. Camera moved when picture Try to keep the camera steady when was taken you take pictures. Flash may not have Wait for fl...
-
Page 23: Fcc Statement
FCC Statement (United States Only) This equipment has been tested and found to comply with the limits for a Class B digital device, pursuant to Part 15 of the FCC Rules. These limits are designed to provide reasonable protection against harmful interference in a residential installation. This equipment generates, uses and can radiate radio frequency energy and, if not installed and used in accordance with the instructions, may cause harmful interference to radio communications. - Page 24 Visit us on line at www.service.fi sher-price.com Call our Consumer Relations Department, toll-free at 1-888-892-6123. Hearing-impaired consumers using TTY/TDD equipment, please call 1-800-382-7470. Write to us at: Fisher-Price® Consumer Relations, 636 Girard Avenue, East Aurora, New York 14052. For countries outside the United States: CANADA: Questions? 1-888-892-6123.
Need help?
Do you have a question about the Kid tough and is the answer not in the manual?
Questions and answers