Table of Contents
Advertisement
OWNER'S MANUAL
Thank you very much for purchasing our DIGITAL ECHO 4CH AV
AMPLIFIER. Prior to use, be sure to read this owner's manual from
cover to cover so that you can make the most out of this unit. The
manual will come in handy whenever you come across any question or
trouble while using the unit.
IMPORTANT SAFETY PRECAUTIONS ................... 2
IMPORTANT SAFETY PRECAUTIONS ................... 3
SPECIAL FEATURES .............................................. 4
PRECAUTIONS FOR HANDLING ........................... 4
BEFORE CONNECTION ......................................... 4
SAFETY PRECAUTIONS ........................................ 5
SYSTEM CONNECTIONS......................................11
CONNECTIONS ................................................... 12
MUSIC VOL CONTROL ...................................... 13
DIGITAL ECHO AV AMPLIFIER
CONTENTS
DOOR LOCKING .................................................. 13
BASIC OPERATION .............................................. 14
ECHO/EFFECT OPERATION ................................ 15
AUTO/VIDEO SIGNAL DETECTION MODE .......... 16
VIDEO SWITCHING .............................................. 16
REMOTE CONTROL OPERATION ........................ 17
TROUBLE SHOOTING ......................................... 18
MAINTENANCE .................................................... 20
AFTER-SALE SERVICING .................................... 20
MANNERS FOR CUSTOMERS ............................. 20
COPY RIGHT ....................................................... 20
ABOUT THE PRODUCT ....................................... 20
SPECIFICATIONS ................................................ 21
Advertisement
Table of Contents

Related Manuals for BMB DAR-800II


Summary of Contents for BMB DAR-800II
-
Page 1: Table Of Contents
DIGITAL ECHO AV AMPLIFIER OWNER’S MANUAL Thank you very much for purchasing our DIGITAL ECHO 4CH AV AMPLIFIER. Prior to use, be sure to read this owner's manual from cover to cover so that you can make the most out of this unit. The manual will come in handy whenever you come across any question or trouble while using the unit. -
Page 2: Important Safety Precautions
Consult the dealer or an experienced radio/TV technician for help. CAUTION Changes or modifications to this equipment not expressly approved by BMB Corp. for compliance could void the user's authority to operate this equipment. -
Page 3: Important Safety Precautions
IMPORTANT SAFETY PRECAUTIONS 1 Read these instructions. • Do not expose this apparatus to drips or splashes. • Do not place any objects filled with liquids, such as 2 Keep these instructions. vases, on the apparatus. 3 Heed all warnings. • Do not install this apparatus in a confined space 4 Follow all instructions. -
Page 4: Special Features
SPECIAL FEATURES • • Ultra high performance digital power amplifiers (4CH). L o w i m p e d a n c e c o m p a t i b l e p o w e r a m p l i f i e r •... -
Page 5: Safety Precautions
SAFETY PRECAUTIONS Check the voltage of your local mains Avoid push or drop any object or supply liquid into the unit Singapore: AC230V Malaysia : AC240V Never push or drop any kind of objects into this unit The power cord should not be connected to a direct through openings as they may touch dangerous current (DC). -
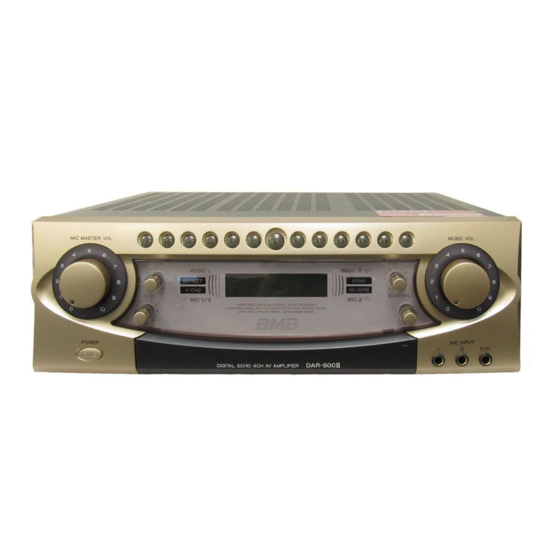
Page 6: Names Of Front-Panel Controls And Their Functions
NAMES OF FRONT-PANEL CONTROLS AND THEIR FUNCTIONS FRONT PANEL 2 567 8 P OWER switch (ON ˘ /OFFÒ) T APE VOL control Press to turn ON the power. Press this again to turn it Adjust the "TAPE" playback volume level. OFF. - Page 7 KEY control buttons L CD Display 1 Function indicator Press the required button when changing the pitch of a song. The buttons can vary the pitch in plus/minus six steps with each button varying the pitch in chromatic interval with respect to the standard pitch. The selected pitch is indicated by the change in color of the pressed button (when play of a song is over, the standard pitch resumes automatically).
-
Page 8: Names Of Rear-Panel Controls And Their Functions
NAMES OF REAR-PANEL CONTROLS AND THEIR FUNCTIONS REAR PANEL MODEL K ARAOKE SENSITIVITY switch DVD INPUT LEVEL control Set the sensitivity at which KARAOKE audio input level Adjust this control by balancing with the level of other is detected and switched automatically. inputs (KARAOKE, TAPE, AUX). - Page 9 T APE SENSITIVITY switch P RE-OUT output level control Set the sensitivity at which tape playback input level is Adjust this control by balancing with the level of power detected and switched automatically. amplifier. M ONO/STEREO select switch L(ow): Set to this position when the function does not change to "BGM"...
- Page 10 MODEL EXT(ernal) REMOTE SENSOR terminal M IC [A][B] jacks Terminal to which an external remote control unit Jack A is a mixing input jack with MIC INPUT 1 on the is connected. If an external remote control unit is front panel whereas jack B is a mixing input jack with connected, the remote sensor (infrared signal reception MIC INPUT 2.
-
Page 11: System Connections
SYSTEM CONNECTIONAS Infrared wireless Karaoke Microphone receiver Video player player (option) camera WT-4500 Right Left Remote sensor MODEL Right Left Graphic equalizer Power Cassette amplifier deck player monitor monitor monitor Right Left... -
Page 12: Connections
CONNECTIONS · How to connect speaker cords One pair of speakers 1. Press the lever, then insert the stripped end of the cord. 2. Release the lever so that the wire is held securely. SYSTEM 1 ± Match wire with ±... -
Page 13: Mechanism To Prevent Excessive Volume Levels Of Mic Master Vol Control And Music Vol Control
Please connect higher power handling speakers when change the maximum volume level to the required setting you use this amplifier DAR-800II. (such as up to 7, 8, 9, etc.). The maximum power of DAR-800II is over 360W/CH peak. · Setting procedure... -
Page 14: Basic Operation
BASIC OPERATION · How to use microphones properly and D epress the power switch (˘) of this unit and other operating precautions equipment. • Keep the microphone approx. 5 to 10 cm away from Connect the required number of microphones. your mouth. -
Page 15: Echo/Effect Operation
ECHO/EFFECT OPERATIONS Using Echo effectors 1. Select ECHO mode by pus hing ECHO SELECT 3. Adjust ECHO speed, and delay by turning ECHO Controls. switch until ECHO Indicator is lit. 2. Adjust ECHO level of microphones to background music by ECH O VOL Control. -
Page 16: Auto/Video Signal Detection Mode
AUDIO/VIDEO SIGNAL DETECTION MODE As for the KARAOKE and DVD functions, the detection ‚ When the switch is set to "VIDEO" mode will be switched from among the three modes The video input is detected, a nd the function will (AUDIO, A &... -
Page 17: Remote Control Operation
REMOTE CONTROL OPERATION E CHO SEL (select) button While holding down the button, the programed effector is selected. At this time, the selected effect is indicated to the LCD display. Please see detailed information on page 15. V -CHG select button While holding down the button, the vocal change function is available. -
Page 18: Troubleshooting
REMOTE CONTROL OPERATION Changing the batteries ATTENTION The improper use of batteries may lead to chemical leakage or explosion. Observe the following precautions: I nsert batteries with their positive (+) and negative (-) poles positioned correctly according to the indication on the battery compartment. Do not use an old and new batteries together. - Page 19 TROUBLESHOOTING Trouble Possible cause Remedy No video. VIDEO OUT jacks are not fully con- Firmly insert TV monitor plug into ‚ ‚ nected. VIDEO OUT jack. VIDEO IN jacks (KARAOKE, DVD, Firmly insert plugs into VIDEO IN jacks. ‚ ‚ CAMERA) are not fully connected.
-
Page 20: Maintenance
Caution of operation and instruction for using the system to your customer. If the unit is found to be defective and it is difficult to repair, bring the defective unit to your nearest BMB authorized service center. MANNERS FOR CUSTOMERS... -
Page 21: Specifications
SPECIFICATIONS Amplifier Dimensions (W x H x D) ....420 x 142 x 396 mm Weight ..............17.1 kg Audio output power: Accessories 150W + 150W + 150W + 150W (Separate 4 amps) Owner's manual ............. 1 360W + 360W (BTL) Wireless remote control unit (RMR-800) .... - Page 22 International Corp. http://www.bmb.com...
Need help?
Do you have a question about the DAR-800II and is the answer not in the manual?
Questions and answers