
Related Manuals for A.W. Sperry Instruments DM-2A POCKET-PRO


Summary of Contents for A.W. Sperry Instruments DM-2A POCKET-PRO
-
Page 1: Operating Instructions
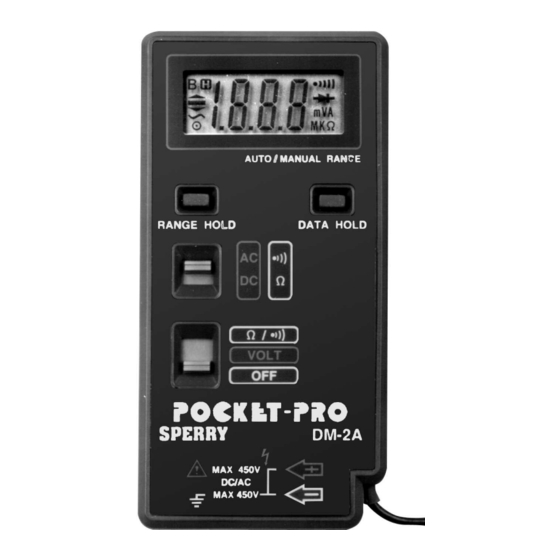
5/96 FORM #262 OPERATING INSTRUCTIONS MODEL DM-2A POCKET-PRO ® DIGITAL MULTIMETER A.W. SPERRY INSTRUMENTS INC. The Professional’s Choice ®... - Page 2 1) INTRODUCTION The DM-2A is an innovative concept in digital multimeter design. It is a miniature ultra-slim DMM which combines the measurement capabilities of a 16 range, 4 function digital instrument with the handiness and simplicity of a pocket calculator.
-
Page 3: Specifications
They are always there when you need them. A handy “booklet style” carry- ing case which hold the instrument, test leads and operating instructions is included, and allows the DM-2A to be carried easily in your shirt pocket. 2) FEATURES UL LISTED…to both US and Canadian standards... - Page 4 IEC-1010-1 Indoor use. If the equipment is used in a manner not specified, the protection provided by the equipment may be impaired. 4) PACKAGING The DM-2A comes complete with two B-6 batteries, C-77 carrying case and form # 262 operating instructions. DOUBLE INSULATION WARNING: TO AVOID ELECTRIC SHOCK DISCONNECT MEASURING TERMINALS BEFORE REMOVING BACK COVER.
-
Page 6: Safety Precautions
5) SAFETY PRECAUTIONS The following safety precautions must be observed to insure maximum personal safety during the operation at this meter. 1. Read these operating instructions thoroughly and completely before operating your Pocket Pro. Pay particular attention to WARNINGS which will inform you of potentially dangerous procedures. -
Page 7: Operation
7. Do not attempt to operate this instrument in an explosive atmosphere (i.e in the presence of flammable gases or fumes, vapor or dust). 8. When testing for the presence of voltage make sure the voltage function is operating properly by reading a known voltage in that function before assuming that a zero reading indicates a no-voltage condition. - Page 8 Data Hold Feature Press [DATA HOLD] button to toggle in and out of the Data Hold mode. In the data hold mode, the annunciator is displayed and the last reading is held on the display. Press [DATA HOLD] button again to release the hold and current readings are once again displayed.
- Page 9 3. Completely de-energize the circuit or device to be measured. Connect the test lead probe tips to the device. 4. The meter will automatically select the proper range and display the reading. Note: The most significant digit blink indicates an overrange condition.
-
Page 10: Battery Replacement
7) BATTERY REPLACEMENT Power is supplied by two button-type batteries (NEDA 1166A, IEC LR-44). “B” appears on the LCD display when replacement is needed. WARNING Before attempting to replace the battery, first discon- nect the Test Leads from any energized circuit. 1.
Need help?
Do you have a question about the DM-2A POCKET-PRO and is the answer not in the manual?
Questions and answers