JVC KW-NT50HDT Instructions Manual
Gps navigation system
Hide thumbs
Also See for KW-NT50HDT:
- Instructions manual (293 pages) ,
- Installation & connection manual (7 pages) ,
- Software update (3 pages)
Table of Contents
Advertisement
Quick Links
GPS NAVIGATION SYSTEM
SISTEMA DE NAVEGACIÓN GPS
SYSTÈME DE NAVIGATION GPS
KW-NT50HDT / KW-NT30HD
HD Radio Traffic is available only for KW-NT50HDT.
HD Radio Traffic se encuentra disponible sólo con el
KW-NT50HDT.
HD Radio Traffic est disponible uniquement pour le
KW-NT50HDT.
For installation and connections, refer to the separate manual.
Para la instalación y las conexiones, refiérase al manual separado.
Pour l'installation et les raccordements, se référer au manuel séparé.
INSTRUCTIONS
MANUAL DE INSTRUCCIONES
MANUEL D'INSTRUCTIONS
Only for KW-NT50HDT
Sólo para KW-NT50HDT
Uniquement pour le
KW-NT50HDT
For customer Use:
Enter below the Model No.
and Serial No. which are
located on the top or bottom
of the cabinet. Retain this
information for future
reference.
Model No.
Serial No.
LVT2219-001A
[J]
Advertisement
Table of Contents

Related Manuals for JVC KW-NT50HDT


Summary of Contents for JVC KW-NT50HDT
-
Page 1: Gps Navigation System
SYSTÈME DE NAVIGATION GPS KW-NT50HDT / KW-NT30HD Only for KW-NT50HDT Sólo para KW-NT50HDT Uniquement pour le HD Radio Traffic is available only for KW-NT50HDT. KW-NT50HDT HD Radio Traffic se encuentra disponible sólo con el KW-NT50HDT. For customer Use: HD Radio Traffic est disponible uniquement pour le KW-NT50HDT. - Page 2 (2) l’ utilisateur du dispositif doit étre prêt à accepter tout brouillage radioélectrique reçu, même Caution si ce brouillage est susceptible de compromettre le Changes or modifications not approved by JVC could fonctionnement du dispositif. void the user’s authority to operate the equipment.
- Page 3 Cet appareil est conforme au cahier des charges CNR-310 d’Industrie Canada. Son emploi est soumis à la condition que l’appareil ne provoque pas de brouillage préjudiciable. Only for KW-NT50HDT This equipment complies with FCC radiation exposure limits set forth for an uncontrolled environment and meets the FCC radio frequency (RF) Exposure Guidelines in Supplement C to CET65.
-
Page 4: How To Forcibly Eject A Disc
How to read this manual: • Illustrations of KW-NT50HDT are mainly used for explanation. • < > indicates the variable screens/menus/operations/settings that appear on the touch panel. • [ ] indicates the buttons on the touch panel. -
Page 5: Table Of Contents
Contents How to forcibly eject a disc ............4 Detaching/attaching the monitor panel ........4 Introduction .......... 8 Parts identification ..............8 Installation settings ..............9 Basic operations ..............10 • Turning on the power ..............10 • Messages about the status of GPS signal reception ......10 •... - Page 6 Changing the sequence of the destination/via points ..... 32 • Avoiding a congestion ahead ............33 • Adjusting the vehicle position ............33 Editing registration of home/favorite points ......34 Only for KW-NT50HDT ..........35 Using information service • Using the traffic information service ..........35 •...
- Page 7 Using other external components ........... 69 • Front AUX ..................69 • AV-IN ....................69 Sound equalization ..............70 Changing illumination color ........... 71 Settings for video playback ............ 72 • Picture adjustment ................. 72 • Changing the aspect ratio ............... 72 AV menu items ..............
-
Page 8: Introduction
Introduction Parts identification Screen (touch panel) Monitor panel 1 Loading slot 5 Volume adjustment knob Adjusts the audio volume. 2 0 (Eject) button • About the adjustable volume range, ☞ page 73 Ejects the disc. (<Amplifier Gain>). 3 AV MAP/DISP OFF button •... -
Page 9: Installation Settings
Installation settings When you turn on the unit for the first time, the initial Adjust the settings. setup screen appears. Turn on the ignition switch. The power is turned on, and the startup screen is displayed for about 5 seconds. Select the language you want for the display and the voice guidance. -
Page 10: Basic Operations
Basic operations Turning on the power Turning off/on the screen Turn on the ignition switch. Startup screen appears for about 5 seconds. • You can change the startup screen. (☞ page 75) [Hold] • When displaying the map screen for the first time after turning on the power, the screen below appears. -
Page 11: Operations On The Touch Panel
Basic operations Operations on the touch panel When items on the menu are not To select folder/track on the list available Select a folder (1), then a track (2). Current folder Current track Non-available items will be shaded Scrolling the track/song information To change the page of menu/list When all the text is not shown at once... -
Page 12: Switching Screens
Switching screens Map screen The AV control bar is displayed on the map screen. You can perform AV source operations using the AV control bar. • Pressing also displays the AV control bar. In this case, the AV control bar disappears automatically after 5 seconds. - Page 13 Navi Menu AV Menu Shows the destination menu and information Changes or turns off the AV source. about the navigation system. Only for KW-NT50HDT Options Settings Changes the detailed settings. (☞ page 72) Changes the navigation settings. (☞ page 40)
-
Page 14: Navigation System
Use of the data is only permitted in this specific JVC incurred to you, your passengers or other road users. system. It is forbidden to extract or make further use... -
Page 15: Basic Operations
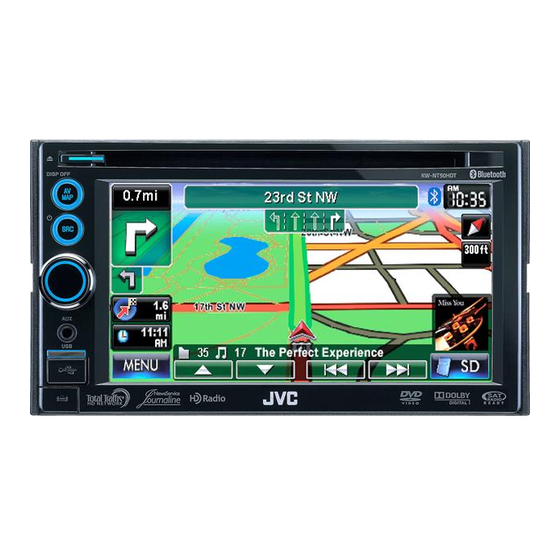
Scale Home (☞ pages 17 and 34) Zoom buttons (☞ below) Traffic information (only for KW-NT50HDT) Shows the AV control (☞ page 35) bar (☞ page 12) Current street Speed limit on the current street Shows <Navi Menu> (☞ page 13) -
Page 16: To Scroll The Map
Basic operations To scroll the map To display your current position The position you touched is centered on the map. To change the map view 3D Map Direction and distance from your current position The three dimensional map is displayed in “heading up.”... -
Page 17: Registering Your Home/Favorite Points
Registering your home/favorite points You can register one point as your home or 100 favorite points. Scroll the map to select the position you want to select as a destination. • To search the destination using <Destination Menu>, ☞ pages 19 to 27. [Save as Home]: The selected position is saved as home and the home is marked with... -
Page 18: Searching For A Place
Searching for a place Setting a destination by scrolling About the search result screen the map Scroll the map to select the position you want to select as a destination. (☞ page 16) Zoom buttons • You can change the map scale by pressing the zoom buttons. -
Page 19: Setting A Destination Using The
Searching for a place Setting a destination using the <Destination Menu> Home * Goes to your home. • To register your home, ☞ page 17. Previous * Searches from the history of previous destinations and via points. • You can select a place from the last 50 destinations and via points. -
Page 20: About Search Screens And Input Screens
Searching for a place About search screens and input screens Read through the following instructions for using search screens and input screens before using <Destination Menu>. To enter names, addresses, or numbers State/Province selecting screen Number of matches You can change the State/Province if the selecting •... -
Page 21: By Address
Searching for a place By address <Address> Enter the street name, then select from the list (☞ page 20). Selects the center of the city (Then, go to step Enter the city name, then select from the list (☞ page 20). Changes State or Province Specifies the zip code (☞... -
Page 22: By Telephone Number
Searching for a place By telephone number To select the center of the street or intersection on the street <Phone> Specifies the crossing street to select intersection on the street Enter the telephone number, then select from the list (☞ page 20). Changes country Selects the center of the street Guidance starts. -
Page 23: From The List Of Poi
Searching for a place From the list of POI <POI Name> Lists from the nearest Lists in alphabetical order Enter the POI name, then select from the list (☞ page 20). Changes State or Province The System displays up to 100 POIs. When searching from a large number of items, it may take some time for the search results to be displayed. -
Page 24: Poi Near A Place/Route
Searching for a place POI near a place/route <Vicinity> The System has a huge database of POIs (Point Of Select a category (1), then a sub-category Interest), such as restaurants, gas stations, hospitals, (2) for the POI. etc. Selects all sub-categories You can search for a POI around the place where you are now. -
Page 25: By Coordinates
You can import POI information on Google Maps through an SD card. For details about Street Director Assistant, visit <http:// Enter the latitude and the longitude. www.jvc.co.jp/english/car/> (English website only). • When the SD card is ejected, the imported POI cannot be used. Lists from the nearest Lists in alphabetical order The search result is displayed. -
Page 26: Quick Search
Searching for a place Quick Search Registered category You have three [Quick Search] buttons in <Destination Menu>. You can assign a POI category to each button. When you press one of the buttons, the System searches for a POI of the registered category. •... - Page 27 Searching for a place To change a category assigned to the To use Quick Search [Quick Search] button Select one of the [Quick Search] buttons whose category you want to change. “Searching...” Select a POI from the list. • The System displays up to 50 search results. The search result is displayed.
-
Page 28: How You Are Guided
How you are guided Starting guidance to the destination or via point Select a destination or via point. (☞ pages 18 The System starts calculating the route to the selected to 27) destination, and guidance starts. To set as destination Cancels the calculation To change the destination To cancel guidance, ☞... -
Page 29: Changing Route Options
How you are guided Changing route options Canceling guidance On the search result screen: Set options. A confirmation message appears. Adjusting the volume of the Priority Select the priority for route calculation ([Fastest]: fastest voice guidance route/[Shortest]: shortest route). Freeway Select whether to use ([Use]) or Toll Road avoid ([Avoid]) these types of... -
Page 30: About Route Guidance Screen
How you are guided About route guidance screen Lanes to take Distance to the next turn (Appears when coming within 3 mi (5 km) of it.) • Press to listen to the last voice guidance again. Next street Next turn to make The second turn to make (if any) Route to take... -
Page 31: Getting Information On Your Route And Places
How you are guided Getting information on your route and places To check the entire route To confirm how your trip will go Drive simulation starts. Returns to previous screen To check the information on the Shows the simulation just before the next turn destination and via points Changes the speed of the drive simulation (normal/faster) -
Page 32: Arranging Your Route
Arranging your route Changing the sequence of the destination/via points • Highways are always used to calculate the route if distance to a destination exceeds a certain distance. • If the destination cannot be reached without using highways, ferries, or toll roads, they are used to calculate the route without respect to the <Route>... -
Page 33: Avoiding A Congestion Ahead
Arranging your route Avoiding a congestion Adjusting the vehicle ahead position If you realize a congestion exists ahead... If you find your current position is displayed on a wrong place on the map, use this setting to correct your position. Select the distance to avoid. -
Page 34: Editing Registration Of Home/Favorite Points
Editing registration of home/favorite points A To edit the name • You can use up to 30 characters. Select a registered point you want to edit. Enters a space Selects your home Displays other keyboards • For available characters, ☞ page 11. B To edit the phone number Displays the favorite point list and select one to edit on the list. -
Page 35: Only For Kw-Nt50Hdt
Using information service (Only for KW-NT50HDT) This function is available on KW-NT50HDT only, not equipped with on KW-NT30HD. Using the traffic information service (Total Traffic HD NET WORK Service) As the traffic information is transmitted by radio stations, JVC cannot assume responsibility for the completeness or accuracy of the information. - Page 36 Using information service (Only for KW-NT50HDT) This function is available on KW-NT50HDT only, not equipped with on KW-NT30HD. Checking the traffic information From <Traffic List> On the map Touch the traffic icon. Select a list (1), then a traffic alert (2).
-
Page 37: Using The Area Information Service (Total Traffic Hd Net Work Service)
Using information service (Only for KW-NT50HDT) This function is available on KW-NT50HDT only, not equipped with on KW-NT30HD. Using the area information service (Total Traffic HD NET WORK Service) You can use the information service provided by HD Radio broadcasts. -
Page 38: Checking The Information Of The Navigation System
GPS satellites. System y Information service being received (Traffic or Area information; only for KW-NT50HDT) These information may not be shown correctly when the reception of GPS signals is poor. The calibration does not function without the connection of GPS antenna and the speed signal lead. -
Page 39: Initializing Memories/Navigation Settings
Initializing memories/navigation settings Memories of home, favorite points or Calibration Data previous destination/via points The Navigation System is gradually optimized by automatic calibration. Reset the calibration data in the following cases: • When you reinstall the unit in another car. •... -
Page 40: Navigation Menu Items
Freeway/ Toll Road/ Ferry Use, Avoid (☞ page 29) Bypass Traffic Auto, Manual, Off (☞ page 35) (Only for KW-NT50HDT) Attention tone* Select the type of attention tone, coming out before the voice guidance by pressing [2] or [3]. Off, Normal, Prompt, A.I. - Page 41 Select whether to show or hide the information of one way road on the map. Show, Hide Traffic Icon Select whether to show or hide the traffic icon on the map. (Only for KW-NT50HDT) Show, Hide (☞ page 36) Scale unit Select the measuring units for distance.
-
Page 42: Additional Information
Additional information • The route calculated by the System is one of the How you are guided possible routes to your destination. The route is not • If GPS signal reception is poor, navigation guidance always the most appropriate one. may not be correct. - Page 43 Additional information List of POI icons Gas Station Special store Travel Parking Barnes & Noble Booksellers Airport Park & Ride Bed Bath & Beyond Rest Area Parking Garage Big5 Car Rental Hotel Blockbuster Video Car Dealer & Service Restaurant Borders Motorcycle Dealer Restaurant Chain Crate &...
-
Page 44: Av Operations
AV Operations Common operations on AV screens <AV Menu> screen Selects the source (☞ below) Turns off the AV source (☞ below) Displays <Settings> (☞ pages 72 to 75) Selecting the playback source • Available sources depend on the external components you have connected, media you have attached and the <Front Aux Input>, <AV Input>... -
Page 45: Listening To The Hd Radio™ Broadcast
Listening to the HD Radio™ broadcast What is HD Radio™ broadcasting? HD Radio stations can deliver high-quality digital sound—AM digital will have FM-like sound quality (in stereo) and FM digital will have CD-like sound quality—with static-free and clear reception. Furthermore, stations can offer text and data, such as artist names, song titles, and Program Service Data (PSD). -
Page 46: Changing Hd Radio Reception Mode
Listening to the HD Radio™ broadcast Changing HD Radio reception Storing stations in memory mode You can preset six channels for each band. Automatic presetting — SSM (Strong-station While receiving an HD Radio broadcast, you can change Sequential Memory) the reception mode — digital or analog. •... -
Page 47: Selecting A Preset Station
Listening to the HD Radio™ broadcast Manual presetting Selecting a preset station Tune in to a station or channel you want to Display the preset list. preset. (☞ page 45) Band The station frequency you want to preset Display the preset list. Also changes preset stations Reducing the interference Select a preset number. -
Page 48: Tagging/Purchasing Your Favorite Songs From Itunes Store
Listening to the HD Radio™ broadcast Tagging/purchasing your favorite songs from iTunes Store Some HD Radio broadcasts provide PSD (Program Step 1: Tagging the song Service Data) for a song. You can tag the song and store While receiving a song with PSD... its PSD while listening the song. - Page 49 Listening to the HD Radio™ broadcast Step 2: Transferring the tagged PSD to Step 3: Purchasing songs from iTunes your iPod/iPhone Store Connect the iPod/iPhone to the unit (☞ page 59). • iTunes 7.4 or later version is required to purchase the tagged songs.
-
Page 50: Disc Operations
Disc operations Caution on volume setting: Insert a disc. The source changes to “DISC” and playback starts. Discs produce very little noise compared with other sources. Lower the volume before playing a disc to avoid damaging the speakers by the sudden Label side increase of the output level. -
Page 51: Playable Disc Types
Disc operations Playable disc types Disc type Recording format, file type, etc. Playable DVD Video (Region Code: 1) * • DTS sound cannot be reproduced or output from this unit. DVD Audio DVD-ROM DVD Recordable/Rewritable DVD Video (DVD-R/-RW * , +R/+RW * DVD-VR * •... - Page 52 Disc operations Only for DVD Video/DVD-VR: Pressing DISP or touching the screen shows the operating buttons and playback information on the screen. The operating buttons and playback information disappear by pressing DISP or when no operation is done for about 5 seconds.
- Page 53 Disc operations VR playback mode—VR-PRG (program) or VR-PLAY (playlist) Playback mode Audio format Disc type Playback status (8: pause/7: stop) Program no. (or Playlist no.)/Chapter no. (or file no.)/Playing time [3 / 8] Starts playback/pauses. Hides/displays the operating buttons Stops playback. on the screen.
- Page 54 Disc operations Playback mode Sound mode (☞ page 70) Disc type Playback status (8: pause) Track no./Playing time The track information appears when it is recorded. [3 / 8] Starts playback/pauses. Selects playback modes. [4] [¢] Press: Selects track. (☞ page 55) Hold: Reverse/forward search.
-
Page 55: Selecting Playback Modes
Disc operations Selecting playback modes For DVD/DVD-VR For CD/MP3/WAV Playback mode Playback mode Selects Random Selects Repeat Select Repeat mode. playback mode playback mode • You cannot activate the repeat mode and the random mode at the same time. • For CD: TRACK Repeats current track. -
Page 56: Settings For The Disc Playback
Disc operations Settings for the disc playback Disc Setup items Selectable settings Initial: Underlined Menu Language Select the initial disc menu language; Initial English (☞ also page 77). Audio Language Select the initial audio language; Initial English (☞ also page 77). Subtitle Language Select the initial subtitle language or erase the subtitle (Off);... -
Page 57: Sd/Usb Operations
SD/USB operations This unit can play the MP3/WMA files stored in SD card/USB mass storage class device. • All tracks in the SD card/USB device will be played repeatedly until you change the source. • Make sure all important data has been backed up. Inserting SD card Connecting USB device You can connect a USB mass storage class device such as... - Page 58 SD/USB operations Audio format (MP3/WMA) Playback mode Sound mode (☞ page 70) Playback status Source type (“SD” or “USB”) (8: pause) Folder no./Track no./ Playing time Tag data appears only While playing, “Jacket when it is recorded. * picture” is shown if the file (Current folder name has the tag data including and file name appear if...
-
Page 59: Listening To The Ipod/Iphone Device
Listening to the iPod/iPhone device Connecting iPod/iPhone Setting the iPod control mode and the speed of the audio books • Use the following cables: – To listen to the music: USB 2.0 cable (accessory of the iPod/iPhone) – To watch the video: USB Audio and Video cable for iPod/iPhone—KS-U39 (not supplied) KS-U39 (not supplied) USB 2.0 cable (accessory of... - Page 60 • When playing back a track containing Artwork , Notice: operating buttons temporarily disappear while When operating an iPod/iPhone, some operations loading its Artwork. may not be performed correctly or as intended. In this case, visit the following JVC web site: <http:// www.jvc.co.jp/english/car/> (English website only)
-
Page 61: Selecting A Track/Video From Menu On The Ipod/Iphone
Listening to the iPod/iPhone device Selecting a track/video from menu on the iPod/iPhone • Available categories depend on the type of your iPod/ iPhone. You can also select the category by pressing the corresponding tab. These categories are shown in the language selected on your iPod/iPhone. -
Page 62: Listening To Iheartradio With The Ipod/Iphone
Listening to the iPod/iPhone device Listening to iheartradio with the iPod/iPhone You can connect your iPod touch/iPhone to this unit and listen to iheartradio. What is iheartradio? iheartradio is an iPod touch/iPhone application that can deliver access to over 750 local radio stations in both AM and FM, as well as commercial-free and artist-programmed channels. - Page 63 Listening to the iPod/iPhone device Channel number iheartradio mode Station name Sound mode 7 : Sound off Song information Displays the album artwork or the station logo. [3 / 7] Turns the sound on and off. Storing your favorite stations [4] [¢] Selects the previous/next favorite (☞...
- Page 64 Listening to the iPod/iPhone device Searching from the Station List Storing your favorite stations You can use the Station List screen to search for Favorite stations that were stored are displayed in the stations. Station List. (☞ left) Select [Stations]. •...
- Page 65 Listening to the iPod/iPhone device To delete the station from the favorite list Searching for stations in All Cities category by alphabet Select (1), and then select (2). . Select items to delete (1), and delete them (2). Display the first character of the station you The selected items are marked “✔”.
-
Page 66: Listening To The Satellite Radio
Before operating, connect either one of the following (not supplied) to the expansion port on the rear of the unit. To listen to the SIRIUS Satellite radio SCC1 and KS-SRA100 D&P, SCVDOC1 and KS-SRA100 To listen to the XM Satellite radio JVC Smart Digital Adapter–XMDJVC100 CNP2000UCA and CNPJVC1 Activating subscription For SIRIUS Radio For XM Radio Select “SAT”... - Page 67 Listening to the satellite radio Signal Reception Preset no. indicator Sound mode (☞ page 70) Channel no./Channel name Band Category name The song information currently received Only for SIRIUS [Band] Selects the band. [5] [∞] Selects a preset channel. [2 CAT] Selects a category.* For SIRIUS: [CAT 3]...
-
Page 68: Storing Channels In Memory
Listening to the satellite radio Storing channels in memory Selecting preset channels You can preset six channels for each band. Tune in to a station you want to preset. (☞ page 67) Also changes preset channels Display the preset list.(☞ page 67) Selecting a channel quickly Select a channel directly by Select a channel from the... -
Page 69: Using Other External Components
Using other external components Sound mode (☞ page 70) Source type (“Front AUX” or “AV-IN”) The following buttons appear while playing video with “AV-IN” selected as the source. [Aspect] Selects aspect ratio. (☞ page 72) Hides/displays the operating buttons on the screen. Adjusts the picture. -
Page 70: Sound Equalization
Sound equalization You can select a preset sound mode suitable to the music genre. You can also customize the sound mode. Storing your own adjustments You can store your adjustments into <User1>, <User2>, and <User3>. Repeat steps 1 and 2, then in step 3 on the left... -
Page 71: Changing Illumination Color
Changing illumination color You can change the illumination color of the buttons on the monitor panel. Storing your own adjustments • When variable color illumination is selected, you cannot adjust the color. After selecting a color in step 4 on the left... Adjust the color. -
Page 72: Settings For Video Playback
Settings for video playback Picture adjustment Changing the aspect ratio You can adjust the picture quality for video playback You can change the aspect ratio for video playback. such as DVD, iPod video, video from an external component or camera. Display the adjustment menu. - Page 73 AV menu items Menu items Selectable settings Initial: Underlined Equalizer Flat/Natural/Dynamic/Vocal Boost/Bass Boost/Super Bass/ Rhythm/Acoustic/Relax/User1/User2/User3 (☞ page 70) Subwoofer/HPF Adjust the subwoofer output level, Low Pass Filter, and High Pass Filter. Press [Enter] to adjust each setting. • Subwoofer Level: Adjust the subwoofer output level. Off, –24dB to +20dB;...
- Page 74 AV menu items Switches the category by pressing the corresponding tab Menu items Selectable settings Initial: Underlined Dimmer Off: Cancels. On: Activates dimmer. Auto: Dims the screen and the button illumination when you turn on the headlights. • The illumination control lead connection is required. (☞ Installation/Connection Manual) Time: Activates the Dimmer Time setting below.
- Page 75 AV menu items Menu items Selectable settings Initial: Underlined AV Input You can determine the use of the LINE IN and VIDEO IN jacks. (☞ page 69) AV: Select when connecting an AV component such as a camcorder. Audio: Select when connecting an audio component such as a portable audio player.
-
Page 76: Additional Information
Additional information • Do not use a USB device with 2 or more partitions. File playback • Depending on the shape of the USB devices and Playing MP3/WMA /WAV files connection ports, some USB devices may not be • This unit can play back files with the extension code attached properly or the connection might be loose. - Page 77 Additional information Sound signals emitted through the rear terminals Through the analog terminals (Speaker out/F OUT/R OUT) 2-channel signal is emitted. When playing multi-channel encoded disc, multi-channel signals are downmixed. • DTS sound cannot be reproduced. Language codes (for DVD language selection) Code Language Code Language Code Language...
-
Page 78: Bluetooth Operations
Bluetooth Information: this unit depending on the Bluetooth version of If you wish to receive more information about the device. Bluetooth, visit the following JVC web site: • This unit may not work for some Bluetooth <http://www.jvc.co.jp/english/car/> (English devices. website only) •... -
Page 79: Using Bluetooth Device
Bluetooth audio can be connected at a time. • To use the Bluetooth function, you need to turn on Bluetooth function of the device. The sample screen shown here depicts the KW-NT50HDT. <Mode> is displayed. When using the KW-NT30HD, the Device Name displayed Change the PIN code. -
Page 80: Connecting/Disconnecting A Registered Bluetooth Device
Using Bluetooth device To connect Operate the Bluetooth device to connect. Select the device you want to connect. Cancel PIN code (initial: 0000) : mobile phone / : audio player / : both mobile phone and audio player “Connected” appears. Press [OK] to confirm the •... -
Page 81: Using Bluetooth Mobile Phone
Using Bluetooth mobile phone Receiving a call Adjusting the volume of calls/ earpiece When a call comes in/making a call... On map screen: The mobile phone control bars appear. Decrease Increase Status of the device /Battery reminder (only when the information comes from the device) •... -
Page 82: Switching Between Handsfree Mode And Phone Mode
Using Bluetooth mobile phone Using the phone book/call lists Switching between handsfree mode and phone mode While talking... ] From dialed call list. ] From received call list. From missed call list. From phone book. • For copying the phone book, ☞ page 83. •... -
Page 83: Copying The Phone Book
Using Bluetooth mobile phone Copying the phone book Searching for a phone number from phone book You can copy the phone book memory of a mobile phone into the unit (up to 500 memories). Display <Phone Book>. Display the first character of the name you want to search for (1), then search for a name (2). -
Page 84: Deleting The Phone Number Memory In The Unit
Using Bluetooth mobile phone Deleting the phone number About mobile phone compatible memory in the unit with Phone Book Access Profile (PBAP) Display the phone book/call list you want to delete. (☞ page 82) When your mobile phone supports PBAP, phone book and call lists are automatically copied to the unit. -
Page 85: Using Bluetooth Audio Player
Using Bluetooth audio player • To activate “BT Audio” for source selection, ☞ page 75 (<Bluetooth Audio>). • To register a new device, ☞ page 79. • To connect/disconnect a device, ☞ page 80. Battery reminder (only when the information Playback mode Sound mode (☞... -
Page 86: Bluetooth Device Settings
Displays the PIN code of the unit. • To change the PIN code, press [Change], enter a new PIN code, then press [OK]. Device Name Shows the device name to be shown on the Bluetooth device — “KW-NT50HDT” or “KW-NT30HD.” Device Address Shows the MAC address of the unit. -
Page 87: Rear View Camera Operations
Rear View Camera Operations Using a rear view camera • To use a rear view camera, the reverse gear signal lead connection is required. For connecting a rear view camera, ☞ Installation/Connection Manual. Activating the rear view Displaying the picture from the camera rear view camera The rear view screen is displayed when you shift the... -
Page 88: References
References Maintenance Caution on cleaning the unit How to handle discs Do not use any When removing a disc from its case, press down the solvent (for centre holder of the case and lift the Centre holder example, thinner, disc out, holding it by the edges. benzine, etc.), •... -
Page 89: Troubleshooting/Error Messages
Troubleshooting/error messages What appears to be trouble is not always serious. Check the following points before calling a service center. • For operations with the external components, refer also to the instructions supplied with the adapters used for the connections (as well as the instructions supplied with the external components). Symptoms Remedies/Causes No sound comes out of the speakers. - Page 90 Troubleshooting/error messages Symptoms Remedies/Causes Navigation voice cannot be heard from the Guidance volume level is set to the minimum level. Adjust speakers. it to the optimum level. (☞ page 40) The voice guidance does not come out from the Change the <Output> setting. (☞ page 40) speaker on the driver’s side.
- Page 91 Troubleshooting/error messages Symptoms Remedies/Causes “There is no available traffic information now.” No valid traffic information is available now. Try one of the followings: • Move to the place where you can receive traffic service. • No traffic information on your route. Display the list of all traffic information.
- Page 92 Troubleshooting/error messages Symptoms Remedies/Causes Playback does not start. • Insert the disc correctly again. • The format of files is not supported by the unit. Sound and pictures are sometimes interrupted • Stop playback while driving on rough roads. or distorted. •...
- Page 93 Troubleshooting/error messages Symptoms Remedies/Causes While playing a track, sound is sometimes The tracks are not properly copied into the SD card/USB interrupted. device. Copy tracks again, and try again. “No Files” The SD card/USB device has no playable files. Change the SD card/USB device.
- Page 94 Troubleshooting/error messages Symptoms Remedies/Causes “Channel Off Air” Selected channel is not broadcasting at this time. Select another channel or continue listening to the previous channel. “Loading” The unit is loading the channel information and audio. Text information are temporarily unavailable. •...
-
Page 95: Specifications
Troubleshooting/error messages Symptoms Remedies/Causes The rear view screen is not displayed when the • Check <Camera Input> setting. (☞ page 87) gear is shifted to the reverse (R) position. • Check the connection. The rear view screen is displayed when the gear Check <Reverse Signal Polarity>... - Page 96 Specifications 20 W RMS × 4 Channels at 4 Ω and Power Output ≤ 1% THD+N Signal-to-Noise Ratio 80 dBA (reference: 1 W into 4 Ω) 4 Ω (4 Ω to 8 Ω allowance) Load Impedance Equalizer Control Frequencies 45 Hz, 120 Hz, 315 Hz, 800 Hz, 2.4 kHz Range 6.3 kHz, 15 kHz Level...
- Page 97 Specifications Signal Detection System Non-contact optical pickup (semiconductor laser) Frequency Response DVD, fs=48 kHz/96 kHz 16 Hz to 20 000 Hz Dynamic Range 93 dB Signal-to-Noise Ratio 95 dB Wow and Flutter Less than measurable limit Compatible File System FAT 32/16/12 Capacity 8 Mbytes to 2 Gbytes Data Transfer Rate...
- Page 98 END-USER LICENSE AGREEMENT END-USER TERMS The Map Data Disc (“Data”) is provided for your personal, internal use only and not for resale. It is protected by copyright, and is subject to the following terms (this “End-User License Agreement”) and conditions which are agreed to by you, on the one hand, and NAVTEQ North America, LLC (“NT”) and its licensors (including their licensors and suppliers) on the other hand.
- Page 99 Disclaimer of Liability: NT AND ITS LICENSORS (INCLUDING THEIR LICENSORS AND SUPPLIERS) SHALL NOT BE LIABLE TO YOU IN RESPECT OF ANY CLAIM, DEMAND OR ACTION, IRRESPECTIVE OF THE NATURE OF THE CAUSE OF THE CLAIM, DEMAND OR ACTION ALLEGING ANY LOSS, INJURY OR DAMAGES, DIRECT OR INDIRECT, WHICH MAY RESULT FROM THE USE OR POSSESSION OF THIS DATA;...
- Page 100 La marca Bluetooth y sus logotipos son propiedad de Bluetooth SIG, Inc., y cualquier uso de los mismos por Victor Company of Japan, Limited (JVC) se realiza bajo licencia. Otras marcas y nombres comerciales son de sus respectivos propietarios. La marque du mot et les logos Bluetooth sont la propriété...
- Page 101 Having TROUBLE with operation? Please detach the monitor panel, then attach it Still having trouble?? USA ONLY Call 1-800-252-5722 http://www.jvc.com We can help you! EN, SP, FR 0211NSMCREJEIN © 2011 Victor Company of Japan, Limited...
- Page 102 NEGATIVA. Si su vehículo no posee continu de 12 V à masse NEGATIVE. Si votre véhicule n’offre pas ce voltage inverter is required, which can be purchased at JVC car audio este sistema, será necesario un inversor de tensión, que puede ser type d’alimentation, il vous faut un convertisseur de tension, que vous...
- Page 103 JVC ou une by a qualified technician. JVC de equipos de audio para automóviles o a una compañía que compagnie d’approvisionnement. Before installing the unit suministra tales herramientas.
-
Page 104: Installing The Gps Antenna
Install the unit at an angle of less than 30˚ vertically and of less than 5˚ horizontally. Instale la unidad a un ángulo de menos de 30° en sentido vertical, y de menos de 5° en sentido horizontal. Installez l’appareil avec un angle vertical de moins de 30˚ et un angle horizontal de moins de 5˚. 5˚... - Page 105 ENGLISH ESPAÑOL FRANÇAIS ELECTRICAL CONNECTIONS CONEXIONES ELECTRICAS RACCORDEMENTS ELECTRIQUES To prevent short circuits, we recommend that you disconnect the Para evitar cortocircuitos, recomendamos que desconecte el terminal Pour éviter tout court-circuit, nous vous recommandons de débrancher battery’s negative terminal and make all electrical connections before negativo de la batería y que efectúe todas las conexiones eléctricas la borne négative de la batterie et d’effectuer tous les raccordements installing the unit.
- Page 106 Luz de marcha atrás Raccord à sertir* å Å Consulte en el diagrama Fil des feux de recul Feux de recul KW-NT50HDT anterior. KW-NT30HD å Reportez-vous au diagramme Å dans le diagramme ci-dessus. Connecting the speed signal lead / Conexión del conductor de señal de velocidad / Connexion du fil de signal de vitesse •...
- Page 107 You can connect the following components through the various JVC Puede conectar los siguientes componentes mediante los diversos Vous pouvez connecter les appareils suivants en utilisant divers adapters.
Need help?
Do you have a question about the KW-NT50HDT and is the answer not in the manual?
Questions and answers