Advertisement
Advertisement
Table of Contents

Related Manuals for Omron IntelliSense IA1B


Summary of Contents for Omron IntelliSense IA1B
- Page 1 INSTRUCTION MANUAL Automatic Blood Pressure Monitor with Fit Cuff !"#$% =Fit Cuff= IA1B Model...
-
Page 2: Table Of Contents
Contents Introduction ..............2 Notes on Safety ..............3 Know Your Unit ..............5 Quick Reference Guide ............7 Initial Set-Up ..............9 How to Install and Replace Batteries .......... 9 How to Set the Date and Time ..........10 Correct Usage .............. -
Page 3: Introduction
Introduction Thank you for purchasing the Omron Automatic Blood Pressure Monitor IA1B with IntelliSense . Although your blood pressure fluctuates throughout the day, no self adjustment is necessary as the monitor intelligently adjusts to your changing conditions. The IntelliSense monitor uses fuzzy logic intelligence to sense both your systolic and diastolic blood pressure values, and the result is personalized inflation for every reading. -
Page 4: Notes On Safety
Notes on Safety • The warning signs and the sample icons shown here are listed in order for you to use the product safely and correctly, as well as to prevent the risk of damage or injury to you and others from happening. •... - Page 5 Notes on Safety Caution Do not forcibly bend the arm cuff or bend the air tube excessively. When removing the air tube, pull on the air plug at the connection with the main unit not the tube itself. Do not apply strong shocks and vibrations to or drop the main unit. Do not inflate the arm cuff when it is not wrapped around your arm.
-
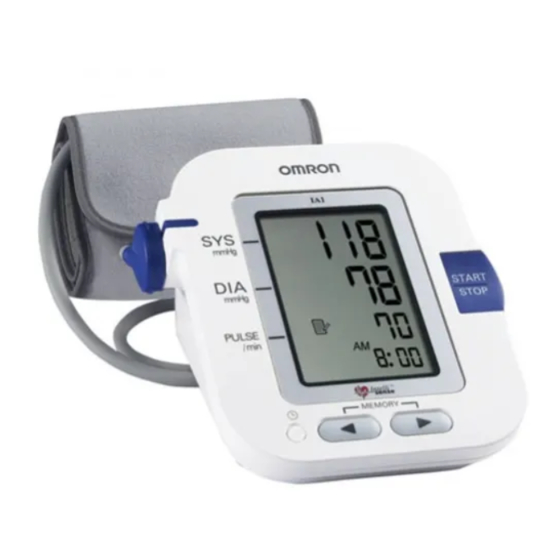
Page 6: Know Your Unit
Know Your Unit Main Unit: Display Battery Compartment START/STOP Button Memory Air Jack Date/Time Setting AC Adapter Jack Display: Systolic Blood Pressure Diastolic Blood Pressure Heartbeat Symbol Memory Symbol Pulse Display Average Value Symbol Deflation Symbol Movement Error Symbol Date/Time Display Irregular Heartbeat Symbol Battery Low Symbol... - Page 7 Know Your Unit Accessories: Arm Cuff Air Tube Air Plug (Connects to Air Jack) Storage Case Four batteries...
-
Page 8: Quick Reference Guide
Quick Reference Guide To help ensure a reliable reading, avoid eating, smoking, exercising for at least 30 minutes before taking a measurement. You should also try to measure your blood pressure at the same time each day. 1. Remove any tight-fitting clothing from your upper arm. 2. - Page 9 • Always wait at least 2-3 minutes before taking another blood pressure measurement. You may require more rest time between readings depending on your individual physiological conditions. • Only use the IA1B to measure your own blood pressure since the results of measurements are stored in memory.
-
Page 10: Initial Set-Up
Initial Set-Up How to Install and Replace Batteries 1. Slide the battery cover down and lift it off the main unit. 2. Install or replace four “AA” size batteries so that the + (positive) and - (negative) polarities match the polarities indicated on the battery compartment, then replace the battery cover. -
Page 11: How To Set The Date And Time
Initial Set-Up How to Set the Date and Time Your blood pressure monitor automatically stores up to 90 measurements values in its memor y and calculates an average value based on the last three measurements. To make use of the memory and average values functions: •... - Page 12 Initial Set-Up Note: The range for the year setting is 2004 to 2030. If the year reaches 2030, it will return to 2004. To change the digits to a lower number, press the button to recede the digits one at a time. If you hold down the button, the digits will advance (or recede) rapidly.
- Page 13 Initial Set-Up 6. Repeat steps 3 and 4 to set the hour and minutes for the time. 7. Press the START/STOP button when you have finished setting the date and time. How to Set the Date and Time...
-
Page 14: Correct Usage
Correct Usage How to Apply the Arm Cuff 1. Make sure the air plug is securely inserted in the main unit. 2. Remove tight-fitting clothing from your upper arm. 3. Sit in a chair with your feet flat on the floor and place your arm on table so that the cuff will be at the same level as your heart. - Page 15 Correct Usage 4. Grasp the grip on the cuff securely Grip with your hand. Velcro 5. Turn the palm of your hand upward. Apply the cuff on your upper arm. 6. Apply the cuff to your upper arm so that the blue strip is along the center of your inner arm, and the air tube is in line with your middle finger.
- Page 16 Correct Usage Taking measurements on the right arm The grip should be at the center of your inner arm. Grip Notes: • Be careful not to rest your arm on the air tube, otherwise it will restrict the flow of air to the cuff. •...
-
Page 17: How To Take A Measurement
Correct Usage How to Take a Measurement 1. Press the START/STOP button and remain still, the cuff will start to inflate automatically. As the cuff begins to inflate, the monitor automatically determines your ideal inflation level. Since this monitor detects the pulse even during inflation, do not move your arm and remain still until the entire measurement process has been completed. - Page 18 Correct Usage 3. When the measurement is complete, the arm cuff completely deflates and your blood pressure and pulse rate are displayed. Note: The monitor automatically stores blood pressure and pulse rate into its memory. 4. Press the START/STOP button to turn the monitor off.
- Page 19 Correct Usage • Your blood pressure monitor includes an irregular heartbeat feature. Irregular heartbeats can influence the results of the measurement. The irregular heartbeat feature automatically determines if the measurement is usable or needs to be repeated. If the measurement results are affected by irregular heartbeats but the result is valid, the result is shown together with the irregular heartbeat symbol ( ).
- Page 20 Correct Usage What is Irregular Heartbeat? Normal Heartbeat irregular heartbeat Pulse heartbeat rhythm that varies by Blood pressure more or less than 25% from the average heartbeat rhythm detected Irregular Heartbeat while the unit is measuring the Short Long systolic and diastolic blood pressure. Pulse If such an irregular rhythm is Blood pressure...
-
Page 21: How To Use The Memory Function
Correct Usage How to Use the Memory Function This monitor has a memory capable of storing 90 sets of readings. Every time you complete the measurement, the monitor automatically stores blood pressure and pulse rate. The monitor also calculates an average reading based on the measurements from the last three readings. -
Page 22: To Delete All The Values Stored In Memory
Correct Usage To View Previous Measurement Values Press the memory button to view the most recent values or press button to view the oldest values. The date and time of each measurement is displayed along with the measurement values. Alternating display Press the button repeatedly to cycle through the previous measurement values... -
Page 23: Troubleshooting
Troubleshooting Error Symbol Cause Correction Cuff is under inflated. Carefully read and repeat Movement during the steps listed under “How measurement to Take a Measurement” on p. 16. Cuff over inflated. indicates Remove the arm cuff. irregular or weak pulses Wait 2 - 3 minutes and then are detected, but result take another measurement. - Page 24 Troubleshooting Problem Cause Remedy No display appears when the START/STOP The batteries are flat. Replace the batteries. button is pressed. Cannot measure or Is the cuff wrapped Attach the arm cuff readings are too high. firmly around the arm? correctly. The blood pressure is Blood pressure readings constantly vary with different each time.
-
Page 25: Care And Maintenance
Care and Maintenance Keep the monitor in its storage case when not in use. To protect your monitor from damage, please observe the following: • Do not subject your monitor and cuff to extreme temperatures, humidity, moisture or direct sunlight. •... -
Page 26: Specifications
Specifications Model: IA1B Display: LCD Digital Display Measurement Range: Pressure: 0 to 299 mmHg, Pulse: 40-180/min. Accuracy/Calibration: Pressure: ±3mmHg or 2% of reading Pulse: ±5% of reading Inflation: Automatic by electric pump Deflation: Automatic pressure release valve Rapid Air Release:...