
Summary of Contents for Marquant MCR-1295
- Page 1 MCR-1295 OWNER’S MANUAL Mobile Video System DVD Player with Radio 4.3 Inch Touch Screen Monitor RDS (Radio Date System) Function USB Interface SD/MMC Card Interface Remote Control...
-
Page 2: Table Of Contents
CONTENTS SAFETY INFORMATION ..................3 DISC NOTES ......................5 INSTALLATION ....................7 USING THE DETACHABLE FRONT PANEL............10 CONNECTIONS....................11 LOCATIONS AND FUNCTION OF THE PLAYER ..........12 LOCATIONS AND FUNCTION OF THE REMOTE CONTROL ......13 BASIC OPERATION ...................16 MENU OPERATION....................18 RADIO OPERATION ......................18 DVD OPERATION ......................21 USB/CARD OPERATION ....................28 AUXILIARY INPUT OPERATION ..................28 BACK SIGHT OPERATION....................29... -
Page 3: Safety Information
SAFETY INFORMATION Use This Product Safely This unit has been designed and manufactured to assure personal safety. Improper use can result in electric shock or fire hazard. The safeguards incorporated in this unit protect you if you observe the following procedures for installation, use and servicing. - Page 4 SAFETY INFORMATION CAUTION: MOBILE DVD PLAYER IS A CLASS I LASER PRODUCT. HOWEVER THIS MOBILE DVD PLAYER USES A VISIBLE/INVISIBLE LASER BEAM WHICH COULD CAUSE HAZARDOUS RADIATION EXPOSURE IF DIRECTED. BE SURE TO OPERATE THE MOBILE DVD PLAYER CORRECTLY AS INSTRUCTED. USE OF CONTROLS OR ADJUSTMENTS OR PERFORMANCE OF PROCEDURES OTHER THAN THOSE SPECIFIED HEREIN MAY RESULT IN HAZARDOUS RADIATION EXPOSURE.
-
Page 5: Disc Notes
DISC NOTES Disc formats supported by this player 12 cm disc (Single-sided disc only) Video CD 12 cm disc 12 cm disc 12 cm disc Handling and Cleaning Dirt, dust, scratches and warping discs will cause wrong operation. Do not place stickers or make scratches on discs. Do not warp discs. - Page 6 DISC NOTES Preparing New Discs with Rough Spots A new disc may have rough edges on its inside and outside edges. If a disc with rough edges is used, the proper setting will not be performed and the player will not play the disc. Therefore, remove the rough edges in advance by using a ballpoint pen or pencil as shown on the right.
-
Page 7: Installation
INSTALLATION Notes: Take out screw Choose the mounting location where the unit before installation. will not interfere with the normal driving function of the driver. Before finally installing the unit, connect the wiring temporarily and make sure it is all connected up properly and the unit and the system work properly. - Page 8 INSTALLATION and Plain Washer) to attach the other end of Sleeve metal strap to a solid metal part of the vehicle L Key Outer Trim Ring under the dashboard. This strap also helps Front Panel ensure proper electrical grounding of the unit. Note to install the short threading terminal of the mounting bolt to the back of the unit and the other long threading terminal to the dashboard.
- Page 9 INSTALLATION DIN REAR-MOUNT (Method B) If your vehicle is a Nissan, Toyota, follow these mounting instructions. Use the screw holes marked T (Toyota), N (Nissan) located on both sides of the unit to fasten the unit to the factory radio mounting brackets supplied with your vehicle.
-
Page 10: Using The Detachable Front Panel
USING THE DETACHABLE FRONT PANEL To Detach the Front Panel 1. Press the release button , then the right-hand side of the panel will be ejected. 2. Remove the front panel by pulling its left-hand Precautions when handling side outward. Do not drop the front panel. -
Page 11: Connections
CONNECTIONS Line No. Line color Function (terminal color) Black Auxiliary input right (RED) Black Auxiliary input left (WHITE) Black Auxiliary video input (YELLOW) Green Rearview input (YELLOW) Grey Video output 1 (YELLOW) Grey Video output 2 (YELLOW) Grey Rear RCA out right (RED) Grey Rear RCA out left (WHITE) Brown... -
Page 12: Locations And Function Of The Player
LOCATIONS AND FUNCTION OF THE PLAYER (power on/off button): Press to turn the unit on/off. 2. MOD: Press to select the desired mode, such as DVD, RADIO, AUX in … etc. 3. (Mircorphone optional for BT): For this unit without Bluetooth function, it is invalid. 4. -
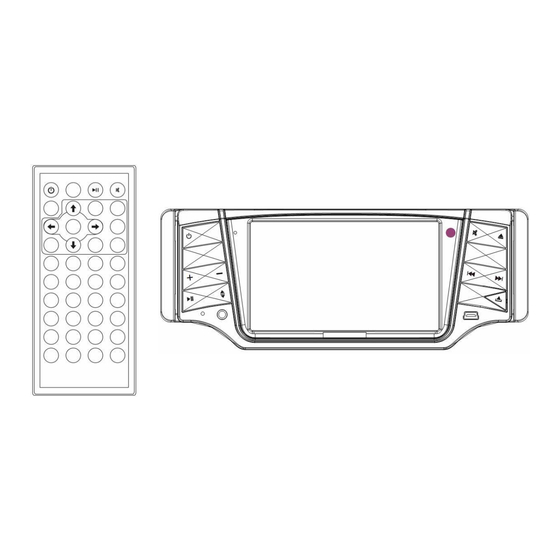
Page 13: Locations And Function Of The Remote Control
LOCATIONS AND FUNCTION OF THE REMOTE CONTROL... -
Page 14: Locations And Function Of The Remote Control
LOCATIONS AND FUNCTION OF THE REMOTE CONTROL 11. PBC Press it to turn on the unit. When the unit is on, It can be used to change between PBC ON and PBC OFF on the VCD disc. press it to turn the unit off. 12. - Page 15 LOCATIONS AND FUNCTION OF THE REMOTE CONTROL 24. Audio Press to display the audio information of the DVD/VCD disc. 25. 10+ Digital selecting button for track, cooperatively used with numeric buttons. 26. GOTO GOTO (Disc search button) used in media play mode, cooperatively used with numeric buttons.
-
Page 16: Basic Operation
BASIC OPERATION TURNING ON/OFF THE UNIT Press button on the front panel or on the remote control to turn the unit on. When the unit is on, press button on the front panel or on the remote control will turn the unit off. PANEL RELEASE/REINSTALL/ANGLE ADJUST To Release the Front Panel Press the release button... - Page 17 BASIC OPERATION MODE SELECTION Press MOD button on the front panel or MODE on the remote control to select the desired mode to enjoy. BRAKE FUNCTION If the brake wire (pink wire) isn’t connected to the ground (when driving), the picture will not be shown on the screen in DVD/AUX in mode for safety purpose.
-
Page 18: Menu Operation
MENU OPERATION MAIN MENU When the unit is on, the following picture will appear. If in other mode, press return icon on the right-top of the screen to return to the main menu. Click the different icon on the interface to enter into the desired mode. The following contents will introduce the different functions the unit provides. - Page 19 MENU OPERATION ※ APS--- click to start automatic memory storing/program scanning function. - Automatic memory storing Press and hold AMS button on remote control or APS icon about several seconds, the radio searches from the current frequency and checks the signal strength until one cycle search is finished. And then stations are stored into the preset number button in turn according to the strength of the stations.
- Page 20 MENU OPERATION ※ RDS OPERATION Touch the right zone position or the other black zone except the operation icons in interface (1) to enter into the following picture (2): a) Click AF icon on the screen or press LOU/AF button on the front panel for several seconds to switch AF function on or off.
-
Page 21: Dvd Operation
MENU OPERATION TA: Traffic Announcement Identification Identification data showing traffic information is being transmitted or not PTY: Program Type Code Contents of programs such as news, light music, sports etc. TP: Traffic Program Identification Identification data for traffic information-broadcasting station ※... - Page 22 MENU OPERATION 3) You can press Title button on the remote control or TIT icon on the screen to return to the title of the DVD disc. ※ EJECTING A DISC Press on the front panel to eject the disc. ※...
- Page 23 MENU OPERATION ※ ON-SCREEN DISPLAY FUNCTION Press the OSD button on the remote control or click OSD icon on the screen during playback to display the console information of the current disc on the screen. For an example (when playing a DVD disc): Once you press OSD button on the remote control or click OSD icon on the screen you will see the information as the following order.
- Page 24 MENU OPERATION ※ GOTO FUNCTION FOR DVD: Press GOTO button on the remote control, the screen will display the information as followed: Use the numeric buttons and buttons to move the cursor position to input the desired Title, Chapter or Time, then press ENTER button on the remote control to confirm. FOR VCD (WITH PBC OFF)/CD: You can input the Track and Time then press ENTER to confirm.
- Page 25 MENU OPERATION ※ AUDIO FUNCTION FOR VCD Press Audio on the remote control or click L-R icon on the screen during playback to change the channel, such as MONO L, MONO R and STEREO. ※ PROGRAM PLAY In program play mode, you can play the track in your desired sequence. To program play a disc, please follow the next instructions.
- Page 26 MENU OPERATION When the cursor is on the topside, use buttons to move between the different pages, such as SYSTEM SETUP, LANGUAGE SETUP, AUDIO SETUP, VIDEO SETUP and DIGITAL SETUP. * Press button to move the cursor to the setup page below and then you can use buttons to move between the different setup options.
- Page 27 MENU OPERATION 3) AUDIO SETUP When you open the AUDIO menu, you will see the following picture: AUDIO SETUP AUDIO OUT EXIT SETUP * AUDIO OUT: Change among SPDIF/OFF, SPDIF/RAW and SPDIF/PCM. * KEY: Change the tone within a certain range. 4) VIDEO SETUP When you open the VIDEO menu, you will see the following picture: VIDEO SETUP...
-
Page 28: Usb/Card Operation
MENU OPERATION 3. USB/CARD OPERATION On the front panel of the unit there is an interface for USB. When you connect an USB to the interface, it can play the audio/video files on the USB. Note to use a conversion cable to connect the USB device with the normal terminal through the little USB interface on the front panel. -
Page 29: Back Sight Operation
MENU OPERATION You are suggested to connect one group of auxiliary input source. ※ NP --- click to select input video system according to the following sequence: →NTSC→ PAL-I→ PAL-DK → PAL-BG →PAL-M → PAL-N →SECAM-DK ※ EQ--- click to change the equalization mode, such as EQ OFF, POP, ROCK, CALS, JAZZ, FLAT and VOCAL. - Page 30 MENU OPERATION --- Brightness adjustment --- Contrast adjustment --- RGB (Chroma) adjustment --- click to back to main menu interface. --- click to current mode, such radio, DVD… ※ EQ Click the different icon on the picture to select the corresponding equalization mode. ※...
-
Page 31: Trouble Shooting
TROUBLE SHOOTING What might appear to be a malfunction in your unit may just be the result of slight misoperation or miswiring. Before calling service, first check the following table for possible problems. Under no circumstances should you try to repair the player yourself, as this will invalidate the warranty. Only qualified service personnel can remove the cover or service this player. - Page 32 TROUBLE SHOOTING The parking brake is not engaged. For safety reasons no television/video images are displayed while the vehicle is moving. Engaging the parking brake will cause images to be displayed. The sound quality is poor or distorted. One of the speaker wires is being pinched by a screw in the car. Check the speaker wiring.
-
Page 33: Specifications
SPECIFICATIONS GENERAL Power Supply Requirements : DC 12 Volts, Negative Ground Maximum Output Power Version Y : 4x40 watts Current Drain - Version Y : 15 Ampere (max.) RADIO For 2 Bands Frequency Coverage 87.5 to 108 MHz Sensitivity (S/N=30dB) 10 dBu Image Rejection >45dB... - Page 34 MCR-1295 MANUEL D’UTILISATION Système vidéo portable Lecteur DVD avec radio Écran tactile 4.3" Fonction RDS (Radiodiffusion de données de service) Interface USB Interface carte SD/MMC Télécommmande...
- Page 35 BRANCHEMENTS CONNECTEUR D’ANTENNE (NOIR) MARRON REARVIEW ROSE FREINAGE BLEU ANTENNE ELECTRIQUE ROUGE INTERRUPTEUR D’ALLUMAGE (ACC+) JAUNE FILTRE& MEMOIRE/BATTERIE (B+) BOITIER A NOIR FUSIBLES SOL (B-) HAUT-PARLEUR BLANC GRIS AVANT CANAL HAUT-PARLEUR AVANT GAUCHE DROIT BLANC/NOIR GRIS/NOIR VERT HAUT-PARLEUR VIOLET HAUT-PARLEUR ARRIERE CANAL ARRIÈRE DROIT GAUCHE...
- Page 36 EMPLACEMENTS ET FONCTIONNEMENT DU LECTEUR (marche/arrêt) : Permet d'allumer/éteindre l’appareil. MOD : Permet de sélectionner le mode souhaité comme DVD, RADIO, AUX in … etc. (Microphone optionnel pour BT) : Non disponible pour cet appareil sans fonction Bluetooth. LOU/AF : Appuyez brièvement sur ce bouton pour activer ou désactiver la fonction LOUDNESS. Appuyez sur ce bouton pendant plusieurs secondes pour activer ou désactiver le mode AF en mode RDS.
- Page 37 EMPLACEMENTS ET FONCTIONNEMENT DE LA TÉLÉCOMMANDE...
- Page 38 EMPLACEMENTS ET FONCTIONNEMENT DE LA TÉLÉCOMMANDE LOC/RDM Permet d’allumer l’appareil. En mode marche, Appuyez sur ce bouton pour une lecture appuyez sur ce bouton pour éteindre l’appareil aléatoire de toutes les pistes. MODE En mode radio, appuyez brièvement sur ce Lorsque l’appareil est allumé, appuyez sur ce bouton pour sélectionner entre les stations bouton pour sélectionner un mode différent...
- Page 39 EMPLACEMENTS ET FONCTIONNEMENT DE LA TÉLÉCOMMANDE 20. Slow Préparer la télécommande Pour certains disques, appuyez sur ce bouton Insérer les piles pour démarrer la fonction qui permet d’avancer 1. Ouvrez le couvercle du compartiment à piles. doucement. 2. Insérez les nouvelles piles. Assurez-vous que les 21.
-
Page 40: Fonctionnement De Base
FONCTIONNEMENT DE BASE ALLUMER/ÉTEINDRE L’APPAREIL Appuyez sur le bouton du panneau avant ou de la télécommande pour allumer l’appareil. Lorsque l’appareil est allumé, appuyez sur le bouton du panneau avant ou de la télécommande pour éteindre l’appareil. RÉGLAGE ANGLE/ RÉINSTALLATION/LIBÉRATION DU PANNEAU Pour libérer le panneau avant Appuyez sur le bouton de libération du panneau avant, ce qui éjectera le côté... - Page 41 FONCTIONNEMENT DE BASE FONCTION MUTE Appuyez sur les boutons du panneau avant ou de la télécommande pour couper le son. Appuyez à nouveau pour le remettre. MODE SELECTION Appuyez sur les boutons MOD du panneau avant ou MODE de la télécommande pour sélectionner le mode souhaité.
- Page 42 FONCTIONNEMENT DU MENU MENU PRINCIPAL Lorsque l’appareil est allumé, l’image suivante apparaît. Sous d’autres modes, appuyez sur le bouton retour en haut à droite de l’écran pour revenir au menu principal. Cliquez sur une icône de l'interface pour accéder au mode souhaité. Le contenu suivant présentera les différentes fonctions que propose l’appareil.
- Page 43 FONCTIONNEMENT DU MENU ※ MUTE --- cliquez pour éteindre ou remettre le son. ※ LOUD --- cliquez pour activer ou désactiver la fonction loudness. ※ APS --- cliquez pour démarrer la fonction de balayage du programme/stockage sur la mémoire automatiques. - Stockage sur la mémoire automatique Maintenez le bouton AMS de la télécommande ou l’icône APS enfoncé...
- Page 44 FONCTIONNEMENT DU MENU Lorsque vous recherchez une station en mode local, si aucune station n’est disponible, l’appareil basculera en mode distant et recherchera automatiquement une station. Si aucune station n’est encore disponible, l’appareil arrêtera la recherche et reviendra en mode local. Lorsque vous recherchez une station en mode distant, si aucune station n’est disponible, l’appareil arrêtera la recherche en mode distant.
- Page 45 FONCTIONNEMENT DU MENU Groupe SPEECH : Groupe MUSIC: M1 : ACUALITES, AFFAIRES EN COURS, INFO M1 : M POP , M ROCK M2 : SPORT, EDUCATION, COMEDIE M2 : M SIMPLE D’ECOUTE, CLASSIQUE LEGER M3 : CULTURE, SCIENCE, VARIETES M3 : CLASSIQUE SERIEUX, AUTRES MUSIQUES M4 : METEO, FINANCE, PROGRAMMES POUR M4 : JAZZ, COUNTRY ENFANTS...
- Page 46 FONCTIONNEMENT DU MENU Appuyez sur l’icône DISC en haut à gauche de l’écran pour afficher l’image suivante : ※ LECTURE DU MENU VIDÉO DVD Lorsque vous lisez un DVD sur le lecteur DVD : 1) Vous lirez automatiquement le disque qui s’arrêtera à l’image du menu. Utilisez les boutons du curseur de la télécommande ou cliquez sur les icônes à...
- Page 47 FONCTIONNEMENT DU MENU DVD/VCD/CD/MP3 : Lecture normale → X2 → X4 → X8 → X20 ※ LECTURE AU RALENTI Pendant la lecture, appuyez sur SLOW de la télécommande. À chaque fois que vous appuyez sur le bouton, la vitesse d’avance lente (SF) change en fonction du disque comme indiqué ci-dessous. DVD : Lecture normale →...
- Page 48 FONCTIONNEMENT DU MENU ※ LECTURE RÉPÉTÉE Lecture répétée : Lorsque vous souhaitez répéter la lecture d’un disque, d’une piste ou d’un chapitre entier sur un disque. Appuyez plusieurs fois sur le bouton RPT de la télécommande pour sélectionner différents modes de répétition.
- Page 49 FONCTIONNEMENT DU MENU ※ FONCTIONS SPÉCIALES POUR DVD Fonction sous-titre multi-langue Pendant la lecture, appuyez sur Sub-T de la télécommande ou cliquez sur l’icône S-T à l’écran. Les informations correspondantes s’afficheront à l’écran. À chaque fois que vous appuyez sur le bouton, la langue du sous-titre changera dans un ordre successif. Remarques : Le numéro de la langue varie en fonction du disque.
- Page 50 FONCTIONNEMENT DU MENU 2) Utilisez les boutons du curseur pour sélectionner les objets que vous souhaitez programmer. Les objets sélectionnés seront surlignés. 3) Entrez le numéro que vous souhaitez programmer via les boutons numériques (0-9) de la télécommande. 4) Utilisez les boutons du curseur pour sélectionner PLAY, puis appuyez sur le bouton ENTER de la télécommande pour confirmer.
- Page 51 FONCTIONNEMENT DU MENU 1) REGLAGE SYSTEME A l’ouverture du menu des réglages, la page des réglages du système apparaîtra tout d’abord. Voir ci-dessous : SYSTEM SETUP TV SYSTEM TV TYPE PASSWORD RATING DEFAULT EXIT SETUP * SYSTEME TV : Changer le SYSTEME TV et choisir entre NTSC, PAL et AUTO. * TV TYPE : Changer TV TYPE et choisir entre 4:3 PS, 4:3 LB et 16:9.
- Page 52 FONCTIONNEMENT DU MENU 3) REGLAGE AUDIO A l’ouverture du menu AUDIO, l'image suivante apparaîtra: AUDIO SETUP AUDIO OUT EXIT SETUP * AUDIO OUT : Changer et choisir entre SPDIF/ ARRET, SPDIF/RAW et SPDIF/PCM. * KEY : Changer La tonalité à une certaine portée. 4) VIDEO SETUP A l’ouverture du menu VIDEO, l’image suivante apparaîtra : VIDEO SETUP...
- Page 53 FONCTIONNEMENT DU MENU 3. FONCTION USB/CARTE Une interface USB se situe devant l’appareil. Lorsque vous connectez une clé USB à l’interface, l’appareil peut lire les fichiers audio/vidéo contenus dans la clé USB. Remarque : utilisez un câble de conversion pour connecter le dispositif USB avec une borne normale via la petite interface USB sur le panneau avant.
- Page 54 FONCTIONNEMENT DU MENU 4. FONCTIONNEMENT DE L’ENTRÉE AUXILIAIRE Le panneau avant de l’appareil dispose d’une prise d’entrée auxiliaire AUX (AV1). A l’arrière de l’appareil, se trouve également un ensemble de prises d’entrée auxiliaire (AV2). Vous pouvez connecter un dispositif auxiliaire à partir de ces prises. Dans le menu principal, cliquez sur l’icône [entrée AUX] pour accéder à l’interface correspondante.
- Page 55 FONCTIONNEMENT DU MENU Cliquez sur l’icône correspondante du menu pour accéder au réglage. ※ Apparances Cliquez sur MODE1, MODE2 et MODE3 pour accéder à l’apparence de l’affichage correspondante. --- Réglage de la luminosité --- Réglage du contraste --- Réglage RGB (Saturation) --- cliquez pour revenir à...
- Page 56 FONCTIONNEMENT DU MENU ※ Voix La barre des valeurs Utilisez la barre des valeurs pour régler la valeur des modes suivants : BASS, TREB, BAL et FADE. ※ HEURE L’heure Les minutes Cliquez sur 12 ou 24 pour choisir les formats 12 ou 24 de l’heure. Cliquez sur l’heure ou les minutes que vous souhaitez changer, puis utilisez ‘-‘...
- Page 57 MCR-1295 HANDLEIDING Mobiel videosysteem DVD speler met radio 4.3 inch touchscreen monitor RDS (Radio Data Systeem) functie USB Interface SD/MMC kaartinterface Afstandsbediening...
- Page 58 AANSLUITINGEN Lijn No. Lijnkleur Functie (terminal kleur) Zwart Auxiliaire uitgang rechts (ROOD) Zwart Auxiliaire uitgang links (WIT) Zwart Auxiliaire video-uitgang (GEEL) Groen Achteruitzicht uitgang (GEEL) Grijs Video-uitgang 1 (GEEL) Grijs Video-uitgang 2 (GEEL) Grijs Achter RCA uit rechts (ROOD) Grijs Achter RCA uit links (WIT) Bruin Voor RCA uit rechts (ROOD)
- Page 59 LOCATIES EN FUNCTIES VAN DE SPELER (aan/uit knop): Druk op de knop om het apparaat aan/uit te zetten. MOD: Druk op deze knop om de gewenste modus te selecteren, zoals DVD, RADIO, AUX in … etc. (Microfoon optioneel voor BT): niet geldig voor dit apparaat zonder Bluetooth functie. LOU/AF: Druk kort op deze knop om 'loudness’...
- Page 60 LOCATIES EN FUNCTIES VAN DE AFSTANDSBEDIENING...
- Page 61 LOCATIES EN FUNCTIES VAN DE AFSTANDSBEDIENING LOC/RDM Druk op deze knop om het apparaat aan te Druk hierop om alle nummers in willekeurige zetten. Druk op deze knop om het apparaat uit volgorde af te spelen. te zetten als het apparaat aanstaat. Druk hier in radio modus kort op om te MODE schakelen tussen lokale en veraf gelegen...
- Page 62 LOCATIES EN FUNCTIES VAN DE AFSTANDSBEDIENING 20. Langzaam De afstandsbediening instellen Indrukken bij sommige disks om de langzaam De batterijen plaatsen afspeel functie op te starten. 1. Open het deksel van het batterijcompartiment. 21. ZOOM 2. Plaats de nieuwe batterijen. Zorg ervoor dat de Indrukken om het beeld te vergroten.
- Page 63 BASISBEDIENING HET APPARAAT AAN-/UITZETTEN Druk op de knop op het voorpaneel of op de afstandsbediening om het apparaat aan te zetten. Als het apparaat aanstaat kunt u door op de knop op het voorpaneel of op de afstandsbediening te drukken het apparaat uitzetten.
- Page 64 BASISBEDIENING MUTE FUNCTIE Door op de knop op het voorpaneel of op op de afstandsbediening te drukken wordt het geluid gedempt. Door weer te drukken wordt het geluid weer ingeschakeld. MODUS SELECTIE Druk op de MOD knop op het voorpaneel of op MODE op de afstandsbediening om de gewenste modus te selecteren om van te genieten.
- Page 65 MENUBEDIENING HOOFDMENU Als het apparaat aanstaat wordt het volgende beeld weergegeven. In een andere modus kunt u op het terugkeer icoon rechtsboven in het scherm klikken om terug te keren naar het hoofdmenu. Klik op de verschillende iconen in de interface om de gewenste modus te openen. De volgende inhoud geeft de verschillende functies weer die het apparaat ter beschikking heeft.
- Page 66 MENUBEDIENING ※ MUT--- klik om het geluid te dempen of weer aan te zetten. ※ LOUD--- klik om loudness aan of uit te zetten. ※ APS--- klik om de automatische geheugenopslag/programma scannen functie te activeren. - Automatisch geheugenopslag Druk op de AMS knop op de afstandsbediening of op het APS icoon en houdt deze enkele seconden ingedrukt waarna de radio vanaf de huidige frequentie begint te zoeken en de signaalsterkte controleert totdat één zoekcycles is afgerond.
- Page 67 MENUBEDIENING Indien in lokale modus tijdens het zoeken geen zender beschikbaar is wordt er naar de veraf modus overgeschakeld en automatisch naar een zender gezocht. Indien ook daar geen zender beschikbaar is zal de zoekfunctie stoppen en wordt er terug geschakeld naar de lokale modus. Indien er in veraf modus naar een zender wordt gezocht en er is in deze modus geen zender beschikbaar, dan zal het zoeken in veraf modus worden gestaakt.
- Page 68 MENUBEDIENING MUZIEK groep: SPRAAK groep: M1: POP M, ROCK M M1: NIEUWS, ZAKELIJK, INFORMATIE M2: EASY M, LICHTE M M2: SPORT, EDUCATIE, DRAMA M3: KLASSIEK, ANDERE M 3: KULTUUR, WETENSCHAP, GEVARIEERD M4: JAZZ, COUNTRY M4: WEER, FINANCIEEL, KINDEREN M5: NATIONAAL M, GOUWE OUWE M5: SOCIAAL, RELIGIE, BELSPELLEN M6: VOLK M M6:REIZEN,ONTSPANNING,DOCUMENTAIRE...
- Page 69 MENUBEDIENING Klik op het DISC icoon linksboven in het scherm om het volgende beeld weer te geven: ※ DVD VIDEO AFSPEEL MENU Als een DVD disk in de DVD speler wordt afgespeeld: 1) De disk wordt automatisch afgespeeld en stopt bij de menu weergave. Gebruik de pijlknoppen op de afstandsbediening of klik op de iconen op het beeld om tussen de gemarkeerde werkbalken in het menu te navigeren.
- Page 70 MENUBEDIENING DVD/VCD/CD/MP3: Normaal afspelen → X2 → X4 → X8 → X20 ※ LANGZAAM AFSPELEN Druk tijdens het afspelen op SLOW op de afstandsbediening. Elke keer als de knop wordt ingedrukt verandert de snelheid van langzaam vooruit afspelen (SF) afhankelijk van de disk als volgt. DVD: Normaal afspelen →...
- Page 71 MENUBEDIENING Functie: geeft de gespeelde tijd van het huidige hoofdstuk weer. 4) C-: Geeft de resterende tijd van het huidige hoofdstuk weer. 5) T: Geeft de gespeelde tijd van de hudige titel weer. 6) T-: Geeft de resterende tijd van de huidige titel weer. 7) C: Geeft de gespeelde tijd van het huidige hoofdstuk weer.
- Page 72 MENUBEDIENING ※ ZOOM FUNCTIE Hiermee wordt de afmeting van het beeld vergroot. Druk op de ZOOM knop op de afstandsbediening om te wisselen tussen schaal 2, schaal 3 en schaal 4, 1/2 schaal,1/3 schaal, 1/4 schaal. Indien de schaal ¼ is kunt u door weer op de ZOOM knop te drukken de zoom functie uitzetten. ZOOM 2 →...
- Page 73 MENUBEDIENING Om een disk te programmaren om af te spelen dient u de instructies hieronder te volgen. Voor VCD/CD/MP3: 1) Druk met PBC UIT op de PROG knop van de afstandsbediening om de programmeren bewerkingsinterface te openen. 2) Gebruik de pijlknoppen om de onderdelen te selecteren die u wilt programmeren.
- Page 74 MENUBEDIENING pagina’s te navigeren, zoals SYSTEEM INSTELLINGEN, TAAL INSTELLINGEN, AUDIO INSTELLINGEN, VIDEO INSTELLINGEN en DIGITALE INSTELLINGEN. Systeem- Taal- Audio Video Digitale instellingen instellingen instellingen instellingen instellingen * Druk op de knop om de pijl naar de instellingen pagina hieronder te bewegen waarna u de knoppen kunt gebruiken om tussen de verschillende instellingen opties te navigeren.
- Page 75 MENUBEDIENING U kunt voor de SUBTITLE LANGUAGE kiezen uit: Italiaans, Engels, Poetsmiddel, Frans, Spaans, Russisch, Duits en UIT. U kunt voor de MENU LANGUAGE kiezen uit: Italiaans, Engels, Poetsmiddel, Frans, Spaans, Russisch, Duits en Latijn. U kunt voor de DIVX LANGUAGE kiezen uit: CYRILLIC en- WESTERN EU. 3) AUDIO INSTELLINGEN Indien u het AUDIO menu opent ziet u het volgende beeld: AUDIO SETUP...
- Page 76 MENUBEDIENING ※ LAATST GESPEELD GEHEUGEN 1) Als u tijdens het afspelen van een disk het apparaat uitzet en dan weer aan zal de DVD verder afspelen vanaf het punt waarop er werd onderbroken. 2) Indien u tijdens het afspelen op de MODE knop drukt om naar een andere modus over te schakelen en dan weer terugkeert naar de DVD modus zal het apparaat het afspelen hervatten vanaf het punt dat er werd onderbroken.
- Page 77 MENUBEDIENING 4. BEDIENING AUXILIAIRE INVOER Op het voorpaneel van het apparaat zit een auxiliaire ingang AUX (AV1). Op de achterkant van het apparaat zit ook een groep auxiliaire ingangen (AV2). U kunt een auxilliair apparaat op deze ingangen aansluiten. Klik in het hoofdmenu op het [AUX in] icoon om de corresponderende interface te openen.
- Page 78 MENUBEDIENING Klik op het corresponderende icoon in het menu om de instellingen te openen. ※ Uiterlijk Klik op MODE1, MODE2 en MODE3 de corresponderende uiterlijkweergave te openen. --- Helderheid instellen --- Contrast instellen --- RGB (Chroma) instellen --- Klikken om terug te keren naar de hoofdmenu interface. --- Klik voor huidige modus, zoals radio, DVD…...
- Page 79 MENUBEDIENING ※ Stem De waardebalk Gebruik de waardebalk om de waarde van BASS, TREB, BAL en FADE modus in te stellen. ※ KLOK Het uur De minuut Klik 12 of 24 om het 12 uur formaat of 24 uur formaat te selecteren. Klik op het uur of de minuut welke u wilt veranderen, en daarna op ‘-’...
Need help?
Do you have a question about the MCR-1295 and is the answer not in the manual?
Questions and answers