Table of Contents

Subscribe to Our Youtube Channel
Related Manuals for Master-force 240-0041


Summary of Contents for Master-force 240-0041
- Page 1 18" Scroll Saw with Rotary Attachment DO NOT RETURN TO STORE Questions? Problems? Please call our customer help line: (888) 315-3080 M-F 8-5 CST or by email: partsandservice@greatlakestec.com SKU: 240-0041 Operation and Safety Instructions...
-
Page 2: Table Of Contents
Know your scroll saw……………………………………………………………………………. Assembly and adjustments………………………………………………………………………. Operation………………………………………………………………………………………… Maintenance……………………………………………………………………………………… Exploded view and parts list…………………………………………………………………………… Warranty………………………………………………………………………………………….. Technical data 18" Scroll Saw with Rotary Attachment 240-0041 Motor: 120 V, 60 Hz, 2 A Blade speed: 400-1,600 SPM Rotary tool speed: 1,100-4,500 RPM Maximum cutting capacity: 2”... -
Page 3: General Safety Rules
11. AVOID ACCIDENTAL START-UPS. Make sure the power switch is in the OFF position before plugging in the power cord. 12. REMOVE ADJUSTMENT TOOLS. Always make sure all adjustment tools are removed from the power tool before turning it on. 240-0041 (888)315-3080... - Page 4 Z87.1. Normal safety glasses only have impact resistant lenses and are not designed for safety. Wear a face or dust mask when working in a dusty environment. Use ear protection, such as plugs or muffs, during extended periods of operation. 240-0041 (888)315-3080...
-
Page 5: Specific Safety Rules For The Scroll Saw
• Carry the scroll saw by its base. Do not move the scroll saw by pulling on the power cord. Pulling on the power cord could cause damage to the insulation or the wire connections resulting in electric shock or fire. 240-0041 (888)315-3080... - Page 6 • Turn the saw OFF and unplug the power cord if the blade jams in the workpiece while being backed out. This condition is usually caused by sawdust clogging the line you are cutting. If this happens, turn OFF the scroll saw and unplug the power cord. Wedge open the workpiece and back out the blade. 240-0041 (888)315-3080...
-
Page 7: Electrical Information
2. Properly grounded outlet 3 - Grounding prong 3. Grounding prong CAUTION: In all cases, make certain the outlet in question is properly grounded. If you are not sure if it is, have a licensed electrician check the outlet. 240-0041 (888)315-3080... - Page 8 OFF position and the electric current is rated the same as the current stamped on the motor nameplate. Running at a lower voltage will damage the motor. WARNING: This tool must be grounded while in use to protect the operator from electric shock. 240-0041 (888)315-3080...
-
Page 9: Know Your Scroll Saw
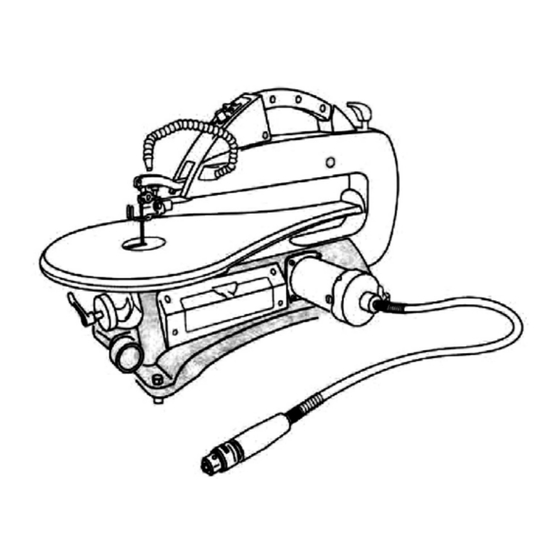
Know your scroll saw On/off and light switches Rotary table Speed control knob Blade tension lock lever Dust blower and light Rubber bearing cover Lower blade holder Motor Bevel lock handle Storage compartment Bevel adjustment knob Sawdust port Base Saw table Rotary tool cable Blade Rotary tool in clamp... -
Page 10: Assembly And Adjustments
Rotary table with dust port (Assembled on the scroll saw) Rotary table insert Chuck key Not shown: Pin-less blade (1) Allen wrench (3mm, 4mm & 5mm) Extra brush (1 set) Storage compartment (Fig. 2) A storage location (1) for small accessories 240-0041 (888)315-3080... - Page 11 4. Tighten the table bevel lock handle (3) to prevent movement. 5. Loosen the screw (7) holding the bevel scale pointer and position pointer to 0º. Tighten the screw. 6. Attach the blade guard foot (1) and tighten the screw (2). 240-0041 (888)315-3080...
- Page 12 1. Secure the rotary tool table (1) to the side of the saw using the four hex screws (2) and washers provided with the table. 2. Place the rotary table insert (3) in the opening on the rotary table. Note: The rotary tool (4) attaches to the clamp located below the rotary tool table. 240-0041 (888)315-3080...
- Page 13 This will keep your saw cutting efficiently. Adjusting the dust blower/light (Fig. 11) For best results, the dust blower tube (1) should be adjusted to direct air and light at the blade and workpiece. 240-0041 (888)315-3080...
-
Page 14: Blade Care
3. Use the right blade (see instructions on replacement blade packaging for proper use.) 4. Feed the workpiece correctly into the blade. 5. Use thin blades for intricate cutting. CAUTION: Any and all servicing should be performed by a qualified service center. 240-0041 (888)315-3080... - Page 15 Place a blade (2) in the upper and lower blade holders (3). b. Tighten the lower and upper blade knobs (4) by hand or provided allen wrench. c. Lower the blade tension lock lever (1). Make sure the blade is properly located in the blade holders. 240-0041 (888)315-3080...
- Page 16 Assembly and adjustments (continued) WARNING: Remove the saw blade before installing and/or using the rotary tool. Connect the rotary tool to the saw (Fig. 16) The rotary tool can be used as a handheld or stationary device. The rotary tool connects to the motor and is operated using the ON/OFF switch and variable speed dial on the saw.
-
Page 17: Operation
LED Light switch (Fig. 19) 1. To turn on the light, press the light switch (1) to the ON (I) position. 2. To turn OFF the light, press the light switch (1) to the OFF (O) position. 240-0041 (888)315-3080... - Page 18 CAUTION: Do not force the leading edge of the workpiece into the blade. The blade will deflect, reducing accuracy of cut, and may break. When the cut is complete, move the trailing edge of the workpiece beyond the blade guard foot. Turn the switch OFF. 240-0041 (888)315-3080...
- Page 19 5. Follow steps 3-7, under Freehand cutting. 6. When finished making the interior scroll cuts simply turn the scroll saw OFF. Unplug the saw before removing the blade from the blade holder. Remove the workpiece from the table. 240-0041 (888)315-3080...
- Page 20 When the cut is complete, m ove the trailing edge of the workpiece beyond the blade guard foot. Turn the switch OFF. Tool needed antity Description Small C-clamp Ruler or measuring tape 12” straight scrap of wood (thickness to match workpiece) 240-0041 (888)315-3080...
-
Page 21: Maintenance
While the brushe s are seating, some sparking may be noticed in the motor. This is normal for new brushes. 240-0041 (888)315-3080... -
Page 22: Exploded View And Parts List
Exploded view and parts list 240-0041 (888)315-3080... - Page 23 (continued) Part# Order # Descrip tion Order # Description 240-0041-001 Screw ST4.2×12 240-0041-041 Screw M 5x25 240-0041-002 Cover 240-0041-042 Screw M6x20 240-0041-003 Screw M4x12 240-0041-043 Sleeve 240-0041-004 Washer 4 240-0041-044 Washer 240-0041-005 Screw ST2.9×8 240-0041-045...
- Page 24 Exploded view and parts list (continued) Order # Descrip tion rt # Order # Description 240-0041-081 Snap Ring 12 240-0041-121 Rotary Shaft 240-0041-082 Screw M4x30 240-0041-122 Chuck 240-0041-083 Wheel 240-0041-123 Clamp Clip 240-0041-084 Screw M5x8 240-0041-124 LED Light 240-0041-085 Motor...
-
Page 25: Warranty
/ comments, technical assistance or repair parts – lease Call Toll Free at: 1-888-315-3080 (M-F 8am – 5pm) CST AVE YOUR RECEIPTS. THIS WARRANTY IS VOID WITHOUT THEM. Printed in China 240-0041 (888)315-3080...
Need help?
Do you have a question about the 240-0041 and is the answer not in the manual?
Questions and answers