Table of Contents
Advertisement
Advertisement
Table of Contents

Related Manuals for MSI Wind Box DC100


Summary of Contents for MSI Wind Box DC100
- Page 1 Wind Box DC100 Personal Computer MS-B023 (V1.X) System G52-B0231X1...
-
Page 2: Table Of Contents
Preface Contents Copyright Notice .....................iii Trademarks ....................iii Revision ......................iii Upgrade and Warranty .................. iv Acquisition of Replaceable Parts ..............iv Technical Support ..................iv Green Product Features ................. v Environmental Policy ..................v Safety Instructions ..................vi CE Conformity ....................viii FCC-B Radio Frequency Interference Statement ........viii WEEE Statement .................. -
Page 3: Copyright Notice
Trademarks All trademarks are the properties of their respective owners. ■ MSI is a registered trademark of Micro-Star Int’l Co., Ltd. ■ AMD is a registered trademark of Advanced Micro Devices, Inc. ■... -
Page 4: Upgrade And Warranty
Alterna- tively, please try the following help resources for further guidance. ◙ Visit the MSI website for technical guide, BIOS updates, driver updates and other information via http://www.msi.com/service/download/ http://www.msi.com/service/download/ ◙... -
Page 5: Green Product Features
Users should contact the local authorized point of collection for recycling and disposing of their end-of-life products. ◙ Visit the MSI website and locate a nearby distributor for further recycling information. ◙ Users may also reach us at gpgreenteam@msi.com for information regarding proper Disposal, Take-back, Recycling, and Disassembly of MSI products. -
Page 6: Safety Instructions
Preface Safety Instructions Read the safety instructions carefully and thoroughly. All cautions and warnings on the equipment or user’s manual should be noted. Keep the User’s Guide that comes with the package for future reference. Keep this equipment away from humidity and high temperature. Lay this equipment on a reliable fl... - Page 7 Wind Box DC100 Never pour any liquid into the opening that could damage or cause electri- cal shock. Place the power cord in a way that people are unlikely to step on it. Do not place anything on the power cord.
-
Page 8: Ce Conformity
Preface CE Conformity Hereby, Micro-Star International CO., LTD declares that this de- vice is in compliance with the essential safety requirements and other relevant provisions set out in the European Directive. FCC-B Radio Frequency Interference Statement This equipment has been tested and found to comply with the limits for a Class B digital device, pursuant to Part 15 of the FCC Rules. -
Page 9: Weee Statement
Wind Box DC100 WEEE Statement (English) Under the European Union (“EU”) Directive on Waste Electrical and Electronic Equipment, Directive 2002/96/EC, which takes eff ect on August 13, 2005, products of “electrical and electronic equipment” cannot be discarded as municipal waste anymore and manufacturers of covered electronic equipment will be obligated to take back such products at the end of their useful life. - Page 10 Preface (Greek) (Ελληνικά) Σύμφωνα με την Οδηγία 2002/96/ΕΚ της Ευρωπαϊκής Ένωσης («ΕΕ») περί Απόρριψης Ηλεκτρικού και Ηλεκτρονικού Εξοπλισμού (WEEE), η οποία λαμβάνει ισχύ στις 13 Αυγούστου 2005, τα προϊόντα «ηλεκτρικού και ηλεκτρονικού εξοπλισμού» δεν είναι δυνατόν να απορριφθούν πλέον ως κοινά απορρίμματα και οι κατασκευαστές κεκαλυμμένου...
- Page 11 Wind Box DC100 (Indonesia) (Bahasa Indonesia) Sesuai dengan Regulasi Uni Eropa (“UE”) perihal WEEE (Limbah Peralatan Listrik dan Elektronik), Directive 2002/96/EC, yang berlaku sejak 13, 2005, produk “peralatan listrik dan elektronik” tidak lagi dapat dibuang sebagai sampah umum dan pabrik peralatan elektronik diwajibkan untuk mengambil kembali produk terse- but pada saat masa pakainya habis.
- Page 12 Preface (Danish) (Dansk) I henhold til direktiv fra den europæiske union (EU) vedrørende elektrisk og elektronisk aff ald , Direktiv 2002/96/EC, som træder i kraft den 13. august 2005, må produkter som “elektrisk og elektronisk udstyr” ikke mere bortskaff es som kommunalt af- fald.
-
Page 13: Overview
Chapter 1 Overview Congratulations for purchasing the Wind Box DC100 (MS-B023) System. This system is your best slim PC choice. With the fantastic appearance and ultrasmall form factor, it can easily be set anywhere. The feature packed platform also gives you an exciting PC experi-... -
Page 14: Packing Contents
Overview Packing Contents Wind Box Series AC/DC Adapter AC Power Cord User Manual Driver/ Utility Disk Stand & Quick Guide * Please contact us immediately if any of the items is damaged or missing. * The illustrations are for reference only and your packing contents may slightly vary depending on the model you purchased. -
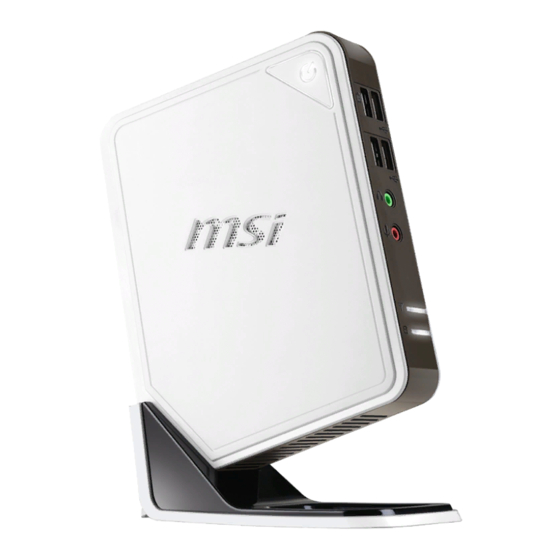
Page 15: System Overview
Wind Box DC100 System Overview Front View Ventilator Ventilator The ventilator on the enclosure is used for air convection and to prevent the equipment from overheating. Do not cover the ventilator. Card Reader Drive Card Reader Drive The built-in card reader may support various types of memory cards. - Page 16 Overview USB 2.0 Port USB 2.0 Port The USB (Universal Serial Bus) port is for attaching USB devices such as keyboard, mouse, or other USB-compatible devices. It supports up to 480Mbit/s (Hi-Speed) data transfer rate. Headphone Jack Headphone Jack This is a connector for headphones. Microphone Jack Microphone Jack This is a connector for microphones.
-
Page 17: Rear View
Wind Box DC100 Rear View Card Reader Drive Card Reader Drive The built-in card reader may support various types of memory cards. Power Button/ LED Power Button/ LED Press the power button to turn the system on and off . The power LED glows when the system is turned on and goes off... - Page 18 Overview HDMI-Out Port HDMI-Out Port The High-Defi nition Multimedia Interface (HDMI) is an all-digital audio/ vid- eo interface capable of transmitting uncompressed streams. HDMI supports all TV format, including standard, enhanced or high-defi nition video, plus multi-channel digital audio on a single cable. USB 2.0 Port USB 2.0 Port The USB (Universal Serial Bus) port is for attaching USB devices such...
- Page 19 Wind Box DC100 Power Jack Power Jack The AC/DC adapter converts AC power to DC power for this jack. Power supplied through this jack supplies power to your personal computer. To prevent damage to the PC, always use the supplied power adapter.
-
Page 20: System Specifi Cations
Overview System Specifi cations Processor Processor ■ ® Brazos Fusion APU (Accelerated Processing Unit) Chipset Chipset ■ Hudson-M1 Chipset ® Memory Memory ■ 1 DDR3 1066 SO-DIMM slot ■ Supports the maximum of 4GB ■ Wired LAN: supported by Realtek RTL8111E Gigabit Ethernet controller ®... - Page 21 Wind Box DC100 Power Supply Power Supply ■ 40 watt AC/DC adapter with active PFC ■ Input: 100-240V~, 50-60Hz, 1.2A ■ Output: 19V 2.1A Dimension Dimension ■ 186 mm (W) x 222 mm (H) x 76 mm (D) (with stand) ■...
-
Page 22: Component Replacement & Upgrade
Overview Component Replacement & Upgrade Please note that certain components preinstalled in the product may be upgradable or replaceable by user’s request depending on the models users purchased. 1-10 To learn more about upgrade limitation, please refer to the specifi cations in the User’s Manual. -
Page 23: Getting Started
Chapter 2 Getting Started This chapter provides you with the information on hard- ware setup procedures. While connecting peripheral devices, be careful in holding the devices and use a grounded wrist strap to avoid static electricity. -
Page 24: Safety & Comfort Tips
Put your hands on the desk naturally to support your wrists. Avoid using your PC in a place where discomfort may occur (such as on the bed). The Wind Box DC100 is an electrical device. Please treat it with great care to avoid personal injury. -
Page 25: Connecting Peripheral Devices
To connect the VGA/ HDMI device, fi rst make sure the Wind Box DC100 and the tar- geted device are both powered off , and then connect the cable of the device to the VGA/... - Page 26 To connect these devices, install the drivers for each device fi rst if necessary, and then connect the device to the Wind Box DC100. This Wind Box DC100 is capable of auto detecting the USB devices installed, and if there is no detection of the devices, please manually enable the USB devices by going to Start Menu / Control Panel / Add Hardware to add the new device.
- Page 27 Wind Box DC100 Connecting the Network Device The RJ-45 connector of the Wind Box DC100 allows you to connect the LAN (local area network) devices, such as a hub, switch and gateway, to build a network connection. For more instructions or detailed steps on connecting to the LAN, please ask your MIS...
- Page 28 Getting Started Wireless LAN (Optional) This Wind Box DC100 is equipped with wireless LAN module which allows users to perform fast data transmission with standard IEEE 802.11 technology for wireless LAN. This gives users the mobility to move around within a broad coverage area and still be connected to the network.
-
Page 29: Hardware Setup
3. Plug the male end of the AC power cord to the electrical outlet. Important Important We suggest that you connect the AC/DC adapter to your Wind Box DC100 fi rst and then connect the AC power cord to the socket-outlet for safety concerns. Powering on the System... -
Page 31: System Operations
Chapter 3 System Operations This chapter provides you with essential information on system operations, such as system boot setup, recovery disc creation, network connection, and so on. Important Important • It is highly recommended that you create a system re- covery disc as the backup solution in the event of a catastrophic disk failure or other accidents. -
Page 32: System Booting Setup For The Fi Rst Time
System Operations System Booting Setup for the fi rst time For the fi rst-time use, you will need to go over the following steps to start using your Wind Box Series. The entire booting setup will take you around 30 min- utes. -
Page 33: Creating System Recovery Disc
Wind Box DC100 Creating System Recovery Disc For the fi rst-time use, it is highly recommended that you create a system recovery disc as the backup solution in the event of a catastrophic disk failure or other ac- cidents. Before moving forward, please make sure your system booting setup is complete and go over the following procedures to get it done. - Page 34 System Operations 3. Select [Create and burn a recovery disc] and click [Next] to continue. Alterna- tively, choose [Advanced] to bring forth advanced options. 4. The image of recovery disc is being created. It takes some time to fi nish the processing.
- Page 35 Wind Box DC100 5. Follow the on-screen instructions to prepare enough number of blank DVD discs. Insert the blank DVD disc into the optical disc drive and click [Next] to continue. 6. The Windows Disc Image Burner pops up. Click [Burn] to start the burning...
- Page 36 System Operations 7. On completion of the disc creation, click [Close] to exit and take out the disc. Follow the on-screen instructions to create all recovery discs. 8. All recovery discs have been successfully created. Please store the discs carefully and click [Next] to continue.
- Page 37 Wind Box DC100 9. Check the following box if you want to remove the temporary fi les. Click [Fin- ish] to complete recovery disc creation.
-
Page 38: Network Connection Under Windows
System Operations Network Connection under Windows Wired LAN 1. Go to [Start] > [Control Panel]. 2. Select [Connect to the Internet] under [Network and Internet]. - Page 39 Wind Box DC100 3. Select [Broadband (PPPoE)] to connect using DSL or cable that requires a user name and password. 4. Type the information from your Internet Service Provider (ISP) and click [Connect] to establish your LAN connection.
-
Page 40: Wireless Lan
System Operations Wireless LAN 1. Go to [Start] > [Control Panel]. 2. Select [Connect to the Internet] under [Network and Internet]. 3-10... - Page 41 Wind Box DC100 3. Select [Wireless] to connect using a wireless router or a wireless network. 4. A list of available WLAN connections pops up. Choose a connection from the list or click [Open Network and Sharing Center] to establish a new connec- tion.
- Page 42 System Operations 6. Followingly, choose [Manually connect to a wireless network] and click [Next] to continue. 7. Enter information for the wireless network you intend to add and click [Next] to proceed. 3-12 8. A new WLAN connection has been made. Click [Close] to exit or select [Change connection settings] to modify the WLAN settings.
-
Page 43: Power Management
Wind Box DC100 Power Management Power management of personal computers (PCs) and monitors has the potential to save signifi cant amounts of electricity as well as deliver environmental benefi ts. To be energy effi cient, turn off your display or set your PC to sleep mode after a period of user inactivity. - Page 44 System Operations ■ The Shut Down Computer menu presents the options of Sleep (S3/S4) & Shut Down (S5) for rapid and easy management of your system power. Power Management through ENERGY STAR qualifi ed monitors (Optional) The power management feature allows the computer to initiate a low-power or “Sleep”...
-
Page 45: System Recovery
Important Important The System Recovery Function is only available on systems bundled with Win- dows OS and MSI utilities by default. The purposes for using the System Recovery Function may include: ■ Restore the system back to the initial status of original manufacturer’s default settings. - Page 46 System Operations 3. Select [MSI Recovery Manager] to start the System Recovery Function; or select [EXIT] to restart the system. 4. The System Recovery Function will get your system back to default settings. Press [OK] to confi rm. 5. Press [OK] to reconfi rm and start the System Recovery Function. Alternatively, press [Cancel] to stop.
-
Page 47: Recovering The System With The Recovery Discs
Wind Box DC100 Recovering the System with the Recovery Discs If the F3 hotkey recovery cannot work, try recovering your system with the recov- ery discs that you created beforehand. Follow the instructions below to continue: 1. Insert the recovery disc into the optical disc drive and restart the system. - Page 48 System Operations 5. The system recovery menu pops up. [Hard Disk Recovery] will format the whole HDD. All data on the HDD will be erased while all settings will be re- stored to manufacturer default. Select [Hard Disk Recovery] only when your HDD is infected with fatal viruses and no solution can be found except a clear cleanup of the HDD.
- Page 49 Wind Box DC100 7. DO NOT turn off the system power while performing the system recovery func- tion, or it may cause unknown damage to the system. 8. The following message indicates successful system recovery. Press [OK] to restart the system and access the Windows operating system as usual.
Need help?
Do you have a question about the Wind Box DC100 and is the answer not in the manual?
Questions and answers