Table of Contents
Advertisement
Quick Links
Download this manual
See also:
Instruction Manual
Advertisement
Table of Contents

Related Manuals for Sennheiser EMP 2015


Summary of Contents for Sennheiser EMP 2015
- Page 1 INSTRUCTION MANUAL EMP 2015 Soundfield System...
- Page 2 We have designed this product to give you reliable operation over many years. Please take a few moments to read these instructions carefully, as we want you to enjoy your new Sennheiser product quickly and to the full. About the instruction manual The instruction manual consists of several parts: •...
-
Page 3: Table Of Contents
Installing a system including two transmitters and an audio device ... 57 Recommendations and tips ..............58 8 Special adjustments ..............59 Basic functions of the Sennheiser operating menu ......59 Adjusting the sensitvity (transmitter only) ........... 60 Adjusting the squelch threshold (receiver section only) ...... 61 Selecting the content of the standard display ........ -
Page 4: Area Of Application
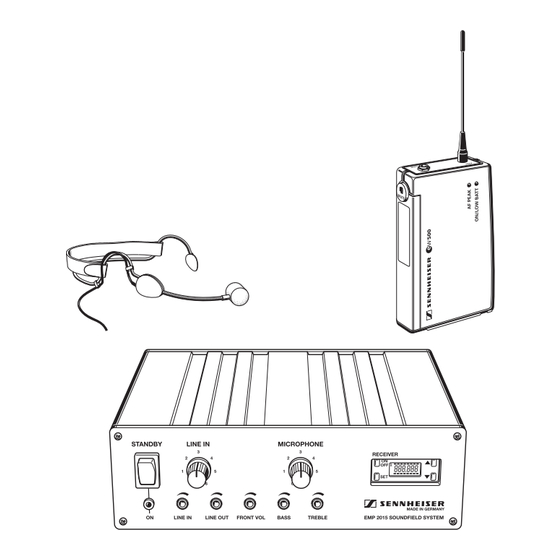
2 Area of application The EMP 2015 Soundfield System is a matched combination of a bodypack transmitter, a microphone and a receiver with an integrated power amplifier. The use of advanced PLL and microprocessor technology combined with the HDX noise reduction system and the latest amplifier technolgy ensure extremely reliable transmission and excellent sound quality. -
Page 5: Cautions And Advisories
This can cause a short circuit and may damage your loudspeaker. SK 500 bodypack transmitter 4 Delivery includes The EMP 2015 Soundfield System consists of the following components: • SK 500 bodypack transmitter with transmitting antenna •... -
Page 6: Components Of The Soundfield System
5 Components of the Soundfield System EMP 2015 receiver/amplifier combination The heart of the Soundfield System is the EMP 2015 receiver with an integrated power amplifier to which you can connect additional audio and sound recording devices as well as FM systems for persons with impaired hearing. -
Page 7: Sk 500 Bodypack Transmitter
SK 500 bodypack transmitter The bodypack transmitter transmits the signals of the connected microphone to the receiver section of the EMP 2015. Antenna Red LED for operation and battery status indication (ON/LOW BAT) Yellow LED for audio peak (AF PEAK) -
Page 8: Getting Ready
To ensure sufficient ventilation, please make sure that the ventilation apertures at the side panels are not covered. An integrated temperature monitoring device protects the EMP 2015 against overheating by turning it off if the temperature rises above a certain value. After sufficient cooling, the EMP 2015 is automatically turned on again. -
Page 9: Me 3 Headmic
Connecting the antenna Screw the antenna onto the antenna socket (M3 connection). Connecting the microphone Connect the 3.5 mm jack plug from the microphone cable to the jack socket (MIC/LINE) Lock the jack plug by screwing down the locking ring Attaching the transmitter to clothing The SK 500 transmitter is best attached to e.g. -
Page 10: Installing The Basic System
Installing the basic system The basic system consists of the EMP 2015 receiver/amplifier combination, the SK 500 bodypack transmitter, a microphone and loudspeakers: Installing the loudspeakers The Soundfield System should generate a uniform sound field in the entire room. The speaker’s voice should not be reproduced louder than normal but should be heard at the same level everywhere in the room. - Page 11 Connecting the loudspeakers The EMP 2015 has four independent power amplifiers. Therefore, you can connect up to eight loudspeakers to the EMP 2015 Soundfield System. When installing a system with up to eight loudspeakers, make sure that the individual loudspeakers have an impedance from 4 to 8 ohms.
-
Page 12: Turning The System Components On And Off
Turning the system components on and off Turning the amplifier on/off The amplifier is fitted with both a mains switch and an operating switch . Via the mains switch, the amplifier can be disconnected from the mains (position “0”). The mains switch can always remain set to “I”. When putting the system into operation, turn the amplifer on by setting the mains switch to “I”. -
Page 13: Operation
Operation Transmitter and receiver section of the Soundfield System have been factory- preset to allow immediate use after system installation and turn-on. For excellent speech intelligibility, however, make sure that the transmitter sensitivity is adjusted correctly (u “Adjusting the sensitivity”). Buttons Press the button... - Page 14 Battery status indication The red LED and the 8-segment bargraph on the display provide information on the battery status. Bargraph: The bargraph indicates the (remaining) battery capacity in 3 steps: 8 segments: the full battery capacity is available, 4 segments: the battery capacity is sufficient, 1 segment: the battery is going flat, immediately replace the battery.
-
Page 15: Connecting External Audio Devices
You can connect two mono or two stereo audio devices to the amplifier. Connect the RCA plugs of the sound recording devices to the RCA sockets (LINE IN) at the rear of the EMP 2015. For correct connection of the different audio devices, please refer to the diagrams at the left. Note: Stereo (left-right) signals are mixed in the amplifier and are then available as a mono signal. -
Page 16: Connecting Fm Systems For Persons With Impaired Hearing
All standard FM transmitters are fitted with a line or audio input which should be used for connecting the transmitter. In general, the line output ¸ level control (LINE OUT) on the EMP 2015 should be turned clockwise as far as possible. ¸ Testing the FM system... -
Page 17: Special Applications
7 Special applications Installing a system with up to eight loudspeakers By connecting two loudspeakers to each loudspeaker output, you can connect up to eight loudspeakers to the Soundfield System: The Soundfield System should generate a uniform sound field in the entire room. - Page 18 Connecting the loudspeakers When installing a system with up to eight loudspeakers, make sure that the individual loudspeakers have an impedance from 4 to 8 ohms. The peak pulse power must be 30 W minimum. When using more than one loudspeaker, make sure that the individual loudspeakers have the same polarity (+/–).
-
Page 19: Connecting Sound Recording Devices
Connect the RCA plugs of the sound recording devices to the RCA sockets (LINE OUT) at the rear of the EMP 2015. For correct connection of the different audio devices, please refer to the diagrams at the left. 2 mono sound recording devices... -
Page 20: Installing A System Including Several Transmitters (Team Teaching)
With one Soundfield System, up to three speakers can speak simultaneously in the same room. Transmitter 1 is directly received by the receiver section of the EMP 2015. Transmitters 2 and 3 require an additional receiver respectively. The receivers can be connected to the RCA sockets (LINE IN) of the EMP 2015. -
Page 21: Installing A System Including Two Transmitters And An Audio Device
You can also connect an additional receiver and an external audio device (e.g. VCR) to the two line inputs (LINE IN) of the EMP 2015. With such a system, the signals of two speakers speaking simultaneously and the signals of a VCR or similar are then reproduced by loudspeakers in the room. -
Page 22: Recommendations And Tips
Recommendations and tips ... for the ME 3 headmic Always use the microphone with a windscreen and position the microphone at the corner of the mouth. You can vary the bass reproduction by increasing/decreasing the talking distance. Make sure that the sound inlet is directed towards the mouth. The sound inlet is marked with a little dot. -
Page 23: Special Adjustments
8 Special adjustments Basic functions of the Sennheiser operating menu With the Soundfield System, all necessary adjustments to the transmitter and receiver section settings can be made by using the buttons. The settings are indicated on the respective displays. Important:... -
Page 24: Adjusting The Sensitvity (Transmitter Only)
SenSit Adjusting the sensitvity (transmitter only) If the microphone sensitivity is not adjusted correctly, the speaker’s voice can sound distorted or noisy. Distortion occurs if the microphone sensitivity is adjusted too high. In this case, the transmitter’s yellow audio peak indication LED lights up . -
Page 25: Adjusting The Squelch Threshold (Receiver Section Only)
Adjusting the squelch threshold (receiver section only) SqELCH The amplifier’s receiver section is equipped with an adjustable squelch which eliminates annoying noise when the transmitter is turned off. It also suppresses sudden noise when the transmitter leaves the reception area. Press the button to select the “SqELCH”... -
Page 26: Configuring A Frequency Memory
Configuring a frequency memory Transmitter and receiver section of the Soundfield System have 16 switchable frequency memories respectively to store up to 16 transmission and receiving frequencies. The 16 factory-preset transmission/receiving frequencies are all intermodulation-free, i.e. you could operate up to 16 transmission links simultaneously in the same room. - Page 27 Ch no 3. Assign a channel number You now have to assign the frequency memory a channel number (from 0 to 255). If you use several Soundfield Systems in neighboring rooms, you can assign channel numbers 1 – 16 to one group of transmitters and receivers and channel numbers 17 –...
-
Page 28: Activating/Deactivating The Lock Mode
Activating/deactivating the lock mode After you have finished your entries, you can lock the buttons on the transmitter and the receiver section to prevent accidental programming or turning off during operation. Activating the lock mode Press the button five times to select the “Loc” menu. The current setting is indicated on the display. -
Page 29: Acoustically Adapting The Soundfield System To A Room
Acoustically adapting the Soundfield System to a room Before you use the Soundfield System for the first time in a room, you should acoustically adapt it to the room. Turn on both the bodypack transmitter and the microphone. Reset the two volume controls on the amplifier to “0”. -
Page 30: Care And Maintenance
9 Care and maintenance The components of the Soundfield System should be cleaned from time to time. Use a damp cloth for cleaning. Do not use solvents or solvent-containing cleansing agents as these could damage the surface of the components. Replacing the windscreen If the windscreen shows signs of wear such as tears or holes, replace the windscreen. -
Page 31: Troubleshooting
No operation indication Battery is flat (transmitter) Replace the battery No mains connection (EMP 2015) Check to see if the mains plug is connected and if the amplifier is turned on No RF signal and... - Page 32 Transmission frequency is not the Set the transmitter and the same as the receiving frequency receiver section to the same frequency (u “Special adjustments”) If problems occur that are not listed in the above table, please contact your local Sennheiser agent for assistance.
-
Page 33: Recommended Accessories
11 Recommended accessories Clip-on microphone for SK 500, ME 2 condenser, omni-directional Clip-on microphone for SK 500, ME 4 condenser, cardioid Rack-mount receiver for operating an additional transmission link EM 500 Bodypack transmitter for “team teaching” SK 500 Connecting cable for connecting an EM 500, 1/4”... -
Page 34: Specifications
12 Specifications EMP 2015 receiver/amplifier combination Amplifier section Operating voltage 230 V (EU and UK version) 115 V (US version) Power consumption < 3 W (stand by) < 20 W (position “ON”) < 200 W (max. rms level) Fuse 2 AT...
Need help?
Do you have a question about the EMP 2015 and is the answer not in the manual?
Questions and answers