Table of Contents
Advertisement
Quick Links
Download this manual
See also:
Quick Reference Manual
Advertisement
Table of Contents

Related Manuals for Neve Genesys


Summary of Contents for Neve Genesys
-
Page 1: Issue 1
NEVE NEVE NEVE NEVE GENESYS User Manual Issue 1 527 - 384... -
Page 2: Health & Safety Notice
GENESYS User Manual Issue 1 Health & Safety Notice FOR YOUR OWN SAFETY AND THE PROTECTION OF OTHERS, PLEASE OBSERVE THE FOLLOWING SAFETY HEALTH AND SAFETY INSTRUCTIONS READ THESE INSTRUCTIONS AND KEEP THEM HANDY HEED ALL SAFETY WARNINGS DO NOT USE NEAR WATER... -
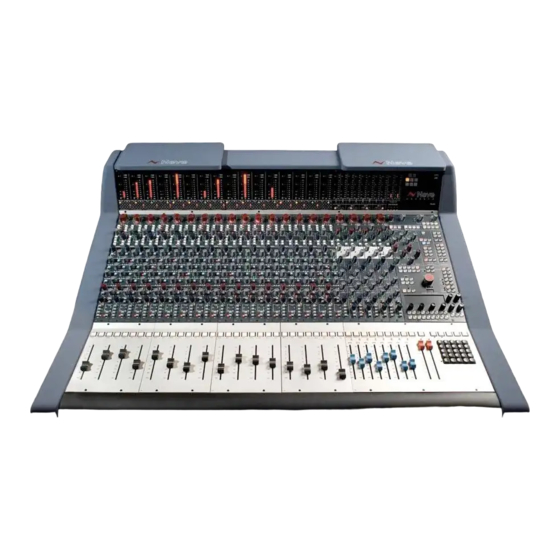
Page 3: Console Overview
Six Auxes 4 Mono and two stereo • stereo mix buss • Two stereo monitoring speaker sets • Two 5.1 monitoring speaker sets • 16 channels of Neve mic/line amplifiers • 16 channels of DAW monitoring • 8 Groups • 1 Main output •... -
Page 4: Introduction To Genesys
© ® 2008 AMS Neve Ltd own the copyright of all information and figures contained in this manual which are not to be copied or reproduced by any means or disclosed in part or whole to any third party without written permission. -
Page 5: Table Of Contents
GENESYS User Manual Issue 1 Table of Contents Health & Safety Notice...........2 SEL Mode on the AUXES Section To Set How the Channel and Monitor paths feed the Console Overview..........3 Auxes..............26 Introduction to GENESYS........4 DIRECT OUTPUT Section About this manual..........9 Master Level............27... - Page 6 GENESYS User Manual Issue 1 LS..............37 EXT 3 & EXT 4............47 OSC FRQ............37 D-EXT led............47 INT..............47 METERS Section EXT..............47 CH MTRS............37 SUM..............47 CH I/P............37 INS..............47 DAW SND............37 ST (or Downmix)..........47 DAW RET............37 ØL..............47 8T MTRS............37 AFL/PFL led............48 8T..............37 PFL..............48 AUX..............37 SIF..............48...
- Page 7 GENESYS User Manual Issue 1 Desk Designer............72 TRANSPORT Keys Tie Ch Sel............73 MASTER AUTOMATION buttons Sel Route............73 DYN..............73 KEYPAD EQ..............73 Last One Used..........73 Meterbridge OSC..............73 Osc with Slate..........73 CHANNEL Meters Osc to 2T............73 MIX..............61 Setups...............73 MTR..............61 Set by Reset..........73 8T 1 to 8T 8 leds..........61 Calibrate............73...
- Page 8 GENESYS User Manual Issue 1 DAW Return............90 Optional AES Channels cassette, SMN 812 – 409 Channel Insert 2 Send.........91 Socket 1............95 Channel Insert 2 Return........91 Socket 2............95 Channel Insert 1 Send.........92 Socket 3............95 Channel Insert 1 Return........92 Optional Dynamics Cassette, SMN 812 – 412 Key Input............96...
-
Page 9: About This Manual
GENESYS User Manual Issue 1 About this manual This manual consists of: • A section-by-section operational overview of all parts of the console surface • Technical & physical specifications including power consumption, dimensions, weight and other relevant information • Section on the optional Automation system •... -
Page 10: Abbreviations & Acronyms
GENESYS User Manual Issue 1 Abbreviations & Acronyms 8 Track Power Supply Unit After Fader Listen Return Calibrate Reverb Channel Return Talkback Channel Mic Control Room Monitor Select Digital Audio Workstation Solo In Front Digital External(s) Signal D-EXT Digital Line(s) -
Page 11: The Computer Cassette
Ethernet STD Standard Ethernet port. RS 232 Typically used for controlling external mic modules, for example the Neve 1081s. For backing up and recalling Automation files, Recall files, Desk Setups etc to a USB device. There is another USB port on the meter bridge for ease of access. -
Page 12: New Style
GENESYS User Manual Issue 1 With the Automation option fitted, additional connectors become available. Ethernet 1 Auto & Ethernet 2 Auto Used for HUI control & communication. Ether 1 Auto is used to connect to a DAW and provide Midi over Ethernet communication so HUI control is possible. -
Page 13: Optional Console Hardware
EQ Cassette (Part number SMN 812-411) This cassette provides 8 Channels with classic Neve 1084 EQ (3 bands per channel). Without this card, the EQ button (and led) on each channel strip will not function. The EQ button underneath the DAW screen will also be locked out. -
Page 14: Channels Ad/Da Cassette
GENESYS User Manual Issue 1 Channels AD/DA Cassette (Part number SMN 812 – 410) This cassette provides 8 channels with AD/DA converters. Without this card, the DLN and D-MON functionality (and leds) will not be available on the console. The AD/DA cassette provides facility for digital Lines and digital externals into the desk plus enabling the Direct Outputs on each channel to be sent digitally. -
Page 15: Digital Monitoring Cassette
GENESYS User Manual Issue 1 Digital Monitoring Cassette (Part number SMN 812 – 410) This single card (regardless of console size), enables all of the Main Mix, 2T, 8T, 5.1 and Auxiliary Sends to be sent from the desk digitally. -
Page 16: Optional Console Software
For the purposes of this manual, it has been presumed that the Recall package has been installed. See chapter on Recall. For more information on the optional Automation and Recall packages, please contact your local Neve distributor. - 16 -... -
Page 17: Wiring Connections / Setup For Hui Control
GENESYS User Manual Issue 1 Wiring connections / Setup for HUI control The type of connections depend on the type of computer cassette installed in the console. OLD type computer Mouse Standard supplied Crossover Ethernet cable To TFT screen Ethernet Hub... -
Page 18: New Type Computer
If you do not wish to run HUI over LAN (Local Area Network) then retain the blue Ethernet cable as supplied and connect as shown in the upper diagram. If you wish to run HUI over LAN, connect the Genesys computer as shown, discarding the Ethernet link cable on old style computer cassettes. -
Page 19: Sel Mode
GENESYS User Manual Issue 1 SEL Mode Channel Sel Mode > When SEL is selected by holding down and then releasing on a channel strip, most of that strips functionality plus the ability to change any of the audio is suspended. -
Page 20: Genesys Application Scenarios
Genesys can be used to monitor from the workstation while recording directly from Mic or Line inputs. (The Direct Outs can be used from Genesys to the DAW enabling it to be used like a conventional in line desk with both recording and monitoring signals passing through the unit, connections not shown here). -
Page 21: Mixing
Filter Bank to create a special effect across the whole mix for one section of a song. This can be done by patching the filter bank across the Main Mix of Genesys using the Insert Send/Rtn and then switching it in circuit at the desired time. -
Page 22: Live Recording
The main mix outputs of Genesys should be connected to a recording device such as a DAT or DAW running on a laptop Mac or PC. The output of the recording device should be connected to the Ext 3 input on Genesys (Externals 1 and 2 are Surround inputs). -
Page 23: Hui Control Of Daw (Inc Sub-Mixing)
To enable both the HUI control and the automation, the timecode from Pro Tools needs to be referenced to Genesys, plus an Ethernet cable for the HUI data needs to be plugged from Pro Tools into Ether 1 Auto on the rear of the console. -
Page 24: Channel Strip
GENESYS User Manual Issue 1 Channel Strip CHANNEL Section The free-running Input Level knob attenuates the Input Gain in 11 discreet steps and has a range of +20dB to +70dB, the level being displayed using the internal leds. It is also a 3-state toggle control, and pushing the knob will cycle through: CHM: Selects the Channel / Mic input >... -
Page 25: Processing Section
GENESYS User Manual Issue 1 PROCESSING Section If the optional processing cassettes are present, it is possible to place the EQ – and/or the Dynamics - on either the Channel or Monitor path (it is not possible to split the Dynamics elements so the Compressor and Gate are split between the two paths). -
Page 26: Auxes Section
GENESYS User Manual Issue 1 AUXES Section Master Level Sets the output contribution of the Aux. It has a range of -∞ to 0dB. > Press to enable, and the adjacent led will light. >8T buttons Sets the destination and level control for sending the Auxes to the last two 8T busses. -
Page 27: Direct Output Section Master Level
GENESYS User Manual Issue 1 DIRECT OUTPUT Section Master Level Sets the level of the Direct Output, and has a range of -∞ to +10dB. This control is always in circuit. In it's default state, the Direct Output is fed from the Channel input: •... -
Page 28: Monitor Section
GENESYS User Manual Issue 1 MONITOR Section L / R Pan Pan control. Classic 3dB centre-line pan with S-law shaping. > Press to enable. Mon Level Control Sets the monitor input level, and has a range of -∞ to +10dB. -
Page 29: Sel
GENESYS User Manual Issue 1 Has no intrinsic function in itself, but is used in conjunction with other A channel strip SEL buttons on the channel strip for: button is interlocked • Allocation of processing elements to the Channel and/or Monitor path with all other SEL •... -
Page 30: Preventing Feedback Loops
GENESYS User Manual Issue 1 Preventing feedback loops There are circumstances under which it is possible to create a feedback loop on the console. • If the Direct Output is fed from the Monitor (either Pre- or Post-) and you set the Monitor Input to DAW SND, or •... -
Page 31: Reverb Returns / Aux Masters Section
GENESYS User Manual Issue 1 REVERB RETURNS / AUX MASTERS Section REV Return Section The free-running large knob at the top of the strip sets the input level of the Rev Returns. It has a range of -∞ to 0dB. -
Page 32: Sel Mode On The Rev Return Section
GENESYS User Manual Issue 1 SEL Mode on the REV RETURN Section To set how the Rev Returns feed the Cues The Rev Return can be sent to either Cue or both of them. > Put the 8T/REV Channel into SEL Mode by pressing and holding down the SEL button. -
Page 33: Aux Masters Section
GENESYS User Manual Issue 1 AUX MASTERS Section Master Send Sets the Master Send level for each Aux. This control runs from –∞ to 0dB. > Press to enable the Master Send. MIX Section Sets and controls the Insert Mix Return level. -
Page 34: Auxes Section Iso
GENESYS User Manual Issue 1 8T AUXES Section Isolates the 8T from the Solo system, so that when any other 8T SOLO is detected on the console, that channels 8T is not cut. Puts a pair of strips into SEL Mode enabling you to set Pre/Post states of the 8T Auxes. -
Page 35: Sel Mode On The 8T Auxes Section
GENESYS User Manual Issue 1 SEL Mode on the 8T AUXES Section There is one SEL button for each pair of 8T faders, so pressing, holding and then releasing it will put a pair of fader strips into SEL Mode. -
Page 36: Tone / Rtb Section
GENESYS User Manual Issue 1 TONE / RTB Section SIG PRES Sets the level at which the Meterbridge Signal Present leds come on for channels and 8T's, it has a range of -35dBu (signal present) to +26dBu (overload). It has a centre detent which is calibrated to +4dB via a Trim Pot. -
Page 37: Osc Frq
GENESYS User Manual Issue 1 Sends pink noise only to the loudspeaker outputs. Any audio feeding the loudspeakers will be cut before the pink noise is sent, and then reinstated once pink noise is switched off. OSC FRQ Sets the frequency of the TONE oscillator. -
Page 38: 2T Mtrs
GENESYS User Manual Issue 1 control. The screen-printing on this section of the meterbridge refers to the different path types that can be displayed: 8T 1 8T 2 8T 3 8T 4 8T 5 8T 6 8T 7 8T 8 EXT &... -
Page 39: Master Sel Section
GENESYS User Manual Issue 1 MASTER SEL Section LOCK Lights red and locks the MIC, LN, DAW, SWP & MIX buttons (plus the DLN led) to their current state, preventing them from accidental operation. LOCK needs to be held for 3 seconds before locking or unlocking. -
Page 40: Ch Safe
GENESYS User Manual Issue 1 It will also set CH DAW, I/P 2 and DAW RET to be On and will also turn off CH i/p to direct o/p to stop any DAW feedback. CH SAFE Lights yellow and stops the channel SOLO buttons from affecting the Solo Cuts and 8T Solo Cuts (if linked) when selected. -
Page 41: Daw Snd
GENESYS User Manual Issue 1 DAW SND Lights red when selected, and is interlocked with DAW RET. DAW RET Lights red when selected, and is interlocked with DAW SND. I/P 2 & D-MON led I/P 2 lights yellow when selected, and toggles I/P 2 and the D-MON led... -
Page 42: Route Sel Section
GENESYS User Manual Issue 1 ROUTE SEL Section This section enables the setup routing to the 8T and Main Mix Outputs, plus simple storing and loading of console snapshot stores. FILING Lights yellow, and acts as the On/Off for this panel allowing Stores to be saved or loaded via the stores screen. -
Page 43: Mon
GENESYS User Manual Issue 1 As with the 8Ts (above), scrolling up or down the channel or Rev numbers will allow you to route to Mix L and Mix R. This On/Off button lights yellow when pressed, and allows the Channel path to be routed to Mix L and Mix R in the channel module. -
Page 44: Cue Mix Section
GENESYS User Manual Issue 1 CUE MIX Section Each of the Cue mixes can be sourced from: • A stereo External • Either the Main Mix or the current Control Room Monitor selection (set by UTIL knob) • Four mono Auxes or two stereo Aux. -
Page 45: Sel Mode On The Cue Mix Section
GENESYS User Manual Issue 1 automatically dimmed by 25dB. SEL Mode on the CUE MIX Section To select the Aux feeding the Cue > Put the Monitor panel into SEL Mode. Pressing the Aux 1-6 knob will cycle the Auxes that feed into the Cue: Aux 1 / 2 >... -
Page 46: Control Room Monitor Section
GENESYS User Manual Issue 1 CONTROL ROOM MONITOR Section Sets the monitoring and controls the various sources sent to the loudspeakers. AUX 1 – 6 Lights yellow when selected and will send that Aux to the speakers. CUE 1 & CUE 2 When selected will light yellow and send that Cue to the loudspeakers. -
Page 47: Ext 3 & Ext 4
GENESYS User Manual Issue 1 EXT 3 & EXT 4 When selected, will light yellow and select either of the Stereo External inputs to the monitor system. D-EXT led The D-EXT led will light on the second press of EXT 2. -
Page 48: Afl/Pfl Led
GENESYS User Manual Issue 1 AFL/PFL led This yellow led flashes if a Channel SOLO (with CH SAFE selected), or a Monitor SOLO (with MON SAFE selected) is pressed. It will also light if an 8T SOLO (tied to the Channel or Monitor Safe buttons via the setup screen) is pressed, or if any of the AFL buttons on the Rev returns are selected. -
Page 49: Ls Solo Led
GENESYS User Manual Issue 1 LS SOLO led This red led will light to show that the 6 LS buttons are now in destructive mode and non-latching. This mode allows for any of the buttons to be lit by selection of any of the CUT buttons ie if you were to select L CUT, then all the rest would light (apart from L CUT). -
Page 50: Sel Mode On The Control Room Monitor Section
GENESYS User Manual Issue 1 > Press the knob again to set the AFL level (the AFL led will light). The AFL level will be shown on the alpha display and has a range of 0dB to -36dB. > Rotate the knob to set the value. -
Page 51: To Tie A Set Of Speakers To The Stereo Downmix
GENESYS User Manual Issue 1 To tie a set of speakers to the Stereo Downmix It is possible to tie a set of loudspeakers to monitoring the Stereo Downmix, so that selecting the speaker set, automatically monitors the Stereo Downmix. -
Page 52: To Route 8T Outputs To Specific Loudspeakers
GENESYS User Manual Issue 1 To Route 8T Outputs to specific loudspeakers It is possible to route the 8T Outputs directly to individual loudspeakers. > Press the RTE SEL button on the Route Sel panel and press 8T. > It is now possible to scroll through all of the 8T Outputs using the... -
Page 53: Talkback Section
GENESYS User Manual Issue 1 TALKBACK Section All of the Talkback functions can be accessed remotely via relays and the 5VCTL from the back of the console on a 15-pin D-type connector. These relays & 5VCTL also allow the remote operation of the Loudspeaker CUTS, DIM, TALKBACK to CUE 1 / CUE 2, RED LIGHT, RTB ON and SLATE. -
Page 54: Red Light
GENESYS User Manual Issue 1 This action will also light the DIM lamp, and dim the monitoring. If RTB is on M2, then Operating all will temporarily suspend the Return Talkback. RED LIGHT Lights red allows for a studio external red light to be switched on and off from the console surface, also red light can be switched on and off remotely. -
Page 55: Daw / Console Control Screen
GENESYS User Manual Issue 1 DAW / CONSOLE CONTROL Screen The DAW screen has underneath it 18 dedicated buttons with fixed functions, plus 4 'soft' rotary encoders whose function changes depending on what is displayed on the screen just above them. -
Page 56: 2T Operation
GENESYS User Manual Issue 1 2T Operation 5.1 Mixing Mode On-screen icons will display: • 5.1 (as opposed to Group) • Whether the feeds are sourced Pre- or Post- the 8T • Trim values for the C, S and LS/RS. -
Page 57: F1 - F5
The function of these buttons is displayed on the screen above, and will change depending on which operation is in progress. Establishes communication between Genesys and the DAW, and turns that control On / Off. The red DAW led will light under the 8T faders when control is established. -
Page 58: Pli
GENESYS User Manual Issue 1 This button has no function unless you are in DAW mode. > Press the DAW button. > Press PLI (the button will light). Use the & buttons to select which HUI paths to control. The 4 logicators now control the Plug-Ins parameters for the selected paths: •... -
Page 59: Faders & Keypad
GENESYS User Manual Issue 1 Faders & Keypad Master Faders The 8T faders can either control the 8T levels or a block of 8 DAW faders (the red led underneath the faders will light when DAW control has been established). -
Page 60: Main Mix Fader
GENESYS User Manual Issue 1 MAIN MIX Fader An independent fader controls the Left & Right of the main mix with a range of to 0dB. The CUT button acts on both the L & R of the Main Mix. -
Page 61: Meterbridge
GENESYS User Manual Issue 1 Meterbridge CHANNEL Meters Each fader strip meter has 2 scales: • VU scale, displayed to the right • dBu scale, displayed to the left Beneath this, a bank of 15 leds displays the following information: Indicates whether the Monitor path or Channel path is contributing to the L and R of the Main Mix. -
Page 62: Master Meter Section
GENESYS User Manual Issue 1 MASTER METER Section Lights when the 8T meters are being fed from the DAW metering. The button itself has no intrinsic function and is for display only. SOLO Flashes whenever a Solo (either AFL or PFL) is detected anywhere on the console. -
Page 63: Daw
GENESYS User Manual Issue 1 Lights red whenever the DAW button is pressed on the Control Room Panel and indicates that the 8T meters are being feed from the DAW metering and not the console metering. PSU STATUS Indicates the state of the internal console power supplies. -
Page 64: Master Screen
GENESYS User Manual Issue 1 Master Screen As SEL Mode on the monitor panel allows you to make individual changes mid-way through a session on the console surface, so the SETUP screen allows you to make the same console-wide changes all in one action. - Page 65 GENESYS User Manual Issue 1 The EQ screen is only available if you have at least one of the optional EQ cassettes fitted. The display to the right of the screen displays the current channel. How and when the EQ screen is displayed is set by CH SEL or EQ on the Monitor panel.
-
Page 66: Dyn
GENESYS User Manual Issue 1 The Dynamics screen is only available if you have at least one of the optional Dynamics cassettes fitted. Allows setup and control of Dynamics on the DAW screen. Compressor The three controls shown on screen are operated by the first three encoders below the DAW screen. -
Page 67: Gate/Expander
GENESYS User Manual Issue 1 Gate/Expander The Dynamics screen is only available if you have at least one of the optional Dynamics cassettes fitted. The Gate/Expander controls are accessed by pressing the DYN button, and then pressing the 1 encoder to swap the processing screen over to the Gate/Expander view. -
Page 68: Trk
GENESYS User Manual Issue 1 2 TRK Allows setup and control of the 2T paths from the 8T Groups. The screen that opens depends on how the 2T has been set up to operate, either in Group Mode (shown left) or 5.1 Mode. -
Page 69: Daw
GENESYS User Manual Issue 1 Sets up and controls the Digital Audio Workstation. - 69 -... -
Page 70: Settings
GENESYS User Manual Issue 1 Settings Contains system-wide parameters regarding: • Console layout • 8T to Loudspeaker routing • Solo linking • Path calibration • Loudspeaker settings • Access to Software Updates LS Settings 8T To Mon This matrix allows any of the 8T to be fed to any of the speakers. -
Page 71: Sub Speaker Locks
Power Up On power-up, the console can be set to default to one of four states: Default This is the AMS-Neve default Read-Only setup. As Was The console will be loaded with all the same settings as they were when the power was removed. -
Page 72: Custom Store
These four options are interlocked. Software Updates This is a password-protected programme that allows you or an AMS Neve Representative to check for Firmware and Application software updates once the computer is connected to the Internet. -
Page 73: Tie Ch Sel
GENESYS User Manual Issue 1 Tie Ch Sel Sel Route If ticked, whenever a Channel + >8T or Rev return SEL button is pressed, the ROUTE SEL panel will also go into SEL Mode, allowing that path's routing to be set. - Page 74 GENESYS User Manual Issue 1 MON selects the monitor paths within each channel to be trimed. > Where there are path numbers greater than eight on any type, click the top button again so the lower row of buttons display 9 – 16, 17 – 24 etc.
-
Page 75: Filing
The upper half of the screen is the Destination drive, and can be set to different locations. • The lower half of the screen is the Genesys drive, and allows you to name/select files. This is the Source drive where all Genesys Automation and Recall files are saved to by default. -
Page 76: Delete
GENESYS User Manual Issue 1 > Alternatively, right-click on the folder/file(s) to be copied and from the fly-out menu select the Copy option. > Right-click on the destination location in the upper window and select the Paste option. A copy of the file will be placed in the destination location, providing a file or folder of the same name does not already exist in that location. -
Page 77: System
Restart PC Shuts down and restarts the PC in the correct manner, and takes you back to the desktop so you are able to start the Genesys application again. Shutdown PC Shuts down the PC in the correct manner. -
Page 78: Audio Monitoring Boards
GENESYS User Manual Issue 1 Audio Monitoring Boards Accessible from the rear of the console, the Monitor Boards handle the Cue mixes, Inserts, Outputs and have various trims and system connectors in place. The majority of the signals that appear on the connectors on these boards do not appear on the 25-way D-type connectors. -
Page 79: Monitor Board 3 (Mix Insert)
Spare I/O (Pin 13) is a customising pin used to allow external control of function(s). It can also be configured as an Output to control external equipment. Use of Pin 13 will need further consultation with Neve Service Dept. Monitor Board 2 also allows the loudspeakers for the Down-Mix to be trimmed (with +3dB to -12dB of trim for each of the C, S, LS and RS paths). -
Page 80: Monitor Board 4 (Mix Output)
GENESYS User Manual Issue 1 Monitor Board 4 (Mix Output) This board has 2 XLRs for the Main Mix outputs. It also contains 2 jack sockets that carry the Left and Right o/p of the 2T mix. At the bottom of the board, there are 2 jack sockets, one of which carries the Oscillator / Slate / Pink noise output;... -
Page 81: Genesys Physical Information
GENESYS User Manual Issue 1 GENESYS Physical Information Dimensions Height To top of loudspeaker shelf 977mm / 38.46" 16 Channel console 1090mm / 42.91" 32 Channel console 1760.5mm / 69.31" Width 48 Channel console 2430.5mm / 95.68" 64 Channel console 3100.5mm / 122.06"... -
Page 82: Console Connector Pin-Outs
GENESYS User Manual Issue 1 Console Connector pin-outs Computer Cassette - Data White + Data Green Black Mouse (PS2) - Data + Data / Clock Shell Shield Keyboard (PS2) Keyboard data (+5v signal level) Keyboard reset (not used) Ground (0v) -
Page 83: Timecode
Relay 1 This facility is used for switching the VGA feeds (one Signal Ground each from Genesys and the Ext RS 485+ (depending on jumper configuration) DAW) to enable the system to operate on one TFT screen for RTS or GND (depending on jumper configuration) both machines. -
Page 84: Monitor Section Connectors
GENESYS User Manual Issue 1 Monitor Section Connectors The five pairs of D-type connectors shown here will be present on every console, regardless of console size. Monitor External Inputs 1 & 3 (25-way D-type) Signal Name Screen External 1 Input Left... -
Page 85: Loudspeaker Outputs A & M1
GENESYS User Manual Issue 1 Loudspeaker Outputs A & M1 (25-way D-type) Signal Name Screen Loudspeaker A, Left Output Loudspeaker A, Right Output Loudspeaker A, Centre Output Loudspeaker A, Sub Output Loudspeaker A, Left Surround Output Loudspeaker A, Right Surround Output... -
Page 86: Monitor Insert Send
GENESYS User Manual Issue 1 Monitor Insert Send (25-way D-type) Signal Name Screen Monitor Left Insert Send Monitor Right Insert Send Monitor Centre Insert Send Monitor Sub Insert Send Monitor Left Surround Insert Send Monitor Right Surround Insert Send Mix Left Output * Mix Right Output * * Mix Left and Right are wired here so that the Mix can be presented on a customer patch as well. -
Page 87: Console Outputs - 8Ts
GENESYS User Manual Issue 1 Console Outputs – 8Ts (25-way D-type) Signal Name Screen 8T Output 1 8T Output 2 8T Output 3 8T Output 4 8T Output 5 8T Output 6 8T Output 7 8T Output 8 Console Outputs - Auxiliaries... -
Page 88: 8T Insert Send
GENESYS User Manual Issue 1 8T Insert Send (25-way D-type) Signal Name Screen 8T 1 Insert Send 8T 2 Insert Send 8T 3 Insert Send 8T 4 Insert Send 8T 5 Insert Send 8T 6 Insert Send 8T 7 Insert Send... -
Page 89: Channel Section Connectors
GENESYS User Manual Issue 1 Channel Section Connectors As shown here, these 4 pairs of 25-way D-type connectors will be present for every 8-fader section. The block of faders served by these D-types is indicated by the Block plate in the centre (this will say either 1-8, 9-16 etc). -
Page 90: Daw Send
GENESYS User Manual Issue 1 DAW Send (25-way D-type) Signal Name Screen DAW Send 1 DAW Send 2 DAW Send 3 DAW Send 4 DAW Send 5 DAW Send 6 DAW Send 7 DAW Send 8 DAW Return (25-way D-type) -
Page 91: Channel Insert 2 Send
GENESYS User Manual Issue 1 Channel Insert 2 Send (25-way D-type) Signal Name Screen Channel Insert 2 Send 1 Channel Insert 2 Send 2 Channel Insert 2 Send 3 Channel Insert 2 Send 4 Channel Insert 2 Send 5 Channel Insert 2 Send 6... -
Page 92: Channel Insert 1 Send
GENESYS User Manual Issue 1 Channel Insert 1 Send (25-way D-type) Signal Name Screen Channel Insert 1 Send 1 Channel Insert 1 Send 2 Channel Insert 1 Send 3 Channel Insert 1 Send 4 Channel Insert 1 Send 5 Channel Insert 1 Send 6... -
Page 93: Optional Aes Monitoring Cassette, Smn
GENESYS User Manual Issue 1 Optional AES Monitoring cassette, SMN 812 – 410 This single card (regardless of console size) is sub-fitted beneath the Computer cassette. Firewire A (J 14) Power Voltage Power Ground TPB 0 TPB 0 TPA 0... -
Page 94: Socket 2
GENESYS User Manual Issue 1 Socket 2 (25-way D-type) Signal Name TX 4 AES Channel Outputs 9 & 10 AES Channel Outputs 11 & 12 TX 5 TX 6 AES Channel Outputs 13 & 14 AES Channel Outputs 15 & 16... -
Page 95: Optional Aes Channels Cassette, Smn
GENESYS User Manual Issue 1 Optional AES Channels cassette, SMN 812 – 409 Socket 1 (25-way D-type) Signal Name RX 0 AES Channel Inputs 1 & 2 RX 1 AES Channel Inputs 3 & 4 AES Channel Inputs 5 & 6... -
Page 96: Optional Dynamics Cassette, Smn
GENESYS User Manual Issue 1 Optional Dynamics Cassette, SMN 812 – 412 Key Input (25-way D-type) Signal Name Scrn Key Input 1 Key Input 2 Key Input 3 Key Input 4 Key Input 5 Key Input 6 Key Input 7... -
Page 97: General Fuses - Ratings & Location
GENESYS User Manual Issue 1 General Fuses – Ratings & Location The AC Distribution block on the left (comprising of 3 x IEC connectors) is not fitted to the 16-channel add-on modules. - 97 -... -
Page 98: Appendix A - Processing Cassettes Switch Settings
GENESYS User Manual Issue 1 Appendix A – Processing Cassettes Switch Settings On each of the EQ and Dyn cassettes, there is a block of eight dip- switches, the first three of which need to be set so that each card is addressed correctly. - Page 99 GENESYS User Manual Issue 1 Alphabetical Index Balance..............31 BANK button............58 1/2..............32 BANKS...............58 Bypass............65, 66, 67 2 TRK..............68 2T............38, 46, 52 CAL..............10, 36 2T mix...............80 Calibrate............73 2T MTRS............38 CH..........10, 28, 36, 42, 43 2T Output.............38, 56 CH I/P..............37 2T/MIX...............36 CH MTRS............37 CH SAFE............40, 48...
- Page 100 GENESYS User Manual Issue 1 Last Store Made..........71 Latch..............40 Encore Plus™............16 LATCH..............40 EQ............29, 55, 65, 73 Latching mode............29 EQ cassette............13 LINK..............40 Ether 1...............23 LN............10, 24, 39 Ethernet............16, 17 Lo Shelf..............65 Ethernet 1 Auto...........12 Load..............75 Ethernet 2 Auto...........12 LOAD..............42 Ethernet hub............18 Local Mode............66...
- Page 101 GENESYS User Manual Issue 1 PANS..............57 Software Updates..........72 PEAK..............62 SOLO........29, 34, 40, 48, 59, 62 PFL...........10, 40, 48, 49 SOLO buttons.............40 Phantom power...........24 Solo Cuts............40 Phase..............24 Solo In Front............50 Pink noise.............37, 80 SOLO LINK............40 PLAY..............60 Speaker Trims.............71 PLI...............10, 58 ST..............47, 48 PNK..............36...
-
Page 102: Printing This Manual
© ® 2008 AMS Neve Ltd own the copyright of all information and figures contained in this manual which are not to be copied or reproduced by any means or disclosed in part or whole to any third party without written permission.
Need help?
Do you have a question about the Genesys and is the answer not in the manual?
Questions and answers