Advertisement
Quick Links
Advertisement

Related Manuals for Optiview IRPTZ22


Summary of Contents for Optiview IRPTZ22
- Page 1 USER’S MANUAL IRPTZ22: 22X Zoom Infrared PTZ Camera...
-
Page 2: Table Of Contents
CONTENTS Chapter 1 Precautions ................3 Chapter 2 Structure ..................5 Chapter 3 Dome Settings ................7 Chapter 4 Installation Guide ..............10 Chapter 5 Functions Description ............13 5.1 Features ..................13 5.2 Function Instruction ..............14 Chapter 6 Operation instruction ............18... -
Page 3: Chapter 1 Precautions
Chapter 1 Precautions ● Please read this manual carefully before installation. In transportation and storage process, we need to prevent stress, such as ● Handle with care severe vibration, and immersion to avoid any damage to the product. This product must be carried disassembled and packaged, either in delivery to users or in return delivery to the factory for repairing. - Page 4 product. Such objects or materials may lead to fire, short circuit or damage. If water or liquid flow into the product, turn off the power and disconnect the power cord immediately, and then negotiate with the company. Be careful to protect the camera.
- Page 5 Module Specifications: Model IRPTZ22 Image Sensor 1/4'' Sony Super HAD CCD Pixels 795 (H) × 596 (V) Resolution 540 TV Lines Video Output 1.0Vp-p Composite Video (75Ω) Sync System Internal / External (V-Lock) Lens 3.4~77mm (auto focus) Zoom 22X Optical / 12X Digital...
- Page 6 IRPTZ22 Low-voltage Power Supply Input Voltage (in) > 18-30 V AC Output: Power = 60 W Voltage = 12-18 Vdc Line regulation = 1% Load Regulation = 1% Efficiency = 86%...
-
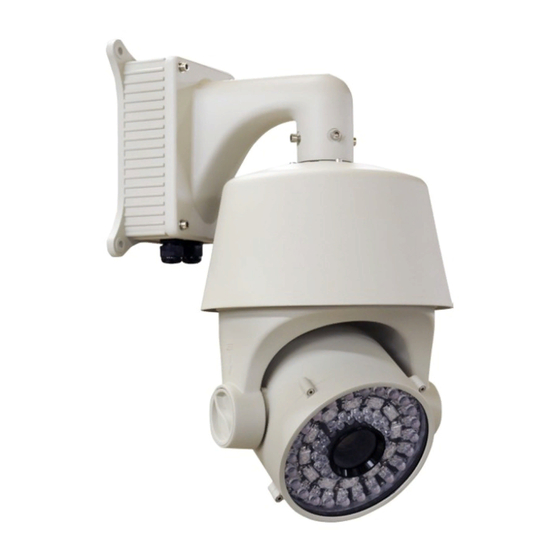
Page 7: Chapter 2 Structure
Chapter 2 Structure Front view Side view... -
Page 8: Chapter 3 Dome Settings
Chapter 3 Dome Settings This product supports two protocols: PELCO-P、PELCO-D, and two baud rate: Protocol Setting 9600BPS, 4800BPS, 2400BPS. Protocol dip switch is bit 1~3 of SW2. Baud rate setting dip switch is bit 4~5 of SW2. Baud Rate Setting... - Page 9 8-bit dip switch (SW1)at dome side is for setting dome address. Dome setting Dome Address Setting adopts binary system, the 8 bit is the highest, the 1 bit is the lowest. Total 255 dome addresses could be set.。 Dome address code table under protocol PELCO-P:...
- Page 10 Dome address code table under protocol PELCO-D: 2. Dip switch for protocol PELCO-P are the same, while dip switch for PELCO-D *Notice: 1. “1” means “on” status and “0” means “off” status. is slightly different. PELCO_D protocol supports maximum 254 dome addresses.
-
Page 11: Chapter 4 Installation Guide
Chapter 4 Installation Guide 1、Take out the bracket and unscrew the power box from the bracket. 2、Thread cables across the bracket and connect them to the circuit board in the power box. Install the dome body to the bracket, screw up with 4 inner hexagon screws. If necessary, apply water-proof glue to the joint gap. - Page 12 4、Attach the drill positioning paste to the wall, and drill according to the paste, and install expansion bolts. 5、Install the dome body together with bracket and power box to the expansion bolts, and tighten with screws.
- Page 13 6、Remove two screws from the power box, and open it. Thread power cable(AC220V)through the water-proof head on the left, and RS485 and video cable through the water-proof head on the right. Connect cables to the circuit board, double check order of connection to avoid damage from wrong connection.
-
Page 14: Chapter 5 Functions Description
Chapter 5 Functions Description 5.1 Features ● Power-off protection, no data loss 1. Built-in Decoder ● Support both Chinese and English menu ● Support one week and eight hours each day timing operation ● Exact time display ● Built-in direction display function ●... -
Page 15: 5.2 Function Instruction
● Auto iris, auto back light compensation 3. Built-in High Definition Day/Night Camera Auto/manual white balance Auto/manual focus ● Auto/manual brightness control ● Multiple kinds of camera for options ● ● Built-in heater 4. All-weather Outdoor Design Built-in fan, can operate in 60℃ ●... - Page 16 Users can set North by themselves, and also can set indication area. When ● Direction Indication Function speed dome turns to the area, the tilt will be displayed in screen. ● Motion Detection Function For some special cameras, the dome can auto track the moving things. In dome effective zoom scope, can zoom in and out any area on screen, also ●...
- Page 17 speed dome can track as it. Each cruising tracks has 32 preset positions. Speed Dome can memory 180s running path or orders. When start ● Pattern Tour pattern tour, speed dome can track as recording path. It supports 4 groups pattern tour.
- Page 18 Auto sense ambient light, and make quick adjustments. 3) Auto Iris Control In the bright background, auto compensate light for the target, and adjust the 4) Auto Back Compensation back light. Auto/Manual adjust depending on the environment light changes. 5) Auto/Manual White Balance Speed dome camera can auto switch between color and black and white.
-
Page 19: Chapter 6 Operation Instruction
Chapter 6 Operation instruction The user can call upon preset position 95 to enter the setting interface of the OSD menu. OSD Menu Tree... - Page 20 It supports two language option Chinese and English. Call upon preset Language position 95 to enter the setting interface of the OSD menu and move to “language setting”, push “ Iris on” to enter setting and move the joystick to switch Chinese/English.
- Page 21 and move joystick, select “display” enter submenu of “display”. Press “Iris on” to set DOME SETTING and with “ON/OFF” option. A:DOME Press “Iris on” to set PRESET SETTING and with ON/OFF/2SEC/5SEC/10SEC B:PRESET option. Press “Iris on” to set AUTO SETTING and with ON/OFF/2SEC/5SEC/10SEC C:AUTO option.
- Page 22 DISPLAY POSITION Press “Iris on” to set DATE/TIME SETTING and move joystick to adjust A:DATE/TIME DATE/TIME until get best position. Press “Iris on” to confirm. Press “Iris on” to set DOME SETTING and move joystick to adjust DOME until get B:DOME best position.
- Page 23 Move the cursor to “IR LED”, and press iris open to submenu. Move the cursor to “Open Control Type”, and press iris open to select IR light A1:Open Control Type control type; move the joystick to set IR light control type as “External synchronization Auto/ Internal Synchronization Auto /Time Schedule/Open/Close”.
- Page 24 morning) 4:Open:IR LED always on. 5:Close:IR LED always off. Note: D/N AUTO of camera is valid, unless the dome is set as “Internal Synchronization Auto”. User can adjust the environment light threshold value as to different B1:Environment Threshold Value application locations. In External synchronization Auto type, default value is 1~2lux(there may be slight difference because of the direction of IR LED.
- Page 25 of IR LED are matched with irradiation distance of camera. With different zoom, IR LED at its best control and adjust power automatically. When select close, start IR LED will depends on illumination set by user and it can’t adjust automatically. It is suggest selecting open zoom match.
- Page 26 joystick and time can be set: 30sec/2min/5min/10min. Press “Iris on” to confirm. Move cursor to STANDBY MOTION and press “Iris on” to setup motion, B1:STANDBY MOTION move joystick and motion can be set:: preset 1/scan 1/crusing tour 1/pattern tour 1/no control. Press “Iris on” to confirm. C:PRIVACY MASK Move cursor to PRIVACY MASK and press “Iris on”...
- Page 27 Move cursor to CLOCK and press “Iris on” to enter the submenu of CLOCK. Move cursor to DATE SETTING and press “Iris on” to setup date. Right/left shift A1:DATE SETTING joystick to setup position and Upper and down shift joystick to setup increase and decrease of date.
- Page 28 select on/off. F:PASSWORD SETTINGS Move cursor to “Modify password”, and press iris open button to password A1.Modify Password modification mode. Input old password first, and the default password is “111111”. Move the cursor to “password protection”, and press iris open button to password B1.Password protection switch setup;...
- Page 30 Input method instruction: 1. Move the cursor to “input information”, and press iris open to information edit mode. Move the joystick left and rightward to move the cursor “ ←”, and press iris on to delete the character by the cursor and press iris off to exit edit mode.
- Page 31 Move the cursor to “other options”, and press iris on to its submenu. Move the cursor to temperature control mode, and press iris on to temperature A1:Temperature Control Mode control setup. Use the joystick to select “Cooling/Auto/Heating/Off”, and press iris on to confirm input. With IR LED on, fans will be set as always on mode.
- Page 32 Camera Setup Camera Setup Auto Focus: auto/manual/one push/zoom trigger Digital Zoom: off/on BackLight Compensation: off/on Picture Freeze: off/on Vertical Mirror Image: off/on Zoom Speed: low/normal/high Day/Night: auto/day/night Advance Option Back Exit Auto Focus includes 4 operating modes: auto/manual/one push/zoom trigger. Remarks:...
- Page 33 A. Auto Focus Move the cursor to “Auto Focus”,and press iris on to focus mode setup menu; move the joystick upward and downward to select focus mode selection. B. Digital Zoom Move the cursor to “Digital Zoom”,and press iris on to digital zoom switch setup.
- Page 34 Move the cursor to“white balance mode”, and press iris on to enter setup A1. white balance mode mode. Move the joystick upward and downward as“Auto/Manual/Indoor/outdoor”. Note:For different cameras, the setup options might be different. Move the cursor to“R gain”,and press iris on to setup mode. Move joystick B1.R Gain upward and downward to set the R gain value.
- Page 35 Move joystick upward and downward to select parameters as“Low/Moderate/high”. Note: For cameras without wide dynamic function, this option setup is not available. Move joystick to“initiation setup”,and press iris on to recover camera H1. Initiation Setup parameters as default. Operation Setup A: Preset A1.
- Page 36 B1. Title Setup Move cursor to“title setup”, and press iris on to setup submenu to make preset position title setup. Move cursor to“call”, and press iris on to call related preset position. C1.Call Press iris on to preset position setup mode, and it shows ”Press iris on to D1.Setup confirm…”.
- Page 37 Move cursor to“start scan”,and press iris on to start related scan. Move cursor to “Set left boundary”,and press iris on to setup mode, it D1.Left Boundary Setup shows ”press iris on to confirm…”. User can make operate dome to expected position, and press iris on to save current position as left boundary.
- Page 38 C1.START MOVE the cursor to START and press IRIS ON to start the current sequence. D1.<SEQUENCE SET> Press IRIS ON to enter into the sequence setting Move the cursor to EDIT and press IRIS ON to enter edition mode. Move the joystick rightward and leftward to select item.
- Page 39 D. PATTERN Move the cursor to PATT and press the key IRIS ON(key on control keyboard) to A1. PATTERN NO. enter the edition mode of sequence No., move the joystick upward and downward to select number. Then press IRIS ON to confirm. B1.
- Page 40 E.<ZONES> A1.ZONE INFORMATION Move the cursor to ZONE NO. and press the key IRIS ON(key on control keyboard) B1.ZONE NO. to enter the edition mode of zone No., move the joystick upward and downward to select number. Then press IRIS ON to confirm. C1.
- Page 41 F.TIMING ACTION TIMING ACTION:The user could set up the required functions during the designated time periods. These functions include presets, cruising track,pattern tours and scanning. Mover the cursor to the time duration to be set, and press “ Iris Open” to enter the setting mode.
- Page 42 G1. BACK Go back to upper menu The settings of each time periods can not overlaid, and the time period can not Note: be allowed to exceed 00:00 If the use tries to control the dome during the TIMING ACTION, then the operation will be stopped and if there is no operation after 25 seconds, then the dome will resume the timing action.
- Page 43 C1. ENABLE Enabel or disable the auto tracking function. *Notice: The auto tracking function is only for the speed dome with the camera module which supports auto tracking. RESTART Press “Iris Open” to restart the dome. FACTORY DEFAULTS Press “Iris Open” to resume all the setting to factory default settings...
- Page 44 HELP Press “Iris Open” to check all the HELP information about the menu settings.