Table of Contents
Advertisement
Available languages
Available languages
Advertisement
Chapters
Table of Contents

Related Manuals for Irradio XTL-926UC


Summary of Contents for Irradio XTL-926UC
- Page 1 XTL-926UC TV Color LCD-TFT 9” 16:9 con tuner digitale e analogico integrato, presa USB e Card Reader 9” 16:9 LCD-TFT Color TV with built-in digital/ analogue tuner, USB socket & Card Reader Manuale d’uso User’s manual...
-
Page 2: Table Of Contents
Indice Precauzioni Accessori III Descrizione IV Descrizione dei tasti del pannello di controllo Tasti sul telecomando VI Collegamento dell'interfaccia principale VII Guida di installazione DVB-T VIII Guida MENU DVB-T 8.1 SETUP (IMPOSTAZIONE) 8.2 TV/RADIO 8.3 MULTIMEDIA 8.4 GAME (GIOCHI) IX Menu ATV Ricerca guasti XI Specifiche tecniche... - Page 3 Questo apparecchio è conforme alla Direttiva 2004 / 108 / CE relativa al rispetto dei requisiti essenziali di compatibilità elettromagnetica (E.M.C.). Questo apparecchio è conforme alla Direttiva 2006 / 95 / CE, che riguarda le prescrizioni relative alla sicurezza degli apparecchi elettronici e loro accessori collegati alla rete, per uso domestico o analogo uso generale (L.V.D.).
-
Page 4: I Precauzioni
I Precauzioni Stoccaggio 1. Non sottoporre il prodotto a temperature troppo elevate o troppo ridotte. La temperatura di stoccaggio può variare da -20°C a 60°C e la temperatura di esercizio da 0°C a 40°C. 2. Non utilizzare il prodotto in ambienti umidi o in prossimità di vasche da bagno, lavandini, cucine, lavatoi o in luoghi umidi come seminterrati, piscine e simili. -
Page 5: Accessori
II Accessori 1. Adattatore alimentazione automobile 2. Adattatore alimentazione CA 3. Cavo antenna 75-Ù 4. Telecomando 5. Batteria AAA 6. Cavo AV 7. Antenna telescopica * Aprire la confezione e verificare che siano presenti tutti gli accessori. -
Page 6: Descrizione
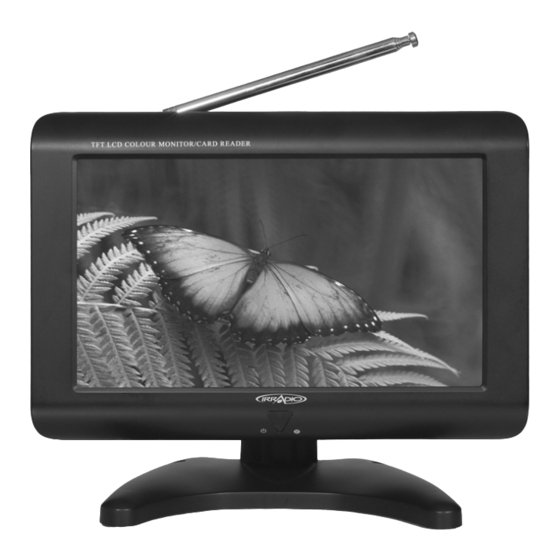
III Descrizione 1. Antenna telescopica 2. Schermo TFT-LCD 3. Indicatore alimentazione Rosso: standby Verde: acceso 4. Finestra di ricezione telecomando 5. CH+/ : selezione canale/tasto Su 6. CH-/ : selezione canale/tasto Giù 7. OK/MUSIC: tasto di conferma/tasto sottofondo musicale 8. VOL+/ : alza volume/ tasto Destra 9. -
Page 7: Descrizione Dei Tasti Del Pannello Di Controllo
IV Istruzioni dei tasti del pannello di controllo 1. CH+/ : in modalità DTV, premere come tasto di direzione nel menu DVT, premere come tasto CH+ senza il menu DTV, premere come tasto CH+ in modalità ATV, premere come tasto Su in modalità CARD. 2. -
Page 8: Tasti Sul Telecomando
V Tasti sul telecomando 1. POWER: standby/spegnimento. 2. MUTE: tasto silenziamento. 3. 0-9: tasti cifra. 4. --/-: selezione diretta canale e tasto selezione P/N. Premere questo tasto per la selezione diretta del canale in modalità ATV. Premere questo tasto per selezionare P/N in modalità... -
Page 9: Collegamento Dell'interfaccia Principale
VI Collegamento dell'interfaccia principale 1. Collegamento all'alimentazione: Collegare la spina dell'alimentazione sull'adattatore CA con il connettore posto sul pannello posteriore del dispositivo e contrassegnato con 2. Collegamento del cavo dell'antenna: Cavo di conversione antenna 75 ohm Collegare un'estremità del cavo dell'antenna al connettore dell'antenna sul televisore e l'altra estremità... -
Page 10: Guida Di Installazione Dvb-T
VII Guida di installazione DVB-T Quando si utilizza il dispositivo per la prima volta o non è salvato alcun elenco programmi, all'accensione del dispositivo, appare la Guida di Installazione DVB-T. Effettuare le impostazioni indicate in figura: Premere i tasti per spostare il cursore sulla voce desiderata e i tasti per regolare le impostazioni standard del proprio sistema DVB-T locale. -
Page 11: Guida Menu Dvb-T
VIII Guida MENU DVB-T Per accedere all’interfaccia MENU, premere il tasto “MENU” sul telecomando o sul dispositivo. Verranno visualizzati cinque menu con alcuni sottomenu. Premere i tast per selezionare i singoli menu e poi selezionare il sottomenu. Premere OK per accedere al sottomenu. Premere i tasti per spostare il cursore nella posizione desiderata. - Page 12 8.1.2 TV Setup (Impostazione TV) Sotto il menu “TV Setup” si trovano le voci seguenti: (1) TV format (Formato TV): modalità di visualizzazione, “4:3LB”, 4:3PS”, “16:9LB” e “16:9FIT”. (2) TV mode (Modalità TV): sistema uscita AV, selezione di “PAL”, “NTSC”, “AUTO”. (3) OSD Transparency (Trasparenza OSD): impostazione dei livelli di trasparenza OSD.
-
Page 13: Tv/Radio
La password di default del dispositivo è 0000. Quando si modifica la password, memorizzare la nuova password. 8.1.4 Advance Timer (Timer di programmazione) Gli utenti possono impostare un orario determinato per guardare determinati canali. L'orario di inizio e di termine può essere impostato in base al sistema di timer del dispositivo. -
Page 14: Multimedia
Quando la voce LCN è impostata su “OFF” (vedi 8.1.1), appare la seguente interfaccia Menu. Le funzioni Move (Sposta) e Sort (Ordina) servono per ordinare i canali. 8.2.2 Accedere al menu “TV Guide”. Sotto la guida dei programmi è possibile visualizzare l'elenco dei canali attuali. Premere i tasti spostare il cursore sul canale che si desidera guardare, premere i tasti per accedere al timer Guide del canale selezionato. - Page 15 8.3.1 Accedere a “My Album” (Il mio album) e premere “INFO” per cambiare i driver come indicato di seguito: Premere i tasti per spostare il cursore e selezionare “Device” (Dispositivo). Premere i tasti per scorrere tra i diversi driver e premere “OK”...
- Page 16 Premere i tasti per selezionare l'immagine desiderata e “OK” per visualizzarla. Premere il tasto “BLU” sul telecomando per tornare al menu del file originale. 8.3.3 Quando si visualizza l'immagine, premere “OK” per accedere alla modalità di riproduzione immagine e passare automaticamente ai diversi effetti di visualizzazione delle immagini.
-
Page 17: Game (Giochi)
Premere i tasti per selezionare la musica che si desidera riprodurre e poi “OK” per confermare. Premere il tasto “ROSSO” sul telecomando per le funzioni riproduci/pausa, il tasto “VERDE” per interrompere la riproduzione, il tasto “GIALLO” per la funzione di ripetizione (premendo ripetutamente tale tasto si attivano le funzioni “Repeating”... -
Page 18: Menu Atv
IX Menu ATV Premere il tasto Menu per visualizzare il menu seguente: MAIN MENU PICTURE SYSTEM PRESET Premere per selezionare una delle voci e aprire il relativo sottomenu. 9.1 PICTURE (IMMAGINE) PICTURE BRIGHT CONTRAST COLOUR RESET Premere per selezionare la voce BRIGHT (Luminosità) e per effettuare la regolazione analogica. - Page 19 SYSTEM ENGLISH CLOCK 16:9 BLUE BACK : consente di selezionare la lingua desiderata. CLOCK (Orologio): consente di impostare l'orario per lo spegnimento automatico. : (modalità visualizzazione schermo) consente di selezionare la modalità di visualizzazione tra 16:9/4:3. : consente di ruotare l'immagine. BLUE BACK: consente di attivare/disattivare tale funzione quando non sono presenti segnali.
- Page 20 Note: Prima di avviare la ricerca automatica, impostare la voce SOUND/ COLOUR (Suono/colore) in base alle specifiche del sistema locale, altrimenti il programma potrebbe non riprodurre l'audio, l'audio potrebbe risultare disturbato o l'immagine potrebbe apparire senza colori. SWAP (Cambia): premere per selezionare questa voce.
- Page 21 9.4 Ricezione adeguata 9.4.1 Per selezionare la corretta lingua OSD, accedere alle impostazioni della voce “Language” sotto System. 9.4.2 Accedere alle impostazioni delle voci “SOUND-SYS” e “ COLOR-SYS” e avviare la ricerca dei canali in base alle specifiche istruzioni riportate al paragrafo 9.3. 9.4.3 Accedere alle impostazioni delle voci “AUTO-SEARCH”...
-
Page 22: Ricerca Guasti
X Ricerca guasti Gli eventi descritti di seguito non corrispondono a guasti. Prima di contattare il servizio tecnico per le riparazioni, verificare il proprio dispositivo in base alle indicazioni sotto riportate. Problemi Cause L'adattatore CA non è correttamente collegato all'adattatore del veicolo. Nessuna immagine Viene utilizzata un'alimentazione non o suono... -
Page 23: Specifiche Tecniche
XI Specifiche tecniche Sistema DTV Frequenza di ingresso: VHF 177.5 MHz - 226.5 MHz UHF 474 MHz - 858 MHz Modulazione: QPSK/16-QAM/64-QAM Standard di decodifica: MPEG-2: MP@ML, MPEG-4: SP&ASP Standard decodifica audio: MPEG1: LAYER I/II/III, MPEG-2: LAYER I/II Sistema ATV Frequenza ricezione analogica: DK/I 49.74 MHz 847.25 MHz BG 48.25 MHz 847.25 MHz Sistema colore analogico: PAL/SECAM... - Page 24 Attenzione Il presente manuale viene fornito esclusivamente come riferimento. Le informazioni contenute nel presente sono soggette a modifica senza obbligo di notifica. La società si riserva il diritto di chiarire ogni eventuale dato poco chiaro, errore od omissione. Attenzione Nessun componente del dispositivo può essere recuperato. Non cercare di aprirlo per migliorarne le prestazioni.
- Page 25 GARANZIA CONVENZIONALE La Società MELCHIONI S.p.A., distributrice sul territorio italiano del marchio IRRADIO, vi ringrazia per la scelta e vi garantisce che i propri apparecchi sono frutto delle ultime tecnologie e ricerche. L’ apparecchio è coperto dalla garanzia convenzionale per il periodo di UN ANNO dalla data di acquisto da parte del primo utente.
- Page 26 UN DOCUMENTO FISCALE (scontrino o fattura) Sig. …………………………………………………………………………………. Via ……………………………………………………………….. n°……………... CAP ………………. Città ………………………………….Prov. ……………… Modello: XTL-926UC Matricola ……………………………………………….. Rivenditore …………………………………….Data acquisto…………………. Timbro e firma del Rivenditore per convalida certificato di garanzia Per eventuali informazioni sui Centri di Assistenza autorizzati sul territorio...
- Page 27 Contents Precautions Accessories Appearance Description of Panel Buttons Description of Buttons on Remote Control Connection of Main Interfaces VII DVB-T Installation Guide VIII DVB-T MENU Operation Guide 8.1 SETUP 8.2 TV/RADIO 8.3 MULTIMEDIA 8.4 GAME ATV Menu Troubleshooting Specifications...
-
Page 28: I Precautions
I Precautions Storage 1. Keep this product away from extremely hot or cold places. The storage temperature ranges from -20 to 60 and the working temperature from 0 to 40 . 2. Do not use this product at damp environment like bathtubs, wash basins, kitchens, washtubs, as well as basements, swimming pools or similar places. -
Page 29: Accessories
II Accessories 1. Car power adapter 2. AC power adapter 3. 75- antenna cable 4. Remote control 5. AAA battery 6. AV cable 7. Telescopic antenna * Open the package and make sure all the items are included. -
Page 30: Appearance
III Appearance 1. Telescopic antenna 2. TFT-LCD screen 3. Power indicator Red: Standby Green: Power-on 4. Remote-control receive window 5. CH+/ : Channel Select/ Upward button 6. CH-/ : Channel Select/ Downward button 7. OK/MUSIC: Confirm button /Music Background button 8. -
Page 31: Description Of Panel Buttons
IV Instruction of control panel buttons 1. CH+/ Under DTV mode, press as direction key with DTV menu, press as CH+ key without DTV menu; press as CH+ key under ATV mode; press to select upward under CARD mode. 2. CH-/ : Under DTV mode, press as direction key with DTV menu, press as CH- key without DTV menu;... -
Page 32: Description Of Buttons On Remote Control
V Remote control button 1. POWER: standby/off key. 2. MUTE: Mute key. 3. 0-9: digit keys. 4. --/-: channel direct selection and P/N switch key. Press for channel direct selection under ATV mode. Press as P/N switch under DTV mode. : return key. -
Page 33: Connection Of Main Interfaces
VI Connection of Main Interfaces 1. Connection of Power Supply: Align the power supply plug on AC adapter with the jack on the machine rear cover marked with DC. 2. Connection of Antenna Cable: 75ohm antenna conversion line Align one end of the attached antenna cable plug in the antenna jack on TV set and the other end plug in the external antenna jack. -
Page 34: Dvb-T Installation Guide
VII DVB-T Installation Guide When first time usages or program list do not exist, the DVB-T Installation Guide will display once the device is turned ON. Please set up as the following Pictures. Press key to move the cursor to your wanted item, press adjust with your local DVB-T standard setting. -
Page 35: Dvb-T Menu Operation Guide
VIII DVB-T MENU Operation Guide Press MENU from the remote control or from the device to enter MENU surface, there will be five menu and some sub-menu under. Press to switch each menu, then press to select sub-menu, press OK to enter sub-menu. Press to move cursor to your wanted location. - Page 36 8.1.2 TV Setup Under TV Setup Menu for the following items: (1) TV format: Display mode, '4:3LB', '4:3PS', '16:9LB' and '16:9FIT'. (2) TV mode: AV output system, selection of 'PAL', 'NTSC', 'AUTO'. (3) OSD Transparency: Setting for OSD transparency levels. (4) Banner Display Time: Menu banner time display setting.
-
Page 37: Tv/Radio
The default password of the device is 0000, please memorize after changing password. 8.1.4 Advance Timer Uers can setup appointed time to watch appointed Channels, start and finish time can be setup according to the timer system in this device, please confirm with the timer system from this device before setting up;... -
Page 38: Multimedia
When LCN setup as OFF , (see 8.1.1) the following Menu surface will be appear: Move and Sort are for setting channels in order. 8.2.2 Enter TV Guide Menu, under the program gide, you can see the current channels display list, press to move the cursor to the channel you wish to watch, press key to enter the Guide timer of... - Page 39 8.3.1 Enter My Album , press INFO to change drivers as shows below: Press key to move cursor to select Device , press switch drivers, press to return to different file Menu surface. Press key to select the picture you wish to view, press OK to confirm as follow: Press INFO from the remote control for viewing tools, press key to move the picture for clock wise or anti-clock wise, press...
- Page 40 Press key to select the picture you wish to view, press OK to view, press 'BLUE' in the remote control to return to the original file Menu. 8.3.3 When viewing Picture, press OK key to enter Picture playing mode and auto-switch to different effect to view the picture. Press INFO from the remote control for playing tools, press key to select previous or next pictures, press RED for play/pause;...
-
Page 41: Game
Press key to select the music you wish to play, press OK to confirm, press RED from the remote control for play/pause, GREEN key for stop, YELLOW key for repeat, press this key respectively can select Repeating , Repeat all , Random , Repeat OFF ;... -
Page 42: Atv Menu
IX ATV Menu Press the MENU button to pop up the following menu: MAIN MENU PICTURE SYSTEM PRESET Press to select one of the three entries above. Press to open the submenu. 9.1 PICTURE PICTURE BRIGHT CONTRAST COLOUR RESET Press to select BRIGHT and press to adjust its analog. - Page 43 SYSTEM ENGLISH CLOCK 16:9 BLUE BACK : Allows you to select the language you want. CLOCK: Allows you to set the time for auto shutdown. : (Display screen mode) Allows you to switch the mode between 16:9/4:3. : Allows you to revolve the image. BLUE BACK: Allows you to activate or deactivate this function when there are no signals.
- Page 44 Note: Before you start the AUTO-SEARCH, please set the SOUND/COLOR as the corresponding local systems. Or, the channel program may have no audio or have cacophony while the image may have no colour. SWAP: Press to select this entry. Press to change it to your required channel.
- Page 45 9.4 Proper Receiving 9.4.1 Access the setting entries of the Language in the System to choose your required OSD language. 9.4.2 Access the setting entries of the SOUND-SYS and COLOR-SYS and start searching channels according to specific instructions in Part 9.3. 9.4.3 Access the setting entries of the AUTO-SEARCH and SEARCH and make sure whether the systems are set according to the responding transmitting requirements.
-
Page 46: Troubleshooting
X Troubleshooting The following phenomenon does not indicate failures. Before you contact us for repair, please check your device according to the approaches below. Problems Causes The AC adapter does not connect to the vehicle adapter properly; No picture or sound Non-permissible power is applied;... - Page 48 Warning This manual is for your reference only. The information in the Manual is subject to change without prior notice. The company reserves the right to explain for any unknowns, errors or omissions. Warning No elements are recoverable inside your device. Do not attempt to open it to improve your TV set.
- Page 49 Melchioni S.p.A. - Milano - Italy Tel. +39 02 57941 - Fax +39 02 55181914 www.irradio.it...
Need help?
Do you have a question about the XTL-926UC and is the answer not in the manual?
Questions and answers