Iomega Home Network Quick Install Manual
Home network hard drive network/usb 2.0
Hide thumbs
Also See for Home Network:
- Quick start manual (20 pages) ,
- Quick start manual (41 pages) ,
- Quick start manual (36 pages)
Table of Contents
Advertisement
Available languages
Available languages
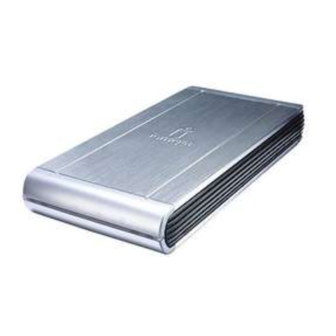
Home Network
Hard Drive
Network/USB 2.0
Quick Install
Installation rapide
Schnellstart
Installazione rapida
Instalación rápida
快速安裝指南
Instalação rápida
Snelle installatie
Snabbinstallation
Hurtig installation
Rask installering
Pika-asennus
Gyors telepítés
Rychlá instalace
Skrócona instrukcja insalacji
Γρήγορη εγκατάσταση
Advertisement
Table of Contents

Subscribe to Our Youtube Channel
Related Manuals for Iomega Home Network


Summary of Contents for Iomega Home Network
-
Page 1: Hard Drive
Home Network Hard Drive Network/USB 2.0 Snabbinstallation Quick Install Hurtig installation Installation rapide Rask installering Schnellstart Pika-asennus Installazione rapida Gyors telepítés Instalación rápida 快速安裝指南 Rychlá instalace Skrócona instrukcja insalacji Instalação rápida Γρήγορη εγκατάσταση Snelle installatie... -
Page 2: Quick Install
USB, see the user’s manual available on the Solutions CD. See the user’s manual available on the Solutions CD for instructions on connecting the Home Network hard Drive to a Mac or Linux computer. -
Page 3: Troubleshooting
Backing Up with Your Drive Iomega recommends data backups to ensure that your critical data is always protected. The frequency of your backups should depend on the importance of your data. To protect your data, you can simply drag and drop copies of your critical files onto the drive, or you can use the included software to schedule regular backups. -
Page 4: Installation Rapide
Installation rapide REMARQUE : l’installation rapide couvre la connexion de votre disque dur Home Network à un réseau. Pour plus d’informations sur la connexion de votre disque dur à un ordinateur par USB, consultez le guide de l’utilisateur disponible sur le CD Solutions. -
Page 5: Dépannage
Configuration du disque dur Home Network Pour configurer votre disque dur Home Network, lancez le logiciel Discovery Tool Home. Une fois la Liste des périphériques mise à jour, sélectionnez votre disque dans cette liste et cliquez sur Gérer le disque. - Page 6 Verbindung funktioniert die Home Network-Festplatte wie jedes gewöhnliche Speichergerät. Alle angeschlossenen Computer erhalten sofort Zugriff auf die neuen Dateien. Wiederholen Sie die Schritte 4 bis 10 auf jedem Computer, den Sie an die Home Network-Festplatte anschließen möchten. Das vollständige Benutzerhandbuch im HTML-Format finden Sie auf der Lösungs-CD. Wenn Sie weitere Fragen zu Ihrem neuen Laufwerk oder zur Software haben, rufen Sie unter www.iomega.com...
-
Page 7: Arbeiten Mit Der Home Network-Festplatte
Arbeiten mit der Home Network-Festplatte Konfigurieren der Home Network-Festplatte Um Ihre Home Network-Festplatte zu konfigurieren, starten Sie Discovery Tool Home. Sobald die Geräteliste aktualisiert ist, wählen Sie Ihr Laufwerk aus der Geräteliste und klicken Sie anschließend auf Laufwerk verwalten. Klicken Sie in der Geräteliste auf Ihr Laufwerk. Verwenden Sie den folgenden Benutzernamen und das folgendes Kennwort, um Ihr Laufwerk zu konfigurieren: Standardmäßiger Benutzername: admin... -
Page 8: Installazione Rapida
Home Network Hard Drive funzionerà come una qualsiasi periferica di archiviazione. Tutti i computer connessi avranno accesso immediato ai nuovi file. Ripetere le operazioni da 4 a 10 su tutti i computer che dovranno essere connessi all’unità Home Network Hard Drive. -
Page 9: Risoluzione Dei Problemi
Esecuzione di backup con l‘unità Iomega consiglia di eseguire dei backup dei dati per garantire la protezione costante delle informazioni di importanza critica. La frequenza dei backup varia in base all‘importanza dei dati da memorizzare. Per proteggere i dati, è sufficiente selezionare e trascinare nell‘unità... -
Page 10: Instalación Rápida
NOTA: La instalación automática instalará Discovery Tool Home y Retrospect Express HD en su sistema. Utilice la instalación personalizada si desea instalar únicamente Discovery Tool Home. Inicie Iomega Discovery Home Tool haciendo doble clic en su icono del escritorio. Espere que finalice la actualización de la lista de dispositivos. -
Page 11: Solución De Problemas
Solución de problemas No se detecta la unidad Si Iomega Discovery Home Tool no puede detectar la unidad, siga las recomendaciones que se muestran a continuación: • Haga clic en el botón Volver a explorar para actualizar la lista de dispositivos NOTA: no se detectará... -
Page 12: 使用您的 Home Network Hard Drive
快速安裝 注意:「快速安裝」包括將您的 Home Network Hard Drive 磁碟機連接到網路。如需透過 USB 將您的硬碟連接到電腦的詳 細資訊,請參閱 Solutions CD 中的使用者手冊。 請參閱 Solutions CD 中的使用者手冊,以取得將 Home Network Hard Drive 磁碟機連接到 Mac 或 Linux 電腦的指示。 請將 Home Network Hard Drive 磁碟機插到不斷電系統 (UPS) 或電源插座上。 請使用隨附的纜線將磁碟機連接至您的網路路由器。 開啟磁碟機電源。請等到指示燈變為恆亮的藍色後再繼續進行。 插入 Solutions CD。如果 CD 功能表未自動啟動,請啟動 Solutions CD 中的「Start」(啟動) 程式。... - Page 13 備份您的磁碟 Iomega 推薦以資料備份的方式來保護您的重要資料。備份的頻率可由資料的重要性來決定。若要保護您的資料,您可簡單 地將重要檔案的複本拖放到磁碟上,或使用隨附軟體排程定期備份。 如需完整設定指示以及備份策略的更多資訊,請安裝此軟體並選擇「說明」。 備份軟體取得方式 大部分的網路硬碟均於包裝中內含備份軟體。特定軟體版本與功能各異。請造訪 www.iomega.com 的「支援與下載」區, 以取得最新資訊或下載軟體。 疑難排解 未偵測到磁碟機 如果 Iomega Discovery Tool 無法偵測到磁碟機,請嘗試以下建議: 按一下「 Rescan」(重新掃描) 按鈕以重新整理裝置清單 • 注意:如果在 Discovery Home Tool 執行時開啟磁碟機電源,將不會偵測到磁碟機。請等到指示燈號為恆亮的藍色之 後再重新掃描網路。 確定磁碟機電源已開啟。磁碟機前方的電源 LED 應該為恆亮的藍色。 • 確認您使用的是功能良好的乙太網路線。 • 如果仍無法偵測到磁碟機,請查看 Solutions CD 上的使用者手冊與 www.iomega.com 上的支援資訊。...
-
Page 14: Instalação Rápida
Instalação rápida OBS: a Instalação rápida aborda como conectar o Home Network Hard Drive a uma rede. Para obter informações sobre a como conectar o disco rígido a um computador via USB, consulte o manual de usuário disponível no CD Soluções. -
Page 15: Snelle Installatie
Snelle installatie OPMERKING: In de handleiding voor snelle installatie vindt u instructies voor de aansluiting van uw Home Network Hard Drive op een netwerk. Voor informatie over het aansluiten van uw harde schijf op een computer via USB raadpleegt u de gebruikershandleiding op de cd Solutions. - Page 16 OBS: Den automatiska installationen kommer att installera Discovery Tool Home och Retrospect Express HD på din dator. Använd anpassad installation om du endast vill installera Discovery Tool Home. Starta Iomega Discovery Tool Home genom att dubbelklicka på dess ikon på skrivbordet. Vänta tills enhetslistan har uppdaterats.
-
Page 17: Rask Installering
MERK: Rask installering omhandler tilkobling av Home Network Hard Drive til et nettverk. Du finner informasjon om tilkobling av harddisken til en datamaskin via USB i brukerhåndboken, som finnes på Solutions CD-platen. Se brukerhåndboken på Solutions CD-platen for å få veiledning angående tilkobling av Home Network Hard Drive til en Mac- eller Linux-datamaskin. -
Page 18: Hurtig Installation
Hurtig installation BEMæRK: Hurtig installation handler om tilslutning af dit Home Network Hard Drive til et netværk. For oplysninger om at tilslutte din harddisk til en computer via USB skal du se brugervejledningen, der findes på Solutions-cd’en. Se brugervejledningen, der findes på Solutions-cd’en for instruktioner om at tilslutte din Home Network Hard Drive til en Mac- eller en Linux-computer. - Page 19 Valitse Home Network -kiintolevy laiteluettelosta. Napsauta Connect to Drive. (Yhdistä asemaan) Valitse levyaseman kirjain ja jaettu kansio (Home Network -kiintolevyn jaetun kansion nimi on oletuksena PUBLIC). Oletuksena salasana ei ole käytössä. Napsauta Connect (Yhdistä). Kun prosessi on valmis, Home Network -kiintolevy ilmestyy näkyviin My Computer (Oma tietokone) -kansioon.
- Page 20 Ha csak a Discovery Tool Home programot szeretné telepíteni, használja a Custom Install lehetõséget. Kattintson duplán az Iomega Discovery Tool Home program ikonjára az asztalon a program elindításához. Várja meg, amíg az eszköz végez a frissítéssel. Válassza ki a merevlemezt az eszközlistáról.
-
Page 21: Rychlá Instalace
Na každém počítači, který chcete připojit, je nutné zopakovat kroky 4 – 10. Úplnou uživatelskou příručku ve formátu HTML najdete na disku CD Solutions. Máte-li další dotazy týkající se nové jednotky a softwaru, přejděte na web www.iomega.com a vyhledejte část Support & Downloads (Podpora a Ke stažení). -
Page 22: Szybka Instalacja
Express HD na Twoim komputerze. Użyj opcji Custom Install (Instalacja niestandardowa), jeżeli chcesz zainstalować tylko narzędzie Discovery Tool Home. Otwórz stronę domową narzędzia Iomega Discovery dwukrotnie klikając jego ikonę na pulpicie. Poczekaj do zakończenia aktualizacji listy urządzeń. Wybierz swój domowy napęd sieciowy z listy urządzeń. -
Page 23: Γρήγορη Εγκατάσταση
σχετικά με τη σύνδεση του σκληρού σας δίσκου μέσω USB, ανατρέξτε στο εγχειρίδιο χρήσης (User’s Manual) στο CD Solutions. Aνατρέξτε στο εγχειρίδιο χρήσης στο CD Solutions για οδηγίες σχετικά με τη σύνδεση του Home Network Hard Drive σε υπολογιστή Mac ή Linux. - Page 24 (shipping may be charged), and Iomega may use new or refurbished parts or products to do so. The replaced part/product will be warranted for the remainder of the original warranty or three (3) months from the date of shipment of such parts/products, whichever is longer. If Iomega is unable to repair or replace a defective product, your alternate exclusive remedy shall be a refund of the original purchase price The above is Iomega’s entire obligation to you under this warranty.
- Page 25 Americhe, nella regione Estremo Oriente e Oceania o nei paesi non membri dell’Unione Europea, in Medio Oriente o in Africa; la garanzia ha una validità di novanta (90) giorni per i prodotti Iomega ricondizionati acquistati in tali regioni; oppure di due (2) anni per i prodotti acquistati dall’utente finale in uno dei paesi membri dell’Unione Europea.
- Page 26 Su única y exclusiva compensación por un defecto cubierto es la reparación o sustitución del producto defectuoso, a elección y cargo de Iomega (el porte puede ser cobrado); Iomega puede utilizar piezas o productos nuevos o reparados para tal fin. La garantía de la pieza o producto repuesto tendrá...
- Page 27 性,IOMEGA 對間接、附帶、衍生性或特殊之損壞或損失 (包括資料、使用或收益上之損失) 均不負責。在任何情況 下,Iomega 的責任皆不超過此磁碟機或媒體磁片的原購價格。有些地區不允許將附帶或間接損壞列為除外責任或責任 限制範圍,因此上述之責任限制範圍或除外責任有可能不適用於您。 取得保固服務 您必須在保固期間內通知 Iomega,以取得保固服務。Iomega 特定的顧客支援政策 (包括收費或服務) 和程序,將隨科技進 步及市場狀況而異。如需 Iomega 目前政策的相關資訊,請造訪我們的網站 www.iomega.com/supportpolicy.html,或寫信 至:Iomega Customer Service, 4059 South 1900 West, Roy, UT 84067。顧客服務部門的聯絡資料可在我們的支援 Web 網站 上取得:www.iomega.com/europe/support。若您的產品符合保固服務的條件,請將此產品和適當的證明文件以及從 Iomega 網站取得或由 Iomega 的代表提供您的寄回授權碼和購買證明,一併送回 Iomega。在進行保固服務時,Iomega 不會保護、還 原或退回資料,因此您在寄出前必須自行複製資料。 限制 上述保固將取代其他任何明示或隱含性的保固,為唯一之責任保證。在適用法律允許的範圍內,IOMEGA 特別聲明對任何...
- Page 28 您要的解答就在網站上。優質的網路支援網站 www.iomega.com。選擇您所在的地區,然後選擇「支援」。 Copyright © 2008 Iomega Corporation. All rights reserved. Iomega, the stylized “i” logo, and REV are either registered trademarks or trademarks of Iomega Corporation in the United States and/or other countries. Microsoft and Windows are either registered trademarks or trademarks of Microsoft Corporation in the United States and/or other countries.
Need help?
Do you have a question about the Home Network and is the answer not in the manual?
Questions and answers