
Related Manuals for Imperial ICSG100

Summary of Contents for Imperial ICSG100
- Page 1 FOR OUTDOOR USE ONLY All STAINLESS STEEL GAS BBQ GRILL USER’S MANUAL MODEL NUMBER: ICSG100...
- Page 2 LIMITED WARRANTY Model Number: ICSG100 All Stainless Steel BBQ Grill We warrant to the original consumer purchaser (“Purchaser”) of the All Stainless Steel BBQ Grill (“Product”) that each Product shall be free from defects in workmanship and materials for a period of the years listed below from the date of original purchase.
-
Page 3: Table Of Contents
TABLE OF CONTENTS BEFORE YOU BEGIN MESSAGE TO OUR USERS PAGE 1 SAFETY SYMBOLS PAGE 1 INSTALLATION & SAFETY PRECAUTIONS PAGE 2 PROPANE & GAS WARNING PAGE 2 ASSEMBLY PARTS PAGE 3 STEP I PAGE 5 STEP II PAGE 6 STEP III PAGE 7 STEP IV... -
Page 4: Message To Our Users
MESSAGE TO OUR USERS Thank you for your purchase of our All Stainless Steel BBQ Gas Grill. We sincerely wish you will enjoy using our fine products. Please read this User’s Manual in its entirety before using the grill. Please contact our customer service if you have any questions. Please read this User’s Manual carefully. -
Page 5: Installation/Safety Precautions
INSTALLATION/SAFETY PRECAUTIONS WARNING READ THIS SECTION FIRST BEFORE INSTALLING THE GRILL This grill is designed to use LP gas only. The installation of this appliance must conform with local codes or, in the absence of local codes, with either the National Fuel Gas Code, ANSI Z223. 1, or CAN/CGA B149.1, Natural Gas Installation Code or CAN/CGA-B149.2, Propane Installation Code. -
Page 6: Parts
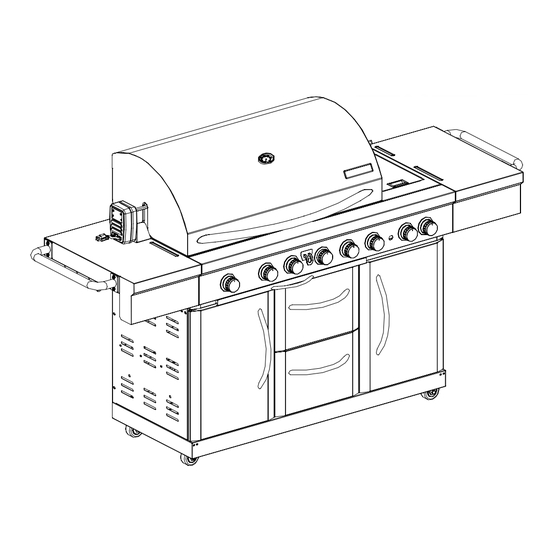
GRILL PARTS LIST REF# DESCRIPTION Q’TY REF# DESCRIPTION Q’TY Double-layer Lid Left Door Temp. Gauge Left Panel Name Plate Back Panel Lid Handle Left Side Shelf Angle Iron Rotisserie Kit Left Side Shelf Side Burner Lid Motor Bracket Hinge, Side Burner Lid Ignition Electrode, Rear Burner Cooking Grid, Side Burner Rear Panel... - Page 7 GRILL PARTS DIAGRAM...
-
Page 8: Step Ipage
ASSEMBLY INSTRUCTIONS PLEASE READ AND FOLLOW THE INSTRUCTIONS CAREFULLY STEP BY STEP Tools Required: #2 Philips head screwdriver (not provided) Hexagon/Allen wrench (provided). The following hardware kit is provided and packed in rotisserie motor carton:: Item Description Specification Quantity Truss head screw 1/4-20x1/2”... - Page 9 ASSEMBLY INSTRUCTIONS STEP II: Take out left side shelf from carton. Use two 1/4-20x1/2” screws to attach left side shelf from inside of the firebox, and use three same screws to attach it from outside of firebox. Use three 5/32-32x3/8” screws to attach left side shelf angle iron to side shelf, and also use two same screws to attach it to firebox from outside.
-
Page 10: Step Iii
ASSEMBLY INSTRUCTIONS STEP III: Take out right side shelf from carton. Use five 1/4-20x1/2” screws to attach right side shelf from outside of firebox. Use three 5/32-32x1/2” screws to attach right side shelf angle iron to side shelf, and also use two same screws to attach it to firebox from outside. Use four 1/4-20x1/2”... -
Page 11: Step Iv
ASSEMBLY INSTRUCTIONS STEP IV: Remove rotisserie rod from back panel packing foam, take out handle, Prongs, and shaft collar from rotisserie carton. Tread tread handle and tighten, slide shaft collar through other side of rod followed by the two prongs, (forks should be pointing towards each other )tighten thumb screws on shaft collar and prongs. - Page 12 ASSEMBLY INSTRUCTIONS STEP V: When the grill is in the desired location, lock the caster brakes, this will keep the grill unit in place for safe operation.
-
Page 13: Gas Connection
GAS CONNECTION ONLY USE THE REGULATOR AND HOSE ASSEMBLY PROVIDED WITH THIS GRILL. REPLACEMENT PRESSURE REGULATORS AND HOSE ASSEMBLIES MUST BE THOSE SUPPLIED BY THE MANUFACTURER This is a LP (Liquefied Petroleum Gas) configured grill. Do not attempt to use a natural gas supply unless the grill has been reconfigured for natural gas use. - Page 14 GAS CONNECTION CONNECT THE REGULATOR TO THE LP TANK VERY IMPORTANT: - THE REGULATOR SHALL NOT BE IN A LOCATION THAT WILL ATTAIN A TEMPERATURE ABOVE 140℉(60℃). - THE REGULATOR SHALL INCORPORATE A PRESSURE RELIEF VALVE OR OVERPRESSURE DEVICE. - THE INLET OF THE PRESSURE REGULATOR SHALL BE FITTED TO CONNECT THE TYPE I CONNECTION OF THE TANK VALVE PER ANSIZ21.81.
- Page 15 GAS CONNECTION WARNING Never insert any foreign objects into the valve outlet. It may damage the valve and cause leak, leaking gas may result in fire, explosion, heavy body injury, or even death. Do not connect this grill to the self-contained LP gas system of a motor home or camper trailer.
-
Page 16: Leak Testing
LEAK TESTING GENERAL Although all gas connections on the grill are leak tested at the factory prior to shipment, a complete gas tightness check must be performed at the installation site due to possible mishandling in shipment, or excessive pressure unknowingly being applied to the unit. -
Page 17: Final Installation Checklist
LEAK TESTING SAFETY TIPS: 1) ALWAYS CHECK FOR LEAKS AFTER EVERY LP TANK CHANGE. 2) ALWAYS CHECK FOR LEAKS BEFORE EACH USE. 3) USE LONG BBQ TOOL TO AVOID BURNS. 4) CHECK ALL GAS SUPPLY FITTINGS FOR LEAKS BEFORE EACH USE. IT IS HANDY TO KEEP A SPRAY BOTTLE OF SOAPY WATER NEAR THE SHUT-OFF VALVE OF THE GAS SUPPLY LINE. -
Page 18: Grill Lighting Instruction
GRILL LIGHTING INSTRUCTION VERY IMPORTANT: ALWAYS INSPECT THE HOSE PRIOR TO EACH USE. BEFORE LIGHTING: Inspect the gas supply hose before turning the gas “ON”. If there is evidence of cuts, wear, or abrasion, it must be replaced before use. The replacement hose assembly must be that specified by the manufacturer. - Page 19 GRILL LIGHTING INSTRUCTION FLAME CHARACTERISTICS: 1) Check for proper burner flame characteristics. Each burner is adjusted prior to shipment; however, variations in the local gas supply may take subtle necessary adjustments. 2) Burner flames should be blue and stable with small yellow tips, no excessive noise, or flames lifting of the burners.
- Page 20 GRILL LIGHTING INSTRUCTION 5) Push and turn rear burner knob slowly to “HI” position with left hand 2 seconds later than push down the button. The built-in igniter will click and spark simultaneously to light the burner once burner lights. Keep pressing safety valve button for 15 seconds to allow the safety valve to open.
-
Page 21: Operating Instruction
Turn off the gas supply when the grill is not in use. Always turn off the LP tank completely and detach from the grill before moving. TOTAL GAS CONSUMPTION: Total gas consumption (per hour) of ICSG100 grill with all burners on “HI”: Main burners 60,000 Btu/hr... - Page 22 OPERATING INSTRUCTION GENERAL USE OF THE GRILL: The grill burners encompass the entire cooking area and are side ported to minimize blockage from falling grease and debris. Above the burners are stainless steel radiated. The igniter knobs are located on the valve panel. Follow the lighting instructions printed on the control panel.
-
Page 23: Care & Maintenance
OPERATING INSTRUCTION WARNING ELECTRICAL GROUNDING INSTRUCTIONS This grill is equipped with a three-prong (grounding) plug on the rotisserie motor,for your protection against shock, and should be plugged directly into a properly grounded three-prong receptacle. Do not cut or remove the grounding prong. -
Page 24: Control Panel 1
CARE & MAINTENANCE MAINTENANCE (CONTINUED) 4) Call our after service center for warranty replacement parts. • CLEANING STAINLESS STEEL CLEANING The grill is made of stainless steel. There are many different stainless steel cleaners available. Always use the mildest cleaning procedure first, scrubbing in the direction of the grain. -
Page 25: Trouble Shooting
TROUBLE SHOOTING SPIDER AND INSECT WARNING Spiders and insects can nest in the burners after storing. These nests can cause fires inside the tube or beneath the grill. This is a very dangerous condition. So always clean the burners before use. WHEN TO LOOK FOR SPIDERS Inspect the burners at least once a year or immediately if any of the following conditions occur:... -
Page 26: Food Safety
FOOD SAFETY FOOD SAFETY: 1) Always follow the following tips to enjoy safe and healthy outdoor grilling. 2) Always use hot soapy water to wash hands, surfaces & utensils after processing raw meat. 3) Always separate raw meat from cooked foods to avoid cross-contamination. 4) Always use clean utensils to handle the food.
Need help?
Do you have a question about the ICSG100 and is the answer not in the manual?
Questions and answers