Table of Contents
Advertisement
Quick Links
See also:
Service Manual
SPLIT TYPE AIR CONDITIONER
INDOOR UNIT/OUTDOOR UNIT
OUTDOOR UNIT
RAC-08PH1
RAC-10PH1
RAC-18PH1
Instruction manual
To obtain the best performance and ensure years of trouble free use, please read this instruction manual completely.
MODEL
RAS-08PH1/RAC-08PH1
RAS-10PH1/RAC-10PH1
RAS-14PH1/RAC-14PH1
RAS-18PH1/RAC-18PH1
RAC-14PH1
– 1 –
INDOOR UNIT
RAS-08PH1
RAS-10PH1
RAS-14PH1
RAS-18PH1
Page 1~20
Advertisement
Table of Contents

Related Manuals for Hitachi RAS-08PH1


Summary of Contents for Hitachi RAS-08PH1
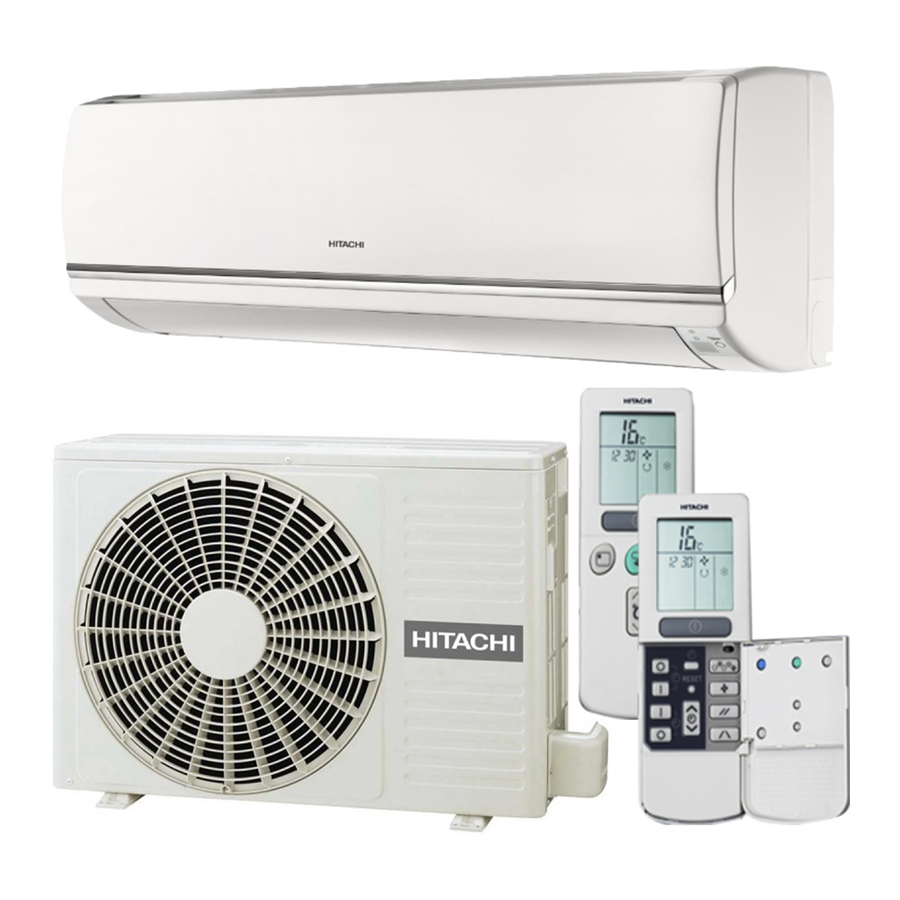
- Page 1 SPLIT TYPE AIR CONDITIONER INDOOR UNIT/OUTDOOR UNIT MODEL RAS-08PH1/RAC-08PH1 RAS-10PH1/RAC-10PH1 RAS-14PH1/RAC-14PH1 RAS-18PH1/RAC-18PH1 INDOOR UNIT OUTDOOR UNIT RAC-08PH1 RAS-08PH1 RAC-14PH1 RAC-10PH1 RAS-10PH1 RAS-14PH1 RAS-18PH1 RAC-18PH1 Instruction manual Page 1~20 To obtain the best performance and ensure years of trouble free use, please read this instruction manual completely.
-
Page 2: Safety Precaution
SAFETY PRECAUTION • Please read the “Safety Precaution” carefully before operating the unit to ensure correct usage of the unit. • Pay special attention to signs of “ Warning” and “ Caution”. The “Warning” section contains matters which, if not observed strictly, may cause death or serious injury. The “Caution” section contains matters which may result in serious consequences if not observed properly. - Page 3 PRECAUTIONS DURING OPERATION • Do not use any conductor as fuse wire, this could cause fatal accident. PROHIBITION • During thunder storm, disconnect the plug top or turn off the circuit breaker. WARNING “OFF” • Spray cans and other combustibles should not be located within a meter of the air outlets of both indoor and outdoor units.
-
Page 4: Outdoor Unit
(Lower section of the side) ceiling, install the bush and drain pipe on the drain port and drain water. MODEL NAME AND DIMENSIONS MODEL WIDTH (mm) HEIGHT (mm) DEPTH (mm) RAS-08PH1, RAS-10PH1, RAS-14PH1, RAS-18PH1 RAC-08PH1, RAC-10PH1 RAC-14PH1 79 2 RAC-18PH1 – 4 –... - Page 5 NAMES AND FUNCTIONS OF EACH PART INDOOR UNIT INDICATIONS OPERATION LAMP (Yellow) This lamp lights during operation. The OPERATION LAMP flashes in the following cases during heating. (1) During preheating TIMER LAMP (Orange) For about 2-3 minutes after This lamp lights when the starting up.
-
Page 6: Remote Control Unit Names/Functions
NAMES AND FUNCTIONS OF EACH PART REMOTE CONTROLLER • This controls the operation of the indoor unit. The range of control is about 7 meters. If indoor lighting is controlled electronically, the range of control may be shorter, in some cases, the control signal may not be received. This unit can be fixed on a wall using the fixture provided. -
Page 7: Automatic Operation
VARIOUS FUNCTIONS ■ Auto Restart Control • If there is a power failure, operation will be automatically restarted when the power is resumed with previous operation mode and airflow direction. (As the operation is not stopped by remote controller.) • If you intend not to continue the operation when the power is resumed, switch off the power supply. When you switch on the circuit breaker, the operation will be automatically restarted with previous operation mode and airflow direction. -
Page 8: Heating Operation
HEATING OPERATION • Use the device for heating when the outdoor temperature is under 21°C. When it is too warm (over 21°C), the heating function may not work in order to protect the device. • In order to keep reliability of the device, please use this device above -15°C of the outdoor temperature. -
Page 9: Dehumidifying Operation
DEHUMIDIFYING OPERATION Use the device for dehumidifying when the room temperature is over 16°C. When it is under 15°C, the dehumidifying function will not work. Press the FUNCTION selector so that the display indicates (DEHUMIDIFY). Press the (FAN SPEED) button to select LOW and SILENT. START Press the (START/STOP) button. -
Page 10: Cooling Operation
COOLING OPERATION Use the device for cooling when the outdoor temperature is -10 to 42°C. If humidity is very high (over 80%) indoors, some dew may form on the air outlet grille of the indoor unit. Press the FUNCTION selector so that the display indicates (COOL). -
Page 11: Fan Operation
FAN OPERATION You can use the device simply as an air circulator. Use this function to dry the interior of the indoor unit at the end of summer. Press the FUNCTION selector so that the display indicates (FAN). Press the (FAN SPEED) button. -
Page 12: How To Set The Timer
HOW TO SET THE TIMER Press the (OFF-TIMER) OFF-Timer button. The (OFF) mark blinks on the display. Stop Start OFF TIMER You can set the device to turn off at ON TIMER the present time. RESERVE CANCEL ON-Timer Press the (ON-TIMER) button. - Page 13 Set the turn-off time with Point the signal window of the remote controller toward the indoor unit, the TIMER control button. and press the (RESERVE) button. (OFF) mark starts lighting instead of flashing and the (RESERVED) sign lights. A beep occurs and the (TIMER) lamp lights on the indoor unit.
-
Page 14: To Set The Sleep Timer
HOW TO SET THE SLEEP TIMER Set the current time at first if it is not set before (see the pages for setting the current time). Press the (SLEEP) button and the display changes as shown below. Mode Indication 1 hour 2 hours 3 hours 7 hours... -
Page 15: Adjusting The Air Deflectors
ADJUSTING THE AIR DEFLECTORS When cooling, dehumidifying Vertical ° about 10 ° about 40 When heating Vertical ° about 10 ° about 45 HOW TO EXCHANGE THE BATTERIES IN THE REMOTE CONTROLLER Push and pull to the direction of arrow. –... -
Page 16: Maintenance
MAINTENANCE CAUTION Cleaning and maintenance must be carried out only by qualified service personal. Before cleaning, stop operation and switch off the power supply. 1. AIR FILTER Please clean the filter once about every two weeks. By doing so, the power rates are saved. In case the air filter is full of dust, the air flow will decrease and the cooling capacity will be reduced. - Page 17 2. CLEANING OF FRONT PANEL Remove the front panel and wash with clean water. Wash it with a soft sponge. After using neutral detergent, wash thoroughly with clean water. When front panel is not removed, wipe it with a soft dry cloth.
- Page 18 INFORMATION CAPABILITIES Heating Capability CAUTION This room air conditioner utilizes a heat pump system that absorbs exterior heat and brings it into a room to be heated. As the ambient Do not use a stove temperature gets lower, heating capability will also lower. In such a other situation, the inverter work to increase compressor rpm to keep the h i g h t e m p e ra t u r e...
-
Page 19: Regular Inspection
REGULAR INSPECTION PLEASE CHECK THE FOLLOWING POINTS EVERY EITHER HALF YEARLY OR YEARLY. CONTACT YOUR SALES AGENT SHOULD YOU NEED ANY HELP. Check to see if the unit’s earth line has been con- nected correctly. If the earth line is disconnected or faulty, unit failure or WARNING electric shock hazard may result. - Page 20 Noise of the ventilation fan sucking in air present in the drain hose and blowing out dehumidifying water that had accumulated in the condensed water collector. For Perking noise details, consult your sales agent. Operation noise changes due to power variations according to room temperature Changing operation noise changes.
- Page 21 RAS-08PH1/RAC-08PH1 RAS-10PH1/RAC-10PH1 RAS-14PH1/RAC-14PH1 RAS-18PH1/RAC-18PH1 RAC-08PH1 RAS-08PH1 RAC-14PH1 RAC-10PH1 RAS-10PH1 RAS-1 PH1 RAS-18PH1 RAC-18PH1 Instruction manual Page 1~20 To obtain the best performance and ensure years of trouble free use, please read this instruction manual completely.
- Page 24 RAC-08PH1 RAC-10PH1 RAC-14PH1 Трубопроводы и проводка Воздухозаборники (на задней панели и слева) RAC-18PH1 RAS-08PH1, RAS-10PH1, RAS-14PH1, RAS-18PH1 RAC-08PH1, RAC-10PH1 RAC-14PH1 RAC-18PH1...
- Page 25 ИНДИКАТОР “РАБОТА” (желтый) Этот индикатор горит во время работы кондиционера. В режиме нагрева индикатор “РАБОТА” мигает в следующих случаях: ИНДИКАТОР ТАЙМЕРА (1) Во время предварительного (оранжевый) нагрева Этот индикатор горит во Мигает в течение примерно 2–3 время работы по таймеру. минут...
- Page 26 Меры предосторожности при использовании пульта • Cоблюдайте сл едующие правила при использовании ПДУ: • Не подвергайте пульт воздействию прямого солнечного света. • Не помещайте пульт вблизи источника тепла. • Обращайтесь с пультом аккуратно. Не роняйте его на пол и следите, чтобы в него не попала вода. •...
- Page 28 Размораживание Размораживание выполняется примерно раз в час, когда на теплообменнике наружного блока образуется лед,каждый раз в продолжение 5–10 минут. Во время выполнения размораживания индикатор “Работа” мигает (горит 3 секунды, затем не горит 0,5 секунды). Максимальная продолжительность размораживания 20 минут. (Если трубопровод длиннее обычного, возможно образование льда.)
-
Page 32: Установка Таймера
УСТАНОВКА ТАЙМЕРА ТАЙМЕР ВЫКЛЮЧЕНИЯ ТАЙМЕР ВКЛЮЧЕНИЯ ПРОГРАММИРОВАНИЕ ОТМЕНА Стоп Пуск... - Page 34 Кондиционер будет выключен командой Таймер Пуск таймера спящего режима и включен спящего режима командой таймера включения.
- Page 35 • Использование горизонтальной направляющей в пределах диапазона регулировки показано справа.
- Page 37 Стержень Стержень Отверстие Отверстие...
- Page 38 Функци я обогрева • Данный кондиционер использует систему теплового насоса, которая поглощает внешнее тепло и переносит его в обогреваемое помещение. При понижении температуры окружающего воздуха понижается и обогревающая способность кондиционера. В такой ситуации инвертер увеличивает обороты компрессора, чтобы предотвратить снижение обогревающей способности кондиционера.
- Page 39 Проверьте, что вилка кабеля питания хорошо вставлена в розетку. Если вилка кабеля питания вставлена в розетку неплотно или нагревается, существует опасность пожара или поражения электрическим током. Если на вилке кабеля питания есть пыль или грязь, очистите вилку и вставьте в розетку. ПРОВЕРЬТЕ...
- Page 40 • Если после выполнения Немедленно обратитесь в сервис-центр описанных выше проверок при возникновении следующих условий: кондиционер все равно не • Часто выключается автоматический вык р а б о т а е т п р а в и л ь н о , лючатель...
Need help?
Do you have a question about the RAS-08PH1 and is the answer not in the manual?
Questions and answers