Lectronix Navion R5000 Operating Instructions Manual
Hide thumbs
Also See for Navion R5000:
- Installation instructions manual (41 pages) ,
- Quick start manual (2 pages)

Subscribe to Our Youtube Channel
Related Manuals for Lectronix Navion R5000


Summary of Contents for Lectronix Navion R5000
-
Page 1: Operating Instructions
™ Navion R5000 Operating Instructions Read these instructions carefully before using this product and keep this manual for future reference. - Page 2 © 2006, 2007 Lectronix, Inc. Part Number – 15898-A.1...
- Page 3 DISCLAIMER THIS IS A DISCLAIMER OF LIABILITY AND DAMAGE RESPONSIBILITY AS REGARDS TO LECTRONIX, INC. AND GARMIN RELATING TO YOUR USE OF THE LECTRONIX NAVION™ R5000 SYSTEM. READ IT CAREFULLY. YOU ASSUME TOTAL RESPONSIBILITY AND RISK FOR USING THIS SYSTEM.
-
Page 4: Table Of Contents
Table of Contents Safety Information ......................... 1 Warnings ............................ 1 Cautions ............................. 3 Notes on Use: Liquid Crystal Panel ................... 3 Getting Started..........................4 Understanding Your Navion™ R5000..................4 Garmin GVN 52 Owner’s Manual....................4 Satellite Radio User’s Guide ...................... 5 Controls, Applications and Functions.................. - Page 5 If You Suspect Something is Wrong ..................39 Common Problems........................39 Appendix A: One Year Limited Warranty .................. 41 Appendix B: Service and Technical Support................42 Contact Lectronix, Inc....................... 42 Appendix C: Software Notice ..................... 43 Software Notice ........................43 Open Source Software ......................43 Appendix D: Navion™...
-
Page 7: Safety Information
IMPORTANT SAFETY INFORMATION Safety Information Read the operating instructions for the Navion™ R5000 and all other components of the system carefully before using the system. They contain instructions about how to use the system in a safe and effective manner. FAILURE TO OBSERVE THE INSTRUCTIONS GIVEN IN THIS MANUAL MAY CAUSE INJURY OR DAMAGE AND VOID THE WARRANTY. -
Page 8: Important Safety Information
IMPORTANT SAFETY INFORMATION Warning Observe the following warnings when installing. • Disconnect the lead from the negative (–) battery terminal before installation. Wiring and installation with the negative (–) battery terminal connected may cause electrical shock and injury due to a short circuit. Some vehicles equipped with the electrical safety system have specific procedures of battery terminal disconnection. -
Page 9: Cautions
IMPORTANT SAFETY INFORMATION Cautions FOLLOW THE LAWS AND REGULATIONS OF YOUR Caution STATE, PROVINCE OR COUNTRY FOR INSTALLATION. THIS PRODUCT IS A CLASS I LASER PRODUCT. Caution USE OF CONTROLS OR ADJUSTMENTS OR PERFORMANCE OF PROCEDURES OTHER THAN THOSE SPECIFIED HEREIN MAY RESULT IN HAZARDOUS RADIATION EXPOSURE. -
Page 10: Getting Started
INTRODUCTION Getting Started Understanding Your Navion™ R5000 The Navion™ R5000 combines radio, CD/MP3 player, rear-view camera system, and advanced engine, coach, and trip monitors into a single integrated system designed specifically for use in Recreational Vehicles. The unit installs easily in the same dashboard space commonly used for existing camera monitors, and replaces three separate systems (camera, radio, and vehicle computer) with one. -
Page 11: Satellite Radio User's Guide
INTRODUCTION Satellite Radio User’s Guide If your Navion™ R5000 includes the optional Satellite Radio system, please refer to the User’s Manual included with your vehicle for information regarding the operation of this service. Controls, Applications and Functions The front panel controls let you select the Navion™ R5000’s Applications and Functions. Refer to the following figure to understand how to use the front panels and controls. -
Page 12: Selecting Applications And Functions
INTRODUCTION Selecting Applications and Functions Each Application (i.e., Audio, Camera, Information or Navigation) includes a subgroup of Functions which you select using the Application controls and four-way arrow keys on the front of the Navion™ R5000. The following table describes the Applications and lists their related Functions. -
Page 13: The Navion™ R5000 Display
INTRODUCTION The Navion™ R5000 Display The Navion™ R5000 display is divided into four windows as shown below. When you select a new Application and Function, the information associated with the current Application and Function may automatically move from the Active Window to the Background or Audio Windows. Application Display Layout... -
Page 14: Using The Sound Controls
INTRODUCTION Using the Sound Controls The sound controls affect the sound source, such as the CD or FM radio. Volume Use the rotary knob to change the volume, regardless of the audio source or Active Application. Turn the knob to the right to increase the volume and left to decrease the volume. -
Page 15: Adjusting The Display
INTRODUCTION Adjusting the Display You can adjust the Screen from any Application. 1) Press the MENU button to access the screen parameters. 2) Use the LEFT or RIGHT arrow key to select the Screen tab. 3) Use the UP or DOWN arrow key to select the parameter for adjustment. 4) Use the LEFT or RIGHT arrow key to adjust the selected parameter. -
Page 16: Fm, Am And Wb Radio
AUDIO FM, AM and WB Radio The Navion™ R5000 system’s FM, AM and WB (Weather Band) Radio Functions are selected via the AUDIO button. FM/AM/WB Radio Buttons & Controls Selecting and Tuning the Radio 1) Press the AUDIO button. 2) Press the AUDIO button repeatedly to step through the radio bands. 3) When you reach the desired radio band, either press the SEL button to enable that band or wait until the highlighted option is automatically selected. - Page 17 AUDIO To save a radio station - Tune to the radio station and press the SEL button. The preset list will update. To recall a radio station - Press the MINUS (-) or PLUS (+) keys to step through the list of stored radio stations.
-
Page 18: Sirius Satellite Radio
AUDIO Sirius Satellite Radio The Navion™ R5000 system is compatible with an optional Sirius Satellite Radio. This section describes the features and functions of the Satellite Radio system. Before using the optional Satellite radio, you need to subscribe to the Sirius service either by phone or via the Internet (see Subscribing to Sirius Satellite Radio). -
Page 19: Tuning The Satellite Radio
AUDIO Note: The Satellite selection will not be present if the optional Satellite Radio is not connected to the R5000. Tuning the Satellite Radio 1) Press the AUDIO button. 2) Press the AUDIO button until Satellite is highlighted. 3) Either press the SEL button or wait until Satellite is automatically selected. 4) Use the UP and DOWN buttons to select the Music Category. -
Page 20: Parental Lockout And Channel Access
AUDIO Parental Lockout and Channel Access Locking a specific satellite radio category and channel will prevent tuning to that particular station. Note: The default Lock Code is 0000. Configuring the Sirius Satellite Radio Locking a Channel and setting a Lock Code 1) Tune the satellite radio to the Category and Channel of interest. -
Page 21: Unlocking A Channel And Removing A Lock Code
AUDIO Unlocking a Channel and removing a Lock Code 1) Tune the satellite radio to the locked Category and Channel. No audio will play and the Locked notification will appear. 2) Press the MENU key. 3) Press the LEFT or RIGHT arrow key to select the Settings screen. 4) Press the DOWN arrow key to move to the keyboard. -
Page 22: Compact Disc (Cd)
AUDIO Compact Disc (CD) The Compact Disk (CD) player is compatible with standard audio CDs as well as audio read/write CDs that include MP3 or WMA files made on your computer. You can play the songs in normal (sequential order) or shuffle mode. CD Playback Buttons &... -
Page 23: Cd Shuffle And Repeat Modes
AUDIO CD Shuffle and Repeat Modes Shuffle mode plays CD tracks in a random sequence. Repeat mode plays CD tracks from beginning to end of the CD repeatedly. If both are selected, the system will repeatedly play the CD in shuffle mode. 1) Press the MENU button to view the options. -
Page 24: Usb Audio
AUDIO USB Audio The system will automatically detect and play MP3 and WMA encoded music from a USB stick when it is inserted into the system (The system may take a few seconds to recognize the USB stick). The song information associated with each music track will appear on the display screen if it is encoded with the song. -
Page 25: Usb Shuffle And Repeat Modes
AUDIO USB Shuffle and Repeat Modes 1) Shuffle mode plays tracks on a random sequence. “Repeat” plays tracks from beginning to end repeatedly. 2) Press the MENU button to view the options. 3) Move to the Settings tab with the LEFT or RIGHT arrow key. 4) Use the UP and DOWN arrow keys to highlight either the Shuffle or Repeat selection. -
Page 26: External Audio
AUDIO External Audio The Navion™ R5000 will play the audio output from your portable audio devices such as an iPod or MP3 player. External Audio Buttons & Controls Playing Files on Portable Audio Devices (MP3 Players) 1) Connect your MP3 player to the R5000 by cabling the MP3 player to the R5000’s Audio Line In jack. -
Page 27: Camera (Cam)
Camera (CAM) The R5000 supports up to three cameras. Mount the cameras on the vehicle so that there is a left, right and a rear camera. The rear camera supports a microphone that can be automatically activated when the RV is shifted into reverse. Camera (CAM) Buttons &... -
Page 28: Configuring The Camera Options
Configuring the Camera Options When in the CAM view, pressing the MENU button provides a list of camera configuration options. Camera MENU Configuration Options, Buttons & Controls Camera MENU Options Table Menu Option Description Use Camera Audio Turns on the rear camera microphone. Once set, the microphone remains active and will override any entertainment audio sources when the camera view is the active application. - Page 29 Menu Option Description Auto Turn Signal Camera Automatically switches the display to the left or right camera when the left or right turn signal is activated. When the turn signal is deactivated, the camera view returns to the previous application. Note: If Auto Reverse is enabled, then Auto Reverse will take priority over Auto Turn Signal Camera.
-
Page 30: Vehicle Status (Status)
INFO Vehicle Status (Status) The R5000 Vehicle Status display provides information about the operating conditions of the vehicle. The following table describes the information available in the status screens. Screen Status Description Traveling information such as road speed, fuel economy, fuel Road level, average fuel economy, total fuel used, instantaneous fuel rate and total vehicle distance is found here. -
Page 31: How To View Status Information In A Background Window
INFO How to View Status Information in a Background Window You can view one of the fields from the status display in the Background window even when the status display is not the main Application. 1) To select an item for display in the background window. Use the UP and DOWN arrow keys to highlight the status item for display. -
Page 32: Alarms
INFO Alarms The Navion™ R5000 continuously monitors system parameters and presents an alarm when the parameter is outside of normal operating conditions. When there is an alarm, an indicator in a red box appears in the background window, overriding anything that is displayed in that window. You should take note of the alarm and check your vehicle to correct the alarm condition. -
Page 33: Vehicle Maintenance (Maint)
INFO Vehicle Maintenance (Maint) The Vehicle Maintenance Information helps you track and monitor key vehicle maintenance items. The maintenance item is shown on the left of the window. The Current column displays the number of miles driven since the item received attention. The Sched. column displays the manufacturer’s recommended scheduled maintenance interval. -
Page 34: Trip Statistics (Trip)
INFO Trip Statistics (Trip) Trip statistics provide the operator with information while traveling. This information can include, traveling time, gallons of fuel used, average miles per gallon etc. Note: The statistics available depend on the make and model of the recreational vehicle. Trip Statistics Buttons &... -
Page 35: Operator's Checklist (Check)
INFO Operator’s Checklist (Check) The Operator’s Checklist provides the operator with a series of predefined lists to use as a reference for typical procedures including Departure, Arrival, Preparation for Storage and Removal from Storage. Operator Checklist Screen Descriptions Table Screen Description Departure A list of common departure tasks... -
Page 36: Clock And Date
INFO Clock and Date The Navion™ R5000’s clock and date are always displayed on the main screen in the lower left hand corner. Clock and Date Buttons & Controls Viewing Clock and Date in the Active Window 1) Press the INFO button until Clock is highlighted. 2) Press the SEL button or wait until Clock is selected automatically. -
Page 37: Setting The Clock And Date
INFO Setting the Clock and Date 1) Press the INFO button repeatedly until Clock is highlighted. 2) Press the SEL button to select Clock or wait until clock is automatically selected. 3) Press SEL button to edit the time and date values. 4) Use the LEFT and RIGHT arrow keys to select the field you want to modify. -
Page 38: Tire Pressure Monitor (Tires)
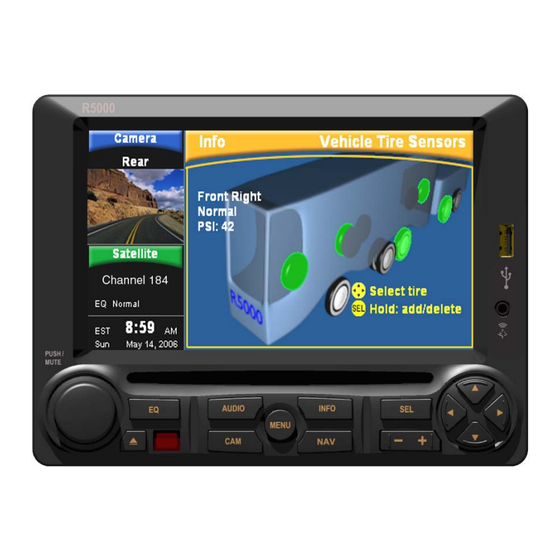
INFO Tire Pressure Monitor (Tires) Using the optional tire pressure sensors installed on each tire, the Navion™ R5000 can monitor the vehicle’s tire pressure and alert you to possible tire pressure problems. Tire Pressure Monitor Controls & Buttons Tire Pressure Sensor Operation Tire pressure is monitored approximately every 5 minutes with sensors placed on each tire. -
Page 39: Installing Tire Pressure Sensors
INFO Installing Tire Pressure Sensors The sensors determine operating pressure of the tire when the sensor is first installed. Therefore the tire pressure at the time of installation is CRITICAL! All tires MUST be inflated to the manufacturer’s recommended cold pressures while the tires are cold. Refer to the owner’s manual. -
Page 40: Removing Tire Pressure Sensors
INFO Removing Tire Pressure Sensors 1) Press the INFO button repeatedly until Tires is highlighted. 2) Press SEL or wait until Tires is automatically selected. 3) Using the FOUR-WAY arrow keys, select the tire where the tire pressure sensor is to be removed. -
Page 41: Navigation (Nav)
Navigation (NAV) The Navion™ R5000 includes support for the optional Garmin GVN52 Navigation system. Please refer to the Garmin User’s Manual included with your RV for information regarding this Application. When navigating, carefully compare information displayed on the unit to all available navigation sources, including information from street signs, visual sightings, and maps. - Page 42 4) The GARMIN remote control can also be used for navigation. Refer to the GARMIN GVN 52 manual for information on the use of the GARMIN Navigation system. 5) Press the MENU button quickly to access the GARMIN menus. Use the FOUR-WAY arrow keys to move around the GARMIN menus. The menu item will be highlighted when selected.
-
Page 43: Configuring Navigation Options
Configuring Navigation Options Navigation options allow you to hear navigation prompts and audio through the R5000. The options are: Route Audio to Main Speakers – Navigation prompts will interrupt current audio source so that navigation prompts can be heard. This would not normally be checked, if the Garmin GVN52 has the external speaker. -
Page 44: Maintenance
Maintenance Your product is designed and manufactured to ensure a minimum of maintenance. Cleaning hints follow. Keep the display clean of dust and debris. 2) Use a dry soft cloth for routine exterior cleaning. Never use benzene, thinner or other solvents. -
Page 45: Troubleshooting
Lectronix, Inc (see Appendix B). Only qualified personnel should service the product. Always refer diagnostics and repair to professionals. Lectronix, Inc. shall not be liable for any accidents arising out of neglect or attempts to repair the unit. - Page 46 CD Problems Problem Possible Cause Possible Solution No playback The disc is inserted upside down. Insert the disc correctly. No playback There is a flaw or foreign object on the Remove the foreign object, or use disc. a flawless disc. Sound skipping There is a flaw or foreign object on the Remove the foreign object, or use...
-
Page 47: Appendix A: One Year Limited Warranty
This R5000 is warranted to be free from defects in material or workmanship for one year from the date of purchase. During this period, Lectronix, Inc. will replace any R5000 that fail in normal use where used in accordance with this users’ manual. This warranty does not cover failures due to abuse, misuse, improper installation, accident, or unauthorized alteration or repairs. -
Page 48: Appendix B: Service And Technical Support
Authorized Service providers only. Contact Lectronix, Inc. For help or service, contact Lectronix, Inc. at 1-888-423-1183. When contacting Lectronix, please have the following system information on hand. To obtain the system information: 1) Press the MENU button. 2) Use the LEFT or RIGHT arrow key to select the System Tab. -
Page 49: Appendix C: Software Notice
Inc. and third party software. Laws in the United States and other countries preserve for Lectronix, Inc. and third party software providers certain exclusive rights, such as the rights to distribute or reproduce the software. Accordingly, any protected software contained in the product may not be modified, ported, reverse-engineered, distributed, or reproduced in any manner. -
Page 50: Appendix D: Navion™ R5000 Technical Specifications
Appendix D: Navion™ R5000 Technical Specifications The specifications noted herein are subject to change without notice. Rear Panel System Connections NAVION R5000 PWR/SPEAKERS Audio TPMS Antenna Line Outs 16Pin Molex Video Vehicle Input CAMERA INPUTS SDAR J1939 REAR LEFT RIGHT... -
Page 51: Technical Performance Specifications
Technical Performance Specifications Power and Grounding AM Tuner Automotive nominal 12 volt, negative ground Frequency Range 530-1710 kHz power. Sensitivity 36.2 dBf (17.7 uV/ 75 ohm) Mechanical Form Factor Main Unit WB Tuner Width 8” Frequency Range 162.4-162.55 MHz Height 6”... - Page 52 Auxiliary Outputs File System Support Outputs used for auxiliary expansion ISO9660 and Joliet CD file systems including video monitor expansion and audio to vehicle surround sound. Audio Digital Formats and Decode Aux Stereo Audio Digital audio decoders • • One (1) stereo audio output pair MP3 (32 to 320 kbps and VBR) •...
-
Page 53: Appendix E: Tire Pressure Monitoring Option
The Navion™ R5000 includes the RF receiver needed to monitor the tire pressure sensors. The setup, control, and monitoring is all done from the R5000 LCD display. Contact Lectronix, Inc. to purchase the optional Navion™ Tire Pressure monitoring kit (see Appendix B for contact information). The Tire Pressure monitoring kit includes the following: •...
Need help?
Do you have a question about the Navion R5000 and is the answer not in the manual?
Questions and answers