Table of Contents
Advertisement
Quick Links
Download this manual
See also:
Instruction Manual
Advertisement
Table of Contents

Related Manuals for AMPHIBICO Dive Buddy EVO HD

Summary of Contents for AMPHIBICO Dive Buddy EVO HD
- Page 1 Instruction Manual Video Camera Housing for SONY® HDR-SR10/SR11/SR12 Before operating the unit, please read this manual carefully. Keep it for future reference.
- Page 2 Now equipped with a 3.5" rear LCD monitor, everyone can shoot High Definition images and take superior digital stills underwater!! Good ergonomics and electronic controls with superb optics is what the Dive Buddy EVO HD offers you in a small compact housing.
-
Page 3: Specifications
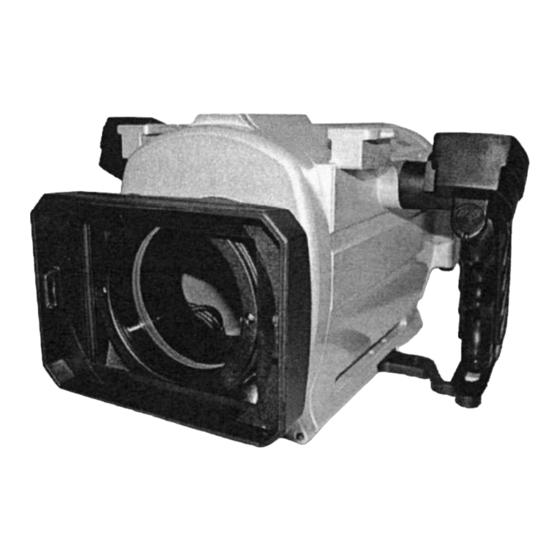
SPECIFICATIONS Dive Buddy EVO HD Marine Housing Sony® HDR- SR10/SR11/SR12 - Marine Grade Aluminum Construction - Fully anodized with a hard coat of polyurethane paint - All hardware is marine grade brass and stainless steel - Optics: Marine bayonet mounted lens system. - Page 4 1. Bayonet mounted lens 2. Incorporated T-Brackets 3. Carry handle dove tail 4. Right electronic grip 5. Right grip support 6. Amphibico's hydrophone 7. Color correction flip filter lever 8. Accessory port * * May not appear on all models...
- Page 5 HOUSING FEATURES & CONTROLS 9. Viewfinder 10. Left grip 11. Status / Wet Alarm LED 12. Right electronic grip 13. Right grip support 14. Safety latch 15. Accessory port...
-
Page 6: Unpacking Your Housing
If damage has occurred, please contact the shipping company immediately. Every Amphibico Housing is pressure tested prior to shipping. However, damage may have occurred during shipping. It is strongly recommended to test dive the housing once without camcorder installed to insure the housing is water tight. - Page 7 WMRHIBICa PREPARING CAMERA & HOUSING Opening the Housing 1. Sit the housing on a flat surface. Press and rotate the rear door latch counter clockwise until the door is open. 2. Removing the saddle: Push the saddle locking latch (a) inwards to release the saddle from the housing.
- Page 8 PREPARING CAMERA & HOUSING Placing the camera into the housing 1. Engage the camera with saddle into the housing, connect the hydrophone cable from inside the housing to the microphone jack of the camera . Loop back the cable towards you and engage the camera further into the housing.
- Page 9 Rear LCD Monitor (continued) Settings for the rear LCD monitor are located on the inside of the rear bulkhead and are described as follows: COLOR To adjust color saturation BRIGHT. To adjust the brightness CONT. adjust the contrast WARNING: IT IS IMPORTANT TO REMOVE BATTERIES FROM BATTERY HOLDER AFTER EVERY USE.
-
Page 10: Replacing The Bayonet Lens
All of the Amphibico housings are provided with brackets where optional accessories- can be mounted. On the Dive Buddy EVO HD housing, these brackets have been machined directly on the body In fact, two T-brackets are incorporated to it. A third one, which is basically done to accommodate the carry handle, is located on top of the body. -
Page 11: Water Entry
Water Entry 1. Always make sure that the electronics of the housing is ON before entering the water. To turn it ON, use the trigger button. This is confirmed by the CAM indicator light turning on steady green. The camera viewfinder will also turn ON. Doing step 1 will activate the built-in moisture alarm sensor located in the bottom of the housing. -
Page 12: Power On/Off
At this point, you should be underwater going down chasing your subject and looking for the best video shot The Dive Buddy EVO HD housing offers a large range of functions like Zoom, record / standby, photo & camera modes and focus capabilities. This chapter will explain you how to use these functions as efficient as possible. -
Page 13: Mode Settings
MODE SETTINGS Camera Mode (Default) Press on the trigger button to start recording. The CAM indicator light will start flashing green when recording. Pressing again on the trigger button will put the camera back on standby and the CAM indicator light will go back to a steady green. Photo Mode Use the Mode button to switch from Camera mode to Photo mode. - Page 14 Zooming Zoom functions have variable speeds. Pressing on the trigger button while zooming will accelerate the zoom. Zoom-W - For most users, shooting in wide Angle is a safer way to achieve good quality images. Shooting in wide angle means better control on the subject and steadier images.
- Page 15 This page is purposely left blank...
-
Page 16: Maintenance
MAINTENANCE WARNING: DO NOT leave the housing exposed to direct sunshine, as extreme heat condition can be detrimental to certain of its components. 1. Keep housing and O-rings away from direct sunlight. Always store unit when possible away from direct sunlight as this can dry out and crack O-rings in the housing. Ultraviolet rays can damage plastics, paint and O-rings. -
Page 17: Servicing Of O-Rings
SERVICING OF O-RINGS 1. O-rings and sealing surface should be lightly lubricated with silicon lubricant on a regular basis. This is not necessary after every dive; every tenth dive during regular heavy use is sufficient. This should always be done before storing the housing and before a first dive after taking the housing out of storage. -
Page 18: Optional Accessories
OPTIONAL ACCESSORIES Optional Accessories Extra large carry case Aluminum carry handle Optics - Bayonet mounted Flat Port - Bayonet mounted .55x lens (as supplied) - +1, +2, +4 Diopters Light - 10 Watt Arc Light "HID Technology" with mounting arm Filters - UR PRO Blue Water 3"X 4"... - Page 19 8. In low light situations, add light with optional Amphibico video lights for brighter and more vibrant colors. As light level falls so does color saturation. Lights will also provide necessary fill during daylight shooting.
-
Page 21: Warranty
Please take time to register your product on line at the following secure WEB site "www.amphibico.com". This way your product will be recorded in our data base in case it gets lost or stolen. It also allows us to contact you in the unlikely event that a safety notification is required on your product. - Page 22 Authorized Amphibico Service Centers Worldwide ASIA (Korea) AUSTRALIA Aquako Inc. Sea Optics Authorized Amphibico Service Center Tel: Authorized Amphibico Service Center 82 2 2202 4972 Fax: 82 2 2202 4971 Tel: 61 8 8363 3277 Fax: 61 8 8363 3211 bang@aquako.com...
Need help?
Do you have a question about the Dive Buddy EVO HD and is the answer not in the manual?
Questions and answers