
Related Manuals for Nexto Di NVS2501

Summary of Contents for Nexto Di NVS2501
- Page 1 VIDEO STORAGE pro Portable Storage for Professional Video Cameras User Guide Version 03/11 NextoDI Co., Ltd. www.nextodi.com...
- Page 2 NVS2501 product allows videographers to save footages from camcorders to a hard drive, without using a computer. The camcorder can then be used to record new ● Do not drop, jar, bump, shock, or expose NVS2501 to severe vibration data. NextoDI has optimized performance so that data transfers from memory card during video preview or while data is being transferred.
-
Page 3: Table Of Contents
7. CHARGING THE RECHARGEABLE BATTERY ......... 8. NVS2501 INTERFACE ..............9. FORMATTING THE HARD DRIVE ........... 10. USING THE NVS2501 AS A HARD DRIVE ........11. DATA BACKUP(COPY) AND VERIFY ..........12. VIDEO/PHOTO PREVIEW ............. 13. USING AN EXTERNAL HARD DRIVE .......... -
Page 4: Product Description
6. Button operation (SATA) hard drive and a Li-Poly battery. The NVS2501 provides the following All of the functions of the NVS2501 are controlled by two buttons, one for power functions: (On/Off) and the other for function control (control key). The power button can also be used as a function key in some instances. -
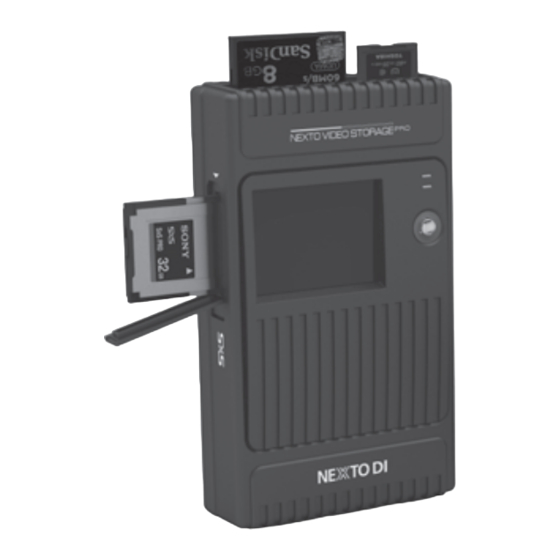
Page 5: Contents Of The Nexto Video Storage Pro
⑤ 14. Burning Blu-ray Disc ⑧ Users can copy video files that are stored in the NVS2501 to a Blu-ray disc using ② a USB Blu-ray driver. After copying the footage, the NVS2501 will support video preview from the Blu-ray Disc. For details, see chapter 18. -
Page 6: Symbols Used In This Document
If the product is used at schools, training facilities, or do-it-yourself/hobby shops, it should not be handled unless supervised by trained, responsible personnel. ● Do not drop NVS2501 device. Warning Caution ● Unauthorized conversion and/or modification of the product is forbidden for safety reasons. -
Page 7: Device Diagram
④ "USB” slot for USB2.0 device connection to a computer ⑤ Recessed Reset key, to be pressed with a tooth pick or similar tool; switches off NVS2501 in the event of a hardware or software malfunction. ⑥ ExpressCard slot for SxS card and CardBus memory card (including P2/P2E) connection. -
Page 8: Charging The Rechargeable Battery
Power Off pressing down on the control key or power key ● If the NVS2501 is operated with a notebook, you must always use the AC for more than 2 seconds. power adapter unit to charge the NVS2501. Notebooks may not deliver the necessary amount of current via USB ●... - Page 9 2. Key operation 4. The LCD Display The NVS2501 is operated by a single control key which can be used in five different ways. The display shows you the “S” (Short) or “L” (Long) symbol as ① ② 145.0 GB a means to invoke the desired function.
-
Page 10: Formatting The Hard Drive
HDD Format Do not attempt to format the NVS2501 disk with a computer. Use only the format You can cancel the operation by pressing function on the NVS2501. This will allow the hard disk to be read by either and holding the control key or power key. -
Page 11: Using The Nvs2501 As A Hard Drive
② Switch the NVS2501 on. the USB cable. ③ Connect the NVS2501 "eSATA" slot via the eSATA cable with a free eSATA port 2. Connect to the computer’s eSATA slot via the NVS2501 "eSATA/USB-Host combo" of your computer. The eSATA cable does not provide power. - Page 12 If your computer detects the NVS2501 correctly, a new drive named [NEXTODI] ② Turn your NVS2501 on. will appear on 'My Computer'. ③ Connect the NVS2501 "Firewire 800 (IEEE 1394b)" slot via the Firewire 800 My Computer (IEEE 1394b) cable with a free Firewire 800 (IEEE 1394b) port on your computer.
-
Page 13: Data Backup(Copy) And Verify
When copying from a memory card, the NVS2501 must not be connected to (2) Memory card with copied data a computer. The NVS2501 can copy a memory card onto the internal hard disk via If the memory card was copied before and not modified since, then you can the built-in memory slot or via the "eSATA/USB-Host"... -
Page 14: Video/Photo Preview
12. Video/Photo Preview 4. Status The NVS2501 shows stored video or photo files after backup depending on the file 102.3 GB format. A preview of both the internal and external device (SxS/P2/CF/SDHC/ Current operation status is shown SDXC/MS/USB) is supported. Users can also choose to delete the backup folders. - Page 15 (4) Selectable command Reference ● See http://www.nextodi.com/manual for supporting preview format. Reference ● The preview of the NVS2501 is a “best effort” preview. The preview speed differs depending on the video format. ● See http://www.nextodi.com/manual for supporting preview format. VIDEO/PHOTO PREVIEW...
- Page 16 4. Copy to External Device 3. Delete the backup data A user can upload the backup folder inside the NVS2501 to a memory card using Select “Delete This Backup” from the Preview 20090601.000 the “Copy to external device” function provided by the NVS2501.
- Page 17 102.3 Gb 0m30s Cancel IIf the operation completes successfully, 102.3 Gb the NVS2501 will make a beeping sound and the display will show: CF is NOT Empty (1) Total number of files in the memory card Copy Done All data in CF Remove CF versus the number of copied files.
-
Page 18: Using An External Hard Drive
13. Using An External Hard Drive 5. Preview from an external device The NVS2501 allows a user to copy a memory card to both the NVS2501 hard drive and to an USB external hard drive at the same time, making two copies of data 149.0 GB... -
Page 19: Making Two Copies In A Single Backup(Multi-Copy)
128GB. 16 Files asks you to confirm the mode of copy. Three ● The wall power adapter should be connected to both the NVS2501 and the options are available as in the normal XCopy Fast Copy USB external hard drive. -
Page 20: Making A Secondary Copy(Sync)
[NVSPRO] folder of the NVS2501 and the [NEXTO] folder of an external hard drive. A new folder will be copied to the external hard drive only Multi Copying if a folder is in the [NVSPRO] folder of the NVS2501—but not in [NEXTO] folder of an external hard drive. 14/16 964.3 MB... - Page 21 Before duplication, the NVS2501 verifies that the copy area of the appears on the screen. Briefly press the Safe Copy external hard drive is safe. If the copy area is not safe, the NVS2501 1. Check bad sectors control key [S] to move to the next screen will automatically search for a new safe area and copy to that area.
-
Page 22: Bad Sector Recovrey
17. Advanced Functions NVS2501 has several advanced function menus, accessible from the Main Menu. 102.3 GB The NVS2501 will begin scanning to see if there are any bad sectors inside of the folder. Menu Operation Checking... Capacity Checks the used capacity and the remaining recordable 4/16 137.1 MB... -
Page 23: Capacity Check
Cancel Select Back 149.0 GB 149.0 GB The NVS2501 will show the capacity status of HDD Info the internal hard drive using a pie diagram. The quick test takes several minutes to test HDD Smart Test the internal hard drive. Pressing the control Used: 37.9 Mb... - Page 24 The power does not turn off automatically at completion of the test. the control key for more than 2 seconds. ● The NVS2501 returns to the initial mode only after the user presses the control key for more than 2 seconds.
-
Page 25: Buzzer
The power does not turn off automatically at the completion Language of the test. Firmware Update ● The NVS2501 returns to the initial mode only after the user pushes Select Back the control key for more than 2 seconds. -
Page 26: Delete Tmp Folder
Select Back If valid firmware is found at the specified location, the NVS2501 indicates a “FW File Firmware Update Select the “TMP folders” submenu from the 149.0 GB Found” message on the LCD. Confirm the “HDD Management” menu. -
Page 27: Language Setting
18. Burning a Blu-ray Disc 6. Language setting A user can connect a USB Blu-ray drive to the NVS2501 through an eSATA/USB HOST combo port. The NVS2501 supports the burning of Blu-Ray Discs--or the preview of Blu-ray Discs-- without the use of a computer. Only the BD-R or BD-RE The user can select the preferred language 149.0 GB... - Page 28 Confirm selection. 6 Video Files 149.0 GB Record Selected Backups BD Burning If you select “Burning BD,” the NVS2501 will into BD-RE? show you the burning process. Press the Select Back 1. Select Folders control key briefly [S] to begin the procedure.
-
Page 29: Examples Of Basic Functions
1. Copying from an SxS card completion of the Disc burning. The USB cable can BD Burn Success now be removed (1) Turn on the NVS2501 by pressing the power button for more than 2 seconds. Wait for the 16/16 428.2MB “XCopy ready ”mode, then insert an SxS card... - Page 30 Copy Success will be shown on the LCD. Remove the SxS card to return to the initial “XCopy ready”mode. The NVS2501 supports copying from the IKEGAMI GFPAK or a USB memory card Copy Done Remove SxS reader. Simply attach the GFPAK or memory card reader to the “eSATA/USB-Host”...
-
Page 31: Auto-Generation Of Index File
The HTML file (NEXTOIDX.HTM) is stored in the root directory of the NVS2501. To access a video file, simply connect the NVS2501 to a computer and This function can be turned on or off from the 149.0 GB... -
Page 32: Troubleshooting Tips
IF THE POWER CANNOT BE TURNED ON: The NVS2501 has an internal rechargeable battery. If you cannot turn on the NVS2501 with the On/Off button, it may be that the internal battery has been discharged. Connect the power adapter to the NVS2501 and push the power button for more than 2 seconds to turn the NVS2501 on. -
Page 33: Battery Disposal
Cd=cadmium, Hg=mercury, Pb=lead. You can return batteries/rechargeable batteries free of Do not connect more than one memory card or USB external HDD to the NVS2501 charge to any authorized disposal station in your area, in our stores at the same time. -
Page 34: Technical Specifications
(6.1 inches * 3.6 inches * 1.3 inches) Dimensions 430g/15.1oz (with Hard drive) Weight NVS2501 Main unit / Manual / AC power adapter / USB cable / Contents eSATA cable / IEEE 1394b (FireWire 800) cable (9-9pin) / AA battery holder / Rubber jacket for shock protection...
Need help?
Do you have a question about the NVS2501 and is the answer not in the manual?
Questions and answers