
Related Manuals for iPECS WIT-400HE

Summary of Contents for iPECS WIT-400HE
-
Page 1: User Guide
WIT-400HE User Guide Please read this User Guide carefully before operating your set. Retain it for future reference. - Page 2 Regulatory Notes and Statements Wireless LAN, Health and Authorization for use Radio frequency electromagnetic energy is emitted from Wireless LAN devices. This energy levels of these emissions, however, are far much less than the electromagnetic energy emissions from wireless devices such as mobile phones.
-
Page 3: Product Safety Instructions
there is no guarantee that interference will not occur. If this equipment does cause interference to radio or television reception, which can be determined by turning the equipment off and on, the user is encouraged to correct the interference by on of the following measure; 1. - Page 4 Issue Release Date Changes Mar 18, 2013 New Product Release...
-
Page 5: Table Of Contents
Contents Before Starting ..............1 Important Safety Informations .................1 Inside the Package ....................5 Phone Basics ...............7 Your Phone........................7 Display Screen .......................10 Getting Started ............... 13 Battery and Charger ....................13 Turning Your Phone On and Off..............16 Navigating Through Menus and Options ..........17 Entering Text ......................18 Headset with Mic ....................21 Phone Carrying .....................22... - Page 6 Phone Calls ............... 31 Making Calls ......................31 Answering Calls .....................34 In Call Options .......................34 Using Quickly Change Mode ................35 Using Keypad Lock (Keyguard) ...............36 Phone Book ..............37 About Phone Book (Contacts) .................37 Add New ........................38 Search Phonebook ....................40 Caller Groups ......................41 Speed Dials ......................44 Delete All .........................46 Sound .................
- Page 7 Font Type .........................53 Language .........................54 Call History ............... 55 Call History ......................55 Call Duration ......................57 Messages ................59 Viewing Message ....................59 Writing Text Message ..................60 Inbox .........................61 Outbox ........................62 Draft ...........................62 Templates ........................63 Tools ..................65 Schedule ........................65 Memo ........................70 Alarm Clock ......................71 Calculator ........................73 World Time ......................73...
- Page 8 Call Transfer......................87 Hold/Save ........................88 Program........................88 Settings ................89 Profile Settings ......................89 System Setting.......................95 Codec Preference ....................96 Wireless LAN Setting ...................97 Security........................97 Wireless LAN Status .....................97 Network Information ..................98 Phone Version ......................98 Reset Settings ......................98 Useful Information ............99 Before Service Inquiry..................99 Troubleshooting ....................102 Specification ......................103 Caring for the Battery ..................105...
-
Page 9: Before Starting
Before Starting Important Safety Informations Improtant safety informations that will help you safely use your phone. Failure to read and follow the important safety information in this phone user guide may result in serious bodily injury, death, or property damage. WARNING: Violation of the instructions may cause serious injury of death. - Page 10 Avoid installing the product near fire or in a small space with poor- ventilation. If not, fire or product defects could be caused. Do not put the phone inside a washing machine or a microwave. It could cause explosion, problems, deformation or defects. Avoid installing the product on a shelf or a slanted surface.
- Page 11 WARNING: Battery Handling Do not disassemble or revise the battery and do not use it for other purposes. Use the specified battery and adaptor only. Fire or personal injury may be caused by heat or rupture. If the battery is damaged, the battery liquid may leak out. Take care not to contact the battery leakage.
- Page 12 If you detect a burning smell or smoke, immediately stop using the product, disconnect the power supply plug and the phone cable and contact the service center. Using it in such condition may cause fire or electric shock. Pay attention not to let the phone contact with volatile substances (benzene, thinner, alcohol, acetone, etc.) If not, fire, deformation or decolorization could be caused.
-
Page 13: Inside The Package
The following items are included in your phone package. Before using the phone, ensure that you have the following package con- tents. If something is missing or not functioning, contact your local distributor. WIT-400HE Charger Connect the Travel Adapter to Charger,... -
Page 15: Phone Basics
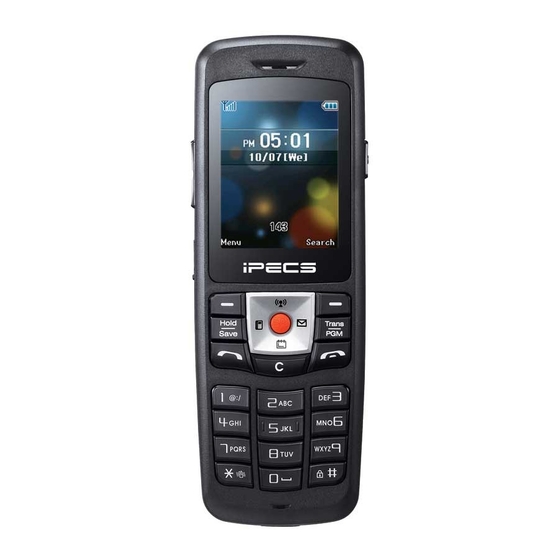
Phone Basics Your Phone The following illustration will help you become familiar with your new Wireless IP Phone. Phone Layout * This phone has an internal antenna. Avoid touching the antenna area unneces- sarily while the antenna is transmitting or receiving. Contact with the antenna affects communication quality. -
Page 16: Key Functions
Key Functions The following list gives a brief description of all available key func- tions of your phone. 1. Earpiece lets you hear the caller. 2. Display Screen displays all the information needed to operate your phone, such as the call status, the date and time, and the signal and battery strength. - Page 17 13. Clear Key deletes single spaces or characters with a quick tuch, but press and hold to delete entire words from the display in text entry mode. When in a menu, press this key to return to the previous menu. Keypad Lock allows you to lock the phone’s keypad immediately in standby mode by pressing and holding it about two seconds.
-
Page 18: Display Screen
Display Screen The display screen provides information about your phone’s status and/or action of the functions shown after successful registration. Display Informations Status Icons display at the top area of the display screen. Time displays the system time in the format HH:MM with AM/PM. -
Page 19: Main Menu
indicates ringtone off or Mute is set. indicates manner mode is activated. Quickly set to vibration mode, phone always vibrates instead of making a sound. indicates you have new text messages. indicates you have Message Waiting/Call Back. indicates alarm is activated. represents the amount of remaining battery charge currently available in your phone. -
Page 20: Main Menu Icons
Main Menu Icons These icons are used to access the following your phone’s main menu options as described in table. Icon Description This icon refers to the menus related to Phone Book. This icon refers to the menus related to Sound for user’s custom- ization. -
Page 21: Getting Started
Getting Started Battery and Charger Your phone is equipped with a Lithium Ion (Li-Ion) battery. It allows you to recharge your battery before it is fully drained. WARNING: Use only Ericsson-LG approved battery, charger, and Power Adapter with your phone. The failure to use a Ericsson-LG approved battery, charger, and Power Adapter may increase the risk that your phone will overheat, catch fire, or explode, resulting in serious bodily injury, death, or property damage. - Page 22 2. Remove the battery cover from the back of the phone. 3. Insert the battery into the opening, making sure the connectors Note: align ( ). Gently press down to secure the battery ( ). Do not force the battery. Li-Ion battery 4.
-
Page 23: Charging The Battery
Charging the Battery When you use phone for the first time, the battery is not fully charged. Fully charge your battery as soon as possible so you can begin using the phone. An icon located in the upper right corner of the display screen shows battery charging status. -
Page 24: Turning Your Phone On And Off
To install the travel adapter: Open the external charger jack cover ( ) of the phone. Plug the flat end of the travel charger into the phone’s charger jack ( ) and the other end into an electrical outlet ( ). Charger jack Cover Electrical outlet... -
Page 25: Navigating Through Menus And Options
Navigating Through Menus and Options Your phone has a simple on screen menu to navigate. Each menu has a list of options. (See "Phone’s Menu" on page 28.) The navigation key on your phone lets you scroll through menus easily. Some of the items you selected has a vertical scroll bar at the right-hand side of the screen keeps track of your position in the menu at all times. -
Page 26: Entering Text
Entering Text You can enter alphanumeric characters using the keypad of the phone. Selecting a Text Input Mode Your phone provides convenient ways to enter letters, puncuations, numbers, and symbols whenever you are prompted to enter text (for example, when adding a Phonebook or when composing text and memo). -
Page 27: Using 123 Mode
The most common punctuation marks such as the "Period", "Com- ma", "Question", and "Exclamation" are available under the If you make a mistake, press to erase a single character. Press and hold to erase an entire word. The following table shows you where each letter can be found on the phone’s keypad. - Page 28 Entering Common Terms, Symbols and Smileys To enter common terms: Common terms make composing text messages easier by allowing you to enter quick messages, such as "Please, Call me back!", "I’m late. I’ll be there at. " , "Where are you now?" or a customized message of your own.
-
Page 29: Headset With Mic
Headset with Mic The headset included with phone features a microphone and an integrated button that allows you to answer and end calls easily. Connecting the Headsest Open the headset jack cover and flip it over ( ) and plug the head- set into phone’s headset jack ( ). -
Page 30: Phone Carrying
Phone Carrying Using the Wrist Strap Carry your phone with the wrist strap that included in your package. This polyester carrying strap attaches easily to your phone. To connect the wrist strap: Thread the small loop of the wrist strap through the strap hole on the phone ( ) and pull the strap through the small loop until the strap is firmly secured ( ). -
Page 31: Access Point
Cisco is currently showing the most optimized seamless roaming. The CISCO APs are strongly recommended to customers. The following is a list of APs that have been made an imperative experimentation with the WIT-400HE and the result. Cisco-AP1231G Cisco-AP1121G Rank... - Page 32 When the receiving packet rate is very low during 10 seconds, WIT-400HE disconnects the call to prevent excessive retransmit of packets. The simultaneous calls are estimated in idle network configura- tion, so it can be decreased by the network condition.
-
Page 33: Registration
IEEE802.11e should be supported. Registration This phone is one of the iPECS phones recognized by the iPECS system. Therefore, your phone must be registered with the iPECS system for successful call processing. The registration is accomplished in two phases; the first phase is Wireless LAN Connection, and the second is System Setting. -
Page 34: Range
These are configured as the phone’s network status. (See “System Settings” on page 95. System IP The phone must be programmed with the IP address of the iPECS system to initially request the registration. Station Set Depend on the system this station number could be set by manual. -
Page 35: Signal Strength
Signal Strength Call quality depends on the signal strength in your area. The signal strength is indicated on the screen as the number of bars next to the Antenna icon. The more bars shown, the better the signal strength. If the phone is out of range of your access point, “Out of range”... -
Page 36: Phone's Menu
Phone’s Menu To view the Main Menu options, their respective submenus, refer to the follow table, it shows the avilable menu structure and indicates the number assigned to each menu option. For more information about using phone's menu see "Navigating Through Menus and Options"... - Page 37 3.6 Backlight 3.7 Font Type 3.8 Language 4 Call History 4.1 Call History 4.2 Call Duration 5 Messages 5.1 Write Message 5.2 Inbox 5.3 Outbox 5.4 Draft 5.5 Templates 6 Tools 6.1 Schedule 6.2 Memo 6.3 Alarm/Morning Call 6.4 Calculator 6.5 World Time 6.6 Timer 7 System...
- Page 38 7.7 System Redial 7.8 ICM 7.9 Mute 7.10 Transfer 7.11 Hold/Save 7.12 Program 8 Phone Setting 8.1 Profile Setting 8.2 System Setting 8.3 Codec Preference 8.4 Wireless LAN Setting 8.5 Security 8.6 Wireless LAN Status 8.7 Network Information 8.8 Phone Version 8.9 Reset Settings Chapter 2 Getting Started...
-
Page 39: Phone Calls
Phone Calls While the phone is operating, the Antenna and RSSI level icon at the top of the screen shows whether your are in range of the WLAN area and can make and receive calls. The more RSSI levels mean the stronger signal and the call quality is good. Making Calls Dialing with a Phone Number You can make a call to an internal (another user in your system) or to... - Page 40 Dialing With a Finding Number You can make a call after searching Phone Book and Call History for phone numbers that contain a specific string of numbers. 1. In standby mode, 2. Enter one or more digits. The more numbers you enter, the more specific the search becomes.
-
Page 41: Dialing With Speed Dial
Dialing With Speed Dial Each phone number stored in Phone Book is assigned a speed dial number, which you can use to call that number. 1. In standby mode, 2. Press and hold the speed dial number. The display confirms that the number has been dialed when it shows "Name and Number". -
Page 42: Answering Calls
Answering Calls When the phone rings or vibrates, press . If the headset provided is plugged to the phone, you can also answer an incoming call by pressing the mic button on the headset when the ring sounds. 1. In standby mode, 2. -
Page 43: Using Quickly Change Mode
Using Quickly Change Mode Activating Manner Mode (Quickly Set to Vibrate) You can use the manner mode in public places. To activate the manner mode quickly: From standby mode, activate the manner mode quickly by pressing for 3 seconds. When the manner mode is set, the key tones are silent, and the phone is set to vibrate. -
Page 44: Using Keypad Lock (Keyguard)
To release the permanent lock mode: 1. After releasing the temporary lock mode. 2. Press > Settings > Security. 2. Enter your security code as it is a required field and then press The preset code is “0000”, you can change it to the security code of your choice. -
Page 45: Phone Book
Phone Book The Phone Book helps you stay in touch with the people by keeping track of all their contact information. This chapter explains how to use the Phone Book. About Phone Book (Contacts) This menu allows you to save and manage contact address infor- mation. -
Page 46: Add New
You can enter or select an additional information for the entry, other information is optional: E-mail - E-mail address you assigned to the entry. Group - Group you assigned to the entry. Memo - Note, or other information that related to the entry. Add New This menu allows you to add a new contact address. -
Page 47: Storing Numbers Faster
7. To store an e-mail address to the number: Select E-mail field and enter the e-mail address. Press Menu (left softkey) to select an options .com, Symbol, Emoti- con, or Cancel and then press 8. To assign a group to the number: Select Group field and select a group. -
Page 48: Search Phonebook
Search Phonebook This menu allows you to search your contact entries. Generally, the search operation is performed by entering a name in the field. 1. Press > Phone Book > Search Phonebook, or from standby mode, press Search (right softkey) to access the Search Phonebook. 2. -
Page 49: Caller Groups
Editing an Entry 1. Press > Phone Book > Search Phonebook. 2. Select an entry you wish to edit. 3. Press Menu (left softkey) to display the options. 4. Select Edit and press 5. Follow the applicable instructions in "Add New" on page 38 to edit the entry. -
Page 50: Creating A Group
Changing a Ring Tone 1. Press > Phone Book > Caller Groups. 2. Scroll to view ring tones assigned to the group and select one. 3. Press Menu (left softkey) to display the options. 4. Select Modify melody and press 5. -
Page 51: Editing A Group
Editing a Group You can edit a group except for default groups. 1. Press > Phone Book > Caller Groups. 2. From the caller groups, select one. 3. Press Menu (left softkey) to display the options. Press Change (right softkey) to directly access the edit mode. 4. -
Page 52: Speed Dials
Excluding Group Members You can exclude group members from the caller group. 1. Press > Phone Book > Caller Groups. 2. From the caller groups, select one and press 3. Select desired entry and press Menu (left softkey) to display the op- tions. - Page 53 4. Select an entry for which you wish to assign a speed dial location. If an entry has more than one number stored, press the navigation key left or right to select a contact type. Only numbers in your Phone Book can be assigned as speed dial numbers.
-
Page 54: Delete All
Changing a Speed Dial Number You can change an already in use speed dial location to a new phone number. 1. Press > Phone Book > Speed Dials. 2. Select a speed dial number you wish to change. 3. Press Option (left softkey) to display the options. 4. -
Page 55: Sound
Sound This menu allows you to customize your phone to sound just the way you want it to. Your phone provides a variety of ringer options that allow you to set your ring, volume, or effect sound. This chapter describes how to change your phone’s sound setting to best suit your needs. -
Page 56: Ring Tone Volume
Ring Tone Volume You can adjust the volume settings to suit your needs and your environment. 1. Press > Sound > Ring Tone Volume. 2. Using the navigation key, choose a volume level and press The volume level is set at , you will not hear any ring tone when you receive a call regardless of the ring tone you have set. -
Page 57: Key Tone
Key Tone You can set the key tone that sounds when a key is pressed. 1. Press > Sound > Key Tone. 2. Using the navigation key, select a key tone and press No sound will not make key tone when you press keys. Key Tone Volume You can adjust the volume of the keypad tone. -
Page 59: Display
Display This menu allows you to customize your phone to look just the way you want it to. This chapter describes how to change your phone’s display setting to best suit your needs. Screen Theme You can choose what you see on the display screen when in standby mode. -
Page 60: Greeting Note
Greeting Note You can set your own custom greeting to display on the screen in standby mode. 1. Press > Display > Greeting Note. 2. Select one of the following options and press Change text input mode On to show the greeting, enter a custom greeting up to 50 charac- ters long. -
Page 61: Menu Style
Menu Style You can choose how your phone’s menu is displayed in either a list style or an grid style on the screen. 1. Press > Display > Menu Style. 2. Select one of the following options and press List menu to display the menu as a list. Grid menu to view the menu as a grid. -
Page 62: Language
Language You can set the language to use for displaying messages and menus. 1. Press > Display > Language. 2. Select the language available in the language list and press Currently supported languages are 6 Languages: Korean, English, Spanish, Italian, German and Turkish. Chapter 6 Display... -
Page 63: Call History
Call History The call history keeps track of all calls. This chapter guides you through accessing and making the most of your call history. Call History The call history is a list of the last 100 phone numbers for calls you have dialed, received, or missed. -
Page 64: Call History Options
Call History Options Select an entry and press to display the date and time of the call, the phone number, and the caller’s name (if the number is already in your phonebook). Press Menu (left softkey) to display the following options: Not saved number Call’s detail information... -
Page 65: Call Duration
Call Duration This menu allows you to view or reset the cumulative call time by time since start use. Viewing Call Duration 1. Press > Call History > Call Duration. 2. Select an option to view the cumulative call time. When you select call option to view its details, you see all the length of cumulative time the calls. -
Page 67: Messages
With Messages, you can send and receive short text messages be- tween your phone and another phone that has been registered with in the iPECS system. This chapter explains how to use the Messages. Viewing Message When you receive a text message, your phone notifies you with the icon at the top of your screen. -
Page 68: Writing Text Message
Writing Text Message Compose a text message you wish to send it. A single text message can be up to 80 characters. 1. Press > Messages > Write Message. 2. Select Contact me field (It may already be highlighted.) to compose a message. -
Page 69: Inbox
Save to draftbox to save a message as a draft. Save option to select the option you prefer: - Save message will automatically be saved in the Outbox. - Not save message was sent but not saved in the Outbox. 5. -
Page 70: Outbox
Outbox Any message sent from your phone is stored in the Outbox. 1. Press > Messages > Outbox. 2. Select the message you want to view and press 3. Press Menu (left softkey) to select one of the following options and press Forward to send the selected message to another party. -
Page 71: Templates
Write Message to compose a text message. Keep Message to protect the message cannot be deleted. Delete to delete the selected messages. Multiple Delete to delete many messages at once. Delete All to delete all messages. Templates There are four preset messages to help make sending text messages easier. -
Page 73: Tools
Tools Your phone is equipped with several personal information manage- ment features that help you manage your time efficiently. This chapter shows you how to use these features that helps you. Schedule The Scheduler keeps your event convenient and easy to access. Simply store your events and your phone alerts you with a reminder of your event. -
Page 74: Adding An Event
Viewing an Events You can view the schedule by the month and also view the details of each event. 1. Press > Tools > Schedule. 2. Select the day for which you would like to view events and press Initially, the cursor appears on today’s date according to the phone settings. -
Page 75: Deleting An Event
4. Enter a title for the event by highlighting the Subject. Enter the event title and press . (See "Entering Text" on page 18.) Event title must be entered to be saved to a date. 5. Choose a type for the event by highlighting the type field. Press the navigation key left or right to choose Schedule or An- niversary. -
Page 76: Setting Your Holiday
4. Select Multiple Delete to delete an event through the specified period of time and press 5. Using the keypad, enter the date for the duration by highlighting the date field. 6. Press to delete events. To delete all events: 1. -
Page 77: Going To Today
Searching an Event You can find an event which you would like to view by entering the title of event. 1. Press > Tools > Schedule. 2. Press Menu (left softkey) to display the options. 3. Select Search and press 4. -
Page 78: Memo
Memo Your phone comes with a notepad that you can compose a note of up to 180 characters, and store up to 30 memos. Composing a Memo 1. Press > Tools > Memo, or from standby mode, press the naviga- tion key down to directly access the Memo. -
Page 79: Alarm Clock
Deleting All Memo 1. Press > Tools > Memo. 2. Press Menu (left softkey) to display the options. 3. Select Delete All and press 4. Select Yes to delete all saved memo and press Select No to return to the previous menu. Alarm Clock Your phone comes with a built-in alarm clock that has multiple alarm capabilities. -
Page 80: Editing An Alarm
Press the navigation key left or right to select Once, Mon~Wed, Mon~Fri, Mon~Sat, Except holiday, and Everyday. 5. Select a ring type for the alarm by highlighting the ring field. Use the navigation key to scroll through available alarm ring. 6. -
Page 81: Calculator
3. Select Delete All and press 4. Select Yes to delete all saved alarm from the list and press Select No to return to the previous menu. Calculator Your phone comes with a built in calculator that has limited accuracy for simple calculations, such as add, substract, multiply, and divide. -
Page 82: Timer
Timer The timer can be used for various calendrical calculations. Using the D-Day Finder You can calculate what date it will be in a number of days after a particular date. 1. Press > Tools > Timer. 2. Select D-day Finder and press 3. -
Page 83: Using The Stopwatch
3. The list of saved counters will be displayed. Scroll through the list and select one. 4. Press Menu (left softkey) to display the options. 5. Select Edit and press 6. Follow the applicable instructions in "To set the D-day counter" to edit the D-day counter. - Page 84 Press Go (OK key) to start the stopwatch. Press Lap (left softkey) to make a lap time of up to 6. Press Stop (OK key) to pause the stopwatch. Press Reset (right softkey) to reset the stopwatch to zero. Chapter 9 Tools...
-
Page 85: System
System. Note: Any of these features do not work on your phone, please con- tact your system administrator or refer to the iPECS System Manual for details. Call Forward Use the Call Forward features to redirect incoming calls from your phone to another number. - Page 86 Code 4: Busy/ No Answer, refer to page 77. Code 5: Attendant Off-Premise, forward ncoming CO calls to an outside number. It is not supported on WIT-400HE. 3. Enter the phone number (Internal, Internal Groups Number etc.) to which you want to calls forwarded and press You will see a system message informing you that call forwarding is actvated.
-
Page 87: 3-Party Conference
3-Party Conference The phone supports conferencing with two other parties. The number of person supported in a conference call depends on the System. You can do more than a three person conference call with a Multi-Party Conference Interface Module (MCIM). Setting up a Conference Call 1. -
Page 88: Dnd (Do Not Disturb)
DND (Do Not Disturb) When the DND (Do Not Disturb) feature is activated, the phone will not notify you of an incoming call thus allowing you to work without interruptions from incoming calls. Depending on the system the caller will get the busy tone or voice announcement. Activating DND 1. -
Page 89: Call Back
To review/call back a message: When you receive a message, your phone notifies you with the icon at the top of phone's screen. 1. In standby mode, press navigation key left to access the System > MSG/CallBk and press For example, "M: 104" means that this message has been sent from internal number 104. -
Page 90: Flash
The screen will show "ENTER SPD (XX)" to prompt you to enter the Speed Dial location number where required. Assigned Speed Dial number for your phone may differ depend- ing on what system you have used. In iPECS-LIK, the Speed Dial number are: - LIK 50/100: 00 ~ 19... - Page 91 3. Enter the CO Code. Normally the CO code is '9' or '0' etc. For more informa- tion on this, please ask your system administrator. For example, "SPEED 01" means that the number of location in the Speed Dial you entered. 4.
-
Page 92: Using A Speed Dial
Using a Speed Dial You can make a call using Speed Dial in the phone. To make a call using Speed Dial location number: 1. Press navigation key left to select System > System Speed and press 2. Press the Speed Dial location number using the keypad. The follow- ing are number of Speed Dial for your reference: Personal programing Speed Dial - LIK 50/100: 00 ~ 19... -
Page 93: Deleting A Speed Dial
Deleting a Speed Dial You can delete an existing Speed Dial in the phone. 1. Press to access programing mode. 2. Press navigation key left to select System > System Speed and press 3. Enter the Speed Dial location with the number you want to delete. For example, if you want to delete Speed Dial 01, Press "0"... -
Page 94: System Redial
System Redial This feature allows you to redial the last number that you dialled from your phone. 1. Press navigation key left to select System > System Redial and press 2. Press navigation key up or down to scroll though the last dialed numbers. -
Page 95: Mute
Mute Use this feature, you can turn off the microphon in your phone. The other party cannot hear you, but you can still hear them. 1. During a call, press navigation key left to select System > Mute and press Press Mute (middle softkey) to activate the mute feature. -
Page 96: Hold/Save
3. Return to the caller on hold, enter the Access Held CO code. For more information on this, please ask your system administrator. Program The Program allows you to set the features which required to use the WIT-400HE. Some of that features might not be supported in WIT-400HE. 1. Press to access programing mode. -
Page 97: Settings
Settings WIT-400HE is one of the phone to be recognized from the iPECS Sys- tem. This chapter explains how to set the phone connects to a net- work as well as special features that let you manage your networks. Profile Settings... - Page 98 4. To edit the name to use for the default profile: Select Profile Name field and enter a profile name to whatever you want. 5. To assign a profile to the wireless LAN access point: Select Network Name(SSID) field and enter a network name, and then press This SSID must be exactly the same as it is in an access point which you have installed.
- Page 99 The encryption method in use for this profile. An encryption type must be exactly the same as it is in an wireless LAN access point which you have installed. 7. To set authentication to the default profile: Select 802.1X Authenication field and press navigation key left or right to select an valid value NONE, MD5, TTLS, PEAP, LEAP, or TLS and then press 8.
- Page 100 Primary DNS: The primary IP address of the Domain Name Server for this network. Secondary DNS: The secondary IP address of the Domain Name Server for this network. 9. After setting IP address, the phone tries to register with the system if you select this profile.
-
Page 101: Connecting A Profile
- Lock icon ( ) indicates that the wireless LAN is encrypted. Wire- less LANs that do not use encryption do not have the lock icon. - Bar icon ( ) indicates the signal strength in different states of the network. Right part on the screen shows the name of the network. -
Page 102: Managing Profiles
Managing Profiles This menu allows you to edit, delete, and change priority profiles. To edit an existing profile: 1. Press > Settings > Profile Setting. 2. Select a profile you wish to edit. 3. Press Menu (left softkey) to display the options. 4. -
Page 103: System Setting
WIT-400HE, press the navigation key left or right to select Yes or No. Now your iPECS system, your AP and WIT-400HE are in the same IP range, select this value to No. In other cases, you should select this value to Yes. -
Page 104: Codec Preference
5. System IP must manually enter with the same IP address of the iPECS system in order to initially request for registration to the iPECS system. 6. Station Set (extension number for the station) can be entered manu- ally depending on the system you want to register. -
Page 105: Wireless Lan Setting
Wireless LAN Setting You can adjust a roaming level to find the best access point signal within close proximity to each other while moving around. 1. Press > Settings > Wireless LAN Setting. 2. Enter your security code and press The preset code is "0000". -
Page 106: Network Information
Network Information This menu allows you to view the information on using the network configuration. 1. Press > Settings > Network Information. 2. Displays the IP address, netmask, gateway, DNS1, and DNS2. The DNS2 property defines the secondary DNS address. 3. -
Page 107: Useful Information
Useful Information Before Service Inquiry This appendix contains before service inquiry and troubleshooting information that will help you use your phone. Check the following checkpoints before contact the customer ser- vice center. If you have question or need assistance, please consult your local service center. - Page 108 Phone profile’s network configuration must be the same as you are currently using on the installed network. (Refer to "To use phone’s default profile" on page 89.) Check your roaming level from Menu > Settings> Wireless LAN Setting. The roaming level enables you to roam with a voice con- nection between each access point while you are speaking.
- Page 109 The phone does not function normally. Select Menu > Settings > Reset Settings. This feature will reset all custom settings back to factory default. You cannot stop the process after you start it. Note: When you reset the phone, you will have to set it up all over again to your liking.
-
Page 110: Troubleshooting
Troubleshooting If you experience any problems with the normal use of your phone, you should remove and replace the battery, then turn on the phone. Symptoms Troubleshooting Guide Failed to scan AP Scanning access point is failed. Try again and if it fails too, check the access pont status. -
Page 111: Specification
CSMA/CA IEEE 802.11e Other This phone can potentially occur radio interference while the phone is in use. WIT-400HE implements security and en- cryption technologies however, privacy of communications may not be ensured when using this phone. Appendix A Useful Information... - Page 112 Adapter: Adaptor input power AC100~240V, 50/60Hz, 0.15A Adaptor output power 5.1V 0.7A Operating temperature 0˚C ~ 40˚C Battry: Continuous standby time Approximately 50 hours Continuous talk time Approximately 3 hours Estimated charging time Approximately 6 hours Battery type Li-Ion (Lithium Ion) 3.7V 1150mAh LCD: Type 2 inches TFT Graphic LCD 65K colors...
-
Page 113: Caring For The Battery
Caring for the Battery Protecting Your Battery The guidelines listed below help you get the most out of your bat- tery’s performance. Recently there have been some public reports of phone batteries overheating, catching fire or exploding. It appears that many, if not all, of these reports involve counterfeit or inexpensive, aftermarket- brand batteries with unknown or questionable manufacturing standards. -
Page 114: Open Source Software Notice
Open Source Software Notice This following GPL (General Public License) software used in this product are subject to the GPL License Agreements. You can obtain a copy of the GPL licenses from Ericsson-LG Web Site (http://www.lgericsson.com). GPL License: u-boot bash linux busybox glibc... -
Page 115: Caring For The Environment By Recycling
Caring for the Environment by Recycling This symbol means that the your phone or other electrical accessories should not be disposed of with household waste. Do not throw your phone or battery in the trash. Disposal of your old appliance 1. -
Page 117: Indexs
Indexs Battery Cover 9 Access Point 23 Max retry counter 24 Recommended AP 24 Calculator 73 Reject after Full Associa- Call Duration 57 tion 24 Resetting 57 Roaming 24 Viewing 57 The simultaneous calls 24 Caller ID 26 Access Point Probing 27 Call Forward Alarm Clock 71 Activating Call Forward 77... - Page 118 Clear Key 9 Headset Jack 9 Hold Access Held CO code 88 Dialing Font 52 Display Screen 10 Display Informations 10 Idle Clock 52 Main Menu 11 Main Menu Icons 12 Key Functions 8 State Displays 12 Key Tone 49 Status Icons 10 Key Tone Volume 49 Earpiece 8...
- Page 119 Network Information 98 Network Name 90. See SSID Range 26 Recycling 107 Package 5 Registration Phone Book (Contact) iPECS Setup 26 Adding 38 Wireless LAN Connection 26 Caller Groups 41 Reset Settings 98 Deleting Entries 46 Restarting 26 Searching Entries 40...
- Page 120 CO Code 83 Deleting a Speed Dial 85 Schedule 65 Storing a Speed Dial 82 Adding 66 Using a Speed Dial 84 Deleting 67 Going to Today 69 Searching 69 Talk key 8 Setting your Holiday 68 Timer 74 Specific Event 69 D-Day Counter 74 Viewing 66 D-Day Finder 74...
- Page 121 The contents of this document are subject to revision without notice due to continued progress in methodology, design and manufacturing. Ericsson-LG shall have no liability for any error or damage of any kind resulting from the use of this document. ISSUE 1.0 www.ericssonlg.com Posted in Korea...
Need help?
Do you have a question about the WIT-400HE and is the answer not in the manual?
Questions and answers