Table of Contents
Advertisement
Quick Links
Advertisement
Table of Contents

Related Manuals for Diamond Amplification MAC-2

Summary of Contents for Diamond Amplification MAC-2
- Page 1 MAC-2 User’s Manual RJM Music Technology, Inc.
- Page 3 MAC-2 User’s Manual Version 1.0 August 6, 2007 Diamond Amplification 5261 Langfield Road Houston, TX 77040 +1-713-934-0100 Email: techsupport@diamondamplification.com Web: www.diamondamplification.com RJM Music Technology, Inc. 2525 Pioneer Ave #2 Vista, CA 92081 +1-760-597-9450 E-mail: support@rjmmusic.com Web: www.rjmmusic.com...
- Page 4 Copyright © 2007 RJM Music Technology, Inc. All Rights Reserved.
-
Page 5: Table Of Contents
Table of Contents INTRODUCTION FRONT PANEL BACK PANEL PROGRAMMING Continuous Controllers SETUP MODE Setting MIDI Channel Setting Inverted Functions Setting Momentary Functions Grouping Functions DATA BACKUP MAC-2 to MAC-2 copy MAC-2 to computer copy SPECIFICATIONS WARRANTY... -
Page 6: Introduction
Introduction Thank you for purchasing a MAC-2. This product is designed to add MIDI capability to your guitar amplifier. With a MAC-2, you can use a MIDI footswitch to control your amplifier and all of your MIDI- enabled effects, giving you the ability to switch amplifier channels and effects with the tap of a single button. -
Page 7: Front Panel
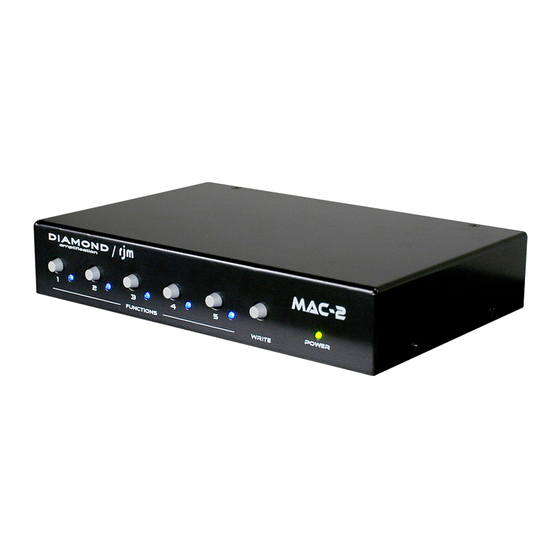
Front Panel Function buttons 1 through 5 – These buttons control the five switches found on the MAC-2. Once the MAC-2 is connected to an amplifier, these buttons will control the amplifier just like the amplifier’s footswitch does – switching channels, boosts, or any other feature found on the footswitch. -
Page 8: Back Panel
MIDI Thru jack. MIDI In – Jack for incoming MIDI commands. Connect your MIDI foot controller here. The MAC-2 will provide phantom power to a compatible MIDI controller if you use a 7-pin MIDI cable. The AC adapter provided with the MAC-2 can phantom power most MIDI... - Page 9 MIDI In jack to phantom power the connected MIDI footswitch. If you are phantom powering, please make sure that the power supply is sufficient to power both the MAC-2 and your MIDI footswitch. If you use certain DC power supplies designed to supply DC power to multiple devices, it may not supply sufficient current.
-
Page 10: Programming
To program the MAC-2, simply connect your MIDI controller’s MIDI output to your MAC-2’s MIDI In jack. The MAC-2 is set for MIDI Channel 1 by default. Either make sure your MIDI controller is set up to transmit on Channel 1, or use the MAC-2’s setup mode to change... -
Page 11: Continuous Controllers
1. Plug a ¼” cable into Switch 1 on the MAC-2 and the jack for your channel switching on your amp. 2. Make sure your MAC-2 is connected to your MIDI controller with a MIDI cable. 3. Using your MIDI controller, step on preset 3. - Page 12 your footswitch to control your amp’s boost function. Pressing that button will allow you to turn the boost on or off regardless of the current MIDI program number that has most recently been selected. The following Continuous Controllers are supported: Continuous Controller Value Function...
-
Page 13: Setup Mode
MAC-2 into your rig. Setting MIDI Channel The MAC-2 responds to MIDI channel 1 by default. If you’d like to change it to respond to a different channel, you can follow these steps: 1. Remove the power supply from the MAC-2 2. -
Page 14: Setting Inverted Functions
Once you’ve chosen your MIDI channel, press the Write button. The MAC-2 will flash its LEDs, then return to normal operating mode with the new settings in effect. Setting Inverted Functions On certain amplifiers, a switching function is inverted. For example: your amp has footswitchable reverb. -
Page 15: Grouping Functions
1. Remove the power supply from the MAC-2 2. Hold down the Function 4 button and plug in the MAC-2’s power supply 3. Keep holding the Functi on 1 button until the LEDs flash Now, press the buttons to select the functions that should be grouped together. -
Page 16: Data Backup
Data Backup To make sure your settings are never lost, you can copy your settings from one MAC-2 to another, or copy them from a MAC-2 to a computer. MAC-2 to MAC-2 copy To copy settings from one MAC-2 to another: 1. - Page 17 To copy your settings from the computer back to your MAC-2, connect the MAC-2’s MIDI In jack to the computer’s MIDI output. Make sure the MAC-2 is on. Using your SysEx program, load your settings and send them to the MAC-2. The MAC-2’s LEDs will flash briefly. Once this is done, disconnect power to the MAC-2, wait a second, then reconnect power.
-
Page 18: Specifications
Specifications Dimensions Half-rack size 8 (W) x 1.5 (H) x 5.7 (D) inches 20.3 (W) x 3.8 (H) x 14.5 (D) cm Weight 2 lbs 0.9 kg Power 9-18 Volts, AC or DC @ 200mA 5.5mm OD, 2.5mm ID x 9.5mm barrel connector Included power supply is 9VDC, 1A Power provided to the Power jack is passed... -
Page 19: Warranty
Warranty RJM Music Technology, Inc. warrants this product against any defects that are due to faulty material or workmanship for a period of one year from the date of original retail purchase. This warranty does not cover damage to the product resulting from accident or misuse. This warranty is transferable provided the current owner has the original purchase receipt and can provide a copy of it when submitting the warranty claim.
Need help?
Do you have a question about the MAC-2 and is the answer not in the manual?
Questions and answers