Elmira Stove Works FIREVIEW 1840 Installation And Operating Instructions Manual
Wood-burning cookstoves
Hide thumbs
Also See for FIREVIEW 1840:
- Installation & operating instructions manual (41 pages) ,
- Installation & operating instructions manual (44 pages)
Table of Contents
Advertisement
Quick Links
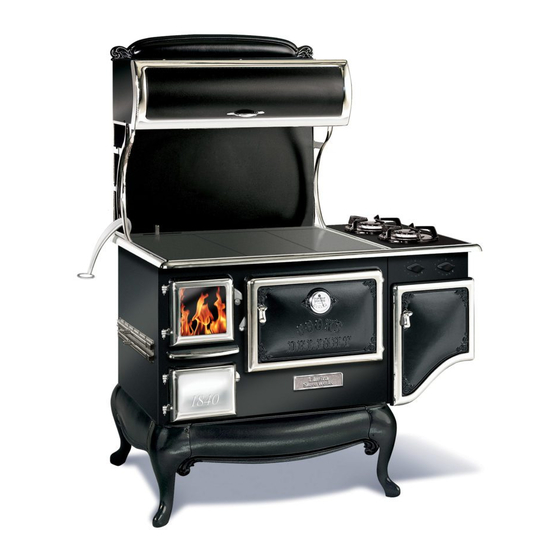
FIREVIEW STOVES
are listed to ULC Standards S-627 &
UL 1482 by Warnock Hersey
Professional Services Ltd.
MODELS
1840 &1842
INSTALLATION & OPERATING
™
INSTRUCTIONS FOR FIREVIEW
WOOD-BURNING COOKSTOVES
Important! Read this entire manual
before you install or use your new
cookstove. To reduce the risk of fire,
follow the installation instructions.
Failure to follow the instructions may
result in property damage, bodily
injury or even death.
SAVE THESE INSTRUCTIONS
FOR FUTURE REFERENCE.
CONTACT LOCAL BUILDING DEPARTMENT AND FIRE AUTHORITIES
REGARDING PERMITS REQUIRED, RESTRICTIONS AND INSTALLATION
INSPECTION REQUIREMENTS IN YOUR AREA.
MODEL 1842-G: INSTALLATION MUST CONFORM WITH LOCAL CODES
OR, IN THE ABSENCE OF LOCAL CODES, WITH
THE NATIONAL FUEL GAS CODE, ANSI Z223.1/NFPA 54.
Handles and controls are hot! Use the tool provided or a fire glove to operate
dampers and doors. Do not touch with bare hands – severe burns could result.
Repeated or extended over-firing of this stove is dangerous and will void the warranty.
This stove is designed to be connected to a 6" flue / chimney system.
The thermometer on the stove door has been calibrated for approximate oven temperatures. Use the interior
oven thermometer provided for accurate readings.
3372-12
Advertisement
Table of Contents

Related Manuals for Elmira Stove Works FIREVIEW 1840


Summary of Contents for Elmira Stove Works FIREVIEW 1840
- Page 1 FIREVIEW STOVES are listed to ULC Standards S-627 & UL 1482 by Warnock Hersey Professional Services Ltd. MODELS 1840 &1842 INSTALLATION & OPERATING ™ INSTRUCTIONS FOR FIREVIEW WOOD-BURNING COOKSTOVES Important! Read this entire manual before you install or use your new cookstove.
-
Page 2: Safety Instructions
SAFETY INSTRUCTIONS Read these instructions completely. Failure to follow these directions could create a fire / safety hazard, and could void the warranty on your stove. Do not place foil, pans, cookie sheets or GAS MODEL 1842-G: roasting pans directly on the oven bottom. The oven rack provided can be set on the important safety instructions, Page 3. -
Page 3: Gas Appliance Safety (Model 1842-G)
Have your chimney cleaned regularly. This Have the chimney inspected and will remove excessive creosote buildup. cleaned on a regular basis. A chimney If any parts of the stove or chimney system fire is a safety hazard. In the event of a begin to glow during operation, the stove is chimney fire: over-fired. - Page 4 the Commonwealth of Massachusetts. If you smell gas: Massachusetts approval code # G1-1202-18. Turn off the gas supply to the stove and 1. This installation must conform to local codes call a qualified serviceman. and ordinances. In the absence of local codes, Do not try to light any appliance.
-
Page 5: Table Of Contents
Contents Chimney Function & Draft: Safety Instructions Chimney Height General Safety Cold or Over-Sized Flue or Liner Woodstove Safety “Stack Effect” & Negative Pressure Gas Appliance Safety (Model 1842-G) Operating Your Fireview Stove Getting Acquainted Break-in Fire Unpacking & Assembly Starting a Fire Removing &... -
Page 6: Getting Acquainted
™ Getting Acquainted With Your Fireview Cookstove This owner’s manual is an important tool, and Your FIREVIEW™ cookstove is the result of thirty-five years of experience designing and should be kept near the stove for reference. If you manufacturing spectacular high-quality wood- sell your stove, pass the manual along to the new burning stoves and kitchen appliances. -
Page 7: Removing & Replacing Firebrick & Grate
6. Cookplates – install right and center plates first Removing Stove from Skid (radiused edge on bottom to front of stove), then follow instructions for installing left plate and lift handle (see “Cabinet Assembly”). 1. Remove plastic from box(es) on cooktop. 2. -
Page 8: Pipe Damper Installation
holes in the left side of the bracket and the rear hole of the right bracket. Position the cabinet as far back on the stove as the bolt holes will allow, leaving a slight air space between the cooktop and splashback. Attach locknuts to the bolts and tighten. -
Page 9: Clearances, Heat Shields
the flue pipe from the flue boot to the top of the consulted before installation to determine cabinet; the main section covers the stove body and the need to obtain a permit. flue boot. Instructions are included with the shield. NOTE: Read the sections on clearances, floor Reducing Clearances protection and chimneys before you begin... -
Page 10: Gas Installation
Step (a): Calculate R of proposed system. 4" brick of C = 1.25, therefore Rbrick = 1/C = 1/1.25 = 0.80 1/8" mineral board of k = 0.29, therefore Rmin.bd. = 1/0.29 x 0.125 = 0.431 Total R = Rbrick + Rmineral board = 0.8 + 0.431 = 1.231 Step (b): Compare proposed system R of 1.231 to specified R of 0.60. -
Page 11: Manual Shutoff
supply system at test pressures equal to or less than Gas Piping to Stove 1/2 psig (3.5kPa). The gas supply pressure for With liquid propane gas, the size of the piping to checking the regulator setting shall be at least the stove is determined by the length of the run eleven inches water column. -
Page 12: Chart Of Clearances
Gas ranges require a CSA approved stainless steel gas flex line or flexible copper coil ½” in diameter and at least three feet long so the stove can be moved for service. Measure MODEL 1840 Inches No Heat Shield... -
Page 13: Optional Heat Shield Kit
Optional Heat Shield Kit A heat shield kit is available for your cookstove. It allows you to substantially reduce required clearances to combustibles. (See “Chart of Clearances”, previous page.) The heat shield kit (#3285 stove shield, #3286 pipe shield) covers the stove body, flue boot and stove pipe. - Page 14 Oven Shield (left side, as you face back of stove): Flue Boot Shield: 1. Remove the four screws spaced down the left 1. Place the flue boot shield in place between the side of the stove, directly above the outside of left and right shields you have installed above.
-
Page 15: Rough-In Diagrams & Dimensions
Rough-in Diagrams & Dimensions Drawings and dimensions provided for reference only, showing approximate dimensions for rough-in purposes. Ensure that no ceiling or floor supports will be cut or compromised for chimney installation. 1840 1840/ 1842 1842... -
Page 16: Wood-Burning Basics
Wood-Burning Basics A wood-burning cookstove is a unique appliance. Dampers The chimney, air intakes, dampers, Fireview door, Your Fireview range features two types of dampers: wood and firebox all work together as one system to 1. An oven slide damper located at the back left determine how efficiently and long your fire will side of the cooktop. -
Page 17: Wood
glass. – striking or slamming the door or glass, in the wood and more energy is being used to splashing liquids on hot glass, etc. create heat. As the temperature of the wood increases, the wood will begin to smoke, Clean glass with low alkaline content releasing hydrocarbon gases and tars. -
Page 18: Chimney Requirements / Installation
Chimney Requirements & Installation WARNING: DO NOT CONNECT THIS UNIT Flue Pipes Flue pipes carry exhaust gases from the stove’s flue TO A CHIMNEY FLUE SERVING ANOTHER APPLIANCE. collar to the chimney. The flue pipe assembly is an extremely important part of a wood-burning system This stove must be connected to 1) a listed 6”... -
Page 19: Stovepipe-To-Chimney Connection
appliance and does not leak out through the 12. During a chimney fire the chimney connector joints between pipe sections. may vibrate violently. The connector must be 13. A flue pipe must never pass through a securely attached to the pipe and chimney, and combustible floor or ceiling, concealed attic, individual sections must be securely attached roof space or closet. - Page 20 Connections to Pre-Fabricated Metal Chimney:...
-
Page 21: Chimney Connection Systems - Thimbles
Chimney Connection Systems – Thimbles (Wall Penetration Assemblies): Use one of these connection methods when the connection from the stove to the chimney is made through a combustible wall. A. Brick Masonry: Minimum 3.5-inch thick brick masonry all framed into combustible wall with a minimum of 2-inch brick separation from clay liner to combustibles. -
Page 22: Chimney Clearances
Chimney Clearances Chimney Height The chimney must: As a general rule, the taller the chimney, the stronger the draft will be. If a chimney is too short, extend a minimum of 14 feet above the collar of inadequate draft will probably result. If the chimney the stove is too tall, excessive draft can result and may lead to extend a minimum of 3 feet above the point... -
Page 23: Operating Your Fireview Stove
(especially when a stove door or cook plate is 3. Opening a window slightly on a calm (windless) opened), and can make it difficult to start and day alleviates any of the above symptoms. establish a good fire. This problem can be 4. -
Page 24: Starting A Fire
small fire. Use the slide dampers on the side of 4. Open both slide dampers on the left side of the stove. The dampers are “OPEN” when all the the stove to keep the fire to a low flame. way to the BACK of the stove, and “CLOSED” 2. -
Page 25: Disposing Of Ashes
resistance on the chimney / draft system. If the 3. Monitor the fire through the Fireview door. Use chimney has not heated adequately to maintain the slide dampers on the side of the stove to proper draft, you may notice some “back- regulate the flame. -
Page 26: Cooking
1. When the fire is out and the stove has cooled for 5. After disposal, replace the ash pan in the stove, several hours, open the Fireview door and left handle facing forward, and close the door. cook plate. Use the rake provided to push loose NEVER ATTEMPT TO REMOVE ASHES ash and small embers through the holes in the WHEN THE STOVE IS HOT. -
Page 27: Oven Cooking
with how your dampers control the cooktop beneficial with some foods to rotate the pan from temperatures, and which sections are best for time to time during cooking, in order to achieve a various types of cooking. more consistent cooking level. As with stovetop cooking, learning how to regulate You can begin cooking as soon as the cooktop temperatures in your oven is part science and part... -
Page 28: Door Thermometer Calibration
5. Unscrew four corner screws holding the interior Before loading wood, always open the oven panel to the door frame, and remove the panel. damper and wait a few seconds before This will expose the back of the thermometer. opening the cook plate or Fireview door. 6. -
Page 29: Gas Burner Operation
To ignite: Trouble-Shooting If you experience an emergency situation, refer to Elmira Stove Works. When calling, please provide the Safety Instructions, such as “Over-Firing - a complete description of the problem, your model Caution!” and “If You Smell Gas” (page 3). - Page 30 Install 6” liner (ideally, Oversized chimney liner – stove is liner should have same designed for a 6” internal area as the flue flue and liner collar of the stove). Turn off furnace and other exhaust factors when stove is burning. Negative pressure Crack a window to in house (caused by...
- Page 31 Temperatures vary Rotate foods for more throughout oven even results. Top of foods in oven brown / Excessive heat in oven Fire too hot Wait until fire burn excessively stabilizes to red-hot coals prior to baking. Reduce fire using slide controls.
-
Page 32: Maintenance & Adjustments
Maintenance & Adjustments Your cookstove will give you years of enjoyment and ashes accumulated under the oven through and great cooking with little maintenance. However, the cleanout opening and into the ash pan. some occasional maintenance is required and will Replace the cleanout plate. -
Page 33: Chimney Cleaning
accumulates on the flue lining. When ignited, this Cookplates creosote makes an extremely hot fire. When burning wood, inspect the chimney connector and chimney During the first few hot firings of your Fireview at least once every two months during the heating cookstove, the cookplates will begin to change season to determine if creosote buildup has color. -
Page 34: Manual Burner Adjustment On Low
The glass should be replaced immediately if has cooled - these spills will discolor porcelain. cracked or broken. Replace glass only with glass supplied by Elmira Stove Works for this stove. Do Manual Burner Adjustment on Low not use substitute materials. -
Page 35: Igniter Battery
Replacement gasket and adhesive can be ordered Igniter Battery from Elmira Stove Works or your dealer. Loose gasket that is still in good condition can be re- Replacing the 9 volt battery in your stove’s igniter applied using high-temperature silicone. Gasket is is a simple and easy process: sold by the foot, or as an assembly. -
Page 36: Removing & Replacing Firebrick & Grate
the lifter handle (if the lifter is attached) through 3. Place the other large fire brick in the firebox and the cabinet bracket, lift the plate off of the stove. slide it up against the right wall of the firebox. 2. -
Page 37: Glossary Of Terms
Glossary of Terms Ash Rake / Ash / Clean-out Tool: tool used to down-drafting is excessive build-up of creosote in scrape ash from around the oven and flue boot. Ash the chimney, which restricts the flow of flue gases. Fire Glove – a heat and fire-resistant glove is scraped from the sides and top of the oven and flue boot, and out clean-out door below the oven. -
Page 39: Fireview Parts (List)
Fireview Parts 1 – Installation & Operating Manual (#3372) 32 – Damper Tracks Top/Bottom (#3242) 2 – Cabinet Door & Hinges (#3307) 33 – Damper Track Center (#3243) 3 – Cabinet Door Springs (#1591) 34 – Air Damper Knob (#3319) 4 –... -
Page 40: Options & Accessories
Options & Accessories Heat Shield Kit (#3285 body, #3286 pipe) Reduces required clearances to allow installation closer to rear walls. Accessories are available through your dealer, or call Elmira Stove Works, 519-669-1281, Toll-free 800-295- 8498, Fax 519-669-1774. -
Page 41: Warranty
This warranty applies only for domestic use when the stove has been properly installed according to instructions supplied by Elmira Stove Works in this manual, and to local building and safety codes. The stove must be connected to an adequate and proper chimney with proper chimney connections.
Need help?
Do you have a question about the FIREVIEW 1840 and is the answer not in the manual?
Questions and answers