Table of Contents
Advertisement
Quick Links
FIREVIEW STOVES
are listed to ULC Standards S-627 &
UL 1482 by Warnock Hersey
Professional Services Ltd.
INSTALLATION & OPERATING
INSTRUCTIONS FOR FIREVIEW
WOOD-BURNING COOKSTOVES
Important! Read this entire manual
before you install or use your new
cookstove. To reduce the risk of fire,
follow the installation instructions.
Failure to follow the instructions may
result in property damage, bodily
injury or even death.
SAVE THESE INSTRUCTIONS
FOR FUTURE REFERENCE.
CONTACT LOCAL BUILDING DEPARTMENT AND FIRE AUTHORITIES
REGARDING PERMITS REQUIRED, RESTRICTIONS AND INSTALLATION
MODEL 1842-G: INSTALLATION MUST CONFORM WITH LOCAL CODES
OR, IN THE ABSENCE OF LOCAL CODES, WITH
THE NATIONAL FUEL GAS CODE, ANSI Z223.1/NFPA 54.
Handles and controls are hot! Use the tool provided or a fire glove to operate
dampers and doors. Do not touch with bare hands – severe burns could result.
Repeated or extended over-firing of this stove is dangerous and will void the warranty.
This stove is designed to be connected to a 6" flue / chimney system.
The thermometer on the stove door has been calibrated for approximate oven temperatures.
Use the interior oven thermometer provided for accurate readings.
U.S. ENVIRONMENTAL PROTECTION AGENCY
This unit is not a certified residential Wood Heater.
The primary use for this unit is for cooking or baking.
INSPECTION REQUIREMENTS IN YOUR AREA.
™
MODELS
1840 &1842
3372-22
Advertisement
Table of Contents

Subscribe to Our Youtube Channel
Related Manuals for Elmira Stove Works 1842-G


Summary of Contents for Elmira Stove Works 1842-G
- Page 1 CONTACT LOCAL BUILDING DEPARTMENT AND FIRE AUTHORITIES REGARDING PERMITS REQUIRED, RESTRICTIONS AND INSTALLATION INSPECTION REQUIREMENTS IN YOUR AREA. MODEL 1842-G: INSTALLATION MUST CONFORM WITH LOCAL CODES OR, IN THE ABSENCE OF LOCAL CODES, WITH THE NATIONAL FUEL GAS CODE, ANSI Z223.1/NFPA 54.
-
Page 2: Safety Instructions
WARNING: If the information in these WARNING: instructions is not followed exactly, a fire with an appropriate extinguisher. Clean the GAS MODEL 1842-G: or explosion may result causing property Never Operate the Top Surface oven compartment on a regular basis to damage, personal injury or death. -
Page 3: Woodstove Safety
Read these instructions completely. Failure to follow these directions could create a fire / safety hazard, and could void the warranty on your stove. with an appropriate extinguisher. Clean the GAS MODEL 1842-G: oven compartment on a regular basis to important safety instructions, Page 3. -
Page 4: Gas Appliance Safety (Model 1842-G)
4. Prepare to get everyone out of the house in case the fire spreads. Gas Appliance Safety 5. Go outside and check to ensure that hot (Model 1842-G) ashes do not ignite shingles or other nearby combustibles. 6. Once the fire has burned out and the... - Page 5 the Commonwealth of Massachusetts. If you smell gas: Massachusetts approval code # G1-1202-18. Turn off the gas supply to the stove and 1. This installation must conform to local codes call a qualified serviceman. and ordinances. In the absence of local codes, Do not try to light any appliance.
-
Page 6: Table Of Contents
Safety Instructions Chimney Height General Safety Cold or Over-Sized Flue or Liner Woodstove Safety “Stack Effect” & Negative Pressure Gas Appliance Safety (Model 1842-G) Operating Your Fireview Stove Getting Acquainted Break-in Fire Unpacking & Assembly Starting a Fire Removing & Replacing Firebrick & Grate... -
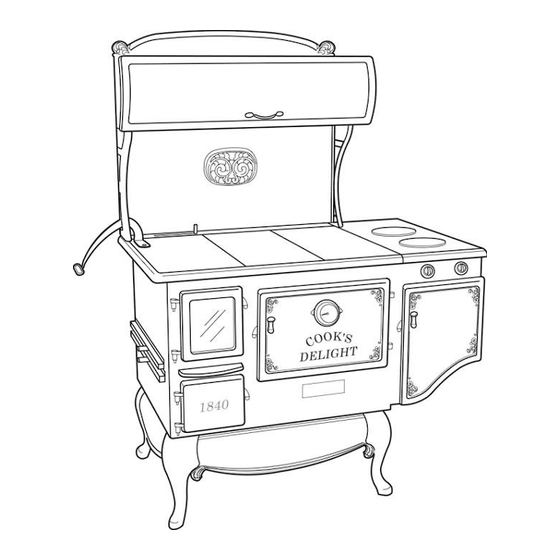
Page 7: Getting Acquainted
Getting Acquainted With Your Fireview Cookstove ™ Your FIREVIEW™ cookstove is the result of This owner’s manual is an important tool, and thirty-five years of experience designing and should be kept near the stove for reference. If you manufacturing spectacular high-quality wood- sell your stove, pass the manual along to the new burning stoves and kitchen appliances. -
Page 8: Removing Stove From Skid
6. Cookplates – install right and center plates first Removing Stove from Skid (radiused edge on bottom to front of stove), then follow instructions for installing left plate 1. Remove plastic from box(es) on cooktop. and lift handle (see “Cabinet Assembly”). 2. -
Page 9: Pipe Damper Installation
holes in the left side of the bracket and the rear hole of the right bracket. Position the cabinet as far back on the stove as the bolt holes will allow, leaving a slight air space between the cooktop and splashback. Twist the bottom front of the left cabinet bracket away from the cooktop so it doesn’t interfere with lifting of the left cookplate. -
Page 10: Clearances, Heat Shields
Appliances and Equipment (CAN3-B365-M84). Floor Protection in this manual. Floor Protection Dual Fuel Model 1842-G: Installation, adjustment If this stove is being installed on a combustible floor, and service must be performed by a qualified gas a noncombustible floor protector is required to installer. -
Page 11: Gas Installation
If C-factor is given: R = 1/C outside of the building. 2) Determine the R-value of the proposed alternate When installing a Model 1842-G dual fuel (wood floor protector. and propane) stove, the installation must comply Use the formula in step (1) to convert values with all codes and standards for both wood-burning not expressed as "R". -
Page 12: Gas Piping To Stove
Gas Piping to Stove supply system at test pressures equal to or less than 1/2 psig (3.5kPa). The gas supply pressure for With liquid propane gas, the size of the piping to checking the regulator setting shall be at least the stove is determined by the length of the run eleven inches water column. -
Page 13: Chart Of Clearances
Model 1842-G: Observe all instructions on the gas appliance rating plate for minimum clearances to any adjacent vertical combustible surfaces. Gas ranges require a CSA approved stainless steel gas flex line or flexible copper coil ½” in diameter and at least three feet long so the stove can be moved for service. -
Page 14: Optional Heat Shield Kit
Optional He at Shield Kit A heat shield kit is available for your cookstove. It allows you to substantially reduce required clearances to combustibles. (See “Chart of Clearances”, previous page.) The heat shield kit (#3285 stove shield, #3286 pipe shield) covers the stove body, flue boot and stove pipe. - Page 15 Firebox Shield (right side): 1. Remove the three screws from the right side panel at the back of the stove. 2. Remove six screws from right flange of flue boot. 3. Put the right side shield in place, aligning the three holes in the shield with the three holes from which you have just removed the screws.
-
Page 16: Rough-In Diagrams & Dimensions
Rough-in Diagrams & Dimensions Drawings and dimensions provided for reference only, showing approximate dimensions for rough-in purposes. Ensure that no ceiling or floor supports will be cut or compromised for chimney installation. 1840 1840/ 1842 1842... -
Page 17: Wood-Burning Basics
Wood-Burning Basics A wood-burning cookstove is a unique appliance. Dampers The chimney, air intakes, dampers, Fireview door, Your Fireview range features two types of dampers: wood and firebox all work together as one system to 1. An oven slide damper located at the back left determine how efficiently and long your fire will side of the cooktop. -
Page 18: Wood
glass. – striking or slamming the door or glass, 2. Smoke & Gases: As the wood in your fire dries splashing liquids on hot glass, etc. out, less energy is being used to evaporate Clean glass with low alkaline content commercial waterin the wood and more energy is being stove glass cleaners, available from your dealer. -
Page 19: Chimney Requirements / Installation
Chimney Requirements & Installation WARNING: DO NOT CONNECT THIS UNIT Flue Pipes TO A CHIMNEY FLUE SERVING ANOTHER Flue pipes carry exhaust gases from the stove’s flue APPLIANCE. collar to the chimney. The flue pipe assembly is an extremely important part of a wood-burning system This stove must be connected to 1) a listed 6”... -
Page 20: Stovepipe-To-Chimney Connection
appliance and does not leak out through the 12. During a chimney fire the chimney connector joints between pipe sections. may vibrate violently. The connector must be 13. A flue pipe must never pass through a securely attached to the pipe and chimney, and combustible floor or ceiling, concealed attic, individual sections must be securely attached roof space or closet. - Page 21 Connections to Pre-Fabricated Metal Chimney:...
-
Page 22: Chimney Connection Systems
Chimney Connection Systems – Thimbles (Wall Penetration Assemblies): Use one of these connection methods when the connection from the stove to the chimney is made through a combustible wall. A. Brick Masonry: Minimum 3.5-inch thick brick masonry all framed into combustible wall with a minimum of 2-inch brick separation from clay liner to combustibles. -
Page 23: Thimbles Chimney Clearances
Chimney Clearances The chimney must: Draft in an unheated chimney should be between .01” and .15” water column. Ask your extend a minimum of 14 feet above the collar of dealer to confirm the draft. the stove extend a minimum of 3 feet above the point Chimney Height where it passes through the roof As a general rule, the taller the chimney, the... -
Page 24: Operating Your Fireview Stove
(especially when a stove door or cook plate is 3. Opening a window slightly on a calm (windless) opened), and can make it difficult to start and day alleviates any of the above symptoms. establish a good fire. This problem can be 4. -
Page 25: Starting A Fire
• Crumple a few sheets of newspaper into loose A break-in fire is a small, controlled fire that allows the fire brick to heat and cool slowly, avoiding balls and place on grate in bottom of firebox. thermal shock that could crack or break the brick. •... -
Page 26: Disposing Of Ashes
resistance on the chimney / draft system. If the 3. Monitor the fire through the Fireview door. Use chimney has not heated adequately to maintain the slide dampers on the side of the stove to proper draft, you may notice some “back- regulate the flame. -
Page 27: Cooking
1. When the fire is out and the stove has cooled for 5. After disposal, replace the ash pan in the stove, several hours, open the Fireview door and left handle facing forward, and close the door. cook plate. Use the rake provided to push loose NEVER ATTEMPT TO REMOVE ASHES ash and small embers through the holes in the WHEN THE STOVE IS HOT. -
Page 28: Oven Cooking
with how your dampers control the cooktop beneficial with some foods to rotate the pan from temperatures, and which sections are best for time to time during cooking, in order to achieve a various types of cooking. more consistent cooking level. As with stovetop cooking, learning how to regulate You can begin cooking as soon as the cooktop temperatures in your oven is part science and part... -
Page 29: Door Thermometer Calibration
5. Unscrew four corner screws holding the interior Before loading wood, always open the oven panel to the door frame, and remove the panel. damper and wait a few seconds before This will expose the back of the thermometer. opening the cook plate or Fireview door. 6. -
Page 30: Gas Burner Operation
(If the igniter does not spark, ensure burner caps are Model 1842-G dual fuel stove is equipped with two aligned correctly, with the dimple on the cap in the sealed gas burners and a battery-powered ignition recess in the burner. - Page 31 Oversized chimney Install 6” liner (ideally, liner – stove is liner should have same designed for a 6” internal area as the flue flue and liner collar of the stove). Turn off furnace and other exhaust factors when stove is burning. Negative pressure Crack a window to in house (caused by...
- Page 32 Temperatures vary Rotate foods for more throughout oven even results. Top of foods in oven brown / Excessive heat in oven Fire too hot Wait until fire burn excessively stabilizes to red-hot coals prior to baking. Reduce fire using slide controls.
-
Page 33: Maintenance & Adjustments
Maintenance & Adjustments Your cookstove will give you years of enjoyment and ashes accumulated under the oven through and great cooking with little maintenance. However, the cleanout opening and into the ash pan. some occasional maintenance is required and will Replace the cleanout plate. -
Page 34: Chimney Cleaning
accumulates on the flue lining. When ignited, this Cookplates creosote makes an extremely hot fire. When burning wood, inspect the chimney connector and chimney During the first few hot firings of your Fireview at least once every two months during the heating cookstove, the cookplates will begin to change season to determine if creosote buildup has color. -
Page 35: Manual Burner Adjustment On Low
The glass should be replaced immediately if cracked or broken. Replace glass only with glass Manual Burner Adjustment on Low supplied by Elmira Stove Works for this stove. Do The burners have been pre-adjusted at the factory for not use substitute materials. -
Page 36: Igniter Battery
Replacement gasket and adhesive can be ordered Igniter Battery from Elmira Stove Works or your dealer. Loose gasket that is still in good condition can be re- Replacing the 9 volt battery in your stove’s igniter applied using high-temperature silicone. Gasket is is a simple and easy process: sold by the foot, or as an assembly. -
Page 37: Removing & Replacing Firebrick & Grate
3. Place the two rectangular bricks in the right side of Removing & Replacing the firebox and slide them up against the right wall of Removing & Replacing Firebrick & Grate the firebox, under the retaining clips on the secondary air tube, tight together and as far forward in the Firebrick &... -
Page 38: Glossary Of Terms
Glossary of Terms Ash Rake / Ash / Clean-out Tool: tool used to down-drafting is excessive build-up of creosote in scrape ash from around the oven and flue boot. Ash the chimney, which restricts the flow of flue gases. is scraped from the sides and top of the oven and Fire Glove –... -
Page 40: Fireview Parts (List)
Fireview Parts 32 – Damper Tracks Top/Bottom (#3242) 1 – Installation & Operating Manual (#3372) 33 – Damper Track Center (#3243) 2 – Cabinet Door & Hinges (#3307) 34 – Air Damper Knob (#3319) 3 – Cabinet Door Springs (#1591) 34A –... -
Page 41: Options & Accessories
Options & Accessories Heat Shield Kit (#3285 body, #3286 pipe) Reduces required clearances to allow installation closer to rear walls. Accessories are available through your dealer, or call Elmira Stove Works, 519-669-1281, Toll-free 800-295- 8498, Fax 519-669-1774. - Page 42 Notes...
- Page 43 Notes...
-
Page 44: Warranty
This warranty applies only for domestic use when the stove has been properly installed according to instructions supplied by Elmira Stove Works in this manual, and to local building and safety codes. The stove must be connected to an adequate and proper chimney with proper chimney connections.
Need help?
Do you have a question about the 1842-G and is the answer not in the manual?
Questions and answers