Table of Contents
Advertisement
Advertisement
Table of Contents

Related Manuals for Pura QCRO4V-50


Summary of Contents for Pura QCRO4V-50
- Page 1 Installation, Operation & Service Instructions with Part List Quick Change Reverse Osmosis Drinking Water System Model No. QCRO4V-50 This system certified by WQA according to NSF/ANSI 58 for www.pura.com TDS reduction, as verified and substantiated by test data.
- Page 2 Massachusetts. The PURA Quick Change Drinking Water System contains a replaceable reverse osmosis membrane filter which is critical for the effective reduction of Total Dissolved Solids. The filtered water should be tested periodically to verify that the system is performing properly.
-
Page 3: Table Of Contents
Overview of the PURA Quick Change RO System’s Components ....... . -
Page 4: Specifications And Performance Data Sheet
(Stage 3) ....Thin Film Composite Production Rate 1 ... . . QCRO4V-50 36.5 gpd (138 L/day) -
Page 5: Performance Data Sheet
(1) Pressure Regulator is recommended for feed water pressures exceeding 552 kPa (80 psig). Performance Data Sheet Contaminant Reduction table: Model QCRO4V-50 This system has been tested according to WQA S-300 for reduction of the substances listed below. The concentration of the indicated substances in water entering the system was reduced to a concentration less than or equal to the permissible limit for water leaving the system, as specified in NSF/ANSI 58. -
Page 6: Suggested Installation Equipment
Suggested Installation Equipment Recommended tools 1. Utility Knife 2. Flathead Screwdriver 3. Phillips Screwdriver 4. Center Punch 5. 7/8” Stepped Drill Bit 6. Finish Hole Saw 7. Porcelain Saw 8. -
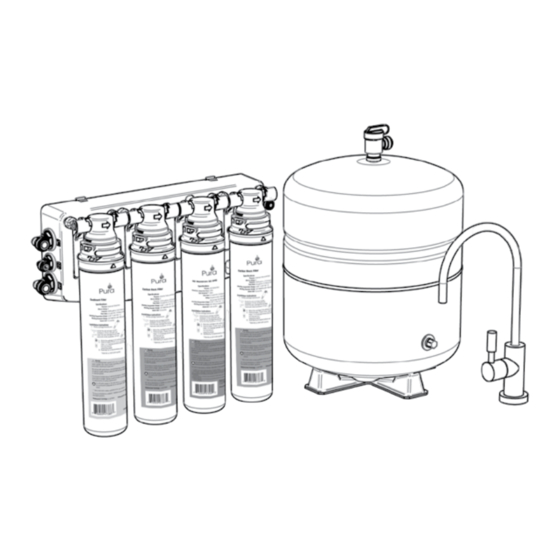
Page 7: Overview Of The Pura Quick Change Ro System's Components
Dispenser Faucet The PURA faucet (8) allows the product water to be drawn from the system with a simple rotation of the handle. This air gap style faucet prevents the unit from siphoning drain water back into the system. It features a built-in siphon break for concentrate discharge as required by most plumbing codes. -
Page 8: Package Contents
Package Contents Main Carton Carton 2 Carton 3 Figure 3 1. RO Manifold with Flow Control 9. Drain Saddle 17. -
Page 9: Preparation
Product Information This manual covers the technical aspects of PURA Quick Change drinking water systems. It is important to read this manual thoroughly so that you can properly apply, install, and service these systems. The substances reduced by this system are not necessarily in the customer’s untreated water. - Page 10 Verify Flow Control Location Flow Restrictor The RO manifold comes attached with the elbow fitting flow control. This flow control is attached to the manifold by quick disconnect fitting which allows it to be easily changed. Verify it is properly located in the outlet next to the symbol.
-
Page 11: Installation
(figure 7) must be observed. The PURA drinking water system is designed to be mounted near a sink for easy access to cold water and drain lines. Lengths of 1/4-inch and 3/8-inch OD plastic tubing will be required to make this installation. -
Page 12: Step 1 Select Component Installation Locations
The following steps will enable you to install the system quickly and orderly. Some variation may be necessary depending on the installation. See page 4 for a check list of tools and materials. typical installations follow this sequence: 1. Select Component Installation Locations 2. -
Page 13: Step 2 Faucet Installation
Step 2 – Faucet installation To simplify its access and installation, we suggest you install the faucet on the rear lip of the sink. It should be evenly positioned with the sink faucet and spray attachment. Should the spray faucet hole not be available for the installation, the sink must be drilled. - Page 14 3/8” Orange 1/4” Orange Tubing Tubing Faucet Base O-ring (in base) Spacer (Optional) Split Washer Flat Washer Lock Washer Faucet Adapter Drain Line from Faucet (3/8” Orange Tubing) Product Line from RO Manifold (3/8”...
- Page 15 Faucet assembly Verify faucet body, metal base, and rubber base washer are in place above sink (Items 1, 3, and 2). Lower faucet into mounting hole and place faucet over hole. Install slotted washer, spacer, faucet washer, and nut onto faucet nipple below sink and snug them up (Items 4, 5, 6, 7 and 8).
-
Page 16: Step 3 Install Adapter Valve On Water Supply
Step 3 – install adapter Valve on Water Supply CautioN! The Adapter valve should be connected to cold water supply only. Connection to hot water supply will damage the system and will void all warranty Adapter Before installing the adapter valve onto the supply line, in- stall the adapter as needed. -
Page 17: Step 5 Install Reservoir Tank
Figure 14 1. Install the drain saddle 2. Tighten the clamps with 3. Drill 3/8” hole through one 4. Attach 3/8” orange tube by valve on to the drain pipe. the help of the two bolts. side of the pipe. -
Page 18: Step 6 Install Filter System Assembly
Step 6 – install Filter System assembly The mounting bracket contains four mounting slots. The holes are sized to accept #10 round head wood screws (supplied). Some types of surfaces such as particle board or drywall, may require the use of plastic screw anchors or toggle bolts to provide adequate support for the unit. -
Page 19: Step 7 Start Up
Orange Attach locking clips to each white Connect the 1/4” OD orange Connect the 3/8” OD white elbow fitting. Do not attach one to tubing from the air gap inlet of the product water tube from the tank the blue flow control. -
Page 20: Performance And Technical Information
Performance & Technical Information The performance of the PURA system can be characterized and judged by the quality and quantity of the water produced by the system. By measuring the contaminant removal performance and flow rates of the system, its operating status can be easily evaluated. -
Page 21: Installing An Ro To Service Other Water Using Appliances
80, then the full pressure in the storage tank will be around 53 psi. Increasing the overall pressure in the system will allow more volume to be drawn from the tank before the pressure dips below a shutoff value. Pura Faucet 3/8” Drain Line... -
Page 22: Service And Maintenance
Service Schedule To keep the PURA system operating properly, it is necessary to change the filters and sanitize the system periodically. Typically, this should be done on an annual basis. Service frequency may vary depending on local water conditions. High sediment, chlorine, turbidity, or hardness levels may require more frequent service. -
Page 23: Parts Breakdown
Parts Breakdown item # Description Qty. 134040R Manifold, Quick Change RO, 4 Stage 92223 Valve, Auto Shut-off 41407553 Fitting, Check Valve, QCRO 41407552 Fitting, T-Connector, QCRO 41407001 Cartridge, Quick Change Sediment Filter - Stage 1 41407002 Cartridge, Quick Change Carbon Block - Stage 2 &... - Page 24 Other Parts 1. Storage Tank – Part # 92371 2. Faucet & Hardware – Part # 92653 3. Drain Saddle – Part # 92160 4. Tank Shut-off Valve – Part # PPSV501222W 5. Adapter Valve ASVPP5 6. 2x Locking Clip (3/8") – Part # 92346 7.
-
Page 25: Troubleshooting
Troubleshooting Guide If a problem cannot be corrected through the use of this troubleshooting guide please have the following information ready prior to calling the 1-800 number on the back of this manual: • Serial # • Model # Problem Possible Cause Remedy Insufficient... - Page 26 Problem Possible Cause Remedy External leakage. a. Tubing not fully seated in fitting a. Check all fittings for tightness. b. Tubing abraded in seal area. b. Recut tubing and redo connection. Overflow at a. Concentrate tubing plugged. a. Clean concentrate tubing of debris. faucet air gap b.
-
Page 27: Warranty Information
PURA Guarantee Subject to the conditions and limitations described below, WaterGroup warrants its PURA Reverse Osmosis Drinking Water Treatment Systems (excluding membrane and cartridge filters), when installed in accordance with WaterGroup specifications, to be free from defects in materials and workmanship under normal use within the operating specifications for a period of three (3) years from the date of purchase (with bill of sale). - Page 28 WaterGroup Companies Inc. 580 Park Street Regina, SK, S4N 5A9, Canada USA Office: WaterGroup Companies Inc. 193 Osborne Road Fridley, MN, 55432, USA www.pura.com 55014CA.0313...
Need help?
Do you have a question about the QCRO4V-50 and is the answer not in the manual?
Questions and answers