
Related Manuals for Humminbird 595C


Summary of Contents for Humminbird 595C
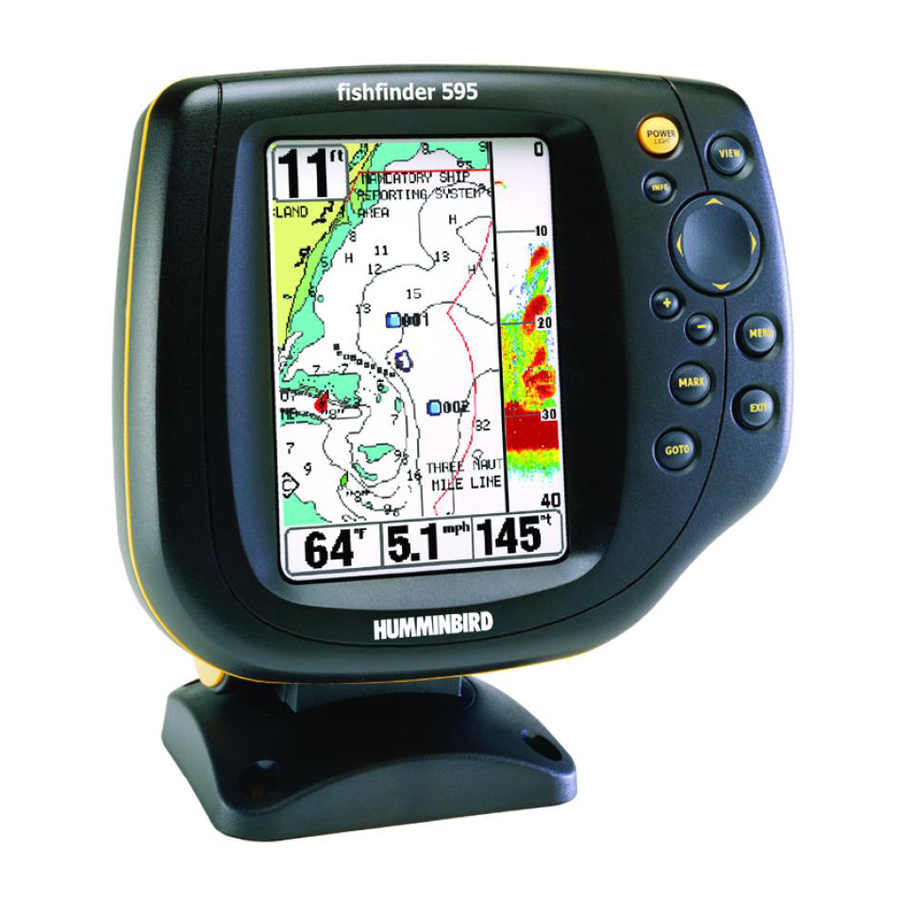
- Page 1 FF595_Man_531385-1_A_PrfE.qxd 12/9/2004 2:40 PM Page 1 FishFinder 595c FishFinder 595c Operations Manual Operations Manual 531385-1_A...
-
Page 2: Table Of Contents
Your Humminbird® is designed for trouble-free use in even the harshest marine environment. In the unlikely event that your Humminbird® does require repairs, we offer an exclusive Service Policy - free of charge during the first year after purchase, and available at a reasonable rate after the one-year period. - Page 3 FF595_Man_531385-1_A_PrfE.qxd 12/9/2004 Table of Contents Powering Up the Unit The Menu System Start-Up Options Menu Normal Operation ... 28 Simulator ... 28 System Status ... 29 Sonar X-Press™ Menu (Sonar Views Only) Sensitivity ... 32 Upper Range (Advanced: Sonar, Split Sonar and Big Digits Views Only) ... 33 Lower Range ...
-
Page 4: How Sonar Works
¼ of a second. It is unlikely that your boat can "outrun" this sonar signal. Single Beam Sonar Your Humminbird® FishFinder 595c uses a 200 kHz single beam sonar system with a 20° area of coverage. Depth capability is affected by such factors as boat speed, wave action, bottom... -
Page 5: How Gps And Cartography Work
FF595_Man_531385-1_A_PrfE.qxd 12/9/2004 How GPS and Cartography Work Your FishFinder uses GPS and sonar to determine your position, display it on a grid, and provide detailed underwater information. The Global Positioning System (GPS) is a satellite navigation system designed and maintained by the U.S. Department of Defense. GPS was originally intended for military use;... -
Page 6: What's On The Sonar Display
FF595_Man_531385-1_A_PrfE.qxd 12/9/2004 What’s On the Sonar Display The FishFinder can display a variety of useful information about the area under and adjacent to Depth - water depth; can be set to alarm when the water becomes too shallow. Cursor - available in Freeze Frame and can be positioned in the Sonar View to provide depth of a sonar return and bottom depth below the cursor. -
Page 7: Views
FF595_Man_531385-1_A_PrfE.qxd 12/9/2004 Views The views available on your FishFinder are: Sonar views: • Sonar View • Sonar Zoom View • Big Digits View Sonar View is the default view. When the VIEW key is pressed, the display cycles through the available views. -
Page 8: Understanding Sonar History
FF595_Man_531385-1_A_PrfE.qxd 12/9/2004 Understanding Sonar History It is important to understand the significance of the FishFinder display. The display does NOT show a literal 3-dimensional representation of what is under the water. Each vertical band of data received by the control head and plotted on the display represents something that was detected by a sonar return at a particular time. -
Page 9: Sonar Zoom View
FF595_Man_531385-1_A_PrfE.qxd 12/9/2004 Sonar Zoom View Sonar Zoom View increases the displayed resolution to separate sonar returns that are very close together, such as those caused by fish suspended close to the bottom or within structure. In Zoom View, the display is split to show a narrow slice of the full range view on the right and the zoomed view on the left. -
Page 10: Bird's Eye View
FF595_Man_531385-1_A_PrfE.qxd 12/9/2004 Bird’s Eye View Bird's Eye View shows a 3D perspective view of the track and the chart land contour from a point above and behind the boat (the eye point). As the boat turns, the eye point moves to follow the boat. -
Page 11: Combo View
FF595_Man_531385-1_A_PrfE.qxd 12/9/2004 Combo View Combo View is displayed as a split screen, with Chart View on the left and Sonar View on the right side of the screen. The width of the sonar window can be changed. Combo View Depth Track (Breadcrumb Trail) -
Page 12: Introduction To Navigation
FF595_Man_531385-1_A_PrfE.qxd 12/9/2004 Nearest Current Station: Current information for the nearest current station to your present position will be displayed. This includes the position of the station and the current changes for today. Two graphs are also presented that show the time, direction and flow speed of the current changes for the 24 hour time period of today’s date. -
Page 13: Navigate To A Waypoint Or Position
FF595_Man_531385-1_A_PrfE.qxd 12/9/2004 letters are available, as well as digits 0-9 and some punctuation characters. In the Waypoint Icon field, use the UP and DOWN Cursor keys to change the icon used to represent the waypoint on the Combo and Chart Views. You can exit these fields with the LEFT and RIGHT Cursor keys or by pressing the EXIT key. -
Page 14: Save, Edit Or Delete A Route
FF595_Man_531385-1_A_PrfE.qxd 12/9/2004 Add or Remove a Trolling Grid: From the Waypoints submenu, select Grid and press the RIGHT Cursor key to display a list of waypoints. Select the waypoint to which you want to add the grid. The trolling grid will appear on all of the navigation views, and can be used as a guide when trolling around a waypoint. -
Page 15: Edit, Delete Or Hide Saved Tracks
FF595_Man_531385-1_A_PrfE.qxd 12/9/2004 Edit, Delete or Hide Saved Tracks Display the Tracks Submenu: From any view, press the MENU key twice to display the Main Menu System, then use the RIGHT Cursor key to select the Navigation tab. Select Tracks and press the RIGHT Cursor key to display the Tracks submenu. -
Page 16: 4-Way Cursor Control Key
FF595_Man_531385-1_A_PrfE.qxd 12/9/2004 4-WAY Cursor Control Key The 4-WAY Cursor Control Key has multiple functions, depending on the situation: Freeze Frame - Pressing any arrow on the 4-WAY Cursor Control key will freeze the display in the Sonar View and a cursor and cursor dialog box will be displayed. The cursor can be positioned on the Sonar View using the 4-WAY Cursor Control key. -
Page 17: Powering Up The Unit
FF595_Man_531385-1_A_PrfE.qxd 12/9/2004 Powering Up the Unit Turn on your FishFinder by pressing the POWER key. The Title screen is displayed until the FishFinder begins operation. Your FishFinder will begin Normal or Simulator operation, depending on the presence or absence of a transducer. -
Page 18: Start-Up Options Menu
FF595_Man_531385-1_A_PrfE.qxd 12/9/2004 Start-Up Options Menu Press the MENU key when the Title screen is displayed to access the Start-Up Options menu. Use the UP or DOWN 4-WAY Cursor keys to position the cursor, then the RIGHT Cursor key to select one of the following choices. -
Page 19: Sonar X-Press™ Menu (Sonar Views Only)
FF595_Man_531385-1_A_PrfE.qxd 12/9/2004 GPS Diagnostic View shows a sky chart and numerical data from the GPS receiver. The sky chart shows the location of each visible GPS satellite with its satellite number and a signal strength bar. A dark grey bar indicates that the satellite is being used to determine your current position. A light gray bar indicates that the satellite is being monitored, but is not yet being used. -
Page 20: Upper Range
FF595_Man_531385-1_A_PrfE.qxd 12/9/2004 Sensitivity Sensitivity controls how much detail is shown on the display. Increasing the sensitivity shows more sonar returns from small baitfish and suspended debris in the water; however, the display may become too cluttered. When operating in very clear water or greater depths, increased sensitivity shows weaker returns that may be of interest. -
Page 21: Lower Range
FF595_Man_531385-1_A_PrfE.qxd 12/9/2004 Lower Range Lower Range sets the deepest depth range that will be displayed. Automatic is the default setting. When in automatic mode, the lower range will be adjusted by the unit to follow the bottom. Selecting a specific setting locks the depth range into Manual mode. Use both Upper and Lower Range together to view a specific depth range manually when looking for fish or bottom structure. -
Page 22: Navigation X-Press™ Menu (Navigation Views Only)
FF595_Man_531385-1_A_PrfE.qxd 12/9/2004 Navigation X-Press™ Menu (Navigation Views Only) The Navigation X-Press™ Menu provides access to the settings most frequently used. Press the MENU key once while in the Bird's Eye View, the Chart or the Combo View to access the Navigation X-Press™... -
Page 23: Skip Next Waypoint (Only When Navigating)
FF595_Man_531385-1_A_PrfE.qxd 12/9/2004 Skip Next Waypoint (Only When Navigating) Skip Next Waypoint removes the next waypoint from the current route. This menu choice will only appear when you are currently navigating a route. To Skip Next Waypoint: 1. Highlight Skip Next Waypoint on the Navigation X-Press™ Menu. 2. -
Page 24: Sonar Menu Tab
FF595_Man_531385-1_A_PrfE.qxd 12/9/2004 Sonar Menu Tab Press the MENU key twice to access the Main Menu System and then press the RIGHT Cursor key to select the Sonar tab. NOTE: Menu choices will vary depending on system settings such as whether the unit is set for Advanced User mode or what transducer is currently selected. - Page 25 FF595_Man_531385-1_A_PrfE.qxd 12/9/2004 Fish Sensitivity Fish Sensitivity adjusts the threshold of the Fish ID+™ detection algorithms. Selecting a higher setting allows weaker returns to be displayed as fish. This is useful for identifying smaller fish species or baitfish. Selecting a lower setting displays fewer fish from weak sonar returns.
- Page 26 FF595_Man_531385-1_A_PrfE.qxd 12/9/2004 Surface Clutter (Advanced) Surface Clutter adjusts the filter that removes surface clutter noise caused by algae and aeration. The lower the setting, the less surface clutter will be displayed. The Surface Clutter menu choice is available when User Mode is set to Advanced (see Setup Menu Tab: User Mode). To change the Surface Clutter setting: 1.
-
Page 27: Navigation Menu Tab
FF595_Man_531385-1_A_PrfE.qxd 12/9/2004 Navigation Menu Tab Press the MENU key twice to access the Main Menu System, then press the RIGHT cursor key to select the Navigation tab. NOTE: Menu choices will vary depending on system settings. Navigation Menu 2:41 PM Page 52 Tracks Submenu The Tracks Submenu contains the following menu choices:... -
Page 28: Routes
FF595_Man_531385-1_A_PrfE.qxd 12/9/2004 Routes allows you to view the Routes submenu. Routes To view the Routes Submenu: 1. Highlight Routes on the Navigation main menu. 2. Use the RIGHT 4-WAY Cursor Control keys to view the Routes Submenu Routes submenu. The Routes Submenu contains the following menu choices: Create allows you to create a new, empty route and add waypoints to it immediately. -
Page 29: Lat/Lon Grid
FF595_Man_531385-1_A_PrfE.qxd 12/9/2004 Lat/Lon Grid Lat/Lon Grid allows you to display or hide a grid showing latitude and longitude lines. To change the Lat/Lon Grid setting: 1. Highlight Lat/Lon Grid on the Navigation main menu. 2. Use the LEFT or RIGHT 4-WAY Cursor Control keys to change the Lat/Lon Grid setting. (Hidden, Visible, Default = Hidden) Spot Soundings Spot Soundings allows you to display or hide spot soundings,... -
Page 30: Map Datum (Advanced)
FF595_Man_531385-1_A_PrfE.qxd 12/9/2004 Map Datum (Advanced) Map Datum allows you to change the map coordinate system used by the FishFinder to match those of a paper map. To change the Map Datum setting: 1. Make sure you are in Advanced User Mode, then highlight Map Datum on the Navigation main menu. -
Page 31: Alarms Menu Tab
FF595_Man_531385-1_A_PrfE.qxd 12/9/2004 Alarms Menu Tab From any view, press the MENU key twice to access the Main Menu System. The Alarms tab will be the default selection. NOTE: When an alarm is triggered, you can silence it by pressing any key. The alarm will be silenced, and will not be triggered again until a new instance of the alarm condition is detected. -
Page 32: Temp Alarm
FF595_Man_531385-1_A_PrfE.qxd 12/9/2004 Temp Alarm Temp Alarm sounds when the water temperature detected by the FishFinder reaches the Temp Alarm setting, which is either set in degrees Fahrenheit or Celsius [International Models Only]. For example, if the Temp Alarm is set to 58 degrees Fahrenheit, and the water temperature falls from 60 degrees to 58 degrees, the Temp Alarm will sound. -
Page 33: Alarm Tone
FF595_Man_531385-1_A_PrfE.qxd 12/9/2004 Alarm Tone Alarm Tone selects the pitch of the alarm sound. A brief tone will be produced as you adjust the Alarm Tone so that you can select the tone that you can hear best. To change the Alarm Tone setting: 1. -
Page 34: Units - Depth
FF595_Man_531385-1_A_PrfE.qxd 12/9/2004 Units - Depth Units - Depth selects the units of measure for all depth-related readouts. To change the Units - Depth setting: 1. Highlight Units - Depth on the Setup menu. 2. Use the LEFT or RIGHT 4-WAY Cursor Control keys to change the Units - Depth setting. (Meters [International Models Only], Feet, Fathoms;... -
Page 35: Triplog Reset
FF595_Man_531385-1_A_PrfE.qxd 12/9/2004 Triplog Reset Triplog Reset resets the Triplog to zero. The Triplog provides the following information: timer for elapsed time, distance traveled since last reset, and average speed. NOTE: See Setup Menu Tab: Select Readouts (Advanced) to find out how to display Triplog information on the screen. -
Page 36: Depth Offset (Advanced)
FF595_Man_531385-1_A_PrfE.qxd 12/9/2004 Depth Offset (Advanced) Depth Offset will adjust the digital depth readout to indicate depth from the waterline or boats keel. Enter a positive vertical measurement from the transducer to the waterline to read the depth from the waterline. Enter a negative vertical measurement from the transducer to keel to read the depth from the keel. -
Page 37: Time Format (Advanced, International Only)
FF595_Man_531385-1_A_PrfE.qxd 12/9/2004 Time Format (Advanced, International Only) Time Format changes the time format used by the unit This menu choice is available only when in Advanced User Mode (see Setup Menu Tab: User Mode.) International Models Only. Time Format selects a 12 hour or 24 hour format for the time of day displayed when Time + Date is selected as a Digital Readout on the Sonar View (see Select Readouts). -
Page 38: Chart View
Page 74 Troubleshooting Before contacting the Humminbird® Customer Resource Center, please read the following section. Taking the time to review these troubleshooting guidelines may allow you to solve a performance problem yourself, and therefore avoid sending your unit back for repair. -
Page 39: Display Problems
FF595_Man_531385-1_A_PrfE.qxd 12/9/2004 Display Problems There are several main conditions or sources of possible interference that may cause problems with the quality of the information displayed on the control head. Look in the following table for some symptoms of display problems and possible solutions: Problem Possible Cause The control head loses power at... -
Page 40: Humminbird® Fishfinder Accessories
NMEA* GPS-compatible device that you may already own to your FishFinder. *NMEA 0183 is a National Marine Electronics Association standard for data communication. Be sure to check out our website www.humminbird.com for additional new and exciting accessories to grow your FishFinder! NOTE: Each accessory requires a separate purchase. -
Page 41: Contact Humminbird
FF595_Man_531385-1_A_PrfE.qxd 12/9/2004 2:41 PM Page 80 Contact Humminbird® Contact the Humminbird® Customer Resource Center in any of the following ways: By Telephone (Monday - Friday 8:00 a.m. to 4:30 p.m. Central Standard Time): 1-800-633-1468 By e-mail (typically we respond to your e-mail within three business days): custserv@johnsonoutdoors.com...
Need help?
Do you have a question about the 595C and is the answer not in the manual?
Questions and answers