SMART Slate WS200 User Manual
Smart slate ws200 interactive whiteboard user guide
Hide thumbs
Also See for Slate WS200:
- User manual (26 pages) ,
- Troubleshooting tips (6 pages) ,
- Quick connect tips (4 pages)
Table of Contents
Advertisement
Advertisement
Table of Contents
Troubleshooting

Related Manuals for SMART Slate WS200


Summary of Contents for SMART Slate WS200
- Page 1 SMART Slate WS200 User Guide...
- Page 2 ULC in the US and/or other countries. The Bluetooth word mark is owned by the Bluetooth SIG, Inc. and any use of such marks by SMART Technologies ULC is under licence. All other third-party product and company names may be trade-marks of their respective owners.
-
Page 3: Important Information
– Do not use the SMART Slate WS200 in a facility control system or any other environment that requires extremely high reliability, or where the use of a wireless device can cause interference; the slate can interfere with or cause other electronic devices to malfunction, or other wireless devices can interfere with or cause the slate to malfunction. - Page 4 IM P O RT A NT I NF O R M A TI O N...
-
Page 5: Table Of Contents
Creating a Wireless Connection with Your Computer ......9 Installing SMART Product Drivers............10 Installing a Paper Underlay ..............10 Connecting Your SMART Slate With Built-In or Third-Party Wireless Adapters ....................12 Using Your Slate ....................13 About the Workspace ................... 13 Turning On and Connecting the Slate ............ - Page 6 CON T EN TS Locking Up Your Slate ................17 Customizing Your Slate..................19 The SMART Notebook Control Panel............19 Changing the Functions of the Slate and Pen Buttons ......20 Customizing the Pen and the Eraser............21 Changing the Tip Feel ................21 Changing the Icon Strip................
- Page 7 CO N T EN TS Dispatch and Repair Status ................35 General Inquiries ..................36 Warranty ....................... 36 Registration....................36...
- Page 8 CON T EN TS...
-
Page 9: Overview
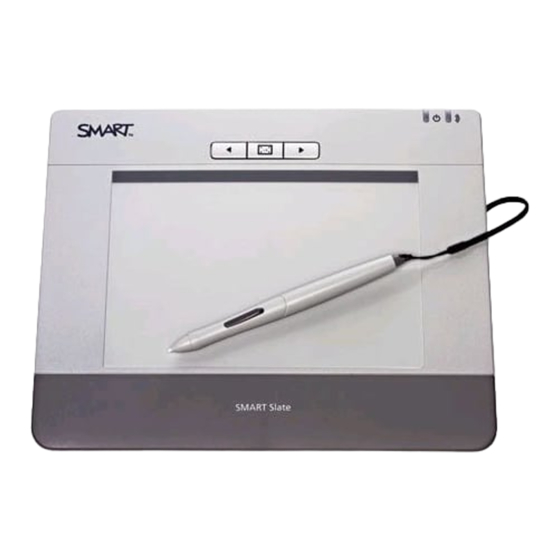
Overview About Your SMART Slate WS200 The SMART Slate connects wirelessly to your computer and a SMART Board™ interactive whiteboard, allowing you to write notes, use programs and perform normal computer operations from a distance of up to 10 m (32'). -
Page 10: Tethered Pen
CH A P T E R 1 – OV ERV IEW USB Charging Cable Receptacle Connect Button Pen Storage Compartment USB Wireless Adapter Pen Tether Slot Storage Compartment Battery Compartment Tethered Pen Eraser The pen controls the pointer on your display. Tether Move the pen above the workspace of the slate to move the pointer. -
Page 11: Usb Wireless Adapter
CH A P T E R 1 – OV ERV IEW USB Wireless Adapter You can order your slate with the USB wireless Installation CD adapter and installation CD. The USB adapter uses Bluetooth® technology to create a wireless USB Wireless connection between your slate and your Adapter computer. - Page 12 CH A P T E R 1 – OV ERV IEW...
-
Page 13: Setting Up Your Smart Slate
Installing the USB wireless adapter (page 8) • Creating a wireless connection to your computer (page 9) • Installing SMART Product Drivers on your computer (page 10) • Installing a paper underlay (page 10) • Connecting your slate using built-in or third-party wireless adapters (page 12) -
Page 14: Attaching The Pen Tether
CH A P T E R 2 – S ET T I NG U P Y O U R S MA R T S L A T E Attaching the Pen Tether The tether connects the pen to the slate so that you don’t misplace the pen. To attach the tether to 1. -
Page 15: Removing The Battery-Insulating Film
CH A P T E R 2 – S ET T I NG U P Y O U R S MA R T S L A T E Removing the Battery-Insulating Film Your slate comes with a lithium ion battery installed. There is a small sheet of insulating film in the battery compartment that prevents battery power discharge. -
Page 16: Charging Your Slate
24 hours of continuous use. WARNING If the SMART Slate WS200 becomes excessively warm or emits an unusual smell whilst the battery is charging, immediately disconnect the charging cable from the slate and turn off the slate. -
Page 17: Creating A Wireless Connection With Your Computer
4. Press New Connection. The Add New Connection Wizard appears. 5. Select the Express Mode check box and then click Next. 6. Click SMART Slate WS200 in the list of devices, click Next and then complete the steps in the connection wizard. NOTE If a dialogue box appears asking you to enter a pass key, type 0000 in the pass key box and then click Next. -
Page 18: Installing Smart Product Drivers
Your SMART Slate WS200 comes with a SMART Product Drivers CD. SMART Product Drivers enable your computer to connect to the slate. To install SMART Insert the SMART Product Drivers CD into your computer’s CD drive and then follow Product Drivers the on-screen instructions. - Page 19 Control Panel. 2. Press SMART Hardware Settings and if you have more than one SMART product connected, press SMART Slate. 3. Select Set Up Underlay and Icon Strip from the first drop-down list.
-
Page 20: Connecting Your Smart Slate With Built-In Or Third-Party Wireless Adapters
CH A P T E R 2 – S ET T I NG U P Y O U R S MA R T S L A T E Connecting Your SMART Slate With Built-In or Third-Party Wireless Adapters If you are unable to order a SMART USB wireless adapter, you can use your computer’s built-in Bluetooth adapter or buy a third-party USB wireless adapter. IMPORTANT Ensure that your wireless Adapter has Bluetooth wireless technology version 2.1... -
Page 21: Using Your Slate
Chapter 3 Using Your Slate This chapter describes the following topics for using your slate: • Turning on and connecting the slate (page 14) • Using the pen (page 14) • Using the slate buttons (page 15) • Using the tools on the icon strip (page 16) •... -
Page 22: Turning On And Connecting The Slate
IMPORTANT Do not press the Connect button on the back of your SMART Slate if you have already created a wireless connection. If you do, delete the SMART Slate WS200 connection in the Bluetooth Settings window and then create a new connection (see page 30). -
Page 23: Using The Slate Buttons
Press the lower rocker switch as you touch and slide the pen on the workspace. If the application that you are writing on is not Ink Aware (not integrated with SMART Notebook software), anything that you write or draw appears on a transparent layer over the current application. -
Page 24: Using The Tools On The Icon Strip
SMART Slate in the list of devices. The battery charge status appears in the upper right-hand corner. Locking Your Slate You can lock the SMART Slate and stop it from interacting with your computer and display. To lock the slate Press the SMART Board icon in your computer’s notification area and then select... -
Page 25: Storing The Pen
SMART Slates Locked window. Press the SMART Board icon in your computer’s notification area and then select Other SMART Tools > Unlock SMART Slates. Storing the Pen You can store the pen in the storage compartment when you are not using it. - Page 26 18 | CH A P T E R 3 – U SIN G Y O UR SL AT E...
-
Page 27: Customizing Your Slate
Changing mouse and gesture settings (page 27) The SMART Notebook Control Panel You can customize many of your slate’s features from the SMART Notebook control panel. You can change the functions of buttons, change digital ink styles, create a custom icon strip on a paper underlay and change other features. -
Page 28: Changing The Functions Of The Slate And Pen Buttons
To change the functions of 1. In the SMART Notebook control panel, use the drop-down lists to select a function the slate and for the button that you want to change. You can select the following options for the... -
Page 29: Customizing The Pen And The Eraser
You can increase or decrease the pen’s touch sensitivity with the Tip Feel slider. To change the pen tip feel In the SMART Notebook control panel, move the Tip Feel slider to change the tip feel and then press OK to save your changes. -
Page 30: Changing The Icon Strip
You can add tools or links to the icon strip on the underlay, change the order icons and remove them. To add a tool to 1. In the SMART Notebook control panel, select Set Up Underlay and Icon Strip the icon strip from the first drop-down list. - Page 31 CH A P T E R 4 – C U S TO M I Z I N G Y O U R S L A T E Tool Function Start/Stop Senteo Quiz Starts or stops a SMART Response (formerly Senteo) quiz. You can add these tools from the General tab:...
- Page 32 CH A P T E R 4 – C U S TO M I Z I N G Y O U R S L A T E To remove a tool from 1. In the SMART Notebook control panel, select Set Up Underlay and Icon Strip the icon strip from the first drop-down list.
-
Page 33: Customizing The Appearance Of The Paper Underlay
Customizing the Appearance of the Paper Underlay You can customize the appearance and layout of the underlay. To add lines to the 1. In the SMART Notebook control panel, select Set Up Underlay and Icon Strip underlay background from the first drop-down list. -
Page 34: Changing How The Slate Maps To Your Display
CH A P T E R 4 – C U S TO M I Z I N G Y O U R S L A T E To insert an image onto 1. In the SMART Notebook control panel, select Set Up Underlay and Icon Strip the underlay from the first drop-down list. -
Page 35: Changing Mouse And Gesture Settings
You can change the mouse and gesture settings for your slate. To change the mouse and 1. In the SMART Notebook control panel, select Mouse and Gesture Settings from gesture settings for the first drop-down list. You can change the following settings:... -
Page 37: Troubleshooting
Troubleshooting pen issues (page 32) Determining Whether Your Slate Is Connected to Your Computer If your computer is not responding to your SMART Slate, check whether your slate is connected to the computer. To determine whether Double-press the Bluetooth icon in your computer’s notification area. -
Page 38: Re-Establishing The Wireless Connection
Your computer does not detect the USB wireless adapter and your slate is not connected to your computer. If your slate is connected to the computer, the SMART Slate appears in the list of devices in the SMART Notebook control panel. -
Page 39: Understanding Your Slate's Led States
31 | CH A P T E R 5 – T R O U B L E S H O O T I N G The Add New Connection Wizard appears. 6. Select the Express Mode check box, press Next and then complete the steps in the wizard. -
Page 40: Troubleshooting Pen Issues
If you encounter issues using the pen, refer to the following table: Symptom Solution You are unable to use the pen Soften the pen’s tip feel. In the SMART Notebook to select or write on the control panel, select SMART Hardware Settings interactive pen display. -
Page 41: Hardware Environmental Compliance
Appendix A Hardware Environmental Compliance SMART Technologies supports global efforts to ensure that electronic equipment is manufactured, sold and disposed of in a safe and environmentally friendly manner. Waste Electrical and Electronic Equipment Regulations (WEEE Directive) Waste Electrical and Electronic Equipment regulations apply to all electrical and electronic equipment sold within the European Union. -
Page 42: Batteries
SMART Technologies products fall under this classification and meet the requirements for China’s EIP regulations. US Consumer Product Safety Improvement Act The United States has enacted the Consumer Product Safety Improvement Act which limits the lead (Pb) content in products. SMART Technologies is committed to complying with this initiative. -
Page 43: Customer Support
Technical Support If you experience difficulty with your SMART product, please contact your local reseller before contacting SMART Technical Support. Your local reseller can resolve most issues without delay. NOTE To locate your local reseller, visit www2.smarttech.com/st/en-US/Where+to+Buy. -
Page 44: General Inquiries
+1 403 228 2500 Email info@smarttech.com Warranty Product warranty is governed by the terms and conditions of SMART’s “Limited Equipment Warranty” that was dispatched with the SMART product at the time of purchase. Registration To help us serve you, register online at www.smarttech.com/registration. - Page 46 Freephone 1 866 518 6791 (US/Canada) or +1 403 228 5940 www.smarttech.com...
Need help?
Do you have a question about the Slate WS200 and is the answer not in the manual?
Questions and answers