Table of Contents
Advertisement
Quick Links
Advertisement
Table of Contents

Related Manuals for EVS GX


![Server EVS XT[2] Technical Reference Hardware Manual](https://static-data2.manualslib.com/product-images/0f2/946555/60x60/evs-xt-2-server.jpg)


Summary of Contents for EVS GX
- Page 1 USER MANUAL Version 1.10...
- Page 2 ...
- Page 3 The address and phone number of the EVS headquarters can be found by clicking the icon in the user interface. You will find the full list of addresses and phone numbers of local offices on the EVS website on the following page: http://www.evs.tv/contacts...
- Page 4 Issue GX server – Version 1.10 – User Manual 1.10.D EVS Broadcast Equipment – September 2012...
-
Page 5: Table Of Contents
Typical Configurations ......................16 GX W .................... 18 NTERFACE Chapter Overview ..................... 18 Server Configuration and Start .................. 19 4.2.1 Accessing the GX Server from a Remote PC ..............19 4.2.2 Server Control Window ......................19 4.2.3 Server Settings ........................20 4.2.4 Server Status Information .....................21 4.2.5... - Page 6 Edit GX Clip Window ......................48 5.5.2 Editing GX Clips Parameters ....................49 5.5.3 General Principles about TC Fields on the GX Server ............52 5.5.4 General Settings in the Edit GX Clips Window..............53 5.5.5 Video Settings in the Edit GX Clips Window ................55 5.5.6...
-
Page 7: What's New
EVS Broadcast Equipment – September 2012 What's New? The changes linked to new features on GX Server version 1.10 are listed in the table below, and are identified in the user manual by the 'New' logo in the margin Updates for GX Server - Version 1.10 Section 2.3.1... -
Page 9: Introduction
1.1.2 General Architecture and Workflow Schema The following schema provides an overview on the system architecture and general workflow for the import of original files, the creation and the playout of GX clips on the GX server. The schema is described below. Original Files... - Page 10 EVS Broadcast Equipment – September 2012 Description When the GX server is switched on, the users can control the GX server from a remote PC via a web-based application using a local network connection. 1. Users configure the server parameters from the web interface on the client PC.
-
Page 11: Gx Server Overview
GX server – Version 1.10 – User Manual Issue 1.10.D EVS Broadcast Equipment – September 2012 GX Server Overview Chapter Overview What about… ? Section Page Hardware Specifications 2.2.1 Page 4 Chassis 2.2.2 Page 4 Front Panel 2.2.3 Page 6 Rear Panel 2.2.4... -
Page 12: Hardware Components
GX server – Version 1.10 – User Manual 1.10.D EVS Broadcast Equipment – September 2012 Hardware Components 2.2.1 Hardware Specifications The following table gives an overview on the hardware specifications of the GX server: Component Specification Core i7 3 GB... - Page 13 GX server – Version 1.10 – User Manual Issue 1.10.D EVS Broadcast Equipment – September 2012...
-
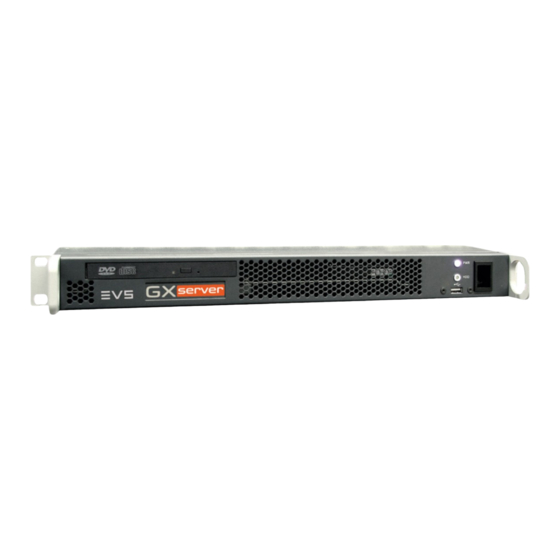
Page 14: Front Panel
Issue GX server – Version 1.10 – User Manual 1.10.D EVS Broadcast Equipment – September 2012 2.2.3 Front Panel The front panel features the elements displayed in the picture, and specified in the table below: Description DVD Player Power indicator... -
Page 15: Rear Panel
GX server – Version 1.10 – User Manual Issue 1.10.D EVS Broadcast Equipment – September 2012 2.2.4 Rear Panel The rear panel features the elements displayed in the picture, and specified in the table below: Description Description Power supplies Gigabit Ethernet connectors... -
Page 16: Safety, Compliance, And Operating Conditions
Issue GX server – Version 1.10 – User Manual 1.10.D EVS Broadcast Equipment – September 2012 2.2.5 Safety, Compliance, and Operating Conditions CE Marking The CE marking is affixed to indicate compliance with the following directives: • 89/336//EEC of 3 May 1989 on the approximation of the laws of the Members States to electromagnetic compatibility. -
Page 17: Environmental Conditions
GX server – Version 1.10 – User Manual Issue 1.10.D EVS Broadcast Equipment – September 2012 Environmental Conditions Temperature: 0°C to + 50°C (32°F to 104°F) ambient with free air flow Relative humidity: 0% to 90% (non-condensing) Cooling requirements: Forced air cooling air flow from front to back Handling/movement: Designed for fixed use when in operation Storage and transportation temperature: 0°C to +70°C (32°F to 158°F) -
Page 18: Server Main Specifications
The supported input audio files are stereo WAV files of 16-bit depth, 48 KHz, including from 2 to 16 channels. 2.3.2 GX Clips The GX clips are created in the database. The A/V material is stored onto the GX Clips drive (SSD): •... -
Page 19: Supported Video Standards
GX server – Version 1.10 – User Manual Issue 1.10.D EVS Broadcast Equipment – September 2012 2.3.3 Supported Video Standards The fill & key GX clips must have been prepared in one of the video standards described in the table below: Common GX server Frame rate... -
Page 20: Client Control Pc
EVS Broadcast Equipment – September 2012 Client Control PC The GX web interface is running on Microsoft Silverlight on the client PC. If the Silverlight framework is not installed on the client PC, users are requested to install it when they launch the GX web interface for the first time. -
Page 21: Gx Server Setup
Cabling The GX server has to be cabled as shown on the schema below to allow: • Users to import video sequences and audio files and to create the GX clips on the server from the client PC. • Operators to control the playout via the switcher. - Page 22 Connect the external controller to the RS422 port on the GX server. Connect one or both of the GigE ports of the GX server to the local area network. This will allow users to connect remotely to the GX server via the GX web interface.
-
Page 23: Installation
The EVS staff will perform the initial installation of the GX server before the server is delivered. When the server is installed, a ghost image of the installed GX server is created in the Restore folder (R: drive). If you need to restore the ghost, please contact EVS support. -
Page 24: Constraints
The XT Network Discovery Port parameter, in the Server Control window, specifies which of both GigE ports is used to discover the EVS servers. The GigE port of the GX server used for discovery must be on the same subnet as the PC LAN IP addresses of the EVS servers. - Page 25 In the third configuration, both GigE ports are used, and the PC LAN and GigE IP address of the EVS servers are on different subnets: • Port 1 of the GX server is used for the remote connection to the GX server and for the server discovery through the PC LAN of the EVS servers. •...
-
Page 26: Gx Web Interface
A dedicated web application, called the 'GX web application', makes it possible to create and prepare the GX clips from a remote PC. Then you can upload the GX clips on the GX server, and eventually start the GX server. -
Page 27: Server Configuration And Start
4.2.1 Accessing the GX Server from a Remote You can access the GX server by typing the server host name or IP address in a web browser on a remote PC whose GigE connection is set up to communicate with the GX server. -
Page 28: Server Settings
GX server – Version 1.10 – User Manual 1.10.D EVS Broadcast Equipment – September 2012 4.2.3 Server Settings The following settings for the GX server can be defined in the Settings area of the Server Control window: Setting Description XT Network... -
Page 29: Server Status Information
This field will not be displayed when a protocol other than the VDCP protocol is selected in the Protocol field. Genlock Phase Phase of the genlock input on the GX server video board. Enable OSD Tick the check box to activate the OSD (status screen) on the SDI output of the GX server. - Page 30 Protocol the GX server is currently set to work with. Output format Currently selected video standard. When the GX server is started, only GX clips created in the selected video standard will be visible to the protocol clients. The value corresponds to the one selected in the Video Standard field in the Settings area.
-
Page 31: Starting The Gx Server
To stop the GX server, click on I. The icon changes from Principles About Starting the Server Once the GX server is switched on, users can connect to and work on the server via the web interface. The following principles apply with a GX server: •... -
Page 32: Overview Of Main Window
Issue GX server – Version 1.10 – User Manual 1.10.D EVS Broadcast Equipment – September 2012 Overview of Main Window 4.3.1 Introduction The main window in the user interface contains two main areas briefly described below: Zone Name See also…... -
Page 33: Import Area
Importing the sequences either only to the Raw Materials drive (HDD drive), or to the Raw Materials drive and to the GX Clips drive (SSD drive) In this area, you actually tag the media and create an entry for it in the GX server database. -
Page 34: Manage Area
Raw Materials drive from the Raw Materials tab. • the GX clips from the GX Clips tab. The GX clips can be offline (only defined in the GX server database) or online (defined in the database and uploaded onto the GX Clips drive). Raw Materials Tab The Raw Materials tab provides a list of the video sequences and audio files available on the Raw Materials drive. - Page 35 (delete the related raw material). GX Clips Tab The GX Clips tab provides a list of the GX clips defined in the GX Server database and also uploaded on the GX Clips drive. From there, you can manage the GX Clips.
-
Page 36: Server Control Button
4.3.5 Rules for Row Selection The following rules apply for the selection of rows corresponding to source files or clips (in the Import area), raw materials (in the Raw Materials tab) or GX clips (in the GX Clips tab): •... -
Page 37: Operation
1.10.D EVS Broadcast Equipment – September 2012 Operation Chapter Overview This chapter explains how you import the raw material onto the GX server, and prepare the GX clips for playout. It contains the following sections: What about… ? Section Page Tree Structure 5.2.1... -
Page 38: Section Page
Issue GX server – Version 1.10 – User Manual 1.10.D EVS Broadcast Equipment – September 2012 How to… ? Section Page How to Connect and Disconnect a Network Drive 5.2.3 Page 32 How to Import Files on the GX Server 5.3.3... -
Page 39: Managing Drives And Folders
Import area. 5.2.2 Automatic or Manual Display The removable drives connected to the GX server (USB, eSata) and the DVD drive are automatically displayed in the tree structure. The drive letter assigned and the drive name are displayed. -
Page 40: How To Connect And Disconnect A Network Drive
5.2.3 How to Connect and Disconnect a Network Drive To map a network drive onto the GX server, proceed as follows: 1. Click the + symbol at the top of the tree structure. A list opens. Note If you want to close the list without taking any action, click the + symbol again. -
Page 41: How To Connect And Disconnect An Evs Server
2. Click the Add XT server item. The Connect to XT window opens. 3. Type the PC LAN IP address of the EVS server to be mapped in the XT IP Address (PC LAN) field. 4. The User and Password fields are correctly pre-filled to connect to an EVS server version 11.0 or later. -
Page 42: Address Range
2. Click the Discover XT server item. The Discover XT window opens. On the left side, a list of EVS servers found on the network is populated. On the right side, the list containing the EVS servers to be mapped is empty. -
Page 43: Selecting And Importing Source Materials
1.10.D EVS Broadcast Equipment – September 2012 How to Disconnect an EVS Server To disconnect an EVS server, select it in the tree structure, click the – symbol at the top, and confirm the disconnection. Selecting and Importing Source Materials Once the drives containing the source files are available in the tree structure, you can easily select the requested sources files and import them. - Page 44 Issue GX server – Version 1.10 – User Manual 1.10.D EVS Broadcast Equipment – September 2012 Field Name Description Values Size Size the file or file sequence The value is expressed in MB or GB. takes up on the drive.
- Page 45 GX server – Version 1.10 – User Manual Issue 1.10.D EVS Broadcast Equipment – September 2012 Field Name Description Values EVS server. ClipName Name of the clip on the EVS server. TC IN IN point of the clip. The IN point is expressed in HH:MM:SS;ff.
-
Page 46: How To Import Files On The Gx Server
In case of normal import, the source files or clips are only imported to the Raw Materials drive, not to the GX Clips drive. You then need to prepare the GX clip before uploading it to the GX Clips drive. For more... -
Page 47: Display Of Imported Elements On The User Interface
5.4 'Managing GX Clips', on page 43. Direct Online Import In case of a direct online import, the files or clips are directly created as GX clips with predefined settings, and uploaded to the GX Clips drive. -
Page 48: Raw Materials Tab
GX server – Version 1.10 – User Manual 1.10.D EVS Broadcast Equipment – September 2012 been defined in the GX server database, and uploaded onto the GX Clips drive. It is ready for playout. 5.3.6 Raw Materials Tab The Raw Materials tab shows the audio and video material available on the Raw Materials drive. -
Page 49: Deleting A Material From The Raw Materials Drive
GX server – Version 1.10 – User Manual Issue 1.10.D EVS Broadcast Equipment – September 2012 Field Name Description Values Size Size of the audio or video file The value is expressed in MB or GB. on the Raw Materials drive. - Page 50 If the GX clip is offline, it is automatically deleted. • If the GX clip is online, it remains available as long as it is online but will be deleted as soon as it will be taken offline. Deleting Audio Raw Material Only...
-
Page 51: Managing Gx Clips
GX server database. As a consequence, a new row is added on the GX Clips tab for this video source, to allow users to associate an audio file to the video and define playout parameters for the GX clip. - Page 52 Size of the GX clip on the GX The value is expressed in MB or GB. Clips drive. When the GX clip is not uploaded onto the GX Clips drive, the value is 0 MB. Online Progress bar to show the The progress bar displays:...
-
Page 53: Switching Gx Clips Online Or Offline
Procedure To put a GX clip online or to take it offline, just click its status icon in the Action filed, or proceed as follows: 1. In the GX Clips tab, select the GX clips to be put online/offline. -
Page 54: Deleting Gx Clips
Switching offline a GX clip whose corresponding raw material has been deleted will automatically delete the GX clip. Consequences When a GX clip is put online, the row corresponding to this GX clip on the GX Clips tab will appear as follows: •... - Page 55 Clip drive and from the Raw Materials drive. Its reference will be removed from the database. If the GX clip contains an audio element, the audio raw material is only deleted if it is not associated with another GX clip.
-
Page 56: Preparing Gx Clips For Playout
You access the Edit GX Clip window by clicking the pen icon , which is highlighted in orange in the screenshot below. The pen icon is located on the GX Clips tab of the Manage area of the GX web interface. -
Page 57: Editing Gx Clips Parameters
Monitor the audio track of a GX clip • Specify the various settings for playing out the GX clip The values you have edited in the Edit GX Clip window are only validated as you press OK to leave the window. Important You can edit GX clip parameters as long as the GX clip is offline (the clip only exists in the database, but has not yet been uploaded on the GX Clip drive). - Page 58 (for both video and audio section, and press ENTER. tracks) By default, the IN point of the GX clip is the first frame of the imported video sequence, and corresponds to the timecode 00:00:00;00. The IN point can never be after the OUT point or the loop point.
- Page 59 GX server – Version 1.10 – User Manual Issue 1.10.D EVS Broadcast Equipment – September 2012 In order to… Do the following… Tick the check box after the Loop field and type the Define a loop on the whole GX clip (from TC IN to video TC number of loops for the GX clip.
-
Page 60: General Principles About Tc Fields On The Gx Server
00:00:00:00. • All frames of a GX clip are played out. In other words, a GX clip that lasts 2 seconds will be played from TC 00:00:00:00 to TC 00:00:01:24 (for 50Hz clips) or TC 00:00:01:29 (for drop-frame 60Hz clips) if the corresponding raw material is played out from start to end. -
Page 61: General Settings In The Edit Gx Clips Window
The GX clip is defined in the database, and uploaded on the GX Clips drive. Id8 Field The Id8 field provides the 8-character ID presented to a client when it obtains a list of GX clips. It is generated by incrementing by 1 the Id8 of the last file imported to the Raw Materials drive. - Page 62 The reference timecode (00:00:00:00) corresponds to the beginning of the corresponding video and audio raw materials. Example If the IN field value is 00:00:00:10, this means both video and audio tracks of the GX clip will start playing 10 frames after the start of the raw material.
-
Page 63: Video Settings In The Edit Gx Clips Window
Example In this example, the video raw material used for the GX clip is 2 seconds. The IN field is 00:00:00:10. The video OUT point defined for the GX clip is on TC 00:00:01:20 of the corresponding raw material. - Page 64 GX clip, defined in the IN field • the end timecode for the video track of the GX clip, defined with the Video OUT point • the loops defined (number of loops and loop length).
-
Page 65: Audio Settings In The Edit Gx Clips Window
The loop will always be performed from that point to the Video OUT field. The GX server will perform a nested loop if the loop point is set to anything other than the IN frame. - Page 66 Example In this example, the audio raw material used for the GX clip is 3 seconds. The IN field is 00:00:00:10. The audio OUT point defined for the GX clip is on TC 00:00:02:10 of the corresponding raw material.
- Page 67 In the following example, a positive delay of 10 milliseconds has been defined. Silence will be added from the GX Clip IN point for the length of the delay. The audio track will then be played normally until the audio track OUT point.
-
Page 68: Clip Preview In The Edit Gx Clip Window
GX Clip OUT 00:00:00:00 00:00:01:24 5.5.7 Clip Preview in the Edit GX Clip Window Video Display The video display makes it possible to preview the fill element, key element or combined fill & key elements, depending on the radio button you select below the video display. - Page 69 The GX clip always starts at 00:00:00:00. Total Duration Shows the protocol duration of the GX clip, this means the duration of the GX clip as it will be displayed to the protocol clients. The duration will depend on the following elements: •...
- Page 70 Note If the GX clip contains a nested loop (the loop point does not start on the TC IN point), the playback marker will move between the IN and OUT points for the first pass. Then, for each nested loop, the marker will just move through the...
-
Page 71: Command Buttons In The Edit Gx Clip Window
• The video raw material is 2 seconds. The audio raw material is 3 seconds • The GX clip starts at TC 00:00:00:10 of the video and audio raw material (IN field = 00:00:00:10). • The GX clip stops at TC 00:00:01:20 of the corresponding video raw material (OUT field = 00:00:01:20). - Page 72 The last frame of the video track can be calculated as follows: 00:00:01:20 + 00:00:00:10*4 (4 loops) – 1f = 00:00:03:04. As an IN field is defined at 00:00:00:10, the last frame of the video track of the GX Clip is 00:00:03:04 – 00:00:00:10 = 00:00:02:24.
-
Page 73: Glossary
Fill clip Clip containing the color portion of the video material. GX Clips drive Solid State Drive (SSD), on the GX server, on which the GX clips are stored and played out. GX clip Fill and key clips (with or without embedded audio), that has been uploaded to the GX Clips drive, and is ready for playout. - Page 74 Belgium www.evs.com/contact EVS Broadcast Equipment is continuously adapting and improving its products in accordance with the ever changing requirements of the Broadcast Industry. The data contained herein is therefore subject to change without prior notice. Companies and product names are To learn more about EVS go to www.evs.com...
Need help?
Do you have a question about the GX and is the answer not in the manual?
Questions and answers