
Related Manuals for Barska Point ‘n View


Summary of Contents for Barska Point ‘n View
- Page 1 Meijer.com Point ‘n View Binocular and Digital Camera Owners Manual w w w . b a r s k a . c o m...
- Page 2 Meijer.com For more information about BARSKA® and our optic products, please visit www.barska.com...
-
Page 3: Table Of Contents
Meijer.com Table Of Contents Features..................Specifications ................Basic Binocular Use ..............Operation of Menu Buttons ............Taking/Deleting Pictures ............Taking/Deleting Video ..............Settings Picture Pixel .............. Image Quality .............. Scenes Effect .............. Expose Values ............White Balance ............. ISO ................Color Mode .............. -
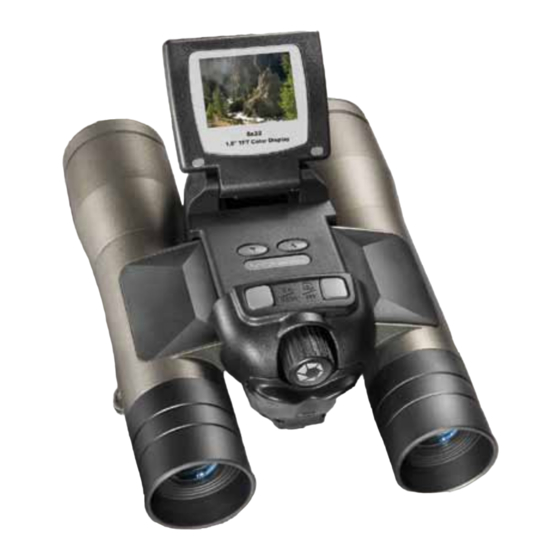
Page 4: Features
Meijer.com Parts of the Binocular *SD Card not included 1. TFT LCD Display 8. Objective Lens 2. Up Button 9. On / Mode Button 3. Down Button 10. Barrel 4. Set Button 11. USB Port 5. Focus Knob 12. SD Slot 6. -
Page 5: Specifications
Meijer.com Product Specifications Camera Specifications 1. Resolutions: 12.0MP 2. Image Size: Still image: 0.3MP---640*480 3.0MP--2048 x 1536 5.0MP--2560 x 1920 8.0MP--3264 x 2448 12.0MP--4032 x 3024 Movie: 30fps@QVGA / 20fps@VGA 3. Image Format: Still image –JPEG Movie—AVI (no time limits) 4. -
Page 6: Basic Binocular Use
Meijer.com Basic Binocular Use 1. If you wear eye glasses, fold down the eyecups and hold the eyepieces up against your glasses. 2. Hold up the binocular to your eyes in the normal viewing position, use both hands to hold each barrel firmly. 3. -
Page 7: Operation Of Menu Buttons
Meijer.com Operation of Menu Buttons 1. Use down arrow key to 1. Use up arrow key to move around menus move around menus 2. Reduces image button 2. Enlarges image button 1. Press once 1. Video mode key - Photograph mode 2. -
Page 8: Taking/Deleting Pictures
Meijer.com Taking a Picture Note: Insert SD card to the unit before taking pictures, or unit will not function. Warning: The unit will be turned off when you insert or extract memory card. Please make sure that the unit is off before removing SD card 1. -
Page 9: Taking/Deleting Video
Meijer.com Taking Video 1. After turning unit on press mode button twice, you will be now be in video mode. To start recording press set button, press set button again when you are finished recording. 2. Press mode button once more, it will be in preview video mode, and will start the video... -
Page 10: Picture Pixel
Meijer.com Picture Pixel Setting Press mode button, select “size”, then press menu options to select the pixel needed, then press set button, press it once more, it will return to taking pictures mode. → Image Quality Setting Press mode button, select “Quality”, then press menu options to select the quality needed, then press set button, press it once more, it will return to taking pictures mode. -
Page 11: Expose Values
Meijer.com Expose Value Setting Press mode button, select “EV”, then press menu options to select the value needed, then press set button, press it once more, it will return to taking pictures mode. → White Balance Setting Press mode button, select “white balance”, then press menu options to select the value needed, then press set button, press it once more, it will return to taking pictures mode. -
Page 12: Iso
Meijer.com ISO Setting Press mode button, select “ISO”, then press menu options to select the value needed, then press set button, press it once more, it will return to taking pictures mode. → Color Mode Setting Press mode button, select “Color”, then press menu options to select the value needed, then press set button, press it once more, it will return to taking pictures mode. -
Page 13: Image Sharpness
Meijer.com Image Sharpness Setting Press mode button, select “sharpness”, then press menu options to select the value needed, then press set button, press it once more, it will return to taking pictures mode. → Preview Function Setting Press mode button, select “Preview”, then press menu options to select on or off, then press set button, press it once more, it will return to taking pictures mode. -
Page 14: Burst
Meijer.com Burst Setting Press mode button, select “Burst”, then press menu options to select on or off, then press set button, press it once more, it will return to taking pictures mode. → Format Setting Press mode button, select “Format”, then press menu options to select cancel or execute, then press set button, press it once more, it will return to taking pictures mode. -
Page 15: Language
Meijer.com Language Setting Press mode button, select “Language”, then press menu options to select the language needed, then press set button, press it once more, it will return to taking pictures mode. → Auto Off Time Setting Press mode button, select “Auto off”, then press menu options to select the time Value, then press set button, press it once more, it will return to taking pictures mode. -
Page 16: Light Frequency
Meijer.com Light Freq Setting Press mode button, select “Light Freq”, then press menu options to select the value needed, then press set button, press it once more, it will return to taking pictures mode. → Date Setting Press mode button, select “Date input”, then press menu options to select off or set, then press set button, press it once more, it will return to taking pictures mode. -
Page 17: Installing Cd
Meijer.com Installation Before using the PC Cam, please make sure to install the CD driver to the PC 1. Put the CD into the PC CD-ROM, PC will read the CD automatically. 2. Then you will find this image on the computer screen, please select “NEXT”... -
Page 18: Pc Cam
Meijer.com 5. Please select “option” then “preview” (see sample below), and it will start the PC Cam function Using PC Cam 1. When you select PC Cam, link the USB cable to the PC’s USB slot, the PC will be in sync with the unit automatically, wait for the video images to appear, the unit is now in sync with the Note: Image may be hazy unless the photographic distance of binocular is more than 60ft/18m away, not suitable for close... -
Page 19: Warranty Information
This warranty is limited to the original purchaser and is not transferable. This warranty applies only to products purchased in the United States of America and Canada. In the event of a defect within 30 days, the consumer must return the defective unit to the BARSKA dealer (the place of purchase) at his/her own expense. - Page 20 Meijer.com w w w . b a r s k a . c o m © 2010 BARSKA® BC155...
Need help?
Do you have a question about the Point ‘n View and is the answer not in the manual?
Questions and answers