Table of Contents
Advertisement
Advertisement
Table of Contents

Related Manuals for GoPro HERO3+ Black Edition


Summary of Contents for GoPro HERO3+ Black Edition
- Page 1 USER MANUAL...
- Page 2 Pour télécharger ce manuel de l’utilisateur dans une autre langue, rendez-vous sur gopro.com/support. Wenn Sie dieses Benutzerhandbuch in einer anderen Sprache herunterladen möchten, besuchen Sie gopro.com/support. Per scaricare questo manuale utente in un’altra lingua, visita gopro.com/support. Para descargar este manual de usuario en otro idioma, visite gopro.com/support.
- Page 3 Join the GoPro party at facebook.com/gopro to see what other GoPro owners are capturing and sharing. Share your footage and join the GoPro movement!
-
Page 5: Table Of Contents
Camera Menu Flow Chart Camera Software Updates Basics Camera Modes Camera Settings Capture Settings Set Up Wi-Fi + Wi-Fi Remote Connecting to GoPro App Storage/microSD™ Cards System Requirements Transferring Files Playback Battery Important Warning Messages Camera Housing Using the Mounts... -
Page 6: Accessories
WEAR IT. MOUNT IT. LOVE IT. FEATURED ACCESSORIES Wrist Housing LCD Touch BacPac ™ Standard Housing Rechargeable Battery Battery BacPac ™ Dual Battery Charger Wi-Fi Remote Protective Lens + Covers More HERO3+ accessories available at gopro.com The Frame... -
Page 7: Mounts + Accessories
SEE MORE AT GOPRO.COM MOUNTS + ACCESSORIES Helmet Front Mount Chesty Handlebar/Seatpost/ Surfboard Mounts Pole Mount Floaty Backdoor Head Strap Suction Cup Vented Helmet + QuickClip Strap Roll Bar Mount Tripod Mounts Anti-Fog Inserts Jaws: Flex Clamp Auto Charger Curved + Flat... -
Page 8: Hero3+ Features
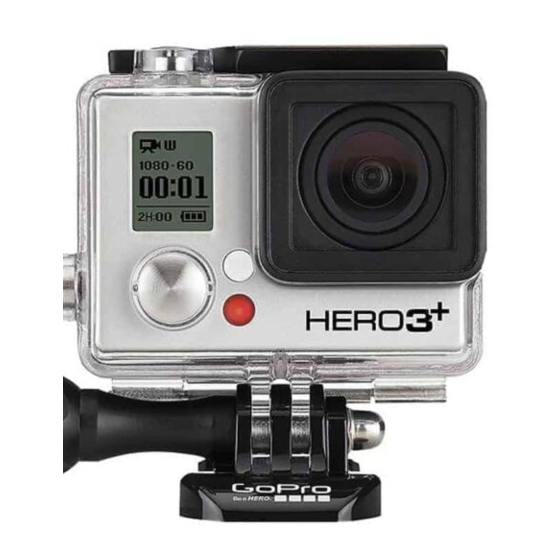
HERO3+ FEATURES 1. Camera Status Lights (Red) 6. Micro HDMI Port (Cable not included) 2. Shutter/Select Button 7. MicroSD Card Slot 3. LCD Status Screen (SD card not included) 4. Wi-Fi Status Lights (Blue ) 8. Mini-USB Port (Supports Composite A/C 5. - Page 9 HERO3+ FEATURES 9. HERO Port 10. Battery Door 11. Wi-Fi On/Off Button 12. Audio Alert 13. Microphone...
-
Page 10: Camera Lcd Status Screen
CAMERA LCD STATUS SCREEN The LCD screen displays the following information about HERO3+ modes and settings: 1. Camera Modes/FOV (Field of View) 2. Capture Setting Modes (not shown) 3. Resolution/fps (Frames Per Second) 4. Time Interval Settings: (not shown) 5. Counter 6. -
Page 11: Camera Menu Flow Chart
CAMERA MENU FLOW CHART MODES CAMERA SETTINGS CAPTURE SETTINGS WI-FI PROTUNE SETTINGS SET UP * Playback only appears if camera is connected to a TV or LCD Touch BacPac™ (sold separately). -
Page 12: Camera Software Updates
Swapping housing doors To get the latest features and best performance from your HERO3+ camera, make sure you’re using the most current camera software. To check if software updates are available, visit: gopro.com/update. USING YOUR HERO3+: BASICS GETTING STARTED Slim housing remove camera 1. -
Page 13: Camera Default Settings
▶See BATTERY LIFE for more information. ▶See PROTUNE for more information. CAMERA DEFAULT SETTINGS The HERO3+ Black Edition camera powers up with the following default settings: Video 1080p SuperView 30fps, Auto Low Light ON Photo 12MP, Ultra Wide FOV... -
Page 14: Powering On And Off
USING YOUR HERO3+: BASICS POWERING ON AND OFF To power ON: Press the Power/Mode Button . The red Camera Status Lights flash three times and the Sound Indicator emits three beeps. To power OFF: Press and hold the Power/Mode Button . -
Page 15: Camera Modes
USING YOUR HERO3+: CAMERA MODES OVERVIEW The HERO3+ features several camera modes. To cycle through the modes, press the Power/Mode Button . The modes will appear in the following order: VIDEO Record Video PHOTO Capture a single Photo BURST PHOTO Capture up to 30 Photos in one second TIME LAPSE Capture a series of Photos at timed intervals... - Page 16 USING YOUR HERO3+: CAMERA MODES VIDEO To record Video, verify the camera is in Video mode. If the Video icon on your camera’s LCD screen is not showing, press the Power/Mode Button repeatedly until it appears. To start recording: Press the Shutter/Select Button .
- Page 17 USING YOUR HERO3+: CAMERA MODES PHOTO To capture a Photo, verify the camera is in Photo mode. If the Photo icon on your camera’s LCD is not showing, press the Power/Mode Button repeatedly until it appears. To take a photo: Press and release the Shutter/Select Button .
- Page 18 USING YOUR HERO3+: CAMERA MODES BURST PHOTO In Burst Photo mode your camera takes multiple photos in short time intervals— 3 photos /1 second, 5 photos /1 second, 10 photos /1 second, 10 photos /2 seconds, 30 photos /1 second, 30 photos /2 seconds or 30 photos /3 seconds. To capture a Burst Photo series, verify the camera is in Burst Photo mode.
-
Page 19: Time Lapse
USING YOUR HERO3+: CAMERA MODES TIME LAPSE Time Lapse mode captures a series of photos at 0.5, 1, 2, 5, 10, 30 or 60 second intervals. To capture a Time Lapse series, verify the camera is in Time Lapse mode. If the Time Lapse icon is not showing on your camera’s LCD screen, press the Power/Mode Button... - Page 20 USING YOUR HERO3+: CAMERA MODES SETTINGS The Settings menu allows you to adjust a variety of camera settings including: Video Resolution Photo Resolution Time Lapse Burst Photo Continuous Photo ▶ See SETTINGS menu to make changes, learn how to navigate menu options and read more details on each setting.
-
Page 21: Camera Settings
CAMERA SETTINGS SETTINGS To enter the Settings menu: 1. Verify the camera is in the Settings mode. If the Settings icon on your camera’s LCD screen is not showing, press the Power/Mode Button repeatedly until it appears. 2. Press the Shutter/Select Button to enter Settings menu 3. - Page 22 CAMERA SETTINGS VIDEO RESOLUTION/ FPS/FOV MODES You can change Resolution, fps (frames per second) and FOV (field of view) in the Video mode menu. You can also turn Auto Low Light mode ON/OFF. Once in the Settings menu: 1. Press the Shutter/Select Button to enter 2.
- Page 23 CAMERA SETTINGS The HERO3+ Black Edition offers the following Video Capture modes: Video NTSC Protune Field of View Screen Resolution (FOV) Resolution 4K / 12.5 Ultra Wide 3840x2160, 16:9 4K 17:9 4096x2160, 17:9 2.7K / Ultra Wide 2704x1524, 16:9 2.7K 17:9...
- Page 24 CAMERA SETTINGS Video Best Use Resolution 4K / Stunning high-resolution video with professional low-light performance. 4K 17:9 Pull 8MP stills from video. Recommended for tripod or fixed position shots. 2.7K / 16:9 / 17:9 resolution video downscales to provide stunning, cinema-quality results 2.7K 17:9 for professional productions.
- Page 25 CAMERA SETTINGS PHOTO RESOLUTION MODES The HERO3+ can capture photos at 12MP, 7MP and 5MP resolutions. Any change to photo resolution also affects photos captured in Photo, Photo Burst and Time Lapse modes. Photo Field of View (FOV) Resolution 12MP Ultra Wide (Default) Ultra Wide, Medium Medium...
- Page 26 CAMERA SETTINGS BURST PHOTO OPTIONS Burst Photo mode captures a series of Photos when the Shutter/Select Button is pressed. Photos can be captured at the following rates: 3 photos in 1 second 5 photos in 1 second 10 photos in 1 second 10 photos in 2 seconds 30 photos in 1 second (Default) 30 photos in 2 seconds...
- Page 27 CAMERA SETTINGS CAPTURE SETTINGS MENU Capture Settings allows you to adjust the following advanced capture options: Camera Orientation Spot Meter Simultaneous Video and Photo Looping Video Protune White Balance* Color* ISO Limit* Sharpness* Exposure* ▶See CAPTURE SETTINGS section for a complete list of capture options. * White Balance, Color, ISO Limit, Sharpness and Exposure are only available while shooting in Protune.
- Page 28 CAMERA SETTINGS SET UP MENU The Set Up menu allows you to adjust the following camera settings: Default mode at Power Up One Button Mode NTSC/PAL On Screen Display Camera Status Lights Sound Indicator Month/Day/Year/Time ▶See SET UP menu section for a complete list of set up options.
- Page 29 WIRELESS CONTROLS The camera’s built-in Wi-Fi allows you to connect to the Wi-Fi Remote or smartphone/tablet via the GoPro App. When Wi-Fi is ON, a Wi-Fi status icon will appear on the camera’s LCD Status Screen and the blue Wi-Fi Status Lights will blink intermittently.
- Page 30 CAMERA SETTINGS DELETE Delete the last file or all files and format the memory card. During delete LAST or ALL, the Camera Status Lights blink until operation is complete. CANCEL (Default) LAST (Formats SD card) To delete LAST or ALL: 1.
- Page 31 CAMERA SETTINGS EXIT screen, press the Shutter/Select Button From the to exit the Settings menu. If at any time you wish to exit from the Settings menu, TIP: press and hold the Shutter/Select Button for two seconds.
-
Page 32: Capture Settings
CAPTURE SETTINGS CAPTURE SETTINGS To enter the Capture Settings menu: 1. Verify the camera is in Settings mode. If the Settings icon on your camera’s LCD screen is not showing, press the Power/Mode Button repeatedly until it appears. 2. Press the Shutter/Select Button to enter the Settings menu 3. - Page 33 CAPTURE SETTINGS You can customize the way your HERO3+ camera captures Video and Photos in the Capture Settings menus, such as Upside Down, Looping Video and White Balance. UPSIDE DOWN Mounting your HERO3+ Upside Down but wish the files to appear upright when viewing or editing? This setting eliminates the need to flip your Video or Photos after recording.
- Page 34 CAPTURE SETTINGS SIMULTANEOUS VIDEO AND PHOTO Simultaneous Video and Photo mode, allows you to simultaneously capture both Videos and Photos. You can set the camera to take a Photo every 5 seconds, 10 seconds, 30 seconds or 60 seconds while you record Video. To set your camera to Picture In Video mode, verify that a supported Video resolution is selected and that Protune is turned OFF.
- Page 35 CAPTURE SETTINGS Simultaneous Video and Photo (continued): Your resulting Photo size is determined by the Video dimensions you select. Video Mode Photo MP 1440p24 fps Wide 12MP Wide 1080p30/25 fps Medium Narrow Wide 1080p24 fps Medium Narrow Wide 720p60/50 fps Medium Narrow While capturing Video you can manually take a Photo at any...
- Page 36 CAPTURE SETTINGS LOOPING VIDEO Looping Video mode allows you to record a continuously looping video that overwrites itself until you press the Shutter/Select Button button to stop it. Looping Video is not available if Protune mode is turned ON. Looping Video options include: (Default) Camera records until memory card is full, then overwrites Max video...
- Page 37 Film/TV Rate Standard While shooting in Protune, you have the option of recording video in cinema- quality 24 fps to easily intercut GoPro content with other source media without the need to perform fps conversion. Turning Protune ON affects several settings and features, such as Video Resolution, fps, FOV and Simultaneous Video and Photo.
- Page 38 60, 50, 48, 30, 25, 24 1080p SuperView 60, 50, 48, 30, 25, 24 960p 100, 60, 50 720p 120, 100, 60, 50 720p SuperView 100, 60, 50 COMPATIBILITY: Protune is compatible with professional color correction tools, GoPro Studio and other video editing software.
- Page 39 CAPTURE SETTINGS PROTUNE SETTINGS Protune enables advanced control of White Balance, Color, ISO Limit, Sharpness and Exposure. Making adjustments to your Protune settings will not affect your non-Protune video modes. You can reset your Protune settings to their default states by selecting RESET in the TIP: Protune menu.
- Page 40 CAPTURE SETTINGS WHITE BALANCE White Balance adjusts the overall color tone of videos. You can make adjustments to White Balance when shooting in Protune mode. White Balance Setting Recommended Lighting Conditions Auto (Default) 3000K Warm light (incandescent or sunrise/ sunset lighting) 5500K Slightly cool light (cool flourescent or average daylight)
- Page 41 COLOR Color allows you to adjust the color profile of your video footage. There are two Color options: GoPro Color (default) and Flat. GoPro Color delivers the same great color you capture when Protune is turned OFF. Flat results in a neutral color profile that can be color-corrected to better match footage captured with other equipment, offering more flexibility in post-production.
- Page 42 CAPTURE SETTINGS ISO LIMIT ISO Limit adjusts the camera’s sensitivity in low-light environments, and creates a balance between brightness and resulting image noise. A higher ISO Limit will result in brighter footage, but you may experience more noise. A lower ISO Limit will result in darker footage, but will deliver reduced noise. ISO Limit Setting Resulting Video Quality 6400 (Default)
- Page 43 CAPTURE SETTINGS EXPOSURE Exposure compensation affects the brightness of your video. Adjusting Exposure can improve image quality when shooting in environments with contrasting lighting conditions. Exposure Settings +2.0 +1.5 +1.0 +0.5 0 (Default) -0.5 -1.0 -1.5 -2.0 Exposure compensation adjusts brightness within the existing ISO Limit.
-
Page 44: Set Up
SET UP SET UP To enter the Set Up menu: 1. Verify the camera is in Settings mode. If the Settings icon on your camera’s LCD screen is not showing, press the Power/Mode Button repeatedly until it appears. 2. Press the Shutter/Select Button to enter the Settings menu 3. - Page 45 SET UP DEFAULT MODE AT POWER UP You can set the camera’s Default mode at power up to any of the following modes: VIDEO (default) PHOTO BURST PHOTO TIME LAPSE...
- Page 46 SET UP ONE BUTTON With One Button mode selected, the camera automatically begins recording when powering the camera ON. One Button mode can be configured to start in Video or Time Lapse. (Default) To turn One Button mode ON: 1. Verify the camera is in Settings mode. If the Settings icon on your camera’s LCD screen is not showing, press Power/Mode Button repeatedly until it appears.
- Page 47 ONE BUTTON, press and hold the Shutter/Select TIP: Button for two seconds. You will return to the ONE BUTTON menu where you can turn ONE BUTTON mode OFF. NOTE: One Button mode is disabled when connected to Wi-Fi Remote or GoPro App.
- Page 48 SET UP NTSC / PAL The NTSC and PAL settings govern Video recording frame rate and playback when viewing Video on a TV/HDTV. Select NTSC when viewing a TV/HDTV in North America. Select PAL if viewing on a PAL TV/HDTV (most televisions outside of North America) or if viewing on a PAL TV/HDTV in any region.
- Page 49 SET UP SOUND INDICATOR You can adjust volume or turn OFF the Sound Indicator. 100% (Default) MANUAL POWER OFF The HERO3+ can be configured to automatically power OFF after a specific period of inactivity (when no Videos or Photos are being taken and no buttons have been pressed).
- Page 50 SET UP MONTH / DAY / YEAR / TIME Set the HERO3+ clock to ensure Video and Photo files are saved with the correct date and time. To change Month/Day/Year/Time: 1. Verify the camera is in Settings mode. If the Settings icon on your camera’s LCD screen is not showing, press the Power/Mode Button repeatedly until...
- Page 51 SET UP EXIT From the EXIT screen, press the Shutter/Select Button to exit the Set Up menu. If at any time you wish to exit from the SET UP menu, press and hold the Shutter/Select Button TIP: two seconds.
-
Page 52: Wi-Fi + Wi-Fi Remote
WI-FI + WI-FI REMOTE WIRELESS CONTROLS The built-in Wi-Fi allows your HERO3+ camera to connect to the Wi-Fi Remote or to the GoPro App using a smartphone or tablet. To turn Wi-Fi ON/OFF via the Wi-Fi On/Off Button Press the Wi-Fi On/Off Button to turn Wi-Fi ON/OFF. - Page 53 WI-FI + WI-FI REMOTE WIRELESS CONTROLS (CONTINUED) On the Wi-Fi Remote: 1. While holding down the Shutter/Select Button , press and release the Power/Mode Button once to power the remote ON into pairing mode. 2. When you see on the remote’s screen, you can release the Shutter/Select Button will appear on both screens once the devices have paired.
- Page 54 WI-FI + WI-FI REMOTE USING YOUR HERO3+ WITH THE WI-FI REMOTE Once you have paired your camera with the Wi-Fi Remote, follow these steps the next time you want to use the remote to control your camera. You only need to pair the camera and remote once.
-
Page 55: Connecting To Gopro App
You can customize the password at gopro.com/update. If you’ve already customized the password, enter that password instead of “goprohero”.) 7. Open the GoPro App on your smartphone or tablet. You will now be able to control the camera with your smartphone or tablet plus view, playback and share select content.*... -
Page 56: Storage/Microsd Cards
The HERO3+ camera is compatible with 4GB, 8GB, 16GB, 32GB and 64GB capacity microSD, microSDHC and microSDXC memory cards. You must use a microSD card with a Class 10 speed rating. GoPro recommends using brand name memory cards for maximum reliability in high-vibration activities. -
Page 57: System Requirements
SYSTEM REQUIREMENTS Minimum system requirements for best playback on Mac® and Windows® PCs: • Mac OS® X 10.5 and later/ Microsoft Windows ® Vista, 7 and later • 2nd generation Intel® Core™-based processor or AMD equivalent (3rd generation Intel Core-i7 recommended) •... -
Page 58: Transferring Files
TRANSFERRING FILES TO TRANSFER VIDEO AND PHOTO FILES TO A COMPUTER On a PC: 1. Connect the camera to the computer using included USB cable. 2. Press the Power/Mode Button to turn ON the camera. 3. Double click “My Computer” and locate “Removable Disk”. 4. -
Page 59: Playback
PLAYBACK TO VIEW VIDEOS AND PHOTOS Videos and Photos can be viewed on a TV/HDTV or the LCD Touch BacPac (optional accessory, sold separately). PLAYBACK ON TV/HDTV To browse Videos and Photos: 1. Plug the camera into a TV/HDTV with a Micro HDMI Cable, Composite Cable or Combo Cable (optional accessories). -
Page 60: Battery
PLAYBACK PLAYBACK ON LCD TOUCH BACPAC (SOLD SEPARATELY) Playback using the LCD Touch BacPac™ follows a similar process/procedure as described with a few slight variations. ▶See the LCD Touch BacPac User Manual for more information. BATTERY MAXIMIZING BATTERY LIFE To maximize battery life, turn Wi-Fi OFF. To maximize battery life when shooting longer-duration activities, turn OFF or detach the LCD Touch BacPac™... -
Page 61: Charging The Battery
You can also charge the battery outside the camera using the Dual Battery Charger (optional accessory, sold separately). No damage will occur to the camera or the battery if used prior to full charge. Spare batteries and additional charging accessories are available at: gopro.com. - Page 62 BATTERY USING THE CAMERA WHILE CHARGING You can capture Video and Photos while charging the camera’s battery. Simply plug the camera into a computer or any USB charging device using the included USB Cable. REMOVING THE BATTERY FROM THE CAMERA The HERO3+ battery is designed to have a tight fit to maximize reliability in high-vibration activities.
-
Page 63: Important Warning Messages
IMPORTANT WARNING MESSAGES MICROSD CARD MESSAGES No card present. The camera requires a microSD, microSDHC NO SD or microSDXC card to record Video or take Photos. SD FULL Card is full. Delete files or swap card. SD ERROR Camera unable to access card. FILE REPAIR ICON ON THE LCD If you see the File Repair icon on the LCD screen, your Video file was corrupted during recording. -
Page 64: Camera Housing
Slim housing closed Swapping housing doors CAMERA HOUSING ASSEMBLING THE CAMERA HOUSING To remove camera from housing: 1. Lift front of latch up to disengage from camera housing. 2. Pivot latch backward and pull up to release backdoor. Slim housing remove camera 3. - Page 65 CAMERA HOUSING Your HERO3+ camera housing comes with two types of backdoors— Skeleton (non-waterproof) and Standard (waterproof). Skeleton Backdoor Standard Backdoor The Skeleton Backdoor (non-waterproof) The Standard Backdoor makes the provides better sound quality by allowing housing waterproof to 131’/40m. more sound to reach the camera’s Use this door when you need to microphone.
- Page 66 mb Screw + Slim housing = Complete Unit CAMERA HOUSING SWAPPING BACKDOORS You can switch the Backdoor of your HERO3+ camera to suit your activity and shooting conditions. To change backdoor: Swapping housing doors Slim housing insert camera 1. Open the Backdoor of the housing so that it is hanging downwards. 2.
- Page 67 CAMERA HOUSING PREVENTING WATER DAMAGE TO YOUR CAMERA The rubber seal that lines the camera housing forms a waterproof barrier that protects your HERO3+ in wet and underwater conditions. Keep the camera housing’s rubber seal clean. A single hair or grain of sand can cause a leak and damage your camera.
-
Page 68: Using The Mounts
To attach your HERO3+ camera to a mount, you will need a Quick Release Buckle, thumb screw or hardware depending on the mount you are using. Quick Release Buckle + Thumb Screw + Slim housing = Complete Unit For more information on mounts, visit: gopro.com/support. Quick Release Thumb Screw... - Page 69 When applying mount, firmly press into place and ensure full contact over entire surface. For best results, attach the mount 24 hours prior to use. ▶See: gopro.com/support for more information on mounts. Locking Plug Using the HERO3+ in high impact sports such as surfing or skiing where significant impact may occur? Use the special Locking Plug which securely locks the Quick Release Buckle fingers into place—...
-
Page 70: Handling The Wi-Fi Remote
USE WITH OTHER ELECTRONIC DEVICES Users of digital transceivers (avalanche beacons) should consult with their user manuals regarding use of GoPro cameras and other GPS or electronic devices when engaged in the avalanche beacon search mode in order to limit potential interference. -
Page 71: Customer Support
CUSTOMER SUPPORT GoPro is dedicated to providing the best possible service. To reach GoPro Customer Support, visit gopro.com/support. REGULATORY INFORMATION To see the complete list of country certifications, refer to the WARRANTY + DISCLAIMERS document included with this product.
Need help?
Do you have a question about the HERO3+ Black Edition and is the answer not in the manual?
Questions and answers