Table of Contents
Advertisement
Advertisement
Table of Contents

Subscribe to Our Youtube Channel
Related Manuals for Dual AMB500W


Summary of Contents for Dual AMB500W
- Page 1 AMB500W INSTALLATION/OWNER'S MANUAL Marine Receiver with Detachable Face...
- Page 2 AMB500W INSTALLATION Preparation Please read entire manual before installation. Before You Start • Disconnect negative battery terminal. Consult a qualified technician for instructions. • Avoid installing the unit where it would be subject to high temperatures, such as from direct sunlight, or where it would be subject to dust, dirt or excessive vibration.
-
Page 3: Wiring Diagram
Gray/Black (-) Violet/Black (-) and amperage. Using Gray (+) Violet (+) an incorrect fuse could damage the radio. The AMB500W uses one 10 amp ATM fuse Left Front Left Rear located beside the wiring White/Black (-) Green/Black (-) connector. -
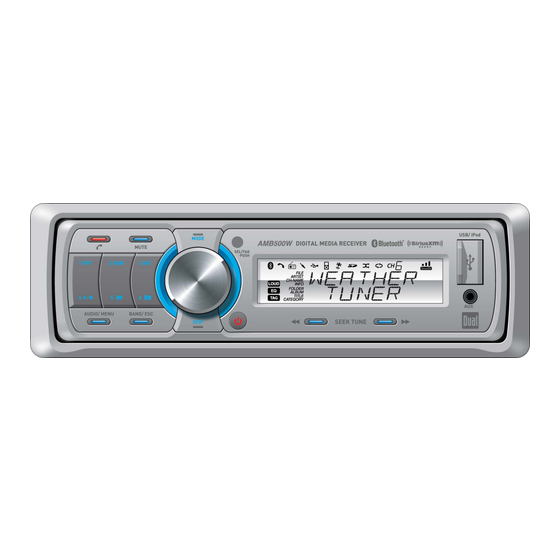
Page 4: Control Locations - Receiver
AMB500W OPERATION Control Locations - Receiver Front Panel Release Tune/Track Up Preset 1 / Repeat Tune/Track Down Bluetooth Talk/End Power Preset 2 / Random Display Mute Preset 6 / Folder Up Preset 3 / Intro Band / Escape Mode (Source) Preset 5 / Folder Down... -
Page 5: Control Locations - Remote
AMB500W OPERATION Control Locations - Remote Power Preset 3 / Intro Key 7 / Key * Volume Up Preset 5 / Folder Down Preset 4 / Play/Pause Select / Tag Preset 6 / Folder Up Preset 1 / Repeat Audio / Menu Kay 8... -
Page 6: General Operation
USB and SD modes will not appear unless a USB device or SD card (sold separately) have been connected. The AMB500W offers two auxiliary input ports, a 3.5 mm Auxiliary Inputs port on the front panel and an RCA connection on the back of the unit. -
Page 7: Setup Menu
AMB500W OPERATION Setup Menu Menu Function Options Action Press SELECT to seek and save 6 strong stations in the current Auto Station AUTO PGM band. (Tuner mode only) Store STATIONS LOCAL OFF Activates distance tuning (Tuner mode only). Local/Distance Activates local tuning for strong station reception only (Tuner mode ... - Page 8 AMB500W OPERATION General Operation 12/24-hour Clock The clock will display 12-hour AM/PM time in USA frequency spacing mode (PM 10 : 00). In European frequency spacing mode, the clock will display 24-hour time (22:00). Audio Press AUDIO momentarily to select between Bass, Treble, Balance, Fader, Equalizer, Subwoofer and Source Volume Level.
-
Page 9: Tuner Operation
AMB500W OPERATION Tuner Operation Seek Tuning Press TUNE or TUNE for more than one second to seek to the next strong station. Press and hold to advance quickly. Manual Tuning Press TUNE or TUNE momentarily to change radio frequency up or down one step at a time. - Page 10 Note: The SiriusXM Connect Vehicle Tuner must have the SiriusXM logo to be compatible with the AMB500W. To connect the SiriusXM Vehicle Tuner, follow the instructions provided with the tuner. When connecting the tuner to the AMB500W, the cable orientation should be connected as shown below. AMB500W Head ...
- Page 11 AMB500W OPERATION SiriusXM Vehicle Tuner Operation Radio ID To view the Radio ID on the LCD, press TUNE or TUNE until channel 0 appears. The 8 character Radio ID will appear on the display. The Radio ID is also printed on the underside of the SiriusXM Vehicle Tuner.
- Page 12 AMB500W OPERATION SiriusXM Vehicle Tuner Operation SiriusXM Setup Menu To access the SiriusXM setup menu options, press and hold AUDIO/MENU for more than 3 seconds, press AUDIO/MENU to cycle through menu options until "SIRIUSXM SETUP" appears, then press SELECT. Press AUDIO/MENU to cycle through the list of submenu options.
-
Page 13: Displayed Information
Displays special channel information from the current channel. SiriusXM Advisory Messages Message Description • Check the SiriusXM tuner connection behind the AMB500W to CHECK TUNER ensure that its correctly connected. • Ensure the SiriusXM antenna cable is connected to the SiriusXM tuner correctly. -
Page 14: Tagging Music
AMB500W. A new list called "Tagged" will appear in iTunes, giving you the option to purchase each song. - Page 15 AMB500W OPERATION iTunes Tagging (SiriusXM Mode) ® Troubleshooting Displayed Message Description There is a compatibility issue with the iPod device that is connected. Check the list of compatible iPod devices below. CHECK iPod VER If the attached iPod device is compatible, update the firmware to the latest version using iTunes.
-
Page 16: Usb/Sd Card Operation
To play MP3/WMA files from most USB mass storage Device devices, open the USB cover door, line up the USB connector (sold separately) and insert the USB device into the AMB500W's USB port. Connect an SD Card To play MP3/WMA files from an SD Card, insert an SD card (sold separately) into the SD card slot, located behind the front panel. - Page 17 AMB500W OPERATION USB/SD Card Operation Displaying Information When a file is accessed, the clock and elapsed time will be displayed. Press DISP momentarily to select between song title, artist, file name, folder name, track number and clock/ elapsed time. "NO TITLE" will be displayed if no song title information is available.
- Page 18 AMB500W OPERATION USB/SD Card Operation File/Folder Compatibility and Support • MP3 data (.mp3) Compatible File Types • WMA data (.wma) • AAC data (.m4a) • DRM protected files • WAV data (.wav) • WMA lossless Incompatible File Types • Apple lossless • WMA Pro • MP3 Pro •...
-
Page 19: Operation Of Ipod/Iphone
USB Connection Using the "dock connector to USB" sync cable (provided with the iPod/iPhone device), plug the USB cable into the AMB500W's USB port. Once connected, playback will begin automatically. Controlling a Device: Full Control When the control of iPod/iPhone feature is set to "FULL" in the Setup Menu, use the following functions to control the device: Song Select... - Page 20 AMB500W OPERATION Operation of iPod/iPhone Controlling a Device: Full Control - Music Search Menu The AMB500W features a powerful music search that simplifies the searching process. Follow the steps below to find the desired song: Begin Searching Press SELECT to begin the search. The main search menu will appear. Select a Category Turn the volume knob to select between artists, albums, songs, playlists, podcasts and audiobooks.
- Page 21 AMB500W OPERATION Operation of iPod/iPhone When the control of iPod/iPhone feature is set to "MANUAL" in the iPod Menu, use the following functions to control the device: Manual Control for iPod When "MANUAL" control is selected from the iPod Menu, the iPod or iPhone device can be controlled directly from the device's interface.
-
Page 22: Bluetooth Operation
(Re)Connecting a Paired Device Many Bluetooth devices support the auto-connect feature, and will connect automatically if the device is in range when the AMB500W is powered-on. If your device was previously paired but does not connect, use these instructions below. Some devices require authorization to allow the auto connect feature. - Page 23 Note: The volume of the ring tone depends on the volume level of the AMB500W. The incoming ring tone may not be heard if the volume is set to a low level or mute is activated.
- Page 24 Audio Transfer Press DISP during a phone call to transfer the call from the AMB500W to the cell phone. Press DISP again to toggle the audio back to the AMB500W. Call Waiting During a phone call, if there is a second incoming call, press to place the first call on hold and switch to the second phone call.
-
Page 25: Bluetooth Reset
2) Press and hold MODE for 5 seconds to reset the Bluetooth settings back to the factory default. Compatibility Note: Due to the differences in Bluetooth technology, some mobile devices may be incompatible, function improperly or may not support all features when used with the AMB500W. -
Page 26: Limited One-Year Warranty
2. If you require service during the original purchase. warranty period, you must carefully pack the product (preferably in the Dual Electronics Corp. agrees, at our original package) and ship it by prepaid option, during the warranty period, transportation with a copy of the original... -
Page 27: Troubleshooting
AMB500W OPERATION Troubleshooting Problem Cause Action Yellow wire not connected or Check connections for incorrect voltage Red wire not Unit will not turn on proper voltage (11~16VDC) connected or incorrect voltage (no power) Black wire not connected Check connection to ground... -
Page 28: Specifications
AMB500W OPERATION Specifications FM Tuner Tuning range: 87.5MHz-107.9MHz Usable sensitivity: 8.5dBf 50dB quieting sensitivity: 10dBf Stereo separation @ 1kHz: 40dB Frequency response: 30Hz-13kHz AM Tuner Tuning range: 530kHz-1710kHz Usable sensitivity: 22uV Frequency response: 30Hz-2.2kHz General Speaker output impedance: 4~8 ohms Line output voltage: 2 Volts RMS... - Page 29 AMB500W OPERATION Notes...
- Page 30 AMB500W OPERATION Notes...
- Page 31 AMB500W OPERATION Notes...
- Page 32 Namsung is under license. Sirius, XM and all related marks and logos are trademarks of Sirius XM Radio Inc. All rights reserved. Other trademarks and trade names are those of their respective owners. www.dualav.com ©2013 Dual Electronics Corp. All rights reserved. NSA1113-V01...
Need help?
Do you have a question about the AMB500W and is the answer not in the manual?
Questions and answers