Table of Contents
Advertisement
Quick Links
Advertisement
Table of Contents

Related Manuals for 360 Systems DigiCart ex E-3000


Summary of Contents for 360 Systems DigiCart ex E-3000
- Page 1 Owner’s Manual...
- Page 2 (Inside front cover – intentionally blank)
- Page 3 ® HARD DISK and MEMORY CARD RECORDER ™ with ETHERNET AUDIO FILE SHARING OWNER’S MANUAL MODEL E-3000 SOFTWARE VERSION 1.24 June, 2013 R O F E S S I O N A L D I G I T A L A U D I O...
-
Page 4: Safety Compliance
SAFETY COMPLIANCE DigiCart/EX complies with the following safety standards: • UL 60950, 3rd Edition, dated December 1, 2000, Standard for Safety of Information Technology Equipment, Including Electrical Business Equipment. EU ELECTROMAGNETIC COMPATIBILITY Type of Equipment: Professional Use Audio Equipment. Conforms to the Following Standards: •... -
Page 5: Table Of Contents
Contents OVERVIEW _________________________________________ 3 Introduction to the DigiCart Recorder What’s New in DigiCart/EX Supported File Formats............3 File Format Indicators on the Front Panel LCD ..3 Notes on file formats ..........3 Storage Capability Accessories RC-320 Remote Control ............3 CHAPTER 1_________________________________________ 3 Installation Mounting................ - Page 6 Memory Card Reader Memory Card Insertion ..........3 Memory Card Removal ..........3 Approved Memory Cards ...........3 Notes on Card Compatibility........3 CHAPTER 3 ________________________________________ 3 File Organization and Navigation Overview of Drive and Directory Structure ......3 Drive Organization Strategy ............3 Network Playlists and Hot Keys .........3 Structure Details..............3 Directories ..............3 Files ................3...
- Page 7 Set Time Display ............3 Utility Menu Features ............. 3 Assign Hot Key (Preset)..........3 Copy Original............3 Copying a Cut using Copy Original ......3 Copying a Playlist (Stack) using Copy Original ..3 Copying a Directory using Copy Original....3 Copy Edited...............
- Page 8 Audio Editing User Interface................3 Edit Audio Files...............3 Head................3 Tail ................3 Pre-Roll..............3 Fade In...............3 Fade Out..............3 Output Gain...............3 CHAPTER 9 ________________________________________ 3 Maintenance General Cleaning ..............3 Calibration ................3 Disk Maintenance ..............3 Program Updates ..............3 Update the Program from a Network Server....3 Update the Program from a Memory Card ....3 Restoring Previous Version.........3 Memory Cards and Card Reader ..........3...
- Page 9 DigiCart.................. 3 DigiCart II................3 DigiCart II Plus ............... 3 DigiCart/E................3 APPENDIX D ________________________________________ 3 D-Net File Transfer Key Features ................3 Transfer Rates ............3 Electrical Specification for D-Net Transfers ....3 D-Net Setup................3 Making a File Transfer ..........3 Wildcard Transfers ............
- Page 10 THIS LIMITED WARRANTY SHALL BE THE REPAIR OR REPLACEMENT OF DEFECTIVE PRODUCT OR COMPONENTS DURING THE WARRANTY PERIOD. Products being returned under warranty shall be sent to 360 Systems or one of its foreign service centers, freight prepaid, in the original or equivalent packaging. Please call 360 Systems for a return authorization number before returning any merchandise for any reason.
- Page 11 COPYRIGHTS Software contained in this product is copyrighted by 360 Systems, and Dolby Laboratories. PATENTS Designs incorporated in this product may be the subject of current or pending United States and foreign patents.
-
Page 12: Warning Symbols
WARNING SYMBOLS THE FOLLOWING WARNING SYMBOLS ARE USED ON THE PRODUCT IN THIS MANUAL: ENGLISH ATTENTION: REFER TO OWNER’S MANUAL FOR IMPORTANT INFORMATION. FRANÇAIS ATTENTION: VEUILLEZ VOUS RÉFÉRER AU MODE D’EMPLOI POUR UNE INFORMATION IMPORTANTE. ITALIANO ATTENZIONE: FATE RIFERIMENTO AL MANUALE PER INFORMAZIONI IMPORTANTI. -
Page 13: Overview
As the 1980s came to a close, the promise of high-quality digital audio became a reality with the introduction of compact disks – but only for pre-recorded music. 360 Systems responded by designing the first practical digital cart machine, introducing it to the broadcast industry at the 1990 ®... -
Page 14: Power
Also new are gain adjustment trims on the analog outputs so that DigiCart/EX can be matched perfectly with downstream equipment. DigiCart/EX now provides power to the 360 Systems RC-320 remote control via the serial cable, so there is no need for a separate wall-mounted power supply. Additionally, there is now a second serial port available for ES-Bus or Peripheral Bus controls, so that the RC-320 remote control can always remain attached. - Page 15 Supported File Formats DigiCart/EX normally records audio in WAV format. Previous DigiCart models used a proprietary recording format. To ensure compatibility with existing DigiCarts and recordings, DigiCart/EX can also play and record those proprietary file formats. DigiCart/EX displays a three-character abbreviation for each file’s format on its LCD display (Format Code).
- Page 16 Playlists. Accessories The following accessories are available separately from 360 Systems. RC-320 Remote Control • Fast, Easy Total Control of All DigiCart Functions •...
- Page 17 Programmable Hot Keys play back cuts with single-keystroke speed. Once the Hot Keys are assigned, they will remain in memory even if power is turned off between uses. Linear Playlists may also be directly assigned to Hot Keys. Hot Keys are ideal for frequently used cuts, such as sound effects, jingles, and station IDs.
-
Page 18: Digital Audio
In some cases, it may necessary to support the back end of the chassis or attached cables. 360 Systems does not provide a bracket for this purpose. Depending on the space available in the rack, you may need to remove the four rubber feet from the bottom of the chassis to allow the chassis to fit into the rack space. - Page 19 OWER WARNING CONNECT ONLY TO A GROUNDED 50/60 HZ AC OUTLET PROVIDING THE CORRECT VOLTAGE (115 VAC OR 230 VAC, AS DELIVERED). DO NOT REMOVE OR DEFEAT THE GROUNDING PIN ON THE AC POWER CORD. A SERIOUS SHOCK HAZARD MAY RESULT FROM FAILING TO MAKE CONNECTION TO A PROPERLY GROUNDED ELECTRICAL OUTLET.
- Page 20 Playlists and disks. Available models include a standard 101-key keyboard, a small footprint mini-keyboard (Model RC-205), or an infrared-linked mini-keyboard (Model RC-235) available from 360 Systems. Contact 360 Systems for details on these accessories.
-
Page 21: Lcd Display
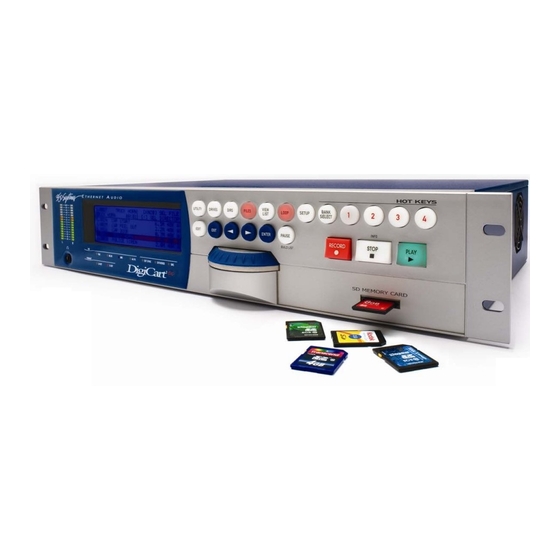
Chapter 2 Control Panel S D M E M O R Y C A R D LCD Display DigiCart/EX employs a graphics LCD with backlight as it’s main display. The display is generally divided into three areas. In the upper left area are the command lines that show machine dialogs, status, and menus. -
Page 22: Headphone Jack
Miscellaneous illuminates to indicate that sync source is set to an external reference in the Setup menu. The LED blinks if there is no valid sync signal presented at the connector. E also illuminate or flash when D-NET Receive is on, see page 3. The D LED illuminates during record when 24-bit digital audio is being dithered down ITHERED... - Page 23 Buttons AVIGATION RROWS buttons are used to: NAVIGATION ARROW • Navigate between drive, directory and cut levels • Select from different values in a menu • Select units for editing operations • Move the cursor during naming operations ENTER B UTTON button is used to: ENTER...
-
Page 24: Exit Button
UTILITY B UTTON button is used to access functions such as Hot Key assignments, copy, rename, delete, UTILITY and disk format operations. Use the selection knob to select a particular Utility function. Utility options are displayed alphabetically in a rotating list. Press the button to initiate the chosen ENTER function. - Page 25 VIEW LIST B UTTON button will immediately display the contents of a Quickstack or Playlist. VIEW LIST VIEW LIST a toggle button that illuminates when active. The displayed list is scrollable. can be used VIEW LIST only when there is a current list to view. If there is no current list, the button will not respond. LOOP B UTTON Press the...
- Page 26 Memory Card Reader The Memory Card Reader allows the use of SD memory cards for audio storage. The Card Reader appears in the system as a Drive at ID 0, with the standard directories numbered 0 to 9, and an S directory for Stacks.
- Page 27 PPROVED EMORY ARDS The following memory cards have been tested and are known to work with DigiCart/EX. • Kingston UltimateX 100X SDHC Class 10 SD10G2 - 4GB, 8GB and 16GB. • Kingston SDHC Class 10 SD10V – 8 GB. • Kingston Ultimate 100x SDHC Class 6 SD6G2 –...
- Page 28 Chapter 3 File Organization and Navigation Overview of Drive and Directory Structure DigiCart/EX retains the same drive and directory structure as previous DigiCarts. DigiCart/EX can have up to seven “logical” drives (numbered 0-6). Drive 0 is always the Memory Card Reader. Drive 1 is always the internal hard disk.
- Page 29 Files may be accessed by name or by file ID number. The key to the file ID system is an easily understood five-character basic identifier. The first character represents the logical disk drive. Drive Level ID: File ID: Indicates DigiCart Index number within drive number 0-6 each directory...
- Page 30 For example, if the internal disk is partitioned into three drives (Numbers 1, 2, and 3), three drive numbers (4, 5, and 6) are available to map network drives. If the internal disk is not partitioned (is only Drive 1), then drives 3, 4, 5, and 6 are available to map network drives; Drive 2 is not available in this case.
- Page 31 Structure Details IRECTORIES DigiCart/EX provides directories to organize and group audio cuts that have something in common; e.g.: spots, jingles, station IDs, production music beds, common types of sound effects, etc. An additional directory, S, is used to store information about Playlists. ILES Files, or “Cuts”...
-
Page 32: Files Button
AITING FOR The unit has successfully determined its IP address, either using DHCP or by using a fixed address assignment. However, if this message persists for more than a few seconds, then the unit was unable to find a server configured to run the Network File System (NFS) protocol. This service is needed by DigiCart to access files on the server. - Page 33 typing only as much of their name as makes them unique. For example: If there is a cut named "BOSTON" and another named "BOND", BOS <ENTER> will find the first and BON <ENTER> will find the other. This search progresses from the currently selected cut, so if there is more than one cut with the same or similar names, subsequent FIND operations will find each one in turn.
-
Page 34: Menu Navigation
Chapter 4 Setup and Utility Menus Menu Navigation The SETUP menu defines the operational behavior of the DigiCart/EX. Setup options are displayed alphabetically in a rotating list. • Press Rotate the Selection Knob to view the options. SETUP. • Use the navigation arrow buttons to select the available settings for the selected option. •... - Page 35 IGITAL ORMAT • PROFESSIONAL FORMAT • CONSUMER FORMAT The DigiCart/EX can output audio on all output connectors simultaneously. The digital outputs can output data in one of two selected formats. The PLAY DIGITAL FORMAT menu sets the format of the digital audio at the outputs. The Professional Format setting will provide an AES/EBU signal at the XLR-3M digital output connector, and an AES/SMPTE 75 ohm signal at the BNC digital output connector.
- Page 36 Files recorded at various sample rates can be converted to a selected rate at play out. Files are not permanently converted; the sample rate converter is switched into the data path and operates “on the fly” during output. For example, if this setting is “Output at 48000”, all files will play at 48000. Files recorded at any sample rate may be converted to match an external reference frequency during play out.
- Page 37 Options if Record Audio Source is set to DIGITAL: • AS RECEIVED • CONVERT TO 44100 • CONVERT TO 48000 • CONVERT TO 88200 • CONVERT TO 96000 • CONVERT TO REFIN When set to “AS RECEIVED”, DigiCart/EX will use the AES data stream clock as its sample rate. When “CONVERT TO a specific sample rate”...
- Page 38 ECORD VERWRITE • CREATE NEW CUT • REPLACE EXISTING CUT Record Overwrite sets a default behavior for new recordings. “Create New Cut” assigns the next available cut ID number in the current directory to the new recording. “Replace Existing Cut” records new audio to a previously-used cut ID number.
- Page 39 ECORD IMIT • NONE • 30 SEC • 1 MIN • 5 MIN • 30 MIN • 60 MIN Enhances the management of available Disk space of DigiCart/EX and accelerates entry to the Record Ready condition when set to smaller values. Furthermore, you can start a recording and walk away knowing that after the specified time limit (setting +5%), the unit will stop recording.
- Page 40 be selected in the range of 192.168.1.16 to 192.168.1.31 or 192.168.2.16 to 192.168.2.31. The factory default setting is AUTOMATIC. EYBOARD • MINI • STANDARD Full size and miniature keyboards use different key codes because of key overlaps. This menu item provides a setup for the standard 101-Key AT-style keyboard or small footprint mini-keyboards (RC- 205) or infrared-linked mini-keyboards (RC-235).
-
Page 41: Set Time Display
DigiCart serial protocol, or a Peripheral Bus (also called P-Bus or E-MEMS) serial connection. Addresses 1 to 4 correspond to the four machine control buttons on a 360 Systems RC-320 remote control. See Appendix B for DigiCart ES-Bus or P-Bus Serial Protocol documentation. - Page 42 Hot Key Mapping Hot Keys assigned on one trigger device (e.g. a keyboard) also map to keys on the other available trigger devices (e.g. an RC-320). The following table shows equivalency of Hot Key assignments on different trigger devices. Keyboard devices can also use compound-alpha keys (e.g.
- Page 43 Assigning a Hot Key on the DigiCart/EX Front Panel • Select the cut or Playlist to be assigned. • Select Assign Hot Key. The display will prompt to select a key. Press UTILITY. • Press to choose the preferred Hot Key bank. The Bank Select button will BANK SELECT illuminate when Bank B is currently selected.
- Page 44 • Select the first cut or Linear Playlist in a directory you wish to assign. • Go to the directory level. • Press the button (or ) and select ASSIGN HOT KEY. UTILITY • Turn ON the keyboard’s Scroll Lock. Use the selection knob to choose the Hot Key number or alpha-character for the Hot Key where the assignment is to begin.
-
Page 45: Copy Original
If the PLAY HOT KEYS USING parameter is set to Local Assignments, the Local Hot Keys list will always be used, regardless of the current drive. Net Drive Hot Key assignments can be reprogrammed from any DigiCart/EX that has access to them. -
Page 46: Copying A Cut Using Copy Original
OPYING A UT USING RIGINAL Copies the current file another location. Select the recording to be copied, then select COPY ORIGINAL from the Utility menu. The display will ask for a destination. Use the selection knob to select a file ID in the destination drive and directory, press the button when you have finished searching. -
Page 47: Copy Edited
If you respond NO to both the Index and Name queries, DigiCart/EX will copy all cuts from the original directory to the destination directory, starting with the lowest available ID number. The display will indicate the name of each cut and its position in the destination directory as it is copied. Copying begins with the cut currently selected in the source directory. -
Page 48: Delete
Select COPY EDITED from the UTILITY MENU. The procedures are the same as for copying a directory using COPY ORIGINAL with the addition of the FILE FORMAT CONVERT option. If the FILE FORMAT CONVERT option is enabled, only linear 16-bit files with sample rates up to 48000 samples/sec will be converted. - Page 49 To Format a Memory Card: • Select Format Disk from the Utility menu and press ENTER • The display will prompt to select a drive for formatting, INTERNAL MEMORY CARD or INTERNAL HARD DRIVE. Select INTERNAL MEMORY CARD and press ENTER •...
-
Page 50: Mount Network Drive
DRIVE 0 Internal Memory Card Reader DRIVE 1 Internal Hard Disk DRIVE 2 Internal Hard Disk Partition (if internal disk is formatted with 2 or more partitions) or Not Used. DRIVE 3 Internal Hard Disk Partition (if internal disk is formatted with 3 or more partitions) or Network Drive DRIVE 4 Internal Hard Disk Partition (if internal disk is formatted with 4 or more partitions) -
Page 51: Chapter 5
Chapter 5 Recording DigiCart/EX can record audio to a Memory Card, to its internal hard disk or to a network drive. To record to a network drive, simply select the drive, directory, and file location as you would for a local drive. - Page 52 WAV or DigiCart format, 24-bit recordings are WAV file format. DigiCart/EX cannot perform internal data format conversions. Recordings must pass through the I/O connectors to be converted. It is sometimes desirable to output a smaller digital word size for use by external equipment, such as a 16-bit DAT recorder.
-
Page 53: Transport Controls
Transport Controls Control of the DigiCart/EX transport may originate from the front panel, a keyboard, the GP inputs on the rear panel, or via the serial ports using an RC-series remote control or automation equipment. Basic transport controls include RECORD, STOP, PLAY, LOOP and PAUSE. Front panel controls have equal authority with commands issued by remote controls or via rear panel connections. -
Page 54: Setting Record Levels
ETTING ECORD EVELS • Using tone, set a "zero" level on the mixer or other program source. • Press the button to go to Record Ready mode and monitor the input. • Adjust the input source level controls as required so that the “0” meter segments are lighted and the “+3”... -
Page 55: Chapter 6
Chapter 6 Playback DigiCart/EX can play audio files in many different ways. These range from the straight-forward press of the PLAY button, to using Hot Keys, to building complex Playlists. Playback can be initiated from the front panel, a keyboard, dedicated RC-series remote control, GPI, or serial control via DigiCart serial protocol or Peripheral Bus. -
Page 56: Transport Controls
Transport Controls Basic transport controls include RECORD, STOP, and PLAY. LOOP and PAUSE are also available. Playback can be initiated from the front panel, from the rear panel GPI or serial port, an RC-series remote control, or a keyboard. Front panel controls have equal authority with commands issued by remote controls or via rear panel connections. -
Page 57: Playing Multiple Cuts - Follow-On Play
Playing Multiple Cuts — Follow-On Play In Follow-On Play, a second cut may be selected and queued to play while a cut is currently playing. NOTE: For Follow-On Play, the RESTART MODE selection in the SETUP menu must be set to “ON COMPLETION”. - Page 58 Building a Quickstack • Press the button. (It will illuminate when pressed.) PAUSE [BUILD LIST] • Select a cut or Playlist (an event) to be added to the Quickstack. • Press the button to add the first event to the Quickstack. The number displayed under PLAY the event ID counts the entries in the Quickstack.
-
Page 59: Chapter 7
Chapter 7 Playlists A Playlist (also known as a Stack) is a list of audio cuts that can be stored on any drive on the DigiCart/EX or network. Some of the most powerful capabilities of DigiCart/EX are its Playlist features. You can create Playlists consisting of multiple cuts and other Playlists. You can edit and update Playlists, and select between two types of Playlists called "Linear"... - Page 60 Linear Playlist A Linear Playlist is a list of items that can be played in sequence from a single PLAY command. When each item in a Playlist has been properly edited, Linear Playlists provide seamless playback of multiple audio cuts. This feature is particularly useful for editing music files, production beds, news interviews, or creating spot sets.
-
Page 61: Creating A Playlist
Compound Playlist A Compound Playlist is one that contains other Playlists; it can also contain individual Cuts. For a Linear Playlist containing a Rotating Playlist, each time the Linear Playlist is played the Rotating element will be different. This allows you to introduce an ever-changing freshness into a routine "air break"... -
Page 62: Playing A Playlist
Saving a Playlist After you have built a Quickstack you may store it as a Playlist. To save a Quickstack: • Press the button before releasing the ) button. ENTER PAUSE MAKE PLAYLIST • Select either Linear or Rotating Playlist type with the navigation controls. •... -
Page 63: Viewing A Playlist
IEWING A LAYLIST To view the contents of the Play queue at any time, press button and rotate select to see VIEW LIST Playlist items remaining to be played. Use the selection knob to scan the events in the list. The number at the upper left of the display shows the event’s position in the Playlist. -
Page 64: Remove
• Select the Playlist to be edited, then press . (Append is not affected by position within EDIT the list.) • Press and select APPEND from the Edit Tools list. Use the selection knob or ENTER navigation arrows to locate the file you wish to insert, then press to append it to the ENTER end of the Playlist and return to Scan mode. -
Page 65: Change Playlist Type
HANGE LAYLIST Switches between Linear and Rotating Playlist (Stack) types. • Select the Playlist to be edited, then press EDIT • Press and select CHANGE LIST TYPE from the Edit Tools list. Press a navigation ENTER arrow button to change the Playlist type between Linear and Rotating. Press ENTER complete the operation and return to Scan mode. -
Page 66: Chapter 8
Chapter 8 Audio Editing This chapter covers editing of audio files and Playlists. DigiCart/EX can make basic edits to audio files, such as Head and Tail Trims, Fades (In and Out), Output Gain adjustment, and Pre-roll. Playlist edits provide lots of flexibility to change Playlists, rather than rebuild them. Non-destructive audio file edits (Head/Tail Trim, Fade In/Out, Gain) can be performed on all playable formats. - Page 67 Head determines the point in a recorded file where playback begins when the button is PLAY pressed. DigiCart/EX has a minimum length of two seconds for any cut. It is not possible to use HEAD trim to further reduce this length. Since tight HEAD trims are usually more important than TAIL trims, always perform the HEAD trim first, and then trim the TAIL if cut length permits.
- Page 68 Setting TAIL POINT to a Specific Value Allows setting the Tail point to a known value. This is accomplished without playing the audio. • Select a cut and press . Select TAIL by using selection knob. Press . The current EDIT ENTER Tail point will be indicated on the display.
- Page 69 After you have recorded a cut, you can program a FADE IN. FADE IN always begins at the HEAD point of a cut, and cannot exceed total cut length or the amount of time between the HEAD point and the beginning of a FADE OUT or the TAIL. The maximum FADE length is 40 seconds. When adjusting FADE IN duration, time is measured as the number of seconds from the HEAD point to the end of the fade.
- Page 70 Setting FADE OUT to a Specific Value This method allows setting the Fade Out length to a known value. This is accomplished without playing the audio. • Select a cut and press . Select FADE OUT by using selection knob. Press .
-
Page 71: General Cleaning
Because hazardous voltages may be present inside this product, refer service to qualified electronics service technicians. Qualified technicians may obtain a factory service manual from 360 Systems Technical Support Department. -
Page 72: Directories
Update Directories, which are all covered under Utility Menu Features beginning on page 3. Program Updates From time to time, 360 Systems may release new versions of the DigiCart/EX operating system program that can be installed by the user via either a memory card or a file on the Ethernet Audio server. -
Page 73: Memory Cards And Card Reader
ESTORING REVIOUS ERSION DigiCart/EX stores two versions of its operating system in flash memory, the current version and the version previous to it. If you need to revert to the previous version of the DigiCart/EX operating system, power the system OFF. Press and hold the button while turning ON the power UTILITY switch. -
Page 74: Special Button Sequences
ROUBLESHOOTING EMORY PERATION Incompatible cards may cause a considerable delay in the power up sequence. The display may stay blank for an extended period and error messages may displayed during initialization. This will normally just require additional waiting time, or the card can be removed until after the DigiCart/EX has initialized. -
Page 75: Appendix A
Appendix A Interface Wiring Audio Connector Wiring BALANCED UNBALANCED PIN–1 GROUND (SHIELD) GROUND. PIN–2 AUDIO " + " AUDIO " + " OR "HOT" PIN–3 AUDIO " – " AUDIO " – " (SHIELD) (JUMPER TO PIN–1 FOR GROUND REFERENCE) SHELL GROUND GROUND... -
Page 76: Gpi/O (General Purpose I/O)
NOTE: If your DigiCart/EX is replacing a DigiCart II, or will be connected to an older DigiCart, you should review the following diagram to be certain that the wiring is compatible. If necessary, contact 360 Systems for documentation on the older machines (units that do not have AES/EBU connections). -
Page 77: Remote Control
No Connect (Was Secondary Cue Out) 19-25 No Connect Remote Control This connection is dedicated to a 360 Systems RC-320 Remote Control with a D-SERIAL-320 Remote Control interface cable. This port communicates with the remote control and also provides its power. SIGNAL... -
Page 78: Aux Serial Port
LED status indicators are included on the connector. The green LED lights to indicate a valid network connection. The yellow LED lights to indicate communication activity. This connection is intended for use only with 360 Systems’ Ethernet Audio Server system. It is not suitable for connection on a generic LAN or WAN system. -
Page 79: Appendix B
Get Directory Info Set cut Info Timer Info Complete protocol documentation is available to qualified parties. Authorization as a DigiCart/EX third party software developer may be discussed by contacting the 360 Systems Customer Service department. ARDWARE ORMAT The serial connection is a 4-wire EIA-485 (RS-485) full-duplex channel. EIA-485 is a multi-drop version of the EIA-422 specification, and is fully compatible. -
Page 80: Peripheral Bus
Peripheral Bus This section covers a general description of the Grass Valley switcher Peripheral Bus II protocol implementation on DigiCarts. (Also known as P-BUS and E-MEMS) The commands are ASCII strings terminated with a carriage return. All data values are represented as hex ASCII digits. Data field widths are fixed, thus all digits must be supplied. -
Page 81: Appendix C
Introduced in 1998, DigiCart II Plus replaced the Bernoulli removable drive with the Iomega Zip 100 drive. DigiCart/E Introduced in 2001, DigiCart/E introduced network operation with the 360 Systems Ethernet Audio Server system and featured the Iomega Zip 250 drive as the removable media. D-Net File Transfer • 69... -
Page 82: Key Features
Appendix D D-Net File Transfer The D-NET capabilities of your DigiCart/EX allow you to use its digital audio interfaces for making audio data transfers between machines using the AES ports. D-NET is particularly useful for maintaining compatibility with older DigiCarts. D-Net enables the digital audio interfaces of your DigiCart/EX to transfer audio files between DigiCart II, DigiCart/E and DigiCart/EX systems. - Page 83 LECTRICAL PECIFICATION FOR RANSFERS File transfers may be accomplished via either of two digital audio interfaces: • AES-3id-2000 (AES standard, 75Ω impedance, BNC connector) • AES-3 (AES standard, 110Ω impedance, XLR connector) Both outputs always carry the same signal. There is no output selection necessary. AES-3ID The AES-3id-2000 interface has been designed to operate using coaxial cable with a nominal impedance of 75Ω...
-
Page 84: D-Net Receiver
EXIT NOTE: Setup can be done from a 360 Systems RC-320 remote control or a keyboard. Please refer to the operations manual of your remote control for complete instructions. The following is a description of the File Transfer Setup options and how to set them. - Page 85 The destination location defaults to the Index number that the file originated from on the source machine. The 360 Systems Instant Replay® can receive cuts in certain formats from your DigiCart/EX. All models of Instant Replay can receive AC-2 and 48K linear files. Models DR-552 and DR-554 can also receive 44.1K linear files.
- Page 86 Echo Function If your D-NET network is configured in a “Daisy Chain,” or loop, and the Echo Function is ON, you will be able to relay the incoming transfer to the digital input of a DigiCart/EX to the digital output on that machine and on to the next DigiCart/EX in the network. DigiCart 2 DigiCart 2 Plus To set ECHO DURING RECEIVE on a DigiCart/EX select DNET FILE TRANSFER from the Utility...
-
Page 87: Transfer Messages
NOTE: A transfer can be canceled by pressing either the buttons. You’ll be STOP EXIT prompted to confirm before the transfer is aborted. During the transfer the display will update the completion percentage of the transfer as it progresses. When transferring drives or directories, the file number within the group updates as each individual file transfer is completed. - Page 88 BORTED RANSFER If you press the buttons on the source DigiCart during a transfer, the transfer will EXIT STOP continue to proceed while the display queries “QUIT TRANSFER? PRESS ENTER/EXIT” If you press the button, the display will revert to normal and the transfer will continue. EXIT If you press the button, the transfer is aborted and the display briefly shows:...
-
Page 89: D-Net Messages
D-Net Messages MESSAGE MESSAGE MEANING LOCATION FILE TO SEND COULD NOT BE SOURCE COULD NOT OPEN FILE OPENED SOURCE FILE IS EMPTY FILE TO SEND IS EMPTY SOURCE NO FILES TO SEND DRIVE TO SEND IS EMPTY SOURCE PART OF FILE MISSING FILE IS SHORTER THAN EXPECTED ERROR READING / WRITING THE EITHER... -
Page 90: Play Word Size
Appendix E Recording Encoded Digital Data As of version 1.14 there is a specific selection in Record Data Format for 24 Bit Digital Data. This can be used to record Dolby E and other formats that use non-audio (really meaning non-PCM) data. When recording the encoded data: •... -
Page 91: General Specifications
Appendix F Technical Specifications General Specifications NTERNAL (Drive data from manufacturer) Capacity 160GB Hard Disk Reliability MTBF: >250,000 hours EMORY EADER Type and Capacity SDHC Class 10. 2GB to 64GB ISCELLANEOUS Cue to Next Cut Instantaneous on all drives. Display 240 x 64 pixel (7 x 40 characters) backlit LCD Level Metering Quasi-peak responding LED display... -
Page 92: Physical Dimensions (Nominal)
Physical Dimensions (nominal) Height 3.48" [89mm] (Standard EIA Rack, 2U High) Width 17" [432mm], except rack mounting ears at 19” [483mm] Depth 12" [305mm] Net Weight 12.75 Lbs [5.6 Kg] Shipping Weight 20 Lbs [9 Kg] Audio Configuration Specifications Sampling Frequencies 96 kHz, 88.2 kHz, 48 kHz, 44.1 kHz Audio Coding 24- or 16-bit Linear PCM... -
Page 93: Appendix N
Appendix N Networking Overview The Ethernet Audio Network is designed to allow the following capabilities: • Share, back up and restore audio recordings between multiple DigiCart/EXs. • Record and Play audio directly from shared network storage. • Share .WAV files with other applications such as Digital Audio Editors. •... -
Page 94: Choosing A Server
DigiCart/EX units. If the server needs to be connected to a local or wide area network this should be through an additional separate interface. Contact 360 Systems Customer Support if you need further guidance on specifying or configuring a large system. -
Page 95: Set Ip Address
Setting up the Network DigiCart/EX should be connected to a server through a Gigabit switch. (If a 10/100 Switch is used, it should have a Gigabit connection to the server.) The DigiCart/EX must be on the same subnet as the Ethernet Audio server. -
Page 96: Setting Up The Ethernet Audio Server
Setting up the Ethernet Audio Server This is a brief overview, followed in the next section by detailed instructions on setting up a system with Windows Server 2008, and Windows 7 with the Hanewin NFS Server program. These are complete for simple systems, however the complete subject of Windows system configuration is beyond the scope of this document. - Page 97 As it is best practice to maintain the same names for the actual Windows folder names as the NFS share names, only use letters and numbers for folder names, and use “_” (underscore) for the space character. Do not add additional folders to a network drive folder. It is best to avoid adding non-DigiCart files to a DigiCart network drive;...
-
Page 98: Setting Up Windows Server
Setting up Windows Server 2008 This assumes that the Windows 2008 system has been installed, authorized and updated. Note that these instructions do not take into account the possible effects of joining the server to a domain. Depending on the way the overall network system is configured, the domain controller may take over control of certain security policies. - Page 99 If the Initial Configuration Tasks dialog below is not displayed, open it by selecting Start>Administrative Tools>Server Manager In Initial Configuration Tasks, click Add roles. Add the File Services role by clicking the check box. Click Next. Networking • 87...
- Page 100 Click the Services for Network File System check box. Click Next. Click Install in the Confirm Installation Selections screen. After installation, the results will be displayed. Click Close. 88 • Networking...
- Page 101 Go into Share and Storage Management (Start>Administrative Tools>Share and Storage Management). Select Edit NFS Configuration. The first step is Select an Identity Mapping Solution, click on Identity Mapping Wizard. Networking • 89...
- Page 102 Select Do not use an identity mapping solution, then click Next. Review the setting and click Configure. Confirm by clicking Close. 90 • Networking...
- Page 103 Next, select Use Services for NFS to Share Folders and click on Provision a Shared Folder Wizard. Click the Browse button to select an existing folder or create a new folder. (Return to this screen to create additional shares. See the end of this section.) Select an existing folder or click Make New Folder.
- Page 104 In the NTFS Permissions screen, click Edit Permissions. Click Other Users or Groups. Click Object Types and set to Group or Built-in security principal. Click Locations and select the local computer if there is more than one choice (cancel any requests for a username and password).
- Page 105 Click OK, then Next in the NTFS Permissions screen. Select NFS by clicking the check box. Edit the Share name if necessary to include only capital letters, no symbols or spaces (except that underscores_can_be_used). The name can be no more than 15 characters long.
- Page 106 Select Enable unmapped user access and Allow anonymous access. Click Edit Permissions. Select Full control. A dialog will appear, click Yes. 94 • Networking...
- Page 107 Select ALL MACHINES and click Edit: Select Read-Write in Permissions. Check Allow root access. Click OK then Next. Networking • 95...
- Page 108 The settings are displayed for review. Click Create. Click Close, or click Shared Folder Location and repeat these instructions from the note on page 3 to create another share. This completes the process. 96 • Networking...
-
Page 109: Creating Net Drives In Windows Explorer
Creating Net Drives in Windows Explorer You can also create Net Drives directly in Windows Explorer: Open Windows Explorer (Start> Programs (or All Programs)>Accessories> Windows Explorer, or, click My Computer) Select the drive and folders where you want to create the Net Drive. Create a folder that will be your Net Drive, or select an existing folder. - Page 110 Select Share this folder by clicking on the check box. Select both Kerberos options and No server authentication if necessary. Select Allow anonymous access. Click on the Permissions button. Set Type of access to Read-Write. Check Allow root access. Click OK on each open properties window. If you are updating an existing Windows installation to Server 2008 and you are configuring an existing DigiCart share, you may...
-
Page 111: Configuring Windows With Hanewin Nfs Server
Configuring Windows with Hanewin NFS Server Windows 7 does not have any option for native NFS service, but there is a package available from Hanewin that does the job nicely. It is also possible to use it with older Windows versions such as Vista and XP. - Page 112 Select the Exports tab and click on Edit exports file. A file will appear with the first four example lines. These lines are for example and are not active because of the “#” characters that begin each line. This feature can be used to temporarily disable shares if you wish.
- Page 113 Go to the DigiCart/EX. Follow the directions on mounting a Network Drive. Configuring Windows Firewall for Hanewin As the system is designed for use on a private trusted network there should be no need for the firewall, however it can be configured to allow access to the Hanewin program’s services. - Go to Control Panel>System and Security>...
-
Page 114: Managing Net Drives On The Digicart/Ex
Managing Net Drives on the DigiCart/EX OUNT ETWORK RIVE DigiCart/EX can attach to up to four network drives at a time. It can be helpful to think of these “virtual drives” as individual projects, each with a set of ten subdirectories that can help you organize your studio. - Page 115 Troubleshooting Network Drive Errors If a connection to the network cannot be established (network connection is broken; network path name changed, deleted, etc.), then an error message indicating the nature of the problem will appear when the network drive is selected. Waiting for Network implies that there is no Ethernet connectivity, either due to a physical or software configuration problem: ⎯...
- Page 116 defined .........19 Error messages ....... 19 Index Declaration of Conformity ..2 ES-Bus ..6, 8, 29, 66, 67, 79 DigiCart Serial Protocol ..67 Exit button ......11 Digital output External Sync selecting .......23 playback ......43 24 Bit Digital Data ....78 DIR OUT OF DATE ....45 record .........
-
Page 117: Mount Network Drive
Mapping Append ....... 52 playback ......43 Hot Keys ......30 Insert ........51 recording ......39 Network Drive ....17, 37 looping ........ 52 Stack ......See Playlist Memory Card Remove ....... 52 Stack mode ....See Playlist formatting ......36 Truncate ......52 Stop button ......
Need help?
Do you have a question about the DigiCart ex E-3000 and is the answer not in the manual?
Questions and answers