Table of Contents
Advertisement
Advertisement
Table of Contents

Related Manuals for Orion SkyView Pro


Summary of Contents for Orion SkyView Pro
- Page 1 Manual orion skyView Pro ® Goto system #7817 customer support (800)‑676‑1343 E‑mail: support@telescope.com Corporate Offices (831)‑763‑7000 89 Hangar Way, Watsonville, CA 95076 Providing Exceptional Consumer Optical Products Since 1975 IN 296 Rev. B 02/09...
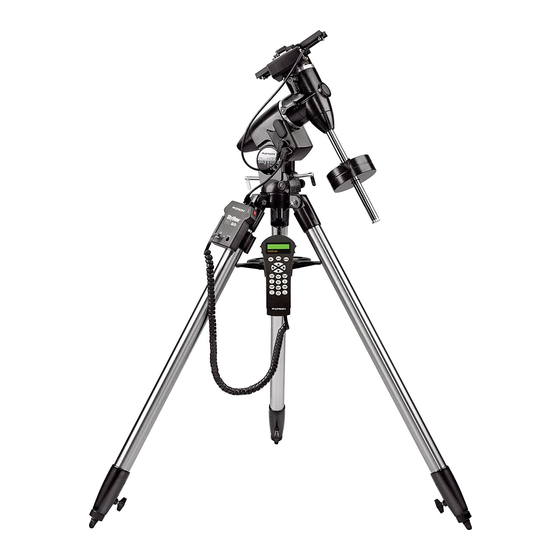
- Page 2 Dec. GoTo motor cover GoTo hand controller bracket R.A. GoTo motor Brass gears Motor control box GoTo hand controller Motor cables GoTo hand controller cable Figure 1. The SkyView Pro GoTo System (not all parts on parts list are shown)
-
Page 3: Parts List
Views of the planets, Moon, galaxies, nebulae, stars, and star clusters will all be as close as the touch of a button. You’ll find using your SkyView Pro GoTo mount will provide an entirely new astronomical experience that will open up new realms of celestial exploration. - Page 4 Note: There is a small packet of grease included with your together. You may have to adjust the way the gears mesh SkyView Pro GoTo system. Once you have installed the GoTo by tightening or loosening the socket-head cap screw that motor so the gears mesh properly, you can apply a very small is used to attach the R.A.
- Page 5 2. Slide the geared end of the remaining small brass gear Figure 9. The Dec. GoTo motor assembly onto the Dec. worm gear shaft of your SkyView Pro mount so it resembles Figure 8. Rotate the small brass gear so...
- Page 6 4. Make certain that the teeth of the smaller gear of the Dec. 1. Attach the motor control box bracket to the top of one of the legs of the SkyView Pro tripod. It will be most conve- GoTo motor assembly meshes with the brass gear. Also,...
- Page 7 Powering the skyView Pro Goto system The three mode buttons are located at the top of the con- The SkyView Pro GoTo system should be powered by an 11V troller, directly below the LCD screen. They include the ESC, to 15V DC power supply (tip positive) capable of producing ENTER, and SETUP buttons.
-
Page 8: Initial Setup
1. Perform the polar alignment using the procedure previ- ously outlined in Section 6 of the instruction manual that came with your SkyView Pro mount. A rough polar align- ment will suffice, but an accurate polar alignment using the polar axis finder scope will increase tracking accuracy (and pointing accuracy for one-star alignments). - Page 9 9. Enter your current local time using the 24 hour clock format 3. The controller will provide a list of stars that can be used as (example: 2:00PM = 14:00). Press ENTER to view the time the second alignment star. Choose a star using the scroll you entered.
-
Page 10: Object Catalog
1. From the alignment screen, select “1-Star Align” using the 3. Use the directional buttons (and RATE button) to accu- rately center the star in a high-powered eyepiece (10mm scroll buttons. Press ENTER to confirm your choice. or less focal length). 2. - Page 11 Park Scope: Moves the telescope to the “home” position. Press ENTER again, and the hand controller will ask “View This allows you to power off the SkyView Pro GoTo system Object?” Press ENTER once more to have the telescope slew while saving alignment and PEC training data.
- Page 12 1 (RA-Dec) or 2 (AzAlt) to make your selection. cially available planetarium software programs can utilize this function and be used to control the SkyView Pro GoTo sys- 4. The default setting will display the R.A./Dec. or Az/Alt coor- tem. Look for software that is compatible with the Celestron dinates the telescope is currently pointed to.
-
Page 13: Auto Guiding
It may take significantly longer if a serial-to-USB adapter is employed on your computer. Figure 16. Pin diagram for the SkyView Pro GoTo autoguider jack 6. When the download is complete, the Firmware Loader will display “Update Complete”. - Page 14 Pro Goto Hand controller Menu tree...
-
Page 15: Technical Specifications
Rate 6 = 400X Rate 7 = 500X Precision Rate 8 = 600X The Skyview Pro GoTo system produces pointing accuracy Rate 9 = 800X (3.4°/sec) and tracking accuracy adequate for most applications. If Tracking rates: S i d e r e a l ( d e f a u l t ) higher precision is required, “cone”... - Page 16 Incorrect star alignment, loose R.A. or Dec. lock-knobs, or 7. Using the Dec. direction button on the hand controller, adjust the telescope in Dec. so Polaris lies on the R.A. “cone” error. If the GoTo hand contoller puts the star outside the eyepiece field of view, you need to determine which of crosshairs of the illuminated reticle eyepiece (Figure 18).
- Page 17 Figure 19a‑b. Rotate the telescope 180° about the R.A.axis. Figure 21a. Adjust the optical axis offset screws this way if Polaris moves toward the center of the eyepiece when the tube is pushed as in Figure 19. Figure 20. gently push the telescope horizontally to determine direction of optical axis offset.
-
Page 18: Appendix B: Periodic Error Correction (Pec)
By recording a full cycle of guiding actions, the SkyView Pro 9. Using the left or right direction button only, move the tele- scope so the guide star remains centered in the eyepiece GoTo system can compensate for drifting in the R.A. -
Page 19: Appendix C: Rs-232 Connection
Alt high byte, Alt low byte. + sidereal mode until another tracking mode is selected. If the power is turned off while the SkyView Pro is in the PEC + sidereal mode, the hand controller loses synchro- nization with the R.A. worm gear and the PEC training will have to be repeated when the power is turned back on. -
Page 20: Appendix D: Standard Time Zones Of The World
D: standard time Zones of the World one‑Year limited Warranty This Orion SkyView Pro GoTo system is warranted against defects in materials or workmanship for a period of one year from the date of purchase. This warranty is for the benefit of the original retail pur- chaser only.
Need help?
Do you have a question about the SkyView Pro and is the answer not in the manual?
Questions and answers