Table of Contents
Advertisement
Advertisement
Table of Contents

Related Manuals for Hotpoint HM311i


Summary of Contents for Hotpoint HM311i
- Page 1 Instructions for Installation and Use Integrated Fridge / Freezer Model HM311i...
-
Page 3: Table Of Contents
Contents Installation Choosing a location Installation Door Reversal Mounting the appliance Get to know your Appliance Getting your Appliance ready for use Final Check Running in the Compressor The Controls Storing Food Storing Fresh Food Freezing Fresh Food/Procedure Storing Frozen Food Defrosting Frozen Food Caring for your Appliance Defrosting... -
Page 4: Choosing A Location
Installation. WARNING: THE APPLIANCE SHOULD ONLY BE INSTALLED BY A QUALIFIED ELECTRICIAN IN COMPLIANCE WITH THESE INSTRUCTIONS, CURRENT STANDARDS AND REGULATIONS. Before Fitting: Before connecting to the electricity supply leave the appliance to stand for 2 hours to allow the cooling system to settle. Please read through this section before starting any work. -
Page 5: Door Reversal
Installation (Door reversal). 1. Top hinge cover of the refrigerator door. 2. Top hinge of the refrigerator door. 3. Top strip. 4. Bottom hinge of the refrigerator door. 5. Top hinge of the freezer door. 6. Washer. 7. Bottom hinge of the freezer door. -
Page 6: Door Reversal
* Put the freezer door on the bottom hinge. * Turn the bottom hinge of the refrigerator door by 180˚, insert the hinge and the washer into the hole of the corner cap on the freezer door and fasten it. -
Page 7: Mounting The Appliance
Mounting the appliance Before mounting the appliance into the kitchen uniut, disconnect the power supply and set the thermostat knob to the OFF (O) position. Push the appliance for some 38mm into the kitchen unit and allow at least 4mm free space on both sides between the appliance and the side walls of the kitchen unit. -
Page 8: Mounting The Appliance
Mounting the appliance Fix the appliance into the kitchen unit. On the upperside, fix the three screws through the rail and on the lower side with 2 screws through the lower hinges. Drill holes ¿3 x 5 (Fig.5). Fig.5 Seal the gap on the opposite side of the hinge with the enclosed seal (Fig.6) Fig.6... -
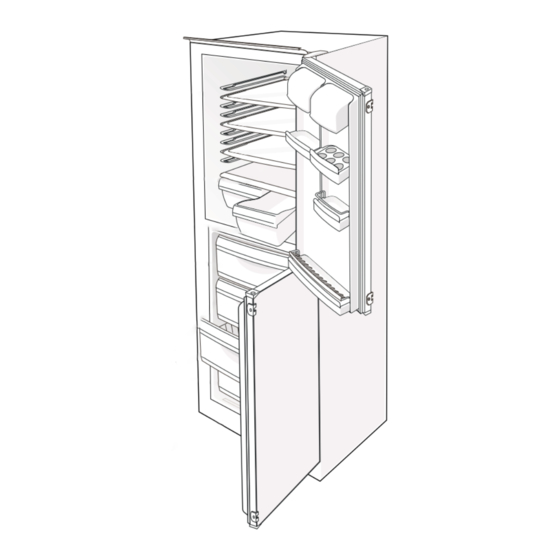
Page 9: Get To Know Your Appliance
3. Fruit and vegetable container The container is under the glass at the bot- tom of the refrigerator and is mainly used to store fruit and vegetables. The door liner The door liner consists of various shelves or... -
Page 10: Getting Your Appliance Ready For Use
Getting your Appliance ready for use. Before connecting to the mains electricity supply leave the appliance to stand for 2 hours to allow the cooling system to settle. Clean the appliance, and be thorough, especially in the interior. (see ‘Caring for your Appliance. -
Page 11: The Controls
The Controls. The temperature in both the fridge and the freezer is regulated by one thermostat which is located inside the top right of the fridge compartment. Turn the control knob clockwise from the OFF (O) position to the required setting 1 - 7. TEMPERATURE SELECTION - Higher settings on the knob (towards 7) mean lower temperatures (colder) in all... -
Page 12: Storing Food
Foods to be stored in the refrigerator should be properly packed, to prevent drying out and odour transference. Plastic bags, containers with lids, foil and plastic stretch wrap are ideal. -
Page 13: Freezing Fresh Food/Procedure
Storing Food. FREEZING FRESH FOODS - Carefully select food you intend to freeze: it should be of high quality and thoroughly cleaned before freezing it. Use correct packaging suitable for the freezer. - The packaging should be air tight and should not leak since this could cause substantial vitamin loss and dehydration of foods. -
Page 14: Caring For Your Appliance
Caring for your Appliance. DEFROSTING: AUTOMATIC DEFROSTING OF THE REFRIGERATOR- There is no need to defrost the refrigerator, because ice deposited on the interior back wall is defrosted automatically. Ice is deposited on the interior back wall during the compressor operation, later on... -
Page 15: Cleaning
Use a soft non-metal brush or a vacuum cleaner. Do not forget to clean also the defrost water receptacle above the refrigerator compressor (do not remove the recepta- cle). Use warm, soapy water to wipe along and in between the creases of the door seal, dry thoroughly. -
Page 16: Troubleshooting
Check that stored food or packaging is not in contact with the cooling plate on the interior rear wall of the refrigerator. (NB. It is normal for droplets to run down the cooling plate). Is there ice formation on the interior rear wall? (see ‘Manual defrosting of the Refrigerator’... -
Page 17: After Sales Service
Hotpoint appliance than us - the manufacturer" As part of our commitment to you, all Hotpoint appliances have the added benefit of a fully inclusive parts and labour guarantee for the first 12 months. In addition to this you also have the advantage of free replacement parts for the first 5 years when fitted by a Hotpoint engineer. -
Page 18: Guarantee
All Hotpoint appliances carry a fully inclusive 12 month parts and labour guarantee as well as free replacement parts for the first 5 years (except microwaves, selected integrated appliances and cooker hoods, which have a one year guarantee) provided that they are fitted by a Hotpoint engineer. -
Page 19: Key Contacts
Over 1200 trained specialists, directly employed by us, ensure that you can have complete confidence in both the appliances and services we offer. (Open 8 to 8 Mon - Fri, 8 to 6 Sat, 10 to 4 Sun & Bank Holidays) Note: Our operators will require the following information: Merloni Elettrodomestici UK Limited, Morley Way, Peterborough, PE2 9JB.
Need help?
Do you have a question about the HM311i and is the answer not in the manual?
Questions and answers