Denon Cocoon Quick Setup Manual
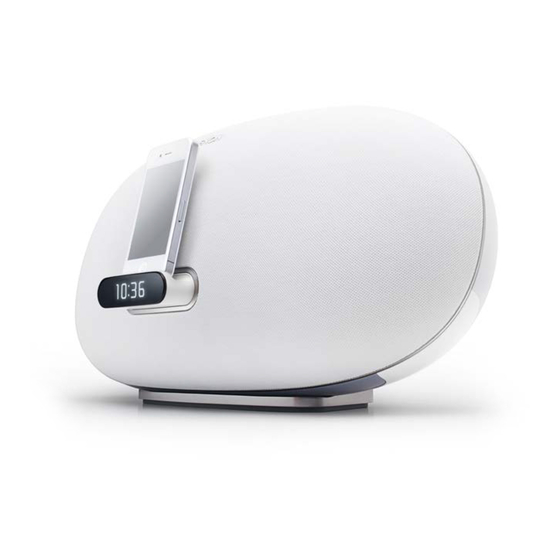
Portable speaker dock
Hide thumbs
Also See for Cocoon:
- Quick setup manual (24 pages) ,
- Quick setup manual (24 pages) ,
- Quick setup manual (13 pages)
Table of Contents
Advertisement
Advertisement
Table of Contents

Subscribe to Our Youtube Channel
Related Manuals for Denon Cocoon


Summary of Contents for Denon Cocoon
- Page 25 DSD-300 PORTABLE SPEAKER DOCK Owner’s Manual...
-
Page 26: Safety Precautions
If the provided plug does not fit into outlet or DENON in the event that abnormal odors or heat generation occurs your outlet, consult an electrician for replacement of the obsolete outlet. - Page 27 This Class B digital apparatus complies with Canadian ICES-003. in this manual, meets FCC requirements. Modification not expressly approved by DENON may void your authority, granted by the FCC, to use the product. z For proper heat dispersal, do not install this unit in a confined 3.
-
Page 28: Table Of Contents
Getting started Thank you for purchasing this DENON product. To ensure proper operation, please read this owner’s manual carefully before using the product. After reading them, be sure to keep them for future reference. Contents Accessories Operations ··············································································12 Getting started ··············································································1... -
Page 29: Features
Turn off the power and unplug the power cord from the power outlet. Next, disconnect the connection cables to other system units Compatible with “Cocoon App” for performing before moving the unit. basic operations of the unit with an iPhone and • About care... -
Page 30: Remote Operation
NOTE operate if the remote control sensor is exposed to direct sunlight, • The Cocoon App can be downloaded for free from the App Store. strong artificial light from an inverter type fluorescent lamp or • Insert the specified batteries in the remote control unit. -
Page 31: Preparations
Preparations Preparations Here, we explain the connections methods for this unit. F Connections vpage 5 v page 5 v page 6 vpage 5 PORTABLE PLAYER F Connecting to a home network (LAN) vpage 7 v page 9 v page 10... -
Page 32: Connections
Connections NOTE Connecting the power cord Connecting a portable player • Do not plug in the power cord until all connections have been completed. When all of the connections are completed, insert the power plug into • If a portable player is connected via the AUX IN jack of the unit, • When making connections, also refer to the owner’s manual of the the power outlet. -
Page 33: Connecting An Ios
• Depending on the type of iOS device and the software version, some functions may not operate. • iPod touch • Note that DENON will accept no responsibility whatsoever for any problems arising with the data on an iOS device when using this unit in conjunction with the iOS device. -
Page 34: Connecting To A Home Network (Lan)
• If you have an Internet provider contract for a line on which network Device that connects to the broadband circuit and conducts Furthermore, you can operate this unit by using Cocoon App on settings are made manually, make the settings at “When “DHCP” is communications on the Internet. -
Page 35: Network Connections And Settings
Network connections and settings There are two types of network connections available – wired and wireless. Select either of them according to your router functions and operating environment. Using a router equipped with the wireless LAN Using a router that is not equipped with the Using PC to make network settings of this unit function wireless LAN function... - Page 36 By just pressing the WPS button on your router and this unit, the iPod touch wireless LAN connection settings are made. Use the DENON application “Cocoon App” to make the wireless LAN connection settings. Internet • Before turning this unit on, make sure that an Ethernet cable is not connected to this unit.
- Page 37 JOIN router that is connected to your the provider you use. To set the connection manually, use the setting Access Point iPod or iPhone. Cocoon (Network Attached procedure of “When “DHCP” is set to “Off” on your router”. Internet Modem w Tap “Join”.
- Page 38 Network connections and settings Using PC to make network settings of this unit • Enter the name in the “Friendly Name” box and click “Set” to change the friendly name. A friendly name is the name of this unit that is presented to the network. n When this unit is connected to your PC through • In “ADVANCE SETTING”, you can manually make settings such as wireless LAN...
-
Page 39: Operations
Operations Operations Here, we explain functions and operations that let you make better use of this unit. F Playback vpage 13 v page 14 v page 15 v page 17 v page 17 v page 18 PORTABLE PLAYER F How to make detailed settings vpage 20... -
Page 40: Playback
Playback This section provides how to play back music with this unit. Preparations Operations possible during playback This unit can play back music from the following devices (media). Setting the current time (Auto Adjust) • iPhone and iPod Selecting the input source When connected to this unit (vpage 14) (12-Hour Display) When using AirPlay (vpage 15) -
Page 41: Various Memory Functions
• Note that DENON will accept no responsibility whatsoever for any This function is activated around 30 seconds after the power is turned problems arising with the data on an iOS device when using this unit Various memory functions in conjunction with the iOS device. -
Page 42: Airplay Function
Launch iTunes and click the AirPlay icon iPad directly to the unit This Computer displayed in the lower right of the window and select Cocoon 1 Make the Wi-Fi settings for iPhone, iPod touch or this unit from the list. AirPlay Device iPad. - Page 43 AirPlay function n Perform iTunes playback operations with the remote control unit of this unit • Source input will be switched to “AirPlay” when AirPlay playback With this unit’s remote control unit, you can perform iTunes song is started. play, pause, and auto search (cue) operations. • You can stop AirPlay playback by choosing other input source.
-
Page 44: Listening To Internet Radio
Important information Press to switch the input source to “AUX”. • Use Cocoon App to change preset details. The broad cast station types and specifications supported by this unit Play the component connected to for playback are as follows. this unit. -
Page 45: Playing Back Files Stored On Pc Or Nas With Cocoon App (Music Server)
Playing back files stored on PC or NAS with Cocoon App (Music server) This unit can play back music files and playlists (m3u, wpl) stored on Settings for playing back with Windows Media Settings for playing back with Windows Media... - Page 46 Playing back files stored on PC or NAS with Cocoon App (Music server) Important information About playback • The network audio playback function of this unit connects to the server using technologies shown below. • Windows Media Player Network Sharing Service • File types that this unit can play back and specifications are shown below.
-
Page 47: How To Make Detailed Settings
How to make detailed settings Menu map Menu operation Setting items Detailed items Description Page Language NOTE Sets the language for display the menu. Language Use buttons on this unit for menu operations. Buttons on the remote control do not work. Clock Auto Adjust(On) Automatically performs the clock setting from the time information on... -
Page 48: Setting The Language (Language)
Setting the language (Language) Setting the clock (Clock) Setting the Time Zone Sets the language for display the menu. You can automatically adjust the clock of this unit using the Internet. • The factory default setting is “English”. (Time Zone) Press + and – at the same time. To use this function, the unit must be connected to the Internet. - Page 49 Setting the clock (Clock) Setting the Summer Time Setting the current time Setting the current time (Manual Adjust) (Summer Time) (Auto Adjust Now) (12-Hour Display) Use the following procedure to set Summer time if the Summer time When the unit is connected to the Internet, the current time is set When the unit is not connected to the Internet, set the current time system is used in your country.
-
Page 50: Setting The Volume Limit (Max Vol Level)
Setting the volume limit Setting the network (Network Info.) (Max Vol Level) Checking the network information WPS Settings (PIN code method) Make a setting for maximum volume. Press + and – at the same time. Use this procedure to configure the wireless LAN settings. • The factory default setting is “50”. -
Page 51: Firmware Update
Press + or – to select “Yes” or the network environment. “No”, then press 13. Press + or – to select “Check for Update” or “Start”, See the DENON website for details about updates. then press 13. Check for firmware updates. Check for Update –... -
Page 52: Informations
Informations Informations Here, we list various information related to this unit. Please refer to this information as needed. F Part names and functions vpage 26 F Other information vpage 28 F Troubleshooting vpage 31 F Specifications vpage 33 F Index vpage 34... -
Page 53: Part Names And Functions
In this case, please contact : Not connected DENON service center. • Battery replacement must be performed by a GRemaining battery level indication during r t y service person. -
Page 54: Rear Panel
Rear panel Remote control unit See the page indicated in parentheses ( ). For buttons not explained here, see the page indicated in parentheses ( ). Skip buttons (8, 9) ··························· (14) Play/Pause button (13) ···························· (14) Input source select button ( ) ················· (13) Power operation button (X) ······················... -
Page 55: Other Information
Other information Trademark information n Trademark information (vpage 28) This product uses the following technologies (Random order): n Explanation of terms (vpage 29) “Made for iPod” and “Made for iPhone” mean that an electronic accessory has been designed to connect specifically to iPod, or iPhone, respectively, and has been certified by the developer to meet Apple performance standards. -
Page 56: Explanation Of Terms
Explanation of terms FLAC IEEE 802.11b Network Names AES (Advanced Encryption Standard) FLAC stands for Free lossless Audio Codec, and is a This is one wireless LAN standard set by the 802 (SSID: Security Set Identifier) This is a next generation standard encryption lossless free audio file format. - Page 57 Explanation of terms Windows Media DRM WPA (Wi-Fi Protected Access) This is a copyright protection technology developed This is a security standard established by the Wi-Fi vTuner by Microsoft. Alliance. In addition to the conventional SSID This is a free online content server for Internet Content providers are using the digital rights (network name) and WEP key (network key), it also radio.
-
Page 58: Troubleshooting
• This unit amplifier circuit has failed. Turn off the power and please – buttons on the upper contact the DENON service adviser. this case, no audio is output even when a station is received. Try part of this unit flash again later, or switch to another radio station. - Page 59 GRemote control unitH Symptom Cause/Solution Page Symptom Cause/Solution Page Cannot connect to • Radio station is not currently broadcasting. Wait a while before – preset radio stations. trying again. The set cannot be • Batteries are worn out. Replace with new batteries. • Radio station is not currently in service.
-
Page 60: Resetting The Microprocessor
Resetting the microprocessor Specifications When the microprocessor is reset, all the settings are reset to their default values. n Audio section Press + and – at the same time. • Amplifiers 2 x 25 W ClassD Turns on the menu settings mode and the menu appears on the • Drivers 2 x 100 mm Woofer display... - Page 61 Firmware Update ············································· 24 Summer Time ·················································· 22 PIN code method ············································· 23 Time Zone ························································ 21 Network Names ················································· 29 Cocoon App ·············································· 3, 17, 18 WAV ··································································· 19 Condensation ······················································· 2 WEP Key ···························································· 30 Connection Wi-Fi ··································································· 30 Operation Mode ·················································...
- Page 62 Dimensions Unit : in. (mm) 13 55/64 (352.0) 1 1/16 (27.0) 5 23/64 (136.0) 25/64 (10.0) Weight : 7 lbs 4 oz (3.3 kg)
- Page 63 D&M Holdings Inc. 3520 10123 00AD...
Need help?
Do you have a question about the Cocoon and is the answer not in the manual?
Questions and answers