Table of Contents
Advertisement
Quick Links
R2G802U
PLEASE READ THE INFORMATION AND FOLLOW ALL INSTRUCTIONS THOROUGHLY BEFORE
USING THIS PRODUCT.
Introduction
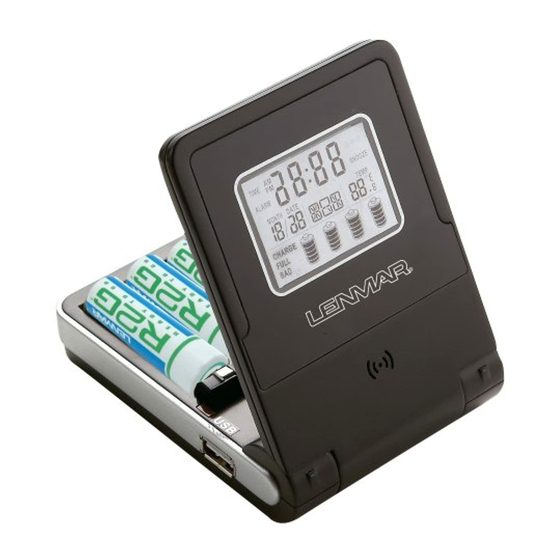
Thank you for purchasing the R2G802 2 Hour Charger. Read the instruction manual
thoroughly before use and keep the manual for later reference. It contains important
operating instructions for your R2G Rechargeable Battery System. The R2G802 is a
combination of Travel Alarm Clock, 2 hour microprocessor controlled charger for 1 to 4
AA/AAA NiMH batteries, Thermometer, and USB PowerPort for charging your cell
phones, MP3 players or any other device that accepts power from a USB port. All the
functions are displayed clearly on a large backlit LCD Display. The charger can be
powered 3 ways and includes a high efficiency "switching" type power supply will adjust
automatically to any voltage from 100 – 240VAC, for international use. A car-cord for
using the charger in the car and a USB cable for powering the charger from your
computer are also included.
Before Use
To activate the clock and thermometer functions, pull out the tab from the side of the
casing at the access cover to the clock battery on the bottom of the unit. The clock
portion of the LCD display will turn on and you will hear alarm music for 10 seconds. The
Clock / Alarm is now ready for use and should be set to the proper time / date. If the LCD
display get dim or the sound of the alarm tone become weak, replace the clock battery
with another new "CR-2025" type 3V Lithium battery which is located on the bottom side
of the charger base.
Caution:
•
Batteries are partially charged as shipped. Must be charged prior to first use for full
capacity.
•
Charge only NiMH type batteries on this charger.
•
Do Not mix AA and AAA or different capacity batteries together when charging
•
Use only R2G, NoMEM PRO or other proper NiMH compatible charger to recharge
the batteries included.
•
Batteries may leak or explode causing personal injury if inserted improperly, disposed
of in fire, mixed with other battery types, or short circuited.
1.
In the regular Time mode, press the
A
button to enter the Alarm mode. The "ALARM"
icon will appear on the LCD in this mode. Pressing the
B
button will start the Alarm icon
flashing along with the item to be set. Use the
and
buttons to change the item to
C
D
the setting you want. When you are done setting each item, press the
to the next item. You can set the hour and minute you want the alarm to sound, the length
of time delay for the "Snooze" setting and select the alarm tone to sound. The following
figure shows the order of items during the Alarm setting process. The "SNOOZE" can be
set in the range of 1 to 60 minutes and there are 8 different kinds of alarm tones for your
choice. Press
C
and
D
to change the setting you want. Pressing the
the setting mode (set mode will automatically if there is no input for 1 minute). The
following figure shows the order of items during the Alarm setting process.
LCD Display Legend
Fig. 1
Getting Ready
Choose the adapter plate for the type of battery you will be charging. Each of the adapter
plates is labeled as to the batteries it can work with. If the charger base does not already
have the adapter plate you want attached, you will need to remove the adapter plate first
by pushing down on the plate and sliding it to the rear of the charger base (away from
the LED indicators). Then, attach the selected adapter plate to the charger unit by
aligning the arrows on the sides of the adapter plates and the charger base as shown.
While pressing down lightly on the adapter plate, slide the plate toward the front of the
charger base until it locks.
Charging Instructions
1. Choose the source of power for the charger unit. You can use the AC adapter which
is international capable accepting 100-240VAC (plug adapter may be required in other
countries, not included), the DC car cord while on the move or plugged into a USB port
on your computer (charge times are increased when USB power is used). Simply plug
the desired power cable into the side of the charger unit and the other end into the
appropriate power source.
2. Insert 1 to 4 pieces of AA or AAA rechargeable Ni-MH batteries into any open battery
location observing the proper battery polarity to the marks in the battery compartment.
Do not mix AA and AAA batteries while charging. The Blue backlight will light up for
around 10 sec once the batteries inserted correctly. For charging AAA batteries, pull
down the adjustable battery contact plate before inserting the AAA batteries into the
compartment. The charger automatically adjusts the charging current depending on the
size of the battery being charged.
3. The LCD will indicate the proper charging and the word "Charge" will be shown to the
left of the battery symbols that indicate each battery's charge progress. After the
batteries are fully charged, the wording "FULL" will indicate on the LCD screen to
indicate the trickle charge and the charged batteries are ready for use. Once charge is
complete, remove batteries and unplug the charger as soon as it is practical. Do not
leave batteries in charger for extended periods of time (more than 1-2 days) or when the
charger is not plugged in. Unplug the charger when not in use.
4. Begin again at Step-1 to charge the next set of batteries.
Warning:
Before charging, read instructions
•
•
This charger is intended for use with Nickel-metal-hydride rechargeable batteries only.
Attempting to charge other types of batteries may cause personal injury and damage
to the charger.
button to move
B
•
Do not expose charger to rain or moisture. For indoor use only.
•
Disconnect from power when not in use.
•
Never use any cable or power adapter not recommended by manufacturer. Otherwise,
risk of fire, electric shock or injury to persons may result.
•
Do not operate the charger if it has been subjected to shock or damage. Take it to a
A
button will exit
qualified serviceman for repair.
•
Do not disassemble the charger. Incorrect reassembly may result in a risk of electric
shock or fire.
•
Unplug the charger from outlet before attempting any maintenance or cleaning.
•
This AC power unit supplied is intended to be used in a vertical or floor
mount position only.
2.
Bad Cell Detection
When charge process is started, the charger detects the health status of each of the cells in
the battery compartment. If any batteries are unsuitable for charging, i.e. short circuit or
reversed polarity, the word "BAD" will indicate on the LCD screen and "battery" icon will flash.
USB Charge Port Operation
When using the USB PowerPort on this charger, the AA/AAA charger function has priority.
The USB PowerPort will not be available while batteries are installed and charging. Once the
AA/AAA batteries have completed their charge, the USB port will be turned on automatically.
The "USB symbol" will be shown on the LCD screen to indicate the USB socket is
ready for use.
Note: Make sure the maximum loading is not exceeding 500mA for the USB socket. Do not
attempt to overload the USB port or damage to the charger or USB device may result.
Clock / Alarm / Day-Date operation
The following shows which buttons on the setting panel you need to press to navigate
between modes. The 2 feet on the bottom rear of the chassis act as switches to activate the
blue backlight on the LCD display. In any mode, just to hit the top of the unit lightly and the
black light will light on for about 10 seconds. The backlight will only operate while the unit is
plugged into power using any of the supplied power adapters.
Setting the Time and Date
Fig. 2
In the regular Time mode, press the
button once and the "Time" icon will starts to flash on
B
the LCD screen along with the item to be changed, which indicates Time Setting mode. Use
and
buttons to change the value of the flashing item. Once the flashing item is set to
C
D
what you want, press
to select the next setting and change as listed above. The "Year"
B
can be set in the range of 2000 to 2099. The day of the week is calculated automatically
according with the date you set. Once all the items are set, press the
setting mode (set mode will automatically if there is no input for 1 minute). The following figure
shows the order of items during the setting process.
Fig. 3
12/24 Hour Mode:
In the regular Time mode, pressing the
C
button will toggle between 12-hour and
24-hour mode.
3.
12VDC, 600mA
AA size – 1-2 pcs., 1.4VDC ea. cell, 1200mA
AC or Car adapter (12VDC input)
AA size – 3-4 pcs., 1.4VDC ea. cell, 800mA
AAA size – 1-4 pcs., 1.4VDC ea. cell, 600mA
Charge rate :
AA / AAA size 1-2 pcs., 1.4VDC ea. cell, 560mA
USB power adapter (5VDC input)
AA / AAA size 3-4 pcs., 1.4VDC ea. cell, 280mA
Trickle mode :
AA 50mA ; AAA 25mA
• 100-240V AC, 50-60 Hz International
Compatible, (12VDC output)
• Car Cord adapter (12VDC output)
• USB cord adapter (5VDC output)
5VDC, 500mA max.
-deltaV, max. time, overcharge protection,
bad cell / reverse polarity / shorted cell detection.
button to exit the
A
Advertisement
Table of Contents

Related Manuals for Lenmar R2G802U


Summary of Contents for Lenmar R2G802U
- Page 1 When charge process is started, the charger detects the health status of each of the cells in the battery compartment. If any batteries are unsuitable for charging, i.e. short circuit or R2G802U reversed polarity, the word “BAD” will indicate on the LCD screen and ”battery” icon will flash.
- Page 2 Package the unit and its accessories carefully using ample padding material to prevent 2800mAh 140 minutes 210 minutes damage in transit and ship it prepaid and insured to: 700mAh 70 minutes 800mAh 80 minutes LENMAR ENTERPRISES, INC. 900mAh 90 minutes 600mA 4035 Via Pescador USA 1000mAh 100 minutes Camarillo, CA 93012 1100mAh...
Need help?
Do you have a question about the R2G802U and is the answer not in the manual?
Questions and answers