
Related Manuals for Honeywell TH8000 Series


Summary of Contents for Honeywell TH8000 Series
-
Page 1: Programmable Thermostats
TH8000 Series Programmable Thermostats OWNER’S GUIDE • Patents Pending ® U.S. Registered Trademark © 2004 Honeywell International Inc. All Rights Reserved 69-1701... -
Page 2: Table Of Contents
Features ... 3 Home Screen ... 4 Programming Your Heating and Cooling Schedule... 6 Operating Your Thermostat ... 12 Replacing Your Batteries... 19 Cleaning Your Thermostat Screen ... 22 Reading Your Outdoor Temperature (Select Models)... 23 Reading Your Remote Indoor Temperature (Select Models)... 24 Reading Your Inside Humidity Level (Select Models) ... -
Page 3: Features
FEATURES • Large, Clear Display with Backlighting—current temperature, set temperature and time are easy-to-read and all are displayed on the home screen. • Menu Driven Programming—Guides you through the scheduling process, showing only necessary information and choices on each screen. •... -
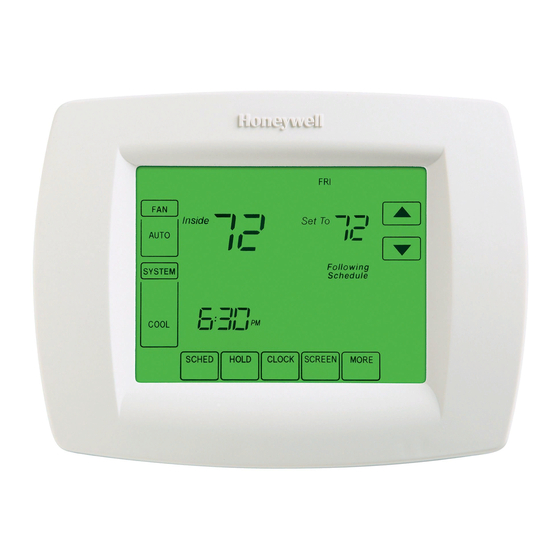
Page 4: Home Screen
SELECTS ON/AUTO/CIRC SYSTEM SELECTS EM. HEAT/HEAT/OFF/COOL/AUTO ENTERS SCHEDULING MODE SETS A PERMANENT HOLD AND ACTIVATES VACATION HOLD Inside AUTO SYSTEM HEAT SCHED HOLD CLOCK SCREEN SCHED HOLD UP ARROW RAISES TEMPERATURE SETTING Set To DOWN ARROW Following LOWERS TEMPERATURE SETTING Schedule MORE (SELECT MODELS) MORE... - Page 5 SHOWS CURRENT DAY OF THE WEEK SHOWS FAN SETTING SYSTEM SHOWS CURRENT SYSTEM POSITION TIME DISPLAY CURRENT TIME OF DAY, HOLD TIME REMAINING OR NUMBER OF VACATION DAYS REMAINING INSIDE TEMPERATURE SHOWS THE CURRENT INSIDE TEMPERATURE Inside Set To AUTO SYSTEM HEAT SCHED...
-
Page 6: Programming Your Heating And Cooling Schedule
Your thermostat can control up to four different schedule periods per day: Wake—Period when you awaken and want your home at a comfortable temperature. Leave—Period when you are away from home and want an energy-saving temperature. Return—Period when you return home and want your home back to a comfortable temperature. Sleep—Period when you are asleep and want an energy-saving temperature. - Page 7 3. It is OK to pick multiple days. Select any combination of days to edit. These days are scheduled with the same times and temperatures. Check marks appear next to days selected. OK TO PICK MULTIPLE DAYS HEAT AUTO CIRC CANCEL PERIOD COOL...
- Page 8 9. When complete, press Done key. “Saving Changes” appears on the screen to indicate changes are being saved to the day(s) modified. SAVING CHANGES M19956 NOTE: To set a Program Schedule for the remaining days of the week, repeat steps 1-9. Example: If Mon - Fri was selected first, go back and repeat steps 1-9 for Sat and Sun.
-
Page 9: Cancelling A Schedule Period
NOTE: You may want to cancel a period to match your lifestyle; for example, if someone is always home during the day on Tuesday, you can cancel the Leave and Return periods (the thermostat would then control to the Wake temperature until the Sleep period). 1. - Page 10 5. Press “Cancel Period” key. The time, temperature(s) and fan setting disappear. The bar above the selected period is removed, indicating the scheduled period was cancelled. NOTE: To reinstate a schedule period, press arrow keys to set desired time and temperatures. 6.
-
Page 11: Setting Time
1. Press Clock. 2. Use arrows to set current time. DONE 3. Press Done key. IMPORTANT The current day of the week should already be set correctly. If not, see advanced settings to set the day. CANCEL M19958 69-1701... -
Page 12: Operating Your Thermostat
Operating Your Thermostat Setting Fan and System Keys SETTING FAN KEY The Fan key selections vary based on your heating and/or cooling system type. On—fan runs continuously. Use this setting for improved air circulation or for more efficient central air cleaning. Auto—fan follows fan program schedule. - Page 13 Your thermostat has three temperature override options: Hold Temperature Until, Permanent Hold and Vacation Hold. HOLD TEMPERATURE UNTIL (TEMPORARY HOLD) Holds temperature temporarily until the next scheduled period time or until the time the user sets. 1. Press Up or Down arrow next to the temperature you want to adjust. “Hold Temperature Until” time appears on the screen.
- Page 14 Inside AUTO SYSTEM Hold Temperature HEAT Until SCHED HOLD CLOCK SCREEN 3. Press the Cancel or Sched key to cancel “Hold Temperature Until” and resume schedule. NOTE: Once “Hold Temperature Until” time is reached, the thermostat shows “Following Schedule” on the screen to indicate that “Temporary Hold” has ended. PERMANENT HOLD Permanent Hold changes the temperature setting until Permanent Hold is cancelled.
- Page 15 Inside AUTO SYSTEM HEAT Permanent Hold SCHED HOLD CLOCK SCREEN 3. Press Cancel key to cancel “Permanent Hold” and resume the schedule. VACATION HOLD Changes temperature setting for a designated number of days. 1. Press the Up and Down arrow keys to set the desired temperature while away on vacation. Notice that “Hold Temperature Until”...
- Page 16 Inside Set To AUTO SYSTEM Hold Temperature HEAT Until DAYS SCHED CLOCK SCREEN CANCEL M19961 4. To cancel the Vacation Hold override early, press the Cancel key. NOTE: When the number of days of Vacation Hold expires, the screen shows “Following Schedule”...
-
Page 17: Fan Schedule
Fan Schedule Press Fan key while in the Scheduling Screen to program the System Fan. Choices available from the Scheduling Screen: Auto (default position)—fan runs with equipment. Programmable for all schedule periods (Wake, Leave, Return and Sleep). On—fan runs continuously (programmable for all schedule periods). Circ—fan runs randomly for approximately 35% of schedule period (programmable for all schedule periods). - Page 18 Inside Set To AUTO Following SYSTEM Schedule HEAT SCHED HOLD CLOCK SCREEN M19962 Manual Override of Fan Schedule Auto—fan is automatically following the Fan schedule (choices are Auto, On or Circulate). On—overrides Fan schedule. Fan is continuously On. Circ—overrides Fan schedule. Fan circulates randomly for approximately 35% of time until the Auto position is selected.
-
Page 19: Replacing Your Batteries
Not all thermostat models require batteries. If your thermostat has batteries, a low battery warning flashes on the home screen for approximately 30 days. NOTE: If the batteries are not replaced when the Low Battery warning is flashing, the LO batt screen will display continuously and the thermostat will not operate until the batteries are replaced. - Page 20 1. Remove thermostat from the base by pulling straight out. WALL M19919 2. Install three new AAA alkaline batteries so all positive ends alternate up, down, up. NOTE: Always use AAA alkaline batteries. 69-1701...
- Page 21 BATTERIES (3) M19918 3. Place the thermostat back on its base by aligning the terminal screw blocks with the pins on the back of the thermostat. 4. Push the thermostat straight onto the base. NOTE: All Program Schedule, Date and Time information is retained while the batteries are being replaced.
-
Page 22: Cleaning Your Thermostat Screen
The thermostat has a touch screen interaction. Follow these steps to clean the screen without making thermostat changes: 1. Press the Screen key. Thermostat locks out all touch keys for 30 seconds to allow for cleaning. OK TO CLEAN SCREEN 2. -
Page 23: Reading Your Outdoor Temperature (Select Models)
Reading Your Outdoor Temperature (Select Models) If your thermostat has an outdoor sensor, the thermostat displays the outdoor temperature. VIEW OUTSIDE TEMPERATURE (SELECT MODELS) The outside temperature is located in the lower right corner of the Home Screen. If it is not on the Home Screen, view the outside temperature by pressing the More key until the outside temperature shows. -
Page 24: Reading Your Remote Indoor Temperature (Select Models)
Reading Your Remote Indoor Temperature (Select Models) If your thermostat has a remote indoor temperature sensor installed, the thermostat displays the inside temperature on the screen from the remote sensor(s). (Then the thermostat internal temperature sensor is not used.) SAT A A T Inside Set To AUTO... - Page 25 Reminder Timers (Select Models) These reminders notify you when to change your furnace filter, humidifier pad or ultraviolet lamp. When the time you set expires, the thermostat flashes “Change” and then ”Filter” or “Change” and “Humidifier Pad” or “Change” and “UV Lamp” until you reset the timer. Resetting Expired Timers When a Timer expires, a Reset key appears on the Home Screen.
-
Page 26: Screen Locked
1. Press More key until the Timer you want to modify appears on the screen. 2. Press Edit key to change the Timer reload value. Use Up and Down arrow keys to change the number of Run Time Days. See Advanced Settings, steps 8 through 10, for approximate calendar days. - Page 27 SCREEN LOCKED Inside Set To AUTO Following SYSTEM Schedule HEAT SCHED HOLD CLOCK SCREEN MORE M19965 Partially Locked Screen When partially locked, the screen indicates Screen Locked for 5 to 7 seconds whenever the user attempts to press a key that is locked. Pressing a locked key while Screen Locked is shown flashes Screen Locked on the screen.
-
Page 28: Reading Your Inside Humidity Level (Select Models)
Fully Locked Screen In this mode, all keys are locked and not functional. To unlock screen, see Advanced Settings section. The screen continuously displays “Screen Locked.” Reading Your Inside Humidity Level (Select Models) Select models can sense the humidity level in the home. If your model has this feature, the humidity level in the home is shown in the lower right corner of the Home Screen. -
Page 29: Controlling Your Inside Dehumidification Setting (Select Models)
Select models read the inside humidity level and set a desired humidity level to help control dehumidification in the home: 1. Press the More key until the inside humidity percent and dehumidification setpoint are shown. Inside Humidity DONE 2. Use Up and Down arrow keys, located to the right of the dehumidifier setpoint, to set your desired humidity level (select models) for dehumidification in the summer. -
Page 30: Temperature Recovery
Dehumidification Control (Select Models) If your thermostat has dehumidification control and you set a dehumidification setpoint, the thermostat attempts to control to this dehumidification setpoint by turning on the air conditioner. In extremely high humidity conditions, thermostat keeps the air conditioner running for up to 3°F below your temperature setpoint. - Page 31 Inside Set To AUTO Following SYSTEM Schedule Recovery HEAT Humidity SCHED HOLD CLOCK SCREEN MORE M19968 IMPORTANT It takes about a week for the thermostat to adjust to local weather, your schedule, the construction of your home and your heating and/or cooling system. Your thermostat learns from experience.
- Page 32 Advanced Heat Pump Features (Select Models) If you have a heat pump heating system, your thermostat can use some special features when used with an Outdoor Temperature Sensor, such as compressor and/or backup heat lockout based on outside temperature. For example, if your backup heat does not turn on above a designated outside temperature, your system uses an advanced heat pump feature.
- Page 33 SET CURRENT DAY SET MONTH SAT A A T DONE USE ARROWS TO SET YEAR AND TIME SAT A A T OK TO PICK MULTIPLE DAYS SCREEN LOCKED CHANGE FILTER UV LAMP HUMIDIFIER PAD DONE M19921 69-1701...
-
Page 34: Advanced Settings
Your thermostat has many advanced settings to match your heating and cooling system. But you can change these settings to match your lifestyle: 1. From the Home Screen, press the System key. Five blank touch keys show on the bottom of the screen between the Done and Cancel keys. - Page 35 3. The User Setup Number is displayed in the lower-left screen. It is a four-digit code beginning with zero. Current setting is displayed in lower-right screen. USER SETUP NUMBER OK TO PICK MULTIPLE DAYS SCREEN LOCKED CHANGE FILTER UV LAMP HUMIDIFIER PAD DONE PRESS TO EXIT USER SETUP...
- Page 36 Step 1. User Setup Number 0120: First Two Digits of Current Calendar Year. To change current setting, press the Up or Down arrow key to the right of the two-digit number in the lower right corner of the screen. Options: 20 —...
- Page 37 Step 4. User Setup Number 0150: Current Calendar Date. To change Options, press the Up or Down arrow key to the right of the number in the lower right corner of the screen. Options:1 through 31 — equals 1 of a month to 31 of a month.
- Page 38 Step 7. User Setup Number 0330: Daylight Savings On or Off. To change Options, press the Up or Down arrow key to the right of the number in the lower right corner of the screen. Options: 0 — Off. Thermostat time is not automatically adjused for Daylight Savings in Fall and Spring. 1 —...
- Page 39 Step 9. User Setup Number 0510: Humidifier Pad Timer. To change Options, press the Up or Down arrow key to the right of the number in lower right corner of the screen. Options: 0 — Off. Thermostat humidifier pad timer is off. 1 —...
- Page 40 Step 11. User Setup Number 0540: Number of Schedule Periods Available to Program. To change Options, press the Up or Down arrow key to the right of the number in the lower right corner of screen. Options: 2 — two program periods available (Wake and Sleep). 4 —...
- Page 41 Step 13. User Setup Number 0670: Screen Lockout Function. To change Options, press the Up or Down arrow key to the right of the number in the lower right corner of the screen. Options: 0 — All keys are available. Screen is unlocked. 1 —...
-
Page 42: Frequently Asked Questions And Answers
Frequently Asked Questions and Answers Q: Some or all keys on the display do not work; why? A: Thermostat screen is locked. See Advanced Setting section to unlock keys on the screen. Q: Backlighting seems dim; is it designed to be dim? A: In models that use batteries for power, install fresh AAA alkaline batteries. -
Page 43: Limited Five-Year Warranty
Golden Valley, MN 55422 This warranty does not cover removal or reinstallation costs. This warranty shall not apply if it is shown by Honeywell that the defect or malfunction was caused by damage which occurred while the product was in the possession of a consumer. -
Page 44: Customer Assistance
CUSTOMER ASSISTANCE If you have any questions about the operation of your thermostat, please go to www.honeywell.com/yourhome, or call Honeywell Customer Care toll-free at 1-800-468-1502. Automation and Control Solutions Honeywell International Inc. Honeywell Limited-Honeywell Limitée 1985 Douglas Drive North 35 Dynamic Drive...
Need help?
Do you have a question about the TH8000 Series and is the answer not in the manual?
Questions and answers