Table of Contents
Advertisement
Advertisement
Table of Contents

Related Manuals for iOptron GoToNova 8401


Summary of Contents for iOptron GoToNova 8401
- Page 1 GoToNova 8401 Hand Controller Instruction Manual...
-
Page 2: Table Of Contents
Table of Content Table of Content ..........................2 1. GoToNova Overview......................3 1.1. GoToNova Computerized Control System..............3 1.2. 8401 Hand Controller Features.................... 4 2. GoToNova 8401 Hand Controller ..................5 2.1. Key Description ........................5 2.2. The LCD Screen ........................6 2.3. -
Page 3: Tm Overview
Star List .................... 24 Appendix D. Set Up USB-PC Connection ................... 30 Appendix E. Firmware Upgrade ....................37 Appendix F. Use a PC to Control an iOptron Mount ..............40 Appendix G. RS-232 Command Set..................... 41 WARNING! NEVER USE A TELESCOPE TO LOOK AT THE SUN! Looking at or near the Sun will cause instant and irreversible damage to your eye. -
Page 4: 8401 Hand Controller Features
1.2. 8401 Hand Controller Features This is an advanced version of iOptron’s flagship product. The revolutionary GoToNova computerized control system that is one of the most technologically advanced automated tracking systems available on the market today. With a database of over 130,000... -
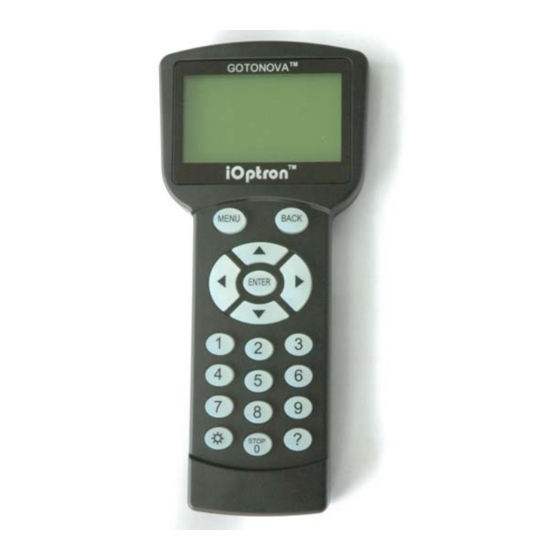
Page 5: Gotonova Tm 8401 Hand Controller
Figure 1. GoToNova 8401 Hand Controller GoToNova 8401 hand controller (HC), as shown in Figure 1, can be used to control ® ® most of iOptron’s GOTO mounts and telescopes, such as SmartStar series, AstoBoy series, ® CubePro , MiniTower... -
Page 6: The Lcd Screen
• USB port: connect the HC to a Computer via a USB cable. 2.2. The LCD Screen The 8401 HC is designed to use for both iOptron’s equatorial (EQ) mount, such as the ® SmartStar -PR GOTO German Equatorial Mount and the GoToNova Equatorial Kit, and ®... - Page 7 The iOptron mounts can be controlled by a number of popular astronomy software programs. For astronomy software that does not have an embedded iOptron mount driver, an ASCOM driver and related platform are needed. Please refer to Appendix F for more...
-
Page 8: Park Position Of The Mount
3. Park Position of the Mount In order to experience the full GOTO capability of GoToNova technology it is very important to set up the mount correctly before observation. The most important position is its Park Position. 3.1. Altazimuth (A/A) Mount Each time the mount is turned on, the default position is Parking Position, i.e., altitude is 90º... -
Page 9: Use The Hand Controller
4. Use the Hand Controller 4.1. Manual Operation of a Telescope You may observe land and astronomical objects using GoToNova’s arrow keys. After the telescope was assembled, flip the I/O switch on the telescope mount to turn on the mount. Use ►,◄,▼ or ▲ buttons to point the telescope to the desired object. You may need to use the number keys to change the slewing speed. -
Page 10: Comets
4.2.3. Comets This catalog contains up to 190 comets. This database is customer upgradeable. 4.2.4. Asteroids This catalog contains up to 4096 asteroids. This database is customer upgradeable. 4.2.5. Stars: • Named Stars: consists of 191 stars with their common names. They are listed alphabetically. -
Page 11: Electric Focuser
4.4. Electric Focuser If you have an electric focuser in your system and it is supported by GoToNova, use this option to adjust the focuser. Use ◄► for coarse tuning and ▼▲ for fine tuning. Refer to your Electric Focuser operation manual for detailed instruction. 4.5. - Page 12 Set up Local Time Set up site Set N/S hemisphere Set display contrast Set Eyepiece light Set Backlight Set anti-backlash Set Key Beep Press ENTER to go to “Setup Site Info” screen. Set up site info: Longitude: W071d27m47s Latitude: N42d15m40s Min.
-
Page 13: Set N/S Hemisphere
To adjust minutes, use the ◄ or ► key to move the cursor, and the number button to change the numbers. To change the “behind” or “ahead of” UT, move the cursor to “ahead of” and using ▲ or ▼ key to toggle between “behind” and “ahead of”. When the number is correct, press ENTER and go back to the previous screen. -
Page 14: Set Key Beep
While viewing an object in the eyepiece, observe the responsiveness of each of the four arrow buttons. Note which directions you see a pause in the star movement after the button has been pressed. Working one axis at a time, adjust the backlash settings high enough to cause immediate movement without resulting in a pronounced jump when pressing or releasing the button. -
Page 15: Set Mount Type
4.5.10. Reset All Reset all settings to factory default data. 4.5.11. Update Firmware Firmware updating using iOptron Downloader through USB port on hand controller. (Refer to Appendix E.) 4.5.12. Set gear ratio Reserved for future products. -
Page 16: One Star Align
Venus). Select an object using ▲ or ▼ key. Then press ENTER. Next use the arrow keys to slew to the object until it is centered in your eyepiece. Then press ENTER. You may need to use the number keys to change the slewing speed to make the centering procedure easier. -
Page 17: Dis R.a Axis Error
will compute the polar axis positioning error of your mount and display it. For a better result, select three stars located in the different part of the sky. Press BACK and you will return to the display. 4.6.5. Dis R.A axis error This only works for EQ mode. -
Page 18: User Objects
“User defined speed” this can be adjusted from 91% to 109% of sidereal speed by pressing the ▲or ▼ buttons. 4.9. User Objects Besides various star lists available in the hand controller --you can add, edit or delete your own user-defined objects. All data you enter is supposedly J2000.0 epoch. 4.10. -
Page 19: Maintenance And Servicing
Do not drop the hand controller which will damage or affect the GOTO tracking accuracy permanently. Do not connect other accessories to the hand controller. Only use iOptron supplied coiled cables and USB cables. Use a wet cloth to clean the hand controller. Do not use solvent. - Page 20 We have found that most problems can be resolved by telephone. So please call first to avoid returning the telescope for repair. Call toll free in the U.S. 866.399.4587 or 1.781.569.0200. It is also strongly suggested that to send technical questions to support@ioptron.com...
-
Page 21: Appendix A. Technical Specifications
Appendix A. Technical Specifications 8-Line Display 32 bit ARM 9 speed Control Speed (1×,2×,8×,16×,64×,128×,256×,512×,MAX) Database GoToNova 130,000 objects database USB Port Protocol ASCOM Firmware Upgrade PC Computer Control... -
Page 22: Appendix B. Gotonova
Appendix B. GoToNova 8401 HC MENU STRUCTURE MENU Select and Slew Select and Slew Planets, Sun, Moon Planets, Sun, Moon Mercury Mercury Venus Venus Mars Mars Jupiter Jupiter Saturn Saturn Uranus Uranus Neptune Neptune Pluto Pluto Moon Moon Deep Sky Objects Deep Sky Objects Named Deepsky Object Named Deepsky Object... - Page 23 Set Up Controller Set Up Controller Set Up Local Time Set Up Local Time Set Up Site Set Up Site Set N/S Hemisphere Set N/S Hemisphere Set Display Contrast Set Display Contrast Set Eyepiece Light Set Eyepiece Light Set Backlight Set Backlight Set Anti-backslash Set Anti-backslash...
-
Page 24: Appendix C. Gotonova Tm Star List
Appendix C. GoToNova Star List GoToNova Deep Sky Object List ID No. OBJECT NGC # Messier # A(Abell) U(UGC) Andromeda Galaxy Barnards Galaxy 6822 Beehive Cluster 2632 Blackeye Galaxy 4926 Blinking Planetary Nebula 6826 Blue Flash Nebula 6905 Blue Planetary 3918 Blue Snowball Nebula 7662... - Page 25 Keyhole Nebula 3372 Lagoon Nebula 6523 Little Gem 6445 Little Gem Nebula 6818 Little Ghost Nebula 6369 North American Nebula 7000 Omega Nebula 6618 Orion Nebula 1976 Owl Nebula 3587 Pelican Nebula 5070 Phantom Streak Nebula 6741 Pinwheel Galaxy Pleiades Ring Nebula 6720 Ring Tail Galaxy...
- Page 26 Messier This table is licensed under the GNU Free Documentation License. It uses material from the Wikipedia article List of Messier objects...
- Page 27 Modern Constellations Constellation Abbreviation Constellation Abbreviation Andromeda Lacerta Antlia Apus Leo Minor Aquarius Lepus Aquila Libra Lupus Aries Lynx Auriga Lyra Boötes Mensa Caelum Microscopium Camelopardalis Monoceros Cancer Musca Canes Venatici Norma Canis Major Octans Canis Minor Ophiuchus Capricornus Orion Carina Pavo Cassiopeia...
- Page 28 GoToNova Named Star List 001 Acamar 049 Ascella 097 Kaus Australis 145 Rassalas 002 Achernar 050 Asellus Australis 098 Kaus Borealis 146 Rasagethi 003 Acrux 051 Asellus Borealis 099 Kaus Media 147 Rasalhague 004 Acubens 052 Aspidiske 100 Keid 148 Rastaba 005 Adhafera 053 Atik 101 Kitalpha...
- Page 29 GoToNova Double Star List Object Const Name Achird 21732 Alrisha Alpha 110291 Theta 38288 Fornacis Alpha 168373 Capella Alpha 40186 Sigma 132406 113389 Alpha 151881 Sirius Wasat Delta 79294 Castor Alpha 60198 Alpha 115756 Epsilon 117112 HR 3579 42642 Kapa 42661 221234 Algieba...
-
Page 30: Appendix D. Set Up Usb-Pc Connection
Appendix D. Set Up USB-PC Connection 1. Download USB2COM driver (cp210x.zip file for 8401) from iOptron Website 2. Install cp210x(usb2com) driver Choose the appropriate driver for your OS. In this case is a Windows XP operation system. Double click on it, and you will see:... - Page 31 Select “I accept the terms of license agreement”, and click “Next” Using the default installation path, c:\SiLabs\MCU\CP210x, or specify your own path by click “Change”. Click “Next”. Then click “Install”.
- Page 32 When finished installation, click “Finish” 3. Plug the USB cable to the USB port on your PC, plug the other end of the USB cable to hand controller. Turn on the power on the mount. 4. Install the Hardware The computer will find a new hardware and show the following screen Select “No, not this time”...
- Page 33 Select “Install from a list or specific location” and click “Next”. Select “Search for the best driver in these locations,” and check “Include this location in the search.” Click on “Browse” and select the cp210x driver from directory c:\SiLabs\MCU\CP210x\Win2K_XP, click OK.
- Page 34 Click “Next”. The computer will start to install the driver for the USB2COM. When the installation is done, click “Finish”. If the computer shows “find a new hardware” screen again, just repeat the steps in this section again.
- Page 35 Now your computer should be ready for Firmware Upgrading; computer communication with the mount via ASCOM platform; and planetarium software applications. However, you need to find assigned COM port number for the USB connection. To do so, right click “My Computer”, and click “Properties”...
- Page 36 Double click on “Ports (COM & LPT)”. Find the COM number and write it down (in the following figure, it is COM4)
-
Page 37: Appendix E. Firmware Upgrade
Appendix E. Firmware Upgrade 1. Download and install Firmware Downloader from iOptron Website 2. Double click and open “iOptron Downloader” On the interface, select appropriate port using pull-down menu (in this case, COM4):... - Page 38 Click “Open Data File” and select the appropriate “.bin” file that matches your hand controller. Then click “Open”. Select “Main Program” in Update Type. Click “Start Download” It shows “Please reset GoToNova[GOTOSTAR], waiting for connection…” On the hand controller, press “MENU”, and using ▼▲ scroll to select “Set u controller”, press “ENTER”, then select “Upgrade firmware”, press “ENTER”...
- Page 39 2. Wrong downloader: you should use iOptron Downloader instead of the Flash Downloader. 3. Use cp210x driver provided by iOptron. The newest version from SiLab may not work properly for iOptron’s hand controller. 4. Screen is now blank: wrong “.bin” file: make sure you have the correct “.bin” file for firmware upgrade.
-
Page 40: Appendix F. Use A Pc To Control An Ioptron Mount
5. Planetarium software. Some company integrated iOptron’s products into their planetarium software, such as Voyage and The Sky X Pro. Therefore, an ASCOM plug-in will not be needed. Most planetarium software can be used to control iOptron’s product via ASCOM. -
Page 41: Appendix G. Rs-232 Command Set
Appendix G. RS-232 Command Set Abbreviations used: DD or DDD degrees or day of the month depending on the context HH hours MM minutes or month depending on the context MM.M minutes and tenths of minutes s + or – sign, assumed to be + if omitted SS seconds SS.S seconds and tenths of seconds YY last two digits of the year... - Page 42 Command: :Gt# Response: sDD*MM:SS# Get the current latitude. Command: :GL# Response: HH:MM:SS.S# Get the current local time in 24 hour format. Overflows from 23:59:59 to 00:00:00. Command: :GS# Response: HH:MM:SS.S# Get the current local sidereal time in 24 hr. format. Command: :GR# Response: HH:MM:SS.S# Get the current Right Ascension of mount.
- Page 43 Command: :Qn# :Qs# :Qe# :Qw# Response: (none) Stop motion in the specified axis. Note that :Qn# is identical to :Qs#, and :Qe# is identical to :Qw#. Motion is terminated only if it was not started by a slew (:MS#) command. Command: :Q# Response: (none) Motion in both axes is stopped, regardless of how the motion was invoked.
- Page 44 Calibrate mount. Current Right Ascension and Declination become the commanded Right Ascension and Declination. This command synchronizes HC coordinate to commanded coordinate. No GOTO needs to be done first. Command: :Sr HH:MM:SS.S# Response: “1” Define the commanded Right Ascension, RA. Command: :Sd sDD*MM:SS# Response: “1”...
- Page 45 2 - lunar Command: :SGS0#,:SGS1#,:SGS2#,:SGS3#, Response: (none) This command sets the guide rate. 0 – 1.0X of sidereal 1 – 0.8X of sidereal 2 – 0.6X of sidereal 3 – 0.4X of sidereal Command: :GGS# Response: ‘0’,’1’,2,’3’ This command gets the current guide rate. 0 –...
Need help?
Do you have a question about the GoToNova 8401 and is the answer not in the manual?
Questions and answers