Table of Contents
Advertisement
Quick Links
Download this manual
See also:
User Manual
Advertisement
Table of Contents

Related Manuals for TizzBird F30

Summary of Contents for TizzBird F30
- Page 1 User’s Manual Smart Media Player TIZZBIRD™ F30 Rev 1.2x...
-
Page 2: Table Of Contents
Table of Contents 1. Safety Notice ................4 2. Features ..................5 3. Specifications ................6 4. Description of Each Part ............. 7 5. Package Contents ..............8 6. Installation and Connection ............9 7. Using Remote Controller............14 8. Initial Screen ................15 Turning On Power ...................... - Page 3 Execute Internet Browser ..................... 47 14.2 Control Internet Browser ....................47 15. Install & Execute Applications ..........48 15.1 Move Applications at Android Phone to TizzBird ............48 15.2 Execute Application ......................49 16. Settings ..................50 16.1 System ..........................50 16.2...
-
Page 4: Safety Notice
1. Safety Notice Keep away the unit from magnetized devices. It Do not try to disassemble the unit. It may cause may erase the data stored in the HDD drive malfunction or fire. inside. Keep away the unit from overheated areas, such Do not place the unit in places that are exposed as heaters. -
Page 5: Features
It also has multiple mounting drive options and automatic browsing capability which maximize the network connection experience. TizzBird can be used as an external USB 3.0 storage thru connecting PC. TizzBird also supports playback the contents at USB flash drive or external HDD thru... -
Page 6: Specifications
3. Specifications Model TizzBird F30 System TCC9302 1Ghz CPU/ 512M Memory/ 2GB NAND flash Booting time from stand-by is less than two seconds. Android Rev 2.3 Gingerbread Video Format: AVI/ MKV/ MPG/ WMV/ VOB/ TP/ TRP/ M2TS/ MOV/ FLV/ IFO/ ISO/ HDMV Codec: MPEG 1/2/4, H264, XVID, WMV9(MP@HL4.1) VC-1(AP@L3) -
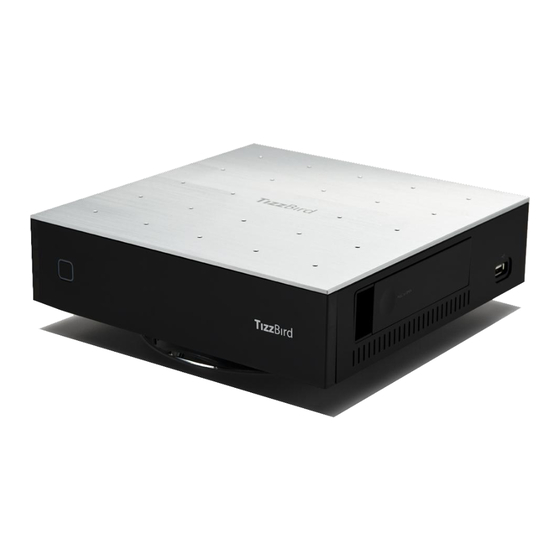
Page 7: Description Of Each Part
4. Description of Each Part Power Button Smart HDD Rack Turn ON/OFF power of the unit. Install/ uninstall the HDD easily with this RACK Connectors Please connect the unit to AV port of the TV or AV receiver. Please connect Ethernet cable or install the Wi-Fi USB dongle for connecting the network. -
Page 8: Package Contents
5. Package Contents The TizzBird package contains the following items. The shape of items described below may slightly different from the actual contents. Main Unit Remote Controller USB 3.0 Cable A/V Cable Quick Guide Power Adapter Power Cable HDMI Cable... -
Page 9: Installation And Connection
6. Installation and Connection Pedestal Assembly This is a guide for assembly of pedestal into the main unit. No screw needed. Find out six bumps of the pedestal and assembly them with six holes of the bottom side of the main unit. Push the pedestal to the front side until the “CLICK”... -
Page 10: Hdd Installation
HDD Installation This is a guide for installation of HDD into the rack. No screw needed Before install the HDD into the rack, please check the four bumps on the rack. There are two A bumps on the side, and two B bumps on the bottom. Find out the side holes of HDD, and assembly them with two A bumps. - Page 11 Connecting the Video The TizzBird supports HDMI, Component and Composite video output for connection to a TV, and each output needs to be configured in the settings browser depending on what cable is being used. Connection to HDMI Out Connection to Component...
- Page 12 Connecting the Audio The unit provides RCA analog stereo output, coaxial and optical digital output and HDMI to connect the audio device like AV receiver and TV. Please connect to audio outputs to appropriate port of audio device. Please select the appropriate input at the audio device using remote controller after connection.
-
Page 13: Connecting Usb Device
Wait until be able to see below screen and press <OK> button. Then select menu language. 3) If the initial TIZZBIRD screen is seen, select the “SETTINGS” browser at the home screen, then configure the SYSTEM/ AUDIO & VISUAL SETTING, etc. -
Page 14: Using Remote Controller
7. Using Remote Controller Turn power ON/OFF Change the TV Output mode Input numbers Go to HOME screen Pop-up MENU screen Resume to previous screen Move to previous /next item (page) Move to each directed item Select Optional “hot” context button Play or Pause Fast-Forward and Rewind Volume Up/ Down... -
Page 15: Initial Screen
8. Initial Screen 8.1 Turning On Power <POWER> Press button on the remote or press the power key at front panel to turn on the power. The unit will start boot-up. LED will blink fast during the booting. LED will keep fade-in & out during normal operation after booting. -
Page 16: Setting Menu Language
8.3 Setting Menu Language Please setup the menu language according to the country. <OK> HOME SCREEN Select “Settings Browser” as previous page’s image, then press button. The following screen will appear. Select “System” to enter the <System> setting. <OK> “Language”... -
Page 17: Screen Alignment
8.4 Screen Alignment Please make sure that TV output is not configured as “OVER-SCAN” mode. It should be “ORIGINAL SCAN” or “NO OVERSCAN” mode to see the whole picture output of this unit. This setting can be changed on TV’s video output settings. If the whole screen cannot be seen or it’s not fit into TV screen, the screen size can be manually adjusted to fit in. -
Page 18: Audio & Visual Settings
8.5 Audio & Visual Settings Please setup the <Screen Resolution> to select most proper video resolution for the display. <OK> Select <Settings Browser> <Audio and Visual <Screen Resolution>, then press <OK> button. Select an appropriate resolution and press button. - Page 19 When “Digital” mode is selected, the pop-up will come out like following picture. The each audio format can be configured as ON/ OFF of pass-thru. Please choose appropriate “On” or “Off” status according to the capability of connected audio device. “HD-Audio”...
-
Page 20: Network Settings
(Wireless), the other is Ethernet (Wired). The USB Wi-Fi dongle should be prepared to connect network thru Wi-Fi. This optional Wi-Fi dongle can be purchased thru TizzBird local dealer, or any USB Wi-Fi module that is using RealTEK RTL8188 or Ralink RT3070 as internal chipset can be used. - Page 21 This pop-up shows the wireless access points available. Select one of them that can be accessible. It shows the signal strength and prompts the password, if password is required like below picture. Password can be input by remote button if it’s composed of numbers. Or mouse or keyboard need to be used if the password is string.
-
Page 22: Configure Ethernet Connection
8.6.2 Configure Ethernet Connection Gigabit Ethernet can be also used to connect wired network. Connect the network cable at the Ethernet network port at rear side of the unit. 1) Select <Settings Browser> <Network> <Ethernet connection>. 2) If the configuration is “Auto IP”, the network connection will occur immediately. 3) Otherwise, network setting should be manually configured by selecting <Ethernet Settings>. -
Page 23: Turning Power Off, Completely Power Off
8.7 Turning Power Off, Completely Power Off To turn off the power, press <POWER> button on the remote or press power key on the front panel. The LED will turn into slightly dimming status, and this shows the unit is in “STAND-BY”... - Page 24 ※ The status of LED lighting is like below Initial booting Blinks fast Operation Stays at maximum bright. Stand-by / Off Completely off ...
-
Page 25: Start-Up And Terminate
Movie Settings The default selection would be MOVIE BROWSER at first start-up. TizzBird is the unique unit compared to other units, since it retains consistent user-interface based on the powerful database feature of Android OS. TizzBird provides full featured cover-view and imaged oriented browsing, which is highly intuitive. -
Page 26: Status Bar And Weather Widget
9.2 Status Bar and Weather Widget Status Weather Home screen also contains status bar and weather widget. The status bar shows current status of each device. Highlighting of each icon means it’s active or mounted. Network Wi-Fi SD Card Server The weather widget shows current date, time and weather. -
Page 27: Change Cover-View Style
9.3 Change Cover-View Style TizzBird provides Open-GL 3D based Cover-View user interface. One of six different styles of cover-view can be selected as a view-style. Press “BLUE” color button on the remote. The cover-view selection pane will pop-up and let you select one of them. -
Page 28: Movie Browser
9.4 Movie Browser Movie browser will scan movie files on the devices when booting first or attaching external device thru USB. It will take several minutes (depends on size of HDD) for the 1 scanning. Once it’s scanned, it will take much less time on next boot. If movie posters are available for the movies, then cover-view screen like below will appear. -
Page 29: Watching Movie
Watching Movie 10.1 Movie Browser If MOVIE BROWSER is selected and if the posters were already scraped or registered for movies, then the following screen will appear. This screen is called “MOVIE BROWSER” screen. Up to 15 movies can be browsed at once per page. Arrow keys can be used to navigate thru posters. -
Page 30: Selecting Device And View
10.2 Selecting Device and View The device and view can be selected at movie browser. This type of device and view selection can be done on music and photo browser as well. Press RED COLOR remote button to select the device. DATABASE, HDD, The RED circle on the above picture shows current selected device. -
Page 31: Movie Browser Menu
10.3 Movie Browser Menu <MENU> button at “MOVIE BROWSER” can be used to do various actions including searching movies, scraping movie posters, jumping based on bookmarks & resuming lists. <MENU> Press button on the remote. “SEARCH” menu like above picture lets you search the movie quickly based on the title <OK>... -
Page 32: To Add Movie Poster
10.4 To Add Movie Poster Movie posters should be added to make fancy movie browser like following screen. TizzBird has built-in poster downloader inside called <SCRAPER> which means scraping the movie information from network. Network should be connected before scraping movie posters. - Page 33 The following screen will appear when start scraping. The scraping will be performed based on the file name, so there can be a chance the file name is not correct or not good enough. In this case, scraping can be tried again on the same file.
-
Page 34: Resume And Bookmark
10.5 Resume and Bookmark TizzBird provides RESUME function to the last playback position of movie, so it’s not <MENU> necessary to search it again manually. Press button at MOVIE BROWSER and select <RESUME> menu to pop-up the resuming list. The resume list will appear like following image. -
Page 35: Movie Playback Menu
BLUE color button: Select video parameters and 3D movie types. YELLOW color button: Show movie playback information TizzBird provides various control functions during movie playback. These functions include <TIME/CHAPTER SEARCH>, <INFO>, <SUBTITLE>, <AUDIO> and <VIDEO> settings. <MENU> <MENU>... -
Page 36: Playback Speed Control
10.7 Playback Speed Control TizzBird provides various playback speeds and skip controls during playback including PAUSE/ FAST-FORWARD/ REWIND/ PREVIOUS/ NEXT. Press <PLAY/PAUSE> button to play or pause the playback. Press <PREV> or <NEXT> button to skip to previous or next chapter. -
Page 37: Playback Information Menu
10.9 Playback Information Menu Select <INFO> image at movie playback menu to confirm the movie playback information. Select <INFO> image. The movie information and current playback position will appear like following image. 10.10 Subtitle Menu Select <SUBTITLE> image at movie playback menu to control the subtitle language, position, size, sync and font Select <SUBTITLE>... -
Page 38: Video Parameter Menu
10.13 Playback 3D Format Movies TizzBird supports 3D files, if 3D display is available. The supported formats are SIDE-BY- SIDE and TOP-AND-BOTTOM. If file name contains 3D and SBS (or TNB) string, then it will turn TV into 3D mode automatically. -
Page 39: Listening Music
Listening Music 11.1 Music Browser The following MUSIC BROWSER screen will appear if music files contain the album art at <LEFT> <RIGHT> their tags. Press keys to move each direction. Keep pressing arrow keys to browsing continuously. The album-art screen will keep changing. <MENU>... -
Page 40: Sorting Music
Music files at large capacity hard drive need to be sorted since it’s easy to organize and search. TizzBird provides various “SORTING” functions based on the powerful Android database. Press GREEN color button on remote to sort by ALBUM, ARTIST, TITLE or YEAR. -
Page 41: Watching Photo
Watching Photo 12.1 Photo Browser The following PHOTO BROWSER screen will appear when selecting PHOTO BROWSER. It’s composed of superb folder thumbnails COVER-VIEW which is quite neat and intuitive. Each image shows thumbnails of photos that folder contains. 12.2 Photo Browsing Menu <MENU>... -
Page 42: Photo Playback Screen
12.4 Photo Playback Screen Photo slide show will start automatically, so next photos will keep appearing with transition effect. The various TRANSITION EFFECTS can be configured at <SETTINGS BROWSER> <PHOTO>. 12.5 Slideshow Control Slideshow can be controlled by arrow and <PLAY/PAUSE> buttons. Press <PLAY/PAUSE> button to pause or resume to playback. -
Page 43: Using File Browser
Using File Browser 13.1 File Browser Screen The following screen will appear when selecting FILE BROWSER. This is quite similar browser user interface that legacy media players provided before. Folder or file based browsing is possible on this browser, and selecting and playback the file directly. The left pane is FOLDER PANE, and the right pane is FILE PANE. -
Page 44: Selecting Device At File Browser
- .TTF extension) to the USB drive or internal HDD from PC, then connect the drive to TizzBird. Press <RED> button to select drive and navigate into the folder that font file was copied. The font file will appear like the following image. -
Page 45: Using File Operation
13.4 Using File Operation Rev 1.12 firmware provides the “File Operation” capability which enables COPY, MOVE, DELETE, RENAME and NEW FOLDER functions. Press “MENU” button on the remote then select the “File Operation” ICON at the pop-up window to enter this mode. This will bring the following screen. - Page 46 Pressing BOOKMARK button will check the selected item like below picture. The check icon will appear on the small box at left side of item. The total size of selected item will be also calculated whenever BOOKMARK button is pressed. It will take some time if there are many items at selected folder. Pressing MENU button will bring the following POP-UP menu to select the function.
-
Page 47: Connecting Internet
Connecting Internet 14.1 Execute Internet Browser Web browser will appear if WEB BROWSER was selected at HOME SCREEN and network was connected like following image. ※ Using mouse is highly recommended at WEB BROWSING. Wireless RF or USB mouse can be used. Web address or other information can be entered thru virtual keyboard with mouse. -
Page 48: Install & Execute Applications
Install & Execute Applications The most different part of TizzBird compared to legacy devices is favorite applications can be installed and run anytime like SMART PHONE. So it’s called SMART MEDIA PLAYER. The genuine smart device let users install and run their own favorite applications. -
Page 49: Execute Application
15.2 Execute Application The following image will appear when run APP BROWSER at home screen. <OK> Use arrow buttons to browse the application and press button to execute it. -
Page 50: Settings
Settings Various set-ups can be configured at SETTINGS BROWSER. 16.1 System Menu language, date & time, system information, firmware information and update can be set-up at this menu. <OK> Language Select menu language. Press to bring the pop-up. Date & Time Set up the date &... - Page 51 The TizzRemote™ is the remote application for TizzBird which can replace keyboard, mouse and keyboard. There are two methods to install the TizzRemote™. The TizzRemote™ itself is already on the Google Market, so you can directly download it at your smart phone. The other way is using the QR code.
- Page 52 Device Scanning Select between scanning device “Always”, “New Device Only” and “Never”. It will determine the scanner for database will be applied always or new device only or never. Scanning Filename Display It will determine display file name during device scanning or not.
-
Page 53: Audio And Visual
16.2 Audio and Visual Video Output Select video output port. Resolution Select resolution of the video output. Native Frame Rate Turn On/Off of original frame rate of the source Cinema Original (24p) Enable/ Disable cinema frame rate TV Original (1080i 60Hz) ... - Page 54 Brightness Change brightness of video. Contrast Change contrast of video. Hue Change hue of video.
-
Page 55: Movie
16.3 Movie Subtitle Language Select subtitle language. Subtitle Setting Select size, position, font, color of subtitle. Please refer 10.10. Resume Select resume screen pop-up method. Instant Skip Interval Select instant skip interval. Instant skip will occur when pressing <UP>... -
Page 56: Music
16.4 Music Instant Skip Interval Select instant skip interval. Instant skip will occur when pressing <UP> <DOWN> key at movie playback. Sort Type Select sorting type of music. Order Type Select ordering type of music browser. -
Page 57: Photo
16.5 Photo Transition Effect Select transition effects of slideshow. Slideshow Interval Select transition interval of slideshow. Slideshow Mode Select showing order of slideshow. Sort Type Select sorting type of photos. Order Type Select ordering type of photos. Transition Effect 16.6 Network... -
Page 58: Cover-View
16.7 Cover-View The cover-view style can be configured for each browser. -
Page 59: Connecting Network Server Or Nas
Please download the “ ” server at Internet at the PC. Please visit our WEB-site (http://www.tizzbird.com) to download the TizzNFS program. Please install it after downloading it. The TizzNFS has following features. Runs on Windows™ XP/ Vista/ 7 (both 32 bit and 64bit) ... -
Page 60: Downloading Other Nfs Server
17.1.3 Downloading other NFS Server Please download the “freeNFS” or “Allegro” NFS server at Internet at the PC. The “freeNFS” and “Allegro” NFS server was confirmed by TizzBird. The “freeNFS” software can be downloadable at following URL: http://sourceforge.net/projects/freenfs/files/FreeNFS.exe/download FreeNFS can be executed without specific installation. -
Page 61: Connecting Nfs Server At Device
17.1.5 Connecting NFS Server at Device Select <Settings Browser Network Network Server Connection”. This will bring the following dialog box. Up to 4 network servers can be connected at this version, and the number of connectable server will be increased at next version. Please select one of the network drive number then press OK. - Page 62 The available NFS servers will appear with names or IP addresses. The “+” sign on the left side of server name means it has exported folders. There can be no “+” sign server which is not exporting the EXPORT NAMES. If PC runs Windows OS, the PC name can also appear like above picture.
-
Page 63: Network Connection Using Samba
17.2 Network Connection using Samba The following section explains how to connect the shared PC folders or NAS (Network Attached Storage) which runs Samba Server. 17.2.1 Activating PC Share Click right mouse button on the folder which will be shared. Select “Property” then “Sharing”... - Page 64 Select “Samba” at dialog box. This will bring the SAMBA BROWSING dialog box like below. If the wanted SAMBA SERVER name is not appeared, please press RED button on remote. The SAMBA server list will appear according to the PC-names or IP address. The “+” sign means it has several shared folders.
-
Page 65: Accessing Network Drive At File/ Media Browser
If the selected folder requires ACCESS RIGHT to connect it, the following dialog box will pop-up to enter the log-in account information. Input the “User name” and “Password” using virtual keyboard. Please check “Remember account” checkbox to by-pass this log-in procedure at next connection. The connection will be made after pressing “Connect”... -
Page 66: Firmware Upgrade
18.1 Online Upgrade (O.T.A – Over The Air Upgrade) TizzBird will connect the firmware update server periodically (once a week) and pop-up upgrade prompt window automatically, if new firmware is available. If TizzBird is connected to the network, the upgrade can be performed as following. -
Page 67: Upgrade At File Browser
18.2.2 Upgrade at File Browser Copy or move the latest firmware to the root folder of USB flash or HDD drive. Connect the drive to USB port of the unit. Select <FILLE BROWSER> at HOME SCREEN. . Browse the firmware file and press <OK>...
Need help?
Do you have a question about the F30 and is the answer not in the manual?
Questions and answers